• Skip to main content
  • Skip to secondary navigation
  • Skip to primary sidebar
  • Skip to footer

M.D. CREEKMORE

  • Blog
  • Books
  • Newsletter
  • Gear I Use
  • About
  • Contact
  • Facebook
  • YouTube
  • Blog
  • Books
  • Newsletter
  • Gear I Use
  • About
  • Contact
  • Privacy Policy
You are here: Home / Archives for Homesteading

Homesteading

Here you will find articles on small acreage homesteading and farming topics such as homestead setup and how to buy a cheap homestead. You'll also find articles on topics such as gardening, DIY projects, raising livestock etc.

How To Collect Rainwater For Home Use

September 14, 2018 M.D. Creekmore

water-barrel-system-completedby Chuck H

Water has always been an afterthought for me and my prepping. It’s so easy for me to take it for granted when all I need to do is turn a faucet handle and fresh, clean water is made available. But what if the power goes down for a significant amount of time and eventually the water stations with it?

So I finally decided to store some water for just such an occasion. The most efficient way I could find to do this was by rain collection in rain barrels.  I tell the neighbors it’s for watering the garden and yes we use it for that as well. But if the SHTF I have 220 gallons of water available for my family to use.

That’s right, four 55-gallon, food-grade barrels collect rainwater. This was quite a process. I Googled it, YouTubed it, and overall did a lot of research. I combined what I thought to be the best way to do it for what I had available. The first step was to acquire the 55-gallon plastic barrels which I got from a local, large-scale food distributor.

You’d also be surprised who has these with just a simple Facebook request. You would also be wise beyond your years to purchase a bung wrench to unscrew the caps on these bad boys. It just makes life a lot easier.

fitting for barrel and rainwater catchment system

Anyhow, the barrels contained salted vodka (not any good…I tried). So I definitely needed to clean them out. It was a matter of putting some hot water and soap in them and screwing the cap back on. Then just have the kids roll it around the backyard a bunch of times, rinse, and repeat as necessary.

Once cleaned I chose to spray paint them a color similar to the siding on my house in the hopes it would blend in a little better than the bright blue plastic it was made of. After they were cleaned and painted I moved on to the deck I would build for the barrels.

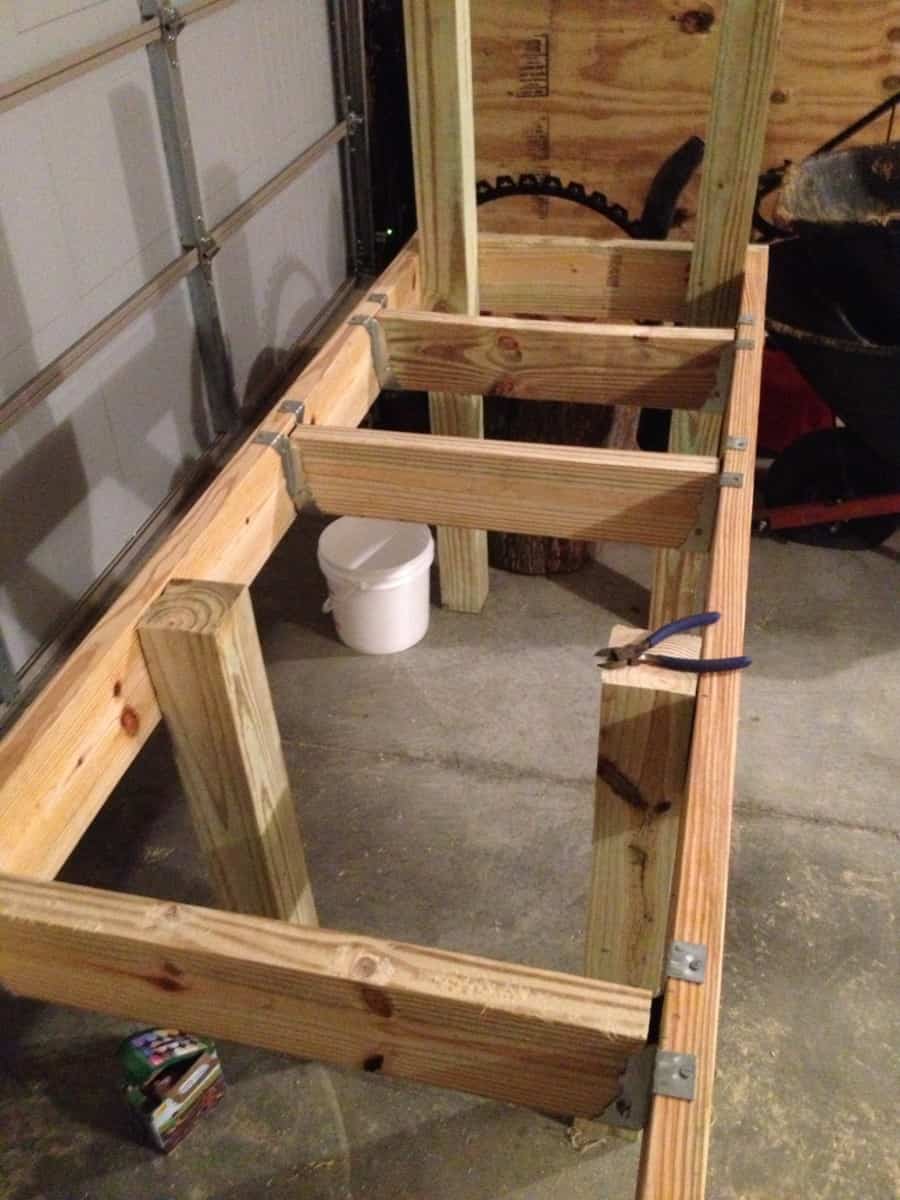
I read in my research that the higher up the barrels the greater the flow of water due to an amazing scientific discovery called…gravity. So my deck would end up being high enough off the ground for me to fit a watering can or 5-gallon bucket under the spigot (about 4′ off the ground). Using treated lumber I ended up with six 4×4 posts as the legs.

They were cut to the appropriate height. Next, I used treated 2x4s and framed out the legs as you see in the pictures.

I basically framed a wall around the legs like you might frame a wall in your house (header, footer, studs, etc.). Once the frame was fixed to the legs I put the deck on which consisted of a treated piece of plywood cut to the dimensions of the frame. This is what my barrels would sit on. Since my plumbing would be under the deck I also cut a hole for each barrel to be plumbed underneath.

Building a wooden frame for water-barrels

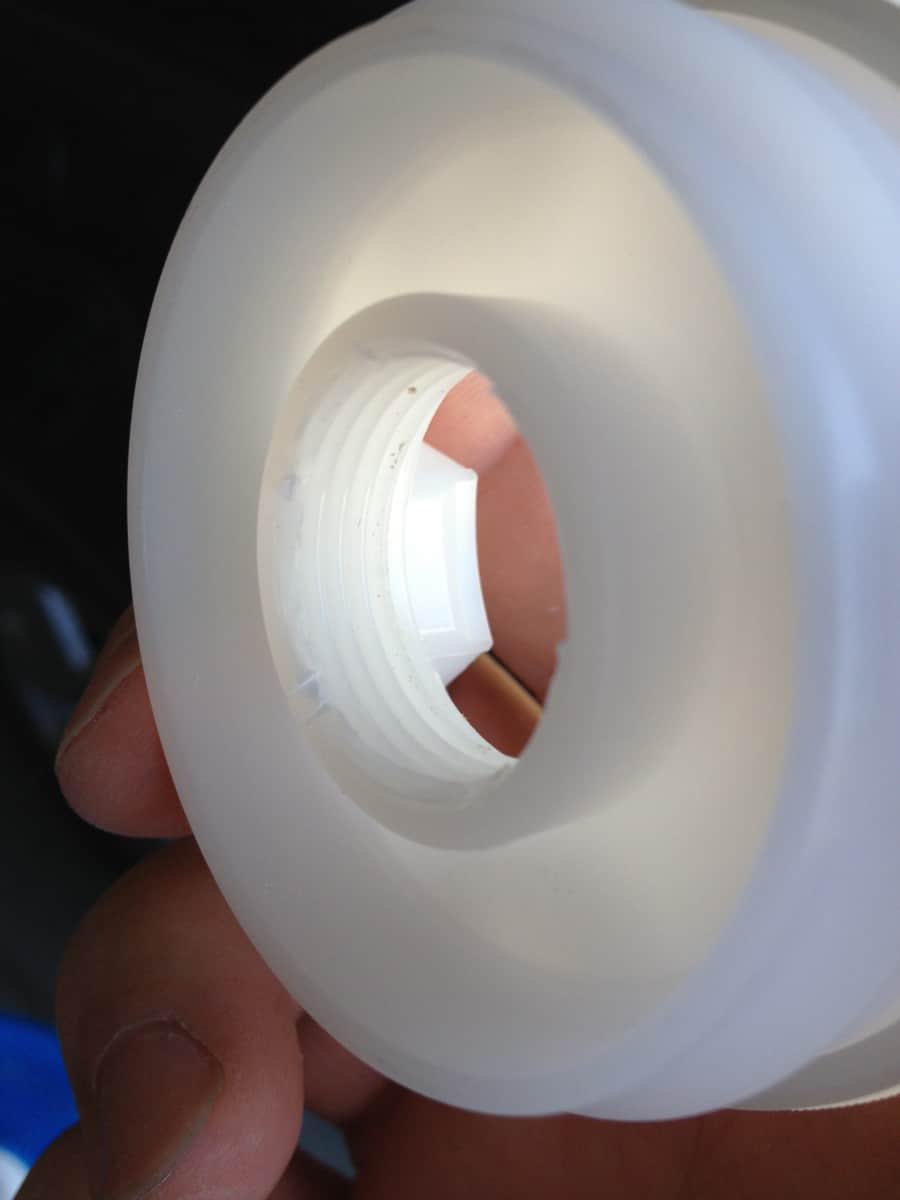
My deck was basically complete for now, so I turned my attention to the plumbing. Now I either got extremely lucky with these four barrels or all barrels are like this, but you’ll notice that one of the bungs is threaded in the middle. A threaded PVC adapter will fit this perfectly.

I planned to store rain in my barrels upside down. Since the hole would be at the bottom of the barrel I was all but assured every last drop of water from the barrels. Water will naturally self-level itself so by plumbing all of the barrels underneath the water would enter the first barrel (from the downspout) go to the bottom of the barrel and into the PVC pipes and then rise up into the other barrels.

That is how I planned to fill all of the barrels without extra holes in the top, just let water and gravity do the work for you. It is VERY important that you dry fit all pipes before permanently affixing them to the barrel and each other. So I set my barrels upside down on the deck and began measuring and cutting the PVC pipes.

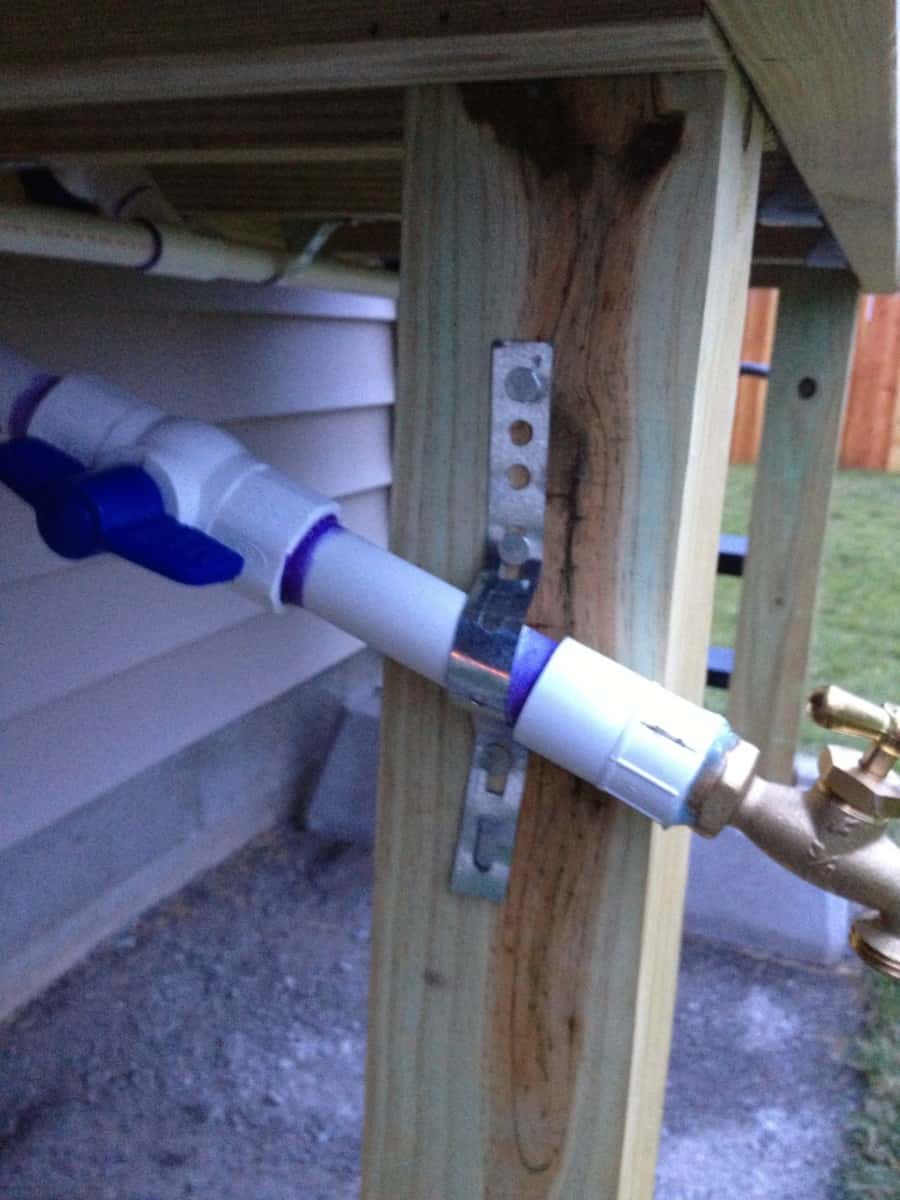
I planned for a shutoff valve at each barrel and another at the spigot (5 total) in case anything needed replacing or isolation it would be easier to shut off the water from that barrel. Once everything was dry-fitted I used some clear, silicone caulking and applied it liberally to the two bungs in the bottom of the barrel.

This is where the bung wrench comes in handy to tighten the bungs completely. Next, I applied the same caulking to the PVC adapter that conveniently threaded inside the one bung. I tightened it all the way thus making a leak-proof seal on all my barrels. I waited to permanently affix the plumbing until everything was in place. So now I had to prepare my yard for the deck and barrels.

preparing the ground for rainwater catchment home use

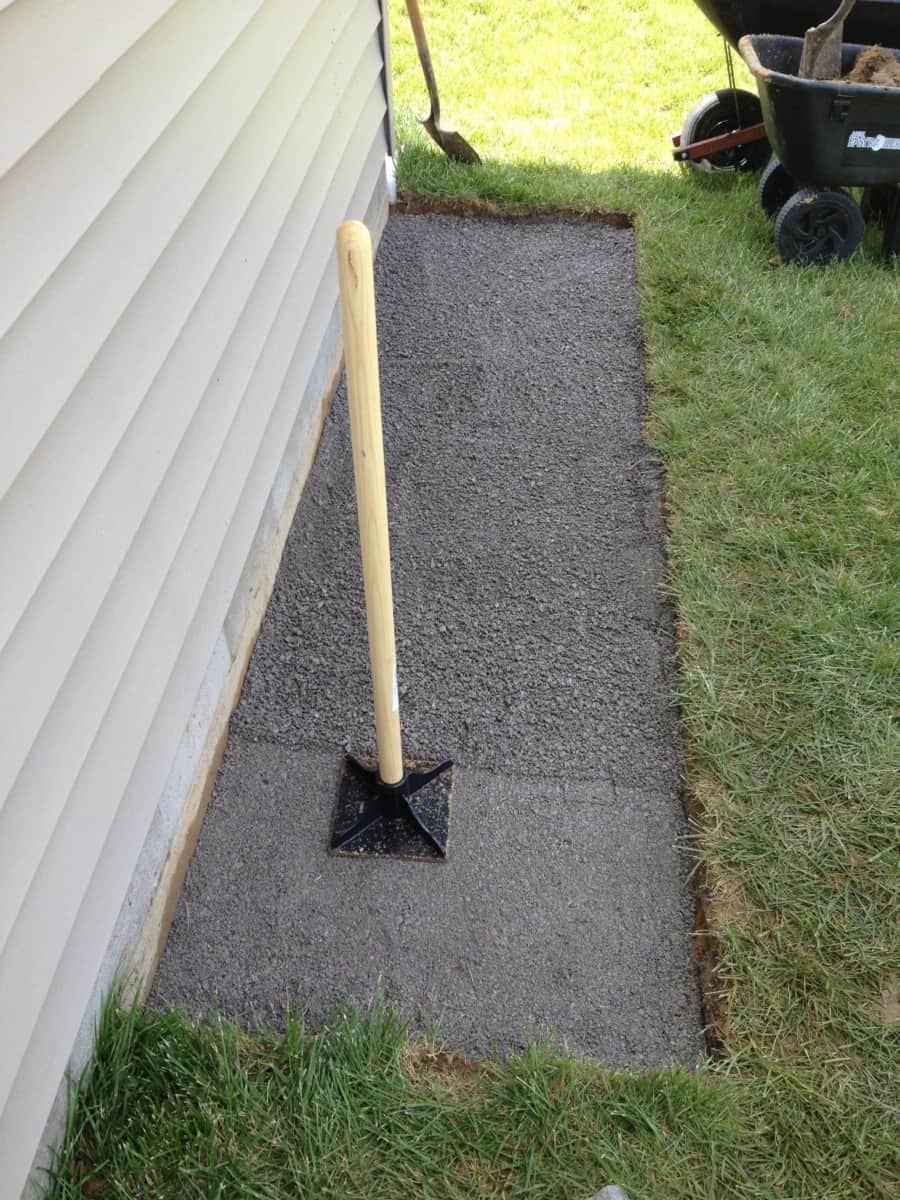
With the help of my wonderful wife, we dug up the sod in the backyard closest to the downspout we wanted to use. We dug a 32” x 115” section of the sod out, about 4” deep, and filled it with crushed rock. Here is where the hardest part of the project comes in.

Using an 8” x 8” tamper I tamped down all of the crushed rock making it about the density of cured concrete. Next, I placed six concrete piers on the crushed rock and, with the help of a friend, set the deck in the piers.
It was time to put the plumbing together permanently. I sanded the rough edges off the cut ends of the PVC pipe and applied the purple primer to the end of the pipe and inside the pipe, I would attach to.

I went a little farther up the pipe with the primer than what I would need so it would be a complete seal. After applying the primer I put PVC cement on the purple primer. Then you push the pipe in the adapter and twist a quarter turn. Hold this in place for 30 seconds and then test your work.

This “twist and hold” method is really important because you’ll notice the pipe wanting to push out of the adapter if not held in place. When done correctly it will be pretty solid. Once I plumbed everything together I used metal, nail-on straps to hold them in place (especially at the spigot). I also angled the spigot down a bit to make sure water wouldn’t sit in one place forever.

Now that the barrels were in place and the plumbing secured I built a small fence around the barrels. If you haven’t noticed by now I did a lot of overkill. The decking, the crushed rock, the concrete piers, etc. I wanted to make sure this much weight would hold (220 gallons of water weighs almost a ton!). So the fence keeps the barrels from blowing off the deck when empty.

At this point, I’m almost finished with the project. I used flexible downspout extenders to route the water from the downspout to the top of the far right barrel. Then another flexible downspout was used as an overflow.

finshing the platform for rainwater system

I put them in place and traced around the end where it met the barrel on one end and the downspout from the house on the other end. I cut the barrel and downspout and installed the flexible downspout to the top of the barrel and the downspout from the house.

Since mosquitos love standing water I placed a cut section of window screen around the opening in the barrel (sealed around the edges with the leak-proof caulking mentioned earlier) and around the end of the flexible downspout (attached with an adjustable ring used for dryer vents) to catch particles that washed off the roof. Now water will enter my barrels!

As I mentioned I did a lot of research before attempting this project. Part of that research mentioned drilling a small hole in the top of the barrels because of pressure that may build up in them would reduce the flow of water. I was skeptical about this but it didn’t hurt to drill a small hole in each and place more window screen over them. I sealed these with the same caulking.

The overflow spout is a necessary part of the project. If the barrels continued to fill past capacity then the plumbing could be damaged and that would be a nightmare. So at the very top of the same barrel the water entered, I measured and cut a hole to install another flexible downspout that would return to the original downspout from the house and flow away from the house.

This part was tricky because I wanted a watertight fit and not to have water spilling out of the hole down the barrel and all over the deck/ground. So I got a large diameter PVC adapter and put it in the hole I had cut. I made it watertight using a metal flange and some all-purpose bondo to seal it to the barrel.

Now the flexible downspout fits perfectly around the PVC adapter and overflows to the original downspout on the house and away from the house.

water catchment system for home useI failed to mention that I also have a small retention basin in my backyard. I drain the barrels before winter so they won’t turn into huge ice chunks. The plan is to use water from the retention basin during the winter if needed. While doing my research I read that rainwater off a roof is not potable.

So if the need arises we will be filtering and boiling any water used from the barrels (and retention basin for that matter). Also during the winter, I take the piece of the downspout from the house that I removed and put a couple adapters on each end, remove the flexible downspouts from the barrels, and place the original downspout back in place. This allows melting snow to flow through the downspout like it’s supposed to.

When spring rolls around I just switch back to my flexible downspouts and I’m refilling the barrels with May showers. It took about 2-3 days to finish the project, a little bit of sweat, and a lot of cuss words, but it was finished. What I like most about the rain barrels is the capability to have 220 gallons of water available to me at almost any time.

A body can survive longer without food than without water so knowing we have this stored away gives me peace of mind. In the meantime, my garden loves the water and occasionally my lawn does too. It’s tucked away behind my house and not many people know it’s there.

You could add some lattice fence-work around the deck frame to hide it even more if privacy is a concern for you.

Hopefully, you’ve learned a little bit about how to make a rain barrel system and its benefits. And that’s really what this blog is all about… learning new things to help us stay prepared.

Filed Under: Homesteading

How to Buy Rural Land Without Getting Conned or Ripped Off

September 13, 2018 M.D. Creekmore

buying-homestead-propertyby MountainSurvivor

About fifteen years ago, when I went to Oklahoma with a friend of mine, we met a man in his mid- to late-fifties that offered to sell us some land that he said he owned. When we went to look at the piece, we saw a small travel trailer sitting there, surrounded by dense stickery brush, and he told us what a good deal he would make us.

After we headed out to discuss buying it from him, the next door neighbor down the road stopped us and asked us if he was trying to sell us the land. When they learned that he was, the neighbor informed us that the guy did not own the three-quarter acre that he had shown us and that his mother had willed him a measly ten feet from the edge of the dirt road. We were relieved that we had not been conned and taken for every cent that we had.

The other day, I was looking at a house on about an acre of land that was for sale on the internet and thought, for the price of about sixteen hundred dollars I could own it, clean it up and either keep it or sell it for a bit of pocket change.

Well, after further investigation, I learned that there was no house at the address that the advertiser had specified nor was there anything in the vicinity for sale which even resembled what I saw on the site. All the red flags were up and I ran as fast as my mouse would click.

The world is full of con artists so anxious to stuff their pockets with greenbacks that they will steal you blind if they have the slightest of chances. But not today because I am going to give you a crash course that will help you avoid looking like a meal for the ruthless vultures.

Now, I am not a real estate agent nor do I know the laws of every state but the principal I am about to share may be applied no matter where you are looking at buying a home or land.

Well, here we go. First, you must look at the land, walk it and verify that the corner posts are in. If you cannot find any then the seller needs to show you exactly where they are. The corner posts are placed into the ground to determine where every edge of a parcel of ground sits.

Without a survey, a landowner will not know where to put a fence, home, buildings, garden, etc. and be assured that they are not infringing on their neighbor’s dirt. Again, verify that a survey has been done by seeing, for yourself, that the posts really are in place.

chickens on the homestead property

Second, you need to do a little easy footwork which will probably take you under thirty minutes per parcel. You should never sign a contract or hand over any cash/trade until you personally, or by phone, contact the Treasurer as well as the Assessor of the County where the land or home is located because their records will enable them to tell you who the actual owner is, what their address is, how much the land is valued at, if the taxes are current or delinquent, the type of use the land has been zoned for such as Recreational which will not allow you to be there year-round, Residential which is usually year round or Ranchland which has it’s own set of rules that are dependent upon the location, possibly if the land is landlocked or legally accessible as well as other details of which only they can tell you about.

If you do not know how to ask for the details, just tell them that you are looking to buy Parcel Number (such and such) in (whatever) County and would like to know what they have on record.

For obtaining the specifications, always have a pen and paper handy, know the parcel number and/or site (situs) address, and the seller’s or real estate agent’s name. Also, most Counties have websites and there are many which provide parcel, tax and other information which is made available to the public.

Please note that, in certain parts of the country, the EPA has a choke hold on land so, if there is a source of water on or nearby a piece they may require that you have an Ecological Study done which will tell you whether or not you can even live on it but be prepared to pay through the nose, or far more than the land’s worth.

And, when purchasing any home or land, verify that an illegal drug dealer, user or manufacturer had ever used the premises because, if they were, the chemicals or drugs that may be left behind can affect your health.

Third, an Escrow Agent must always be involved because their job is to find out if the title is free and clear. You do not want to purchase a parcel of land or home only to later find out that you cannot take full possession because there is a lien or other things tying up the title.

Looking for land is simple if you know where to look or how to search for it. A lot of land goes through Real Estate Agencies and some agents keep a list of properties that they were advertising which they can refer back to if you ask them in a nice way.

Driving around looking for “For Sale” signs, empty or dilapidated houses and paths that are used by vehicles which head onto a parcel of land can lead you right to a purchase.

House and Land Brokers may have what you are looking for or they may know someone who does. Never overlook a broker because they are in business for selling and turning a profit. Check with them for “fixers” that need attention/TLC because if they have been sitting on something for a long time, they are not making any money, and no money means their pockets are not filling up.

If you run into a stubborn broker, one that would rather not sell because they believe the right buyer will come along, just move on and keep trying because, odds are, the tables will turn in your favor.

gardening on the homestead

Banks finance homes and sometimes land. They also like to sell what they foreclose upon because they do not want to lose the interest they would have made by the time the contracts were to be fulfilled. So, all you have to do is call a bank, ask to speak with someone in their loan department and then ask that individual if the bank has any foreclosures.

County Offices are notorious for selling homes, land, and homes with land, foreclosed and abandoned. They acquire them when the owners fail to pay their taxes after a certain period of time. This is where the public lucks out because for the price of the unpaid back taxes they can purchase the properties outright.

And they can do so through either the regular annual or multiple yearly auctions, or surplus sales which are properties which did not sell at the County-held auction(s). To obtain the properties, most Counties require that you submit a bid with payment and then if your bid is accepted, they will provide you with legal documentation.

The County Treasurer always knows when an auction will be held, will have a list of available properties to be auctioned and important information and facts that only they can provide to you as every County and State varies in regards to their rules and bidding processes.

The Internet contains millions of properties for sale. There is so much of it that it would take you years to get through it all. If you like to find things on your own but want to know what to type into the search box, enter “cheap acreage for sale in (the state or location where you are looking)” or “cheap fixers for sale in (again, the state or location where you are interested)”.

You could also type in the first two letters of the state followed by -realestate.net or check your state’s MLS (Multiple Listing Service) which is generally free to the public.

“Owner financing”, “no- or low-down” and “low monthly payments” can be a little hard to find so it is important that you specify that information in the search process but do not give up if you do not find what you are seeking right off. Just be patient and persistent because a search engine contains a lot of information that you may have to sift through before you are successful.

Hopefully our economy will not turn out to be like Greece’s or any nation that has suffered from bankruptcy and we find ourselves “wishing” we had found property and stuck in situations where we cannot even plant food because there is no room, regulations prevent us or we do not have the means or supplies to.

Those who have not found their dirt pie in the sky, what are you waiting for? Do not let your current situation determine when you may begin. Start looking now, begin rounding up the money by selling what you can and working a few extra jobs whenever possible to fill up the piggy bank to secure your future asap.

M.D. Creekmore adds: I found my first property on this website – the bank had foreclosed on it and I bought it directly from the bank. A great book that covers every state, with an eye towards long-term survival is Strategic Relocation: North American Guide to Safe Places.

Recommended Reading

  • Modern Homesteading: Rediscovering the American Dream
  • The Backyard Homestead: Produce all the food you need on just a quarter acre!
  • How To Find and Buy Land for a Small Homestead

Filed Under: Homesteading

Small Homesteading Guide and Layout Plan

September 6, 2018 M.D. Creekmore

Face reality, unless you are super rich putting back more than six months to a one-year food supply, isn’t practical, and even if you have the cash to spend, finding room for storage and the constant dating and rotating become the next obstacle, and this can get quickly become unmanageable.

For most preppers the goal should be a one-year food storage reserve, this should see you through most disasters, but you should also plan and work toward becoming as self-reliant as possible where you are. If you can grow and forage for all or most of your own food then you can survive for decades if need be, and eat healthier too.

In this article, I will cover some key points learned from my experience running a small homestead and providing most of my own food for over a decade. This includes gardening, foraging, and raising domestic livestock as well as tips on preserving the bounty of your harvest.

Self-Sufficiency Starts with the Survival Workshop

Self-reliant prepper workshop

The ability to use tools has been a major contributing factor to our survival and growth as a species, but unfortunately, that ability has turned into a specialty skill set in our increasingly dumbed-down, in the call, “the guy” for everything that needs fixing in the world that we now live in. Unfortunately, for some calling “the guy” may not be an option during a long-term disaster. You will be “the guy” and if it breaks you will probably be the one who has to fix it, and aside from the obvious of needing to know what you are doing, you will also need the correct tools to do the job effectively.

Nothing beats hands-on learning and experience, and you can get that by signing up for any courses available in your area. Look into welding, woodworking, auto mechanics etc. learn all you can, because skills will be needed for your own use and well as being an excellent barter item that no one can steal from you.

You can often get free training, by offering your help to local businesses that specialize in the skills that you want to learn. Tell them that you would like to offer your help free in exchange for them helping you learn those skills. As long as they know that, you are not trying to learn, so that you can then set up as competition later, most will welcome the offer.

As for what tools you will need that really depends on your skills in using those tools, once you gain skills you will know also know what tools you need in your toolbox. But not matter what tool you buy always buy the very best quality that you can afford – low-quality tools often break during use and cause all kinds of cursing, disappointment, and unfinished work.

Another thing to keep in mind when selecting and buying tools is that power from the utility might not be available, therefore hand tools that run on muscle power and sweat should be given top priority, in the prepper’s toolbox, and then rechargeable tools that can be charged via solar or generator power. 

The Prepper’s Garden

the prepper garden
Soil tilled and ready for planting corn, pole beans, and squash.

When it comes to gardening everyone seems to have their own ideas as to what is “the best” method, and they all could be right because different methods are required for different situations and locations, but never the less the basics are still the same. You start with a seed, seedling, or cutting, plant it, nurture it, harvest it, and eventually eat it.

Generally, you will need a fertile soil with a pH-balanced level of between 6.5. – 7, well drained, with six or more hours of direct sunlight, and fresh water to grow a healthy, productive garden. If you can provide this type of growing environment, then the plants will do well without much else from you.

With the survival garden, your goal should be to grow as much produce as possible, on the least space as possible, while doing the least amount of work as possible. Remember minimum effort and the maximum reward is the goal because if you burn more calories planting and tending your garden than you get back from the harvest, you then have a negative return for your effort, which goes again the rules of human survival.

I have found a mix of close planting (sometimes called French intensive) and Ruth Stout’s method as detailed in her book gardening without work, works very well for me, producing an abundant harvest with little effort on my part.

With Ruth Stout’s gardening method you simply keep a thick layer of mulch (usually hay, straw or leaves) on the garden at all times, this keeps down weeds and automatically builds the soil and adds nutrients back as it decays. As it decays into the soil, you simply add more mulch, keeping it at a consistent level to keep smoother weed growth.

There is no need to build and turn a compost pile, or plow, sow a cover crop, weed, and seldom have to water, or do anything else besides adding mulch and plants to grow a productive garden.

The only fertilizers that I use are manure tea, cottonseed, or soybean meal, and then only need small amounts these, especially after the first couple of years once the soil has time to become fertile from constantly rotting mulch. To plant you simply pull back the mulch and plant the seeds, cutting or seedlings as you normally would in any garden.

And that’s all there is to it, mulch, plant, let grow, rest, harvest.

Guerrilla Gardening

Guerrilla gardening is a term used by local pot farmers, who have developed unique skills that allow them to raise the “illegal plants” in a secretive manner. However, before you get all excited with visions of easy money and smoke puffing from a freshly rolled marijuana cigarette, let me clear the smoke from the air, this article is not about growing the illegal weed; it is about growing secret food crops after a complete breakdown of the current system and WROL.

Having the traditional garden planted in rolls and in the open could make you the target of looters, scavengers, and thugs. Having your garden hidden and out of site could mean the difference between plenty and starvation after the balloon goes up.

Secret Grow Rooms

Secret grow rooms or greenhouses should be considered, all that is needed in most cases is to remove the roof from a garage or outbuilding and replace it with corrugated fiberglass. The walls can be painted white, or covered with aluminum foil, to help reflect light back onto the plants inside. From the outside, it just looks like any other outbuilding, while inside it hides an abundant garden.

Tables for plants can be made and rigged on pulleys, so the plants can be lifted closer to the roof providing more sunlight and lowered back down again for watering. Using this method, it would be difficult to grow enough to feed an entire family, but it could be done with proper planning and enough space. Most likely, the secret grow-room would be used to supplement other available food resources.

Order a copy of – Secret Greenhouse of Survival: How to Build the Ultimate Homestead & Prepper Greenhouse by Rick Austin for a full plan for setting up a secret greenhouse.

Forest Gardens

Many people have mentioned forest gardens; the idea has been around for a long time and could work well, for the survivor or a person bugging out to the forest. All you do is – find a suitable spot that is hidden, well drained, and open to sunlight. Dig up the soil, work in organic matter, or timed released fertilizers and plant.

If done right, such a garden can be largely self-maintaining requiring little effort by you after planting.

Avoid making trails to the garden area, people follow trails, and these will lead them directly to your garden, remember the harder it is for you to reach the gardens location the more likely no one else will even try.

Remove all signs of activity, like trash or freshly dug soil. Spread any loose dirt over the area covering any open spots with natural ground cover such as leaves. This also helps form mulch reducing the need for watering significantly. Try to make the garden area blend in with the surrounding forest as much as possible.

Step back and look at the possible approach points, and remove anything that catches the eye. Remember to avoid making trails to and from the site by never going in or out the same way and using alternating entry points. Try to walk on hard surfaces as much as possible to avoid leaving tracks.

Some plants are easier to hide than others are; potatoes, for instance, would be easier to hide than say tomatoes or corn. Most people would pass within three feet of a potato patch and not recognize what they were looking at. Choosing plants that blend in with the surrounding is an important consideration for the secret survival gardener.

The Gardening Nomad

I know a guy who lived in a truck camper for years – he would move from one hide to another every couple of weeks, he had gardens strategically located all over the countryside. I do not know if they were all legal crops (probably not), but know that some of what he grew what he grew were food crops and he seemed to do very well, while living a very simple life, all without a lot of stress and worry.

Three Sisters of the Cherokee

Another growing technique that I recommend is “the three sisters“. This system has been used for thousands of years with great success in both North and South America by many “Indian” tribes and native people.

The three sisters consist of corn, squash, and beans that are planted in a circle, with corn in the center, then pole beans are then planted around the corn and then squash are planted around the outside. The pole beans help to put nitrogen back into the soil, which is great for the corn and squash. The beans climb up the corn, which acts as a natural trellis. The squash with its wide leaves help shade out weeds and reduces the need for watering. It all works together in a sort of mini garden ecosystem.

Perennials

Perennials are my secret weapon against post-collapse hunger pains and starvation – planting perennials will allow you to have a continually replicating food supply, which will provide for you year after year with little effort on your part. Every prepper should establish a good variety of perennial edibles at their retreat.

I have established “gardens” of asparagus, Jerusalem artichokes, horseradish, garlic, perennial onions, and herbs scattered around my homestead. Once these perennials are planted, and established, they continue to grow and expand every year on their own with little or no help from you…

Choosing Seeds

At the beginning of the growing season most gardeners, simply head to their nearest garden center, and pick up whatever seed packets that are being displayed on the shelf that year, or they skip the seeds and their germination altogether by purchasing seedlings and transplanting those directly into their garden.

And why this works well (sometimes) during “good times” when you can still rely on going back and getting new seed for planting a new crop each year, if you’re thinking in terms of long-term survival or saving your own seed from year to year, then you need to consider buying and stockpiling Non-Hybrid (Heirloom) vegetable seeds.

According to the good folks at Heirloom Organics:

Non-Hybrid or Open-Pollinated seeds allow the gardener to collect seeds from a crop for future planting. Hybrid seeds do not. Heirloom Organics Seed Packs are 100% Non-Hybrid and Non-GMO (genetically modified) and specially sealed for long-term storage. Use now AND save for an emergency. All from the same hermetically sealed pack!

And while this is true in most cases, saving seed from year-to-year that grows true, without negative genetic changes is a little more complicated than that. Some plant species, such as corn, okra, and spinach, for example, must “cross-pollinate” each year to remain strong and to be productive.

Constant inbreeding of cross-pollinating plans, even if they are of the non-hybrid variety will result in weak, non-productive plans after the first couple of years. Therefore, even if you start with pure non-hybrid, heirloom seed you cannot save the seed of cross-pollinating species, indefinitely without a negative change in the resulting offspring at some point, due to inbreeding of the plants.

The solution to this problem is to simply, buy enough seed to last several years, and stored in optimal conditions to ensure germination, or buy several different Non-Hybrid, Non-GMO varieties and cross-pollinate each year.

Now the good news, self-pollinating plant species such as bean, pepper, tomato, eggplant, garlic, and pea can be grown and the seeds saved year-after-year with little or no genetic change in growth, health, or overall production, allowing you to continually feed your family, now and during hard times.

Over the years, I have seen many folks express concerns about the germination rate of seeds that have been packaged for long-term storage, such as the Non-Hybrid vegetable seeds that are packaged and sold by Heirloom Organics and other seed vendors.

The main concern seems to be that the process and conditions of storing the seed long-term will somehow cause the seed to not germinate (sprout) when planted. After having tested these seeds and their germination rates over the past several years, and others have done the same with similar results, I can assure you that germination rates remain just as good as or better than seeds stored in a traditional fashion.

Putting back a supply of non-hybrid vegetable seed should be on the to-do list of every, gardener and that applies ten-fold for the “prepper” because we do not know what will happen, the result or how long the duration.

We can only store so much food, and after it is gone, you will have to produce your own or starve….

Fruits, Nuts, and Berries

Fruits, nuts, and berries are one of my favorite hedges against starvation because they can be planted once and then mostly take care of themselves after. However, the biggest benefit is that after planted and established they will come back and provide for years after without you having to do much in the way of care…

Plant it and forget it… well almost.

If you have an empty space on your property, then fill that space by planting a food bearing tree, vine, or shrub. To fill larger areas plant fruit and nut trees, and for smaller areas consider planting strawberries, raspberries, rhubarb, blueberries etc. No space should be left empty especially around a small homestead…

Let us start with fruit trees since these tend to produce the most food for the least amount of work. When choosing fruit trees, look either dwarf or semi-dwarf varieties depending on the space you have available. Never plant a dwarf tree if you have room for a semi-dwarf variety, the semi-dwarf trees grow to a larger size and thus they will produce more fruit under the same growing conditions, they are also more winter hardy, and live longer.

It’s also a good idea to plant a variety of different trees, shrubs and vines that produce different types of fruit, nuts, and berries, i.e. apple, pear, peach, plum, cherry, blackberry, blueberry, raspberry etc. This will not only provide you with more variety at the table, it will also act as insurance against pest and disease that might attack one variety or plant but not another.

Also, when planting apple trees, I suggest that you plant both summer and winter varieties, as you might have assumed summer varieties mature and are ready for harvest before the winter varieties which makes it easier to harvest and preserve the fruit because it’s not all ready for harvest all at once.

As for planting instructions, I am not going to get into that here simply because the details can vary slightly depending on location and type. You will find that the planting instructions for your location will come with the trees, shrubs, and vines when you buy them at the nursery, if not ask.

When choosing varieties for cross-pollination, you can use the free tool at www.orangepippintrees.com/pollinationchecker.aspx to help you make the correct choices. Also, ask at the nursery when you buy your fruit trees for their advice on pollination and their recommendations.

I recommend that before planting your first tree, shrub or vine that you order a copy of The Fruit Gardener’s Bible: A Complete Guide to Growing Fruits and Nuts in the Home Garden by Lewis Hill this is a great book that is dedicated to the subject, and will cover everything that you need to know and then some.

Fruit Tree Pruning Instructions – dormant pruning is done in late fall or winter when the leaves have fallen off.

Practical Domestic Animals and Poultry

When choosing which domestic animals to keep for food, look for those that require the least time and effort to care for. As I explained in the gardening section above, when surviving, you do not want to put in more effort, and thus, burn more calories, then you are going to get back upon consumption.

Look for animals that can generally take care of themselves, like with anything else that you do when trying to survive look for the most reward for the least effort. For example, you do not want to exert 1000 calories, searching for an egg that you are only going to get 78 calories from. If you do this for consistently, then you are ensuring a slow withering death from malnutritions.

Chickens

chickens for self-reliance

No section on raising domestic animals for food would be complete without taking a closer look at raising chickens. Chickens are usually the first thought that pops into a person’s head when they think about farming or homesteading and for good reason.

Really the only downside to raising chickens is the initial startup costs of having to build a coop and feeders and watering containers, after that the cost per bird is extremely low, especially if your let them free-range so that they can forage for most of their own food.

Your main concern will be keeping them safe from predators because everything loves to eat chicken, including but not limited to foxes, raccoons, coyotes, bobcats, mountain lions, owls, hawks, domestic dogs, domestic cats and everything else that likes to eat meat. The best way to keep them safe is to keep

them inside a well-made coop with a securely fenced in outside run, but this means that you’ll have to feed them more because they generally won’t be able to forage for the bulk of their food when confined to such a limited space.

As a compromise, I keep my chickens inside the coop with access to the eight by twenty-five foot run most of the day and let them out to forage of the evenings about two hours before dark. They generally stay within seventy-five yards of the coop, and will go back in to roost before dark. After they are all in I’ll go lock the door to the coop, to keep any predators out and the chickens’ safe inside.

When building your coop seal any openings uptight, even a small hole can give a hungry predator a way in – some will even use a small opening as a starting point that they can enlarge by chewing until they can squeeze inside.

When building your run, you will want to use treated wood for longevity, and to dig a trench six or more inches deep to bury that length of the wire in the ground to prevent predators from digging in under the fencing. I also like to pile rocks all the way around the coop and run – so far, this has worked great and I have never had a predator that has gotten inside the coop or run by digging.

Another thing to keep in mind is that chicken wire by itself is weak, and will not keep a large determined predator out. When I built my first chicken coop and run, I had two stray dogs that managed to rip through the chicken wire and into the coop. Luckily, I was at home and stopped them before they were able to do any more damage.

After that incident, I have always re-enforced the bottom three feet of chicken wire around the run by covering it with welded-wire. This has been very effective at keeping larger predators out and the chickens’ safe inside. My coop is almost finished in the photo above.

Having an outside dog (one that will not kill chickens) is also a great help at keeping your flock safe and for security in general. A good dog will keep watch and run predators off when they wonder into the area before they have a chance to find their way into your coop.

When choosing a type of chicken for survival purposes, look for dual-purpose breeds that are both good egg layers and meat producers. You will also want to choose breeds that go broody and that are good mothers so that you can raise additional birds to replace those that are eaten.

Note: hens will continue to lay eggs, even without a rooster but those eggs will not be fertile and with not hatch producing offspring.

My five most recommended breeds for preppers are the Black Australorp, Rhode Island Red, Dominique, Plymouth Rock, and Wyandotte. These breeds meet all of the criteria listed above and are easy to find or order in most areas and easy to care for.

When you start raising chickens, you will find that it is easy to be carried away with the result being that you end up with more birds than you need. For most preppers, a flock consisting of ten hens and two roosters works out well. The extra rooster acts as a “backup” should something happen to the other, allowing your hens to keep producing offspring.

You can find a wealth of free information detailing everything that you could possibly want to know about raising chickens, breeding, medical issues, coop building etc. However, to be honest, it is not that hard and if it is then you are doing it wrong.

Remember look for a maximum reward for the least effort, once you get your coop built it should only take about ten minutes per day to take care of your flock.

Ducks

I used to keep a few ducks around, and plan to add ten or more back into my flock this coming spring when I can buy day-old ducklings from the local Tractor Supply or Farmers CO-OP, and eventually, I may completely replace my flock of chickens with ducks.

Ducks are smarter than chickens and are better foragers that can find most of their own food, and they are less disease prone and seem to attract fewer predators. Ducks lay just as many eggs as chickens, but the eggs taste better and are larger. They are also better mothers to their young.

Many preppers make the mistake of thinking that they must have a large pond or another body of water on their property to keep ducks, and while the ducks do enjoy that setting, it is not necessary. All that I ever used were several “kiddie pools” that I kept full of water around my property and the ducks thrived.

Since ducks like to poop in the water, you will need to pour it out every week or so and replace it with fresh water. The water from the pools makes an excellent fertilizer that can be poured around your fruit and nut trees.

Rabbits

If the goal is to put meat on the table then you should start building your rabbit hutches now. Rabbits meet or exceed all of the criteria that I previously mentioned about choosing animals that easy to keep and cheap to feed because they do well on nothing more than, fresh dry grass clippings, hay, unused produce from the garden, salt, and fresh water.

I also like to add a hand full of commercial feed pellets for each rabbit every couple of day to round out their diet. This becomes more important during the winter months when fresh grass clippings and hay are not as readily available.

Housing for rabbits is a simple matter; all they need is protection from predators and from harsh weather conditions. Do a web search and you will find a wealth of free hutch building plans, these range from basic but functional to major projects costing several hundred dollars. My preference is to keep it simple and cheap.

You will have to keep the male “buck” separate from the females until you are ready for them to breed. After the female has been breed, remove the male and put him back in his cage. Females are usually ready to breed at around ten months old and will usually bear from eight to fourteen young after a short thirty-day gestation period.

The offspring can be slaughtered after nine weeks and the doe then rebreed again. As you can see if you do the math, one buck and five does can produce a lot of meat quickly. Just don’t make the mistake of eating only rabbit meat – rabbit meat is too lean and humans need some fat to survive and a diet consisting of only rabbit meat by itself does not provide enough fat to keep a human body healthy over the long-term.

Larger Animals

If you have enough land to provide the bulk of food and space for larger domestic animals like hogs and cows, then these can prove a huge benefit and should be considered. These larger animals can provide hundreds of pounds of meat, or as is the case with the cow can also provide milk, cheese, and related products as well as meat when slaughtered.

Goats are a great alternative to the cows and are much easier to care for and will find most of the own food if left free to forage over a large enough area. However, keep in mind that they can kill trees, and native foliage, and will eat your garden, flowerbed or just about anything else that they are allowed to get into.

Since this is not a dedicated book on how to care for and harvest domestic animals, I am going to suggest that you order two books – Barnyard in Your Backyard: A Beginner’s Guide to Raising Chickens, Ducks, Geese, Rabbits, Goats, Sheep, and Cattle by Gail Damerow and Basic Butchering of Livestock & Game by John J. Mettler. These two books will cover everything that you need to know to successfully raise and butcher domestic livestock and poultry.

Bees and Honey

Honeybees have been vanishing at an alarming rate, with losses of upwards of 40% of bee colonies worldwide over the past few years. In addition, while no one seems to agree on the cause, we can all agree that the loss of our honeybees will throw our ecosystem out of balance, making it more difficult or impossible to grow enough food to support the earth’s current population.

Personally, I believe that the predominant cause of this hive die-off is due to the increased planting of GMO crops and especially the use of chemical pesticides that the bees carry back to the hive, causing death and eventual hive collapse.

Having one or two beehives can produce 25 to 50 pounds of honey per year if the hive is healthy and well managed. If you want to keep a hive or two at your homestead, the first thing that you should do is to go talk to a local beekeeper that already has established hives.

These experienced bee keeps can give you some great pointers on keeping bees in your area and the dangers to look out for, and possibly sell you everything that you need to get started.

Foraging For Wild Foods

I love waking up in the morning and seeing this guy in my front yard. He thinks he is a pet it seems but could be dinner if needed.

Foraging for wild foods via hunting, fishing, trapping, and gathering of edible plants and nuts can go a long way toward ensuring your survival after the balloon goes up if you are prepared and have the needed skills to do so.

You need to learn how to hunt, trap, and fish as well as how to recognize and prepare the edible plants and nuts that are abundant in your area.

Granted it’s impossible to teach someone to hunt by writing about it in a book, you need to get out and do it to learn, but you can pick up a few tips and some how-to-do-it knowledge from reading and watching other people hunt on the Outdoor channel.

Generally, trapping is more efficient than hunting especially for those just starting out; traps can be set and work without you having to be there. Set it, leave it, come back, and check it once a day to remove caught game, rebait the trap or both.

You can use the free time to do other needed chores like tending your garden or setting more traps. Harvesting wild game for the stewpot is an excellent long-term survival strategy as long as you do not plan to live off harvested wild game exclusively. Wild game should be considered as only one link, in your food resupply chain, and not as the whole chain.

You must have variable and independent sources of resupply, lined up and ready to go. I have seen too many preppers, who plan to rely 100% on their stored foods. They have no resupply chain, and if the crisis lasts longer than their food stockpile, then they are out of luck.

Plus your stockpile might be looted, burnt, blown away or destroyed a hundred other ways, so please don’t put all of your eggs in one basket, so to speak. Plan on losing your main food supply, and make plans that will allow you to keep on feeding your family, regardless of how empty your storage shelves become.

To start, you will need to learn the basics of setting both store-bought and homemade traps. To help you in both areas, I suggest that you order copies of The New Buckshot’s Complete Survival Trapping Guide by Bruce Hemming, Survival Poaching by Ragnar Benson and The Modern Hunter-Gatherer: A Practical Guide to Living off the Land by Tony Nester.

However you’ll still need to get up and off of your rear-end and actually go outside, and do it. You will need to practice, practice and then practice some more because most animals are smarter than the average human trying to trap them is.

There are other good how-to-do-it trapping books available, but the three are my top recommendations. Just do not think that you are an expert or proficient trapper just because you read a book, you are not.

You have to get outside and DO IT!

As for trap and gear recommendations, I suggest that you lay in a good supply of small game snares, you can make your own snares, but I’ve found that it’s just as cost effective to order them pre-made in bulk than to make your own, especially when you consider your time.

The Dakota line Rabbit Snares are a perfect size and weight for trapping small game like rabbit, squirrel, and pheasant. Larger game can also be taken (easily I might add) with snares, but you will have to make your own, heavyweight snares for this (disclaimer: check and follow game laws… yadda, yadda, yadda), full details on snaring large game are given in the pages of Survival Poaching, that I linked to above.

My next trap recommendation is the 110 Single Spring Body Trap, these are perfect for rabbit, and squirrel sized game, and can be set without a setting tool by most people. When setting these traps, it is a good idea to use a Safety Grip Tool, for your safety.

These traps work by snapping shut with enough force to kill the animal with a blow to the neck, and they have enough power to break your hand if the trap is accidentally tripped while setting it.

Fishing Gear

One of the easiest and often most productive places to forage for food are in lakes and streams. While everyone knows about fishing with a pole, line, and hook, most people never consider methods such as trapping, spearing, gigging, or shooting fish (check your state’s game and fish laws yadda, yadda, yadda) despite the fact that these methods are often far more effective.

First, let us talk about “fishing” after all this is the first thing that most people think of when “catching fish” is mentioned. It is easy to tie a line with hook and bait to a pole and toss the line into the water and wait for something to bite.

Alternatively, to make a “hobo fishing reel” which is really just a soda, soup can or stick with fishing line wrapped around it. While this simple setup will not win any contests for “showiness”, it can be put together in a couple of minutes and is effective enough to put food on the table if the fish are biting.

When riding an ATV or backpacking into the backcountry, I like to fish the abandoned farm ponds, and remote streams, that can be found in my area. I like to take a collapsible fishing rod or the voyager spinning travel kit with me, both work very well and don’t get in the way when riding or hiking in wooded areas like a traditionally fixed fishing rod would.

These types of rods will work great in a bug out kit and for foraging the waters away from your home or retreat after a disaster or TEOTWAWKI. Just be careful not to get so preoccupied with fishing that you become oblivious to your surroundings, and are taken by surprise by someone who may have bad intentions.

In this type of situation, after the stuff has hit the fan it is best not to go out alone if possible. When you’re alone it’s nearly impossible to do a task, such as fishing and stay 100% aware of your surroundings 100% of the time. Having an armed lookout, placed in a concealed location to watch your six is a good idea.

Ditto for other post-disaster, chores as well stay alert and if possible, post a lookout to watch your back.

For mobile fishing tackle, I keep it simple, a few assorted hooks, some split-shot sinkers, a few small artificial lures, and a couple small bobbers. This simple yet basic fishing gear is small and lightweight while still being effective for freshwater fish like bluegill and sunfish.

Another type of “fishing reel” that I have grown fond of using is the Yo-Yo Fishing Reels. Several of these can be set and left alone while you go take care of other chores, like setting up camp or building a fire, and let’s face it having several lines in the water at once can only increase your chances of catching something.

Edible Plants

Every prepper should be able to identify, harvest, and use the edible and medical plants that grow wild in their area. Luckily, there are a number of great books with color photos and detailed information on this subject, but like with most things you’ll still need to go out and actually find, harvest and use these plants because nothing beats getting out in the field and doing it to gain lasting knowledge…

Here are two books, a video, and deck of cards that I recommend:

  • The Forager’s Harvest: A Guide to Identifying, Harvesting, and Preparing Edible Wild Plants by Samuel Thayer
  • Backyard Foraging: 65 Familiar Plants You Didn’t Know You Could Eat by Ellen Zachos
  • Wild Cards: Edible Wild Foods
  • The Forager’s Harvest – Edible Wild Plants 2 DVD Set by Samuel Thayer

Filed Under: Homesteading

What Animals Should I Keep On A Small Homestead?

August 20, 2018 M.D. Creekmore

The chicks are growing up fast and should start laying in a couple more months… Yea!

Have you always dreamed about starting your morning with farm fresh eggs and fresh milk from your own cow or goat? Even on a small homestead, you can make that a reality.

And you will be happy you did. Raising animals will not only provide a source of food and milk for your family, it will provide you with a sense of independence as well as life experiences you can pass down to your children.

Before you begin, we will help you with the questions you need to ask and the planning that goes into bringing farm animals to your homestead.

1. Can you have farm animals on your property?

For obvious reasons, this is the first question you need to go over. Earlier in the series, we talked about purchasing your homestead. And one of the questions to look into was whether you can have farm animals, or anything beyond cats and dogs, outside. But maybe you are inheriting land or want to turn your current property into a homestead.

Many cities and HOAs will have covenants against any type of farm animals on your property. Make sure you aren’t on the wrong side of the law.

2. What do you have space for?

The size of your property will limit what you can have on your homestead. While you will likely see or hear differences on how much space each animal needs, just take this in to consideration.

As you plan what you want, make sure your property can handle it.

3. What animals do you want?

After you have figured out what you have space for, consider what animals you want on your homestead. And for what purpose.

For a smaller homestead, chickens are probably the most common or popular animal, to begin with. They will provide eggs and meat. Ducks will do the same, while rabbits will provide meat.

As you expand your homestead, animals like goats and sheep will be a great addition. Not only do goats provide milk and cheese, they will also clear land for you. And sheep will provide wool as a bonus.

Cows will provide a source of milk or meat. But they will also require more space and more feed. And then there are pigs. They are more work than traditional livestock, but they are both helpful for your homestead and provide great meat.

A wildcard is bees. They are great to have around your garden and, of course, you get free honey. Just make sure you know what you are doing as bees are pretty dangerous. You can learn more about beekeeping here. (affiliate link)

4. How big should I start?

It’s easier to start with smaller animals, like chickens and ducks, before moving up to cows or goats.

We understand the urge to start as big as you can but recommend taking your time. You will likely face your biggest obstacles in the first couple years. It will just be easier to correct that with a smaller flock or herd and then build up with time.

5. How can I involve young kids?

There is just something about young children and animals. For most children, their connection to animals will be picture books or an occasional trip to the zoo. But not on the homestead.

Kids can help by collecting eggs, filling up livestock waterers, feeding the animals, cleaning the chicken coop and milking the family cow. And the bigger kids can help with processing meat. Along the way, they will learn where food comes from and the values of hard work and responsibility.

By preparing, and taking your time early on, the animals on your homestead will provide a great source of food, milk, and pleasure for you and your family for years to come.

If you want even more in-depth prepping then please check out my best selling 176-page book “How To Survive The End Of The World As We Know It – Gear, Skills, and Related Know-How. It’s available in paperback and well as Amazon Kindle.

Filed Under: Homesteading

How To Compost at Home For Beginners

August 9, 2018 M.D. Creekmore

Plastic composter in a garden - filled with decaying organic mat

When you are starting life on the homestead, you quickly learn that common food and yard scraps that most people throw away can be very beneficial.

That is certainly true with composting. If you don’t know how to compost, it’s not difficult and we can guarantee it will be well worth your time and energy.

What are the benefits?

First, you are reducing waste. Estimates say that common food and yard waste make up anywhere between 25 and 50 percent of what people throw away. That means we’re using energy and fuel to transport this waste to a landfill, potentially releasing methane gas. When we don’t have to.

But it will also help your homestead. Applying compost to your soil will make your vegetables and trees very happy and help them grow. It is free fertilizer. Now, you can purchase compost from any big box retailer or nursery, but this is free. And when you have a large garden, it certainly adds up.

If you’re sold on composting but don’t know where to begin, read on.

1. Choose the right location

The location won’t necessarily make or break your compost, but there a couple points to consider to make this easier for you. One, choose a location relatively close to the house. We don’t mean one step from the back door, but when you will be taking regular trips from the house to the compost, I like to make life easier on myself.

The amount of sun won’t necessarily help or hurt your compost, but sun increases the temperature and can cause your pile to dry out. You can remedy that by watering more frequently, but it’d be easier to just choose a different location. We recommend partial shade.

2. Know what goes in a compost

As we have said, most food scraps and yard waste can go in your compost. The eligible items are generally broken down into brown material and green material. And you can probably guess what that includes.

The most common “browns” include dead leaves, pine needles, straw, hay, twigs or bark, sawdust, wood chips and pine cones. With the browns, make sure you chop them up as they tend to break down pretty slowly.

The most common “greens” include grass clippings, fresh leaves, fruits and vegetable peels, coffee grounds, melon rinds and even Christmas greenery.

Your post can be layered, one-row green, one-row brown, or mixed, where the browns and the greens are mixed together. And we recommend an equal amount of browns and greens.

3. It’s easy to build

You can purchase a pre-made compost bin from a big-box retailer or Amazon. This will be the quickest and easiest way to begin.

But if you want to save money, this is something you can do yourself in little time. You generally want a wood frame and wood or wire sides. If you’re looking for free materials, four pallets and some type of twine or wire will do the trick.

4. Maintaining your compost

Use a shovel or pitchfork to regularly turn your compost and mix the layers. A way that people ensure they’ve reached the entire pile is to move it into a new bin. You should turn your compost about once a month. Some do it more frequently, some less. But that is a good average number.

You also need to make sure the compost is kept moist, especially in the dry summer months. We recommended a shadier area so you don’t have to water as much, but you will still need to water in most climates.

5. Using your compost

Now that you’ve put this work into your compost, it’s time to make it work for you. If you have kept a regular schedule of turning the compost, your compost will probably be ready in three or four months depending on your climate and the time of year.

Once your compost is ready, you can now add it to the soil of your vegetable gardens, trees or other plants and shrubbery. Just how much compost you should add will depend on your soil, but we generally recommend adding about one to two inches to the soil.

If you follow these easy and practical steps, you will be composting in no time. And you will be happy you did.

If you want even more in-depth prepping and homesteading information then please check out my best selling 176-page book “How To Survive The End Of The World As We Know It – Gear, Skills, and Related Know-How. It’s available in paperback and well as Amazon Kindle.

You might also like:

  • Start Saving Today and Live Your Homesteading Dream Tomorrow
  • Smart Spending for Preppers Looking for Financial Freedom
  • How Do You Handle Emergency Food Storage?

Filed Under: Homesteading

Homesteading 101 – Prospective Homestead Priorities

August 8, 2018 M.D. Creekmore

by Patient Momma

LOG HOME HOMESTEAD

I have heard of and read some sad accounts of people purchasing property to begin their dream of homesteading, only to find thousands of dollars of expenses facing them. I’ve watched some of those ‘Homestead Rescue’ programs on TV and wondered what in the world were those people thinking?  This article is based on the premise that you’ve decided to get out of the city, to purchase some land with an existing on-grid residence and start homesteading in the country.

Life Style Change

Moving to the country and establishing a homestead is a major lifestyle change for the entire family.  I strongly suggest a family meeting and the reality of the situation be discussed before you even think about looking at property. If you have to work outside the homestead, how long will the commute take?  If children are part of the family visit the appropriate schools and find out if there is bus service to the prospective homestead or decide if you want to homeschool.  If your spouse is not in total agreement with to moving to the country you might be better off just getting yourself some acreage with a hunting cabin for a BOL.

Are you healthy and physically strong enough to do the work a homestead requires?  How far are the closest gas station, grocery store and doctor?   What are the roads like?  The further away from civilization you get, the worse the roads are.  Many country roads are gravel and oil or just gravel or dirt with blind curves and hills.  The countryside is dark…there are no street lights, no painted lines or curbs. Just realize that you leave convenience behind when you move to a country homestead. The road I have to travel is dangerous in the daytime and deadly at night.

When You Decide to Make the Move to the Country

You have been looking for your country property for a while and you made the effort to look at the property in person, not just on the internet. You have finally narrowed your choices down to two places you think would make a good homestead. This article is about taking a serious look at the homestead you are about to buy, so you can put some contingencies in your contract, if needed, to protect yourself.

No offense meant, but most city folks are somewhat oblivious to how things work and what goes on in the country on a regular basis.  Not because they are stupid; but because they are used to the city proving water, electricity, sewage, trash removal, etc.; all for a hefty fee of course.  They are also used to the landlord fixing the all the problems in their abode.  Unless folks were raised in the country, they usually don’t have any experience with well pumps, septic tanks, propane stoves/heaters, wood stoves, plus big bugs, mice, snakes and predators, etc.

Ask Questions

Is the property within city limits or is it just part of the county? It is possible to have a city mailing address but not be in city limits.  So what; why do you care?  If you are within city limits you are subject to city taxes plus all the little annoying rules; like you can’t have chickens, you can’t burn your trash, you can’t fence your property, you can’t build an outbuilding or anything without a permit, etc.  Most country properties are zoned as farm or ranch; but some are not.  You should have a list of questions the seller or the realtor needs to answer so you can make an informed decision.

If you are negotiating with a For Sale By Owner (FSBO), make sure you are familiar with the standard real estate contract for your state.  If you are purchasing a FSBO in a new state, you should consider having a real estate attorney work your contract for your protection.  Country folks are not as dumb as TV makes them out to be.

Inspect the Property

Looking at pictures on the internet is not accurate enough to base a purchasing decision on. You must have an in-person visit to see if 13 of the 15 acres advertised are up a mountain and only suitable for goats. When you see a photo of a beautiful view of a river and rolling hills, remember that the view is looking down and the advertised property has been carved out of a mountain that you have to drive up and down on a dirt or gravel road in all types of weather.

When you go to look at the homestead walk or drive the property (ATV or 4-wheel drive truck) and have the seller point out all the water sources. Is there a pond or lake? Does it flood over in the spring runoff or go dry in the summer heat? Is there a stream moving through the property; if so what is upstream and does it flood during the spring runoff?  Are there natural springs on the property or waterfalls off the hill or mountain? Is there wildlife roaming the property or is it strictly cattle pasture?

Inspect the Residence

When negotiating on the property, make sure you know the condition of the residence’s structure, roof, electrical wiring, plumbing, water well and septic system.  If you are not knowledgeable, you will need to get specific people to do these inspections as the average city home inspector, who charges $400-$700, does not do structural, wiring, pipes, wells or septic. The team of experts you need to do each inspection (structural, roof, electrical, plumbing, water well, septic) will add up to about the same cost but it would cost you more if you use a standard housing inspector plus the team of experts. These inspections can save your sanity and thousands of dollars.

Do not purchase anything without knowing the particulars of these categories. If you are purchasing a vacant property and using a realtor, insist that the realtor find out information from the seller or from public records.  The realtor is paid on commission so make s/he do some work.  If s/he cannot find the information on these critical systems, insist on the seller buying a Home Warranty Insurance Package covering all of these areas. A country package covering well and septic etc., is more expensive than the usual appliance package because they are extra riders to the basic policy.  This protects you for a year. Maybe you want the property in spite of the failures or unknowns, but at least make sure you are aware of the true condition so you know what you’re facing.

Get a Structural Inspection

If the residence is more than 15 years old, first on your priority list should be a structural inspection. Earth settles and the structure moves with it.  Sometimes older residences were built without spec and codes so determine whether the house sits on a cement slab, footers or other type of foundation. If you set a ball on the floor and it rolls across the floor that is a problem. The structural engineer will tell you what the problems are, which could be anything from foundation cracks to failed supports, sinkholes, crooked walls, warped beams, even fire damage. Sometimes the seller is not aware of the structural problems but you need to be before you sign on the dotted line.

Have the Roof Inspected

Make sure you get a reliable company to inspect your roof.  Depending on the location and age of the house it could be a lot worse than it looks. There is no substitute for an expert walking the roof for inspection. In my case the roof had to be replaced because of hail damage and the seller’s insurance paid $10,000 for the replacement.

Beware of DIY Seller Projects

A lot of country properties have homeowner DIY projects done to them; so you need to have experts look at the different things.  My brother bought a 23-year-old house only to late find it had aluminum wiring which could not handle the load of a modern home.  It cost him $15,000 to have the house rewired.

I anticipated the wiring needed updating in the 40-year old house.  I had an electrician come to inspect the wiring and give me a quote on what needed to be replaced, to install new outlets and to put in an another circuit breaker box to safely carry the additional load of newer appliances and multiple refrigerators and freezers. While he was there we found the wiring to barn was run underground from the over-loaded house circuit and without a protective PVC pipes.  The entire system for the tool shed to the barn had to be rewired to meet county code. If the work is required to meet county code, the seller usually has to pay for the update; but it is negotiable.

Inspect the Plumbing and Pipes

If your prospective home has a crawl space somebody needs to get dirty and look at the pipes and vapor barriers to see if they need fixing.  If your location gets cold snowy winters, you really need to have the plumbing pipes wrapped before you move in. It will save you from having to drip the faucets and spigots when the temps drop way down and the pipes are liable to freeze.  In my location we have very mild winters with very few nights below freezing so I decided I didn’t need every pipe in the crawl space wrapped and insulated. However, I found out I did need the exposed outdoor pipes protected and had to do that myself the day before the temperatures dropped to record lows in my area.

Check Out the Water Well

Most country homesteads use well water not city water.  Of course, you ask the seller how old is the well pump and how deep was the well drilled.  Some counties require paperwork when a well is drilled and installed; some don’t.  But checking the records in the county courthouse may give the date the well was drilled or motor last replaced, which is a big help to you.  Unfortunately, the well guy cannot stick a camera down the pipe and see if something is wrong. The well is either pumping or it isn’t.  Changing out the well pump is time-consuming and if the well guy is going to pull 100’ or 140’ of pipes to get to the motor, you might as well have the entire system replaced.   If the property does not have electric power to test the well, just assume it is not working and negotiate the price of a new pump and/or well drilling in the offer.

The more use the well gets the faster the pump wears out.  For example, if your well is used by two people for house water and washing cars it may last 10-12 years.  But if you have 5 or 6 people in your family and are additionally turning the spigots on and off by watering the garden, the animal barns, outbuildings or filling pasture water troughs from one well, the pump will wear out much faster. Depending on where you live, replacing just the well pump can run you around $1,000 to $4,000 depending on the depth of the well. Drilling a new well can cost between $3,000 to $15,000 or higher depending on your location and geology of the ground.  It’s important to be informed before you buy.

What is Your Backup for Water Delivery?

Another priority is your water backup system(s). Ask the seller if they have a backup if the electricity goes out (most well pumps run on electricity) or the pump fails.  We added two backup water systems after we moved in. Our DIY rainwater catchment system is a simple series of gutters, downspouts, and barrels. The rain rolls off the metal roofs of our outbuildings into gutters which have downspouts into 55-gallon food grade barrels. Each barrel sits up on concrete blocks and has a spigot to drain water or attach a hose.  Our redundant off-grid water system is a separate well with a Simple Pump, which is out of sight in an outbuilding.

Know the Age and Condition of the Septic Tank

The age and condition of the septic system is important to know.  The older the septic the stronger the chance of having trouble; which is something you don’t ever want to experience. The size of the septic depends on how many bathrooms, the number of people living in the home and how new the kitchen is; meaning is there a dishwasher, garbage disposal, automatic ice makers, etc. If you don’t know when the septic was last serviced, go by these fabled words: when in doubt, pump it out!  It is better if you can negotiate this action as a part of the selling contract, just like you would a termite inspection.

If the septic system is really old, it is possible the tank may be compromised. A friend purchased an older property and found out the hard way that tree roots had damaged the tank and over run the drain field. An instant $15,000 bill, which homeowners insurance may not pay unless you have a rider. The property I purchased did not have a septic tank; they had the old country system of a pipe running out to the woods.  I refused to buy the property unless they put in a septic system, which the seller did.  On average, a septic tank needs to be cleaned out every 4 or 5 years; but, if you have a house full of females, it only takes 2-3 years to fill up.

Inspect the HVAC System

If the residence has an HVAC system, have it checked out by a reputable person/firm. Just because you can feel hot or cold air coming out the registers doesn’t mean the system works properly.  A new heating/cooling system costs from $5,000 to $13,000 for the average 3 bed/2+bath house, depending on the quality you purchase.  Getting it repaired vs buying a new system can be negotiated with the seller.  When you call for a vendor inspection appointment be sure to ask what the service visit costs; because driving an hour each way to the country is not free.

Check Out the Wood Stove

Depending on the age of the wood stove it may or may not have a blower system.  It may or may not have fire bricks.  If it has tempered glass on the door, check the stuff that is holding the glass in. I say stuff because it varies by age, brand and if it meets current code. If the stove is free-standing, the stove pipe to the outside needs to be checked for cracks or holes so you don’t die in your sleep from carbon monoxide poisoning.  If the pipes are rusted they should be replaced. The insides should also be cleaned to avoid a stove fire which could burn your house down.

If the wood stove is in a fireplace, make sure the flue lining is cleaned and solid. If it has blowers have the wiring inspected and the motor cleaned. It is not very expensive to have the stove, pipes and motor serviced and it is worth it!  Depending on where you live and who your insurer is you may have to have a special rider to your policy if you have a wood stove.

Look at the Barn and Out Buildings

Does the property have an existing barn?  Does it have existing outbuildings? What condition are they in? If you are planning to farm or ranch you will need these structures.  A small metal barn can start at $20,000 and go upwards.  Building an 8’x10’ wood outbuilding will cost you around $500 for materials if you build it; more if you hire a helper.  If you buy a pre-built 10’x16’ metal shed it can run between $1800 to $3000, depending on quality.

Security of a Storm Shelter

High on your list of priorities should be a storm shelter or safe room.  Once you have been through a severe storm that rips your house apart while you cower in the bathtub with a mattress over your head, you won’t live anywhere without one.  Your location will determine whether it is a deep basement, a mid-house safe room or an outside storm shelter.

My location gets a lot of thunderstorms, which can spawn tornadoes.  The existing shelter was an outside concrete and steel framed storm shelter dug in the hillside. I also had a small basement dug as a backup.  I recently saw a new house being built near a town which had a concrete block safe room built in the middle of the house.

How Far is the Fire Department?

You should ask the seller or the realtor how far away is the nearest fire station and does it have a water truck.  There are very few fire hydrants out in the country so the fire department needs to bring the water.  Other items that are critical for country living are fire extinguishers and lots of them.  The further away from a town you are, the more fire extinguishers you should have.  I currently have about 8 scattered throughout the house and barn and I’m ordering a few more for the outbuildings. It is better to get the rechargeable ones; they cost a little more but don’t expire.

If you are buying in dry, wild fire country, you should identify methods of protecting your property.  I know people who lost a home and then rebuilt using concrete block and slate roof.  I have also read about folks who use sprinkler systems in the woods around their houses.  That old phase better-safe-than-sorry applies when you live in the country because your house could burn to the ground before the rescue/fire department/sheriff gets to you.

Backup Power Systems

Many country homes get their power from an electric cooperative via above-ground wires, aka telephone poles, which are prone to failure during any type of a storm. During storm season our power goes out, but usually for less than 48 hours.  Having a backup power system keeps everyone calm and systems working.  Again, it depends on your location on what you get.  Do you have enough sun for solar, wind for turbines or do you want to use a generator?  For short-term emergencies (+/- 3 months) we have a propane standby generator for the house and a portable generator for the barn.  The smaller outbuildings are solar powered.  We are still trying to figure out the best system or method for a long-term grid-down electrical outage.

Is There Protective Fencing?

Another item I consider a priority is fencing.  Living out in the country you are going to have loose critters; e.g., dogs, cats, goats, pigs, raccoons, armadillos, foxes, opossums, coyotes, deer and the occasional lost cow.  Those who choose to be in or near the mountains will have more dangerous critters such as wolves, big cats, bears, etc.

There are no leash laws in the country and some folks let their animals free range.  Many domestic animals roaming free are not vaccinated and wild animals carry a host of diseases.  A 5’ or 6’ agra fence will keep your family and animals safely inside your compound and most of the stray critters away from your house.

If you have deer in your area you will need an 8’ fence around the garden; a plastic deer fence will do.  A friend of mine used a couple of strands of hot wire which kept the deer out, but not the smaller critters.  At a previous home I had an 8’ plastic deer fence around my garden. One morning I looked out and saw a raccoon trying to climb the plastic fencing. The fencing swayed back and forth from the weight of the critter and the coon finally gave up and jumped off.

Around your chicken coops, I recommend a 5’ agra fence plus hot wire at 2 levels. The top-level hot wire discourages the owls, hawks and falcons from waiting for a chicken dinner, while the lower hot wire fends off the raccoons, skunks and opossums. For pigs we use 4’ agra fencing with a low-level hot wire. For goats you need strong fencing and multiple ways of locking the mischievous buggers in. Believe me; a stray goat can destroy any garden in one day!  If you run cattle or keep horses you will need 4 or 5 strand barbed wire fencing to contain them.  All this fencing costs money which adds up so if the property has existing fencing that is a plus.

Check Out the Closest Neighbors

Out in the country, the nearest neighbors might be across the road or 10 miles down the road.  I strongly urge you to make the drive and stop by.  Pull in the drive and blow the horn a couple of times until someone gets up off the porch or comes out of the house.  Stand by the car, wave and say hello.  If s/he waves or says hello go and talk to him/her.  If s/he seems contentious or yells for you to get off the property, seriously consider if you want that person as a neighbor.

Inquire about Communications

Depending on the population of the area, the communication systems will vary.  If you are phone, TV and Internet-dependent you need to ask where the closest cell phone tower is and if there is cable laid nearby.  You may have to get satellite TV/internet service and maybe a landline phone.  In my area, we are 12 miles too far from cell tower range and while in sunny weather we can call out and receive text messages, most of our incoming calls roll directly to voice mail.  Satellite internet out in the country is priced by data amounts so if you have game addicts in your house you need to figure out an alternative to online gaming.  If you go over your allotted data amount it slows to dial up speed or you can buy more data at sky high prices.

Be Aware

I hope this article has helped you to consider some of the variables involved when purchasing a country homestead. While setting up and running a homestead is challenging; it is also exciting. Thinking through these basic issues will help you negotiate your purchase.  Be wise and be aware before you buy!

You should also read:

  • Moving Toward Self-Reliance for the Working Poor
  • You Don’t Need To Be Wealthy to Homestead
  • Start Saving Today and Live Your Homesteading Dream Tomorrow
  • The Philosophy Of Tiny House Living – Things To Consider Before Going Tiny

Filed Under: Homesteading

  • « Go to Previous Page
  • Page 1
  • Interim pages omitted …
  • Page 7
  • Page 8
  • Page 9
  • Page 10
  • Go to Next Page »

Primary Sidebar

Subscribe to Blog via Email

Enter your email address to subscribe to this blog and receive notifications of new posts by email.

Join 7,197 other subscribers
  • Amazon
  • Facebook
  • Substack
  • Twitter
  • YouTube

“Do more with less.”

– Minimalist proverb

Recent Posts

  • Just so you know
  • Weather Update for My Corner of Appalachia
  • Why I’m Ordering Ivermectin + Mebendazole Every Year
  • The Website’s Shutting Down (But Here’s the Plan)
  • You Are Hated! Start Training Like It!

Footer

Recent Posts

  • Just so you know
  • Weather Update for My Corner of Appalachia
  • Why I’m Ordering Ivermectin + Mebendazole Every Year
  • The Website’s Shutting Down (But Here’s the Plan)
  • You Are Hated! Start Training Like It!

More about me

Books I’ve written

Books I’ve read

Follow Me on YouTube

Follow Me on Facebook

Gear I Use and Recommend

Newsletter

Search this site

Follow me elsewhere

  • Amazon
  • Facebook
  • Substack
  • Twitter
  • YouTube

© 2008–2025 M.D. Creekmore · As an Amazon Associate, I earn from qualifying purchases.