• Skip to main content
  • Skip to secondary navigation
  • Skip to primary sidebar
  • Skip to footer

M.D. CREEKMORE

  • Blog
  • Books
  • Newsletter
  • Gear I Use
  • About
  • Contact
  • Facebook
  • YouTube
  • Blog
  • Books
  • Newsletter
  • Gear I Use
  • About
  • Contact
  • Privacy Policy
You are here: Home / Archives for Prepping

Prepping

Here you will find articles about emergency preparedness and prepping including articles on prepper food, prepping checklists, home defense, bugging out, bugging in, and the best prepper gear ideas.

What is The Best Long Term Survival Foods?

November 6, 2018 M.D. Creekmore

Whether you are looking to be better prepared for a general short-term emergency like an extreme weather event or something more long-term such as an economic collapse or civil unrest it’s important to have a sufficient food stockpile so that you can fulfill your nutritional needs until the threat has passed or until you can start producing your own food by gardening and foraging for example.

But what is the best long term survival food? And the answer is foods that will store for well for two or more years and that you normally eat. For example most store bought canned foods have a shelf-life of several years (or even decades), as long as the cans aren’t rusted through or dented and leaking and the contents smell and look fresh then it’s still good to eat. However, if you want to prepare your long term survival foods from basic foods that also have a very long and stable storage life then consider foods such as wheat (or other grains, for those who have trouble digesting gluten), rice, beans, oats, corn, salt, honey, cooking oil and powdered milk.

Storing enough food to survive, unassisted and on your own for three to six months or even a full year or maybe even longer is a daunting prospect and the thought is enough to cause most people to get overwhelmed and some give up altogether.

And while I agree that storing and rotating such a large amount of food on a continuing basis can be a lot of work and takes dedication, it is by no means impossible, and if done right can even be enjoyable – just follow the food storage list below but remembers that this list isn’t set in stone, and neither is anything else in this article. This information is meant to help guide you and to give you some ideas but in the end the best long term food storage needs to be tailored to your personal needs and what you like to eat.

Prepper's Printable Food Storage Checklist
Prepper’s Printable Food Storage Checklist (Click Here For PDF)

Hard Red Winter Wheat

This is the backbone of your survival diet.

Wheat is nature’s longest storing seed, with an indefinite shelf life given proper storage conditions. The wheat (and other grains) can also be sprouted, adding fresh greens to the diet even in winter.

White and Brown Rice

Rice is my favorite storage foods and I actually prefer rice over wheat for storage, but that’s a personal decision, and well I like rice and rice dishes. White rice stores better and has a longer shelf-life than brown rice; however brown rice has more nutritional value.

Despite the trade off in storage duration, I still prefer brown rice for storage because of the added nutritional value.

Pinto Beans

Beans, corn, and rice combined make a complete food, providing just about everything you need to survive. Add some fresh green sprouts or garden produce and extra vitamin C just to be sure you’re getting enough to avoid scurvy, and you’ll be well fed and healthy.

I like to store a combination of pinto beans, black beans, and mung beans. How much you store of each will depend on your personal preferences to taste.

Oats

Don’t go overboard when storing oats, about 20 pounds per adult per year is plenty. Oats have a storage life of approximately four to six years, depending on storage conditions and whether or not they have been opened after being packaged for long-term storage.

Whole Corn

Corn equals cornmeal, cornbread, cornmeal mush, corn cakes, and a huge list of other foods that you can prepare using the seed. I store whole corn because it stores much better and with at least double the shelf-like of cracked corn.

Salt

While not a food but a mineral, salt, is none the less essential to the diet and individual health. Salt is also used in the preservation of food and animal products. Salt, like wheat, has an indefinite shelf life. Store at least 10 pounds of iodized salt per person, per year.

It’s also a good idea to stock up on salt blocks to attract game animals for future harvesting. You can find these in the sporting goods stores and other outlets that sell to hunters. You can also get these through your local farmer’s co-op, where they sell them for domestic livestock supplementation.

Honey or Sugar

As a sweetener honey makes an unequaled contribution to the diet. Honey, like wheat and salt, has an indefinite shelf-life. Store at least 10 pounds per person. If the honey hardens and crystallizes, heat it slowly in a double boiler to reconstitute.

Cooking Oil

There is some controversy as to which is best for storage in the preppers pantry, vegetable oil or olive oil, while both will work fine and you should stock up on the one that you like best. I recommend putting away, 10 quarts, per person, per year.

Powdered Milk

Most people turn their nose at the thought of powdered milk, preferring whole milk from the supermarket shelf. Granted it does have a slightly different taste, but it’s not unpleasant to drink, and after a week or two it seems to “grow” on you. Studies have shown that nonfat powdered milk, when packaged (nitrogen-packed) and stored properly has a storage life of 20 years or more.

Freeze Dried Foods

I prefer to buy those hard-to-store long-term items like powdered milk, dry margarine, butter powder, buttermilk powder, cheese powder, shortening, and powdered eggs pre-packaged for long-term storage in #10 metal cans, from Augason Farms or other reputable survival food vendors.

Supermarket Canned Foods

Canned foods from the supermarket have many advantages when it comes to food storage, they have a decent shelf-life on average of 2-5 years for most products, (note: shelf-life means that the foods retain 100% of their listed original nutritional value up until that point – store bought canned foods remain edible, far past the listed expiration dates in most cases).

As long as the cans aren’t bulging, rusted through or punctured and the foods smell fresh, upon opening then I would not hesitate to eat canned goods that are far past their listed expiration date. But that is a personal choice and one you’ll have to make yourself when the decision is needed.

Store bought canned foods have several advantages over freeze-dried or dehydrated foods, including cost and calories contained per serving. Another advantage is that canned foods already have their own water supply for preparation, so there is no need to use any potable water from your storage.

Despite the advantages of canned foods over freeze-dried and dehydrated foods, canned goods do have some disadvantages in comparison, like, weight, space needed for storage, and shelf-life.

I like to include a combination of the basic foods like wheat, rice, and beans, store-bought canned foods and certain “packaged for long-term storage” foods that are hard to store like powdered milk from one of the reputable survival food vendors…

All canned foods should be dated using a permanent marker and rotated on a FIFO (first-in-first-out) basis. I suggest that you build a rotating canned food shelf that will automatically rotate your canned foods when added and pulled off the shelf.

Always keep a notepad beside the shelf or in your kitchen, and write down every item that you take from the shelf and then take the note with you on your next trip to the supermarket, and then buy and restock the items that you’ve taken from the shelf, that way you always have a fully stocked shelf and a fresh supply.

Please read this article to see how long canned foods can last in storage before going bad…

Don’t Forget the Can Opener

Sure you could use a knife, but a manual can opener is easier and safer – so whatever else you do, don’t forget the can opener. Buy several or the strongest made ones that you can find.

Other Foods to Add to Your Food List

After you get the basic foods listed above in the needed proportions (see below), it is a simple matter to add other foods as you get the extra money.

Canned meats: We all know that SPAM is the preppers go to for a cheap “meat” source that has a longer than average shelf-life, and fat content. Canned hams, tuna, salmon, chicken, and turkey are all welcome additions in my pantry shelf – stock-up on the meats that your family normally eat and date and rotate just as you would any other canned food.

White flour: White flour from the store has a much longer shelf-life than does whole wheat flour because it has been “processed” which removes the oily germ, but unfortunately this “processing also removes the nutrition.

Processed white flour has a shelf-life of over five years if kept dry and safe from pests (like the meal moth). Mill moths get into the flour, lay eggs and those eggs turn into flour weevils, which ruin the flour. Look for tiny dark specks in the flour, as this is the first sign that the flour has been infested.

If it clumps together because of settling, just break it apart and run it through a sifter before use.

Store flour for long-term storage in airtight containers, with oxygen absorbers, added – see details below. You can also freeze flour that has been put into five-gallon buckets. Freezing will also kill any meal moths that happen to have been trapped inside before they can do any damage to your flour.

Most of my “flour” is in the form of whole wheat berries, that I have to mill (grind) before use, but I do have some processed flour in my pantry, for lazy days when I don’t feel like grinding whole wheat into usable flour.

Peanut butter: Peanut butter is a good source of fat and calories and has a decent shelf-life. Peanut butter is also an energy food and one that I always take on hunting and camping trips. Unopened peanut butter will last for years.

Spices: Be sure to include a good selection of spices in your food storage. Spices can make even the most awkward foods palatable, and help to alleviate food boredom. Cinnamon, Turmeric, Paprika, Ginger, Oregano, and Garlic are my favorites and make up the bulk of the spices in my pantry.

Baking powder, baking soda, and yeast: Baking powder, baking soda, and yeast (keep yeast frozen to extend shelf-life) are also essential since you’re storing and baking using unprocessed grains.

Dried pasta: Dried pasta will keep indefinitely if kept dry in bug and rodent proof containers.

Comfort Foods

Storing a sufficient amount of “comfort foods” is very important, to your psychological well-being as well as to alleviate “food-boredom” that is sure to set in after eating only storage foods for several months. Comfort foods are even more important if you have children or need to care for the elderly.

Consider comfort foods such as – Jell-O, instant pudding mix, cake mix, hard candies, chewing gum, Spaghettios, mac and cheese, brownie mix, canned spaghetti and meatballs, mashed potatoes, popcorn, cocoa, tea, coffee, powdered juice mixes, sunflower seeds etc. And remember to date and rotate on a FIFO basis.

We crave variety and having a supply of familiar comfort foods can go a long way toward retaining our sanity and self-worth during a long-term disaster. You can only deny yourself for so long before desperation and depression start to set in. Life will be difficult enough – give yourself a treat. You deserve it.

It is a proven fact that if we are forced to eat foods we don’t want or the same foods for extended periods – just to stay alive – dissociation begins to set in. We begin to float away as an escape – we still eat to stay alive, but suffer a lack of focus and become disoriented in relation to our surroundings.

This is dangerous in a survival setting. Don’t think it can happen? Try eating nothing but beans and rice for three months and you’ll see what I mean. Having a supply of comfort foods can help by providing at least some form of normalcy to your life.

Older folks and children will have the hardest time adjusting to new or unfamiliar foods, with many refusing to eat altogether, especially if the food is unnecessarily bland or unappetizing. Comfort foods will help them cope.

Food Storage Shelf Life (printable chart)

Food Storage Shelf Life (printable chart)

Vitamins and Supplements

To ensure that you’re getting a sufficient amount of needed daily vitamins and minerals for optimum health, you need to stockpile a good multi-vitamin and mineral supplement. Also, consider extra vitamin C and D. Vitamin D is of extra importance if you’re forced to stay inside (bugging in) for a longer than normal period of time and thus are unable to receive the needed vitamin D producing sunlight that is required for optimal health.

Don’t Forget About Your Pets

prepping for pets
She likes to watch the chickens…

Don’t forget to include a sufficient amount of food in your stockpile to feed your pets. A decent dog will increase your chances of survival because they can hunt and alert you to trespassers and other trouble. I prefer smaller dual-purpose breeds, with my choice for a working dog being the Jack Russell terrier.

Three Month Food Storage List for One Adult

  • Wheat 75 Pounds
  • Grains, rice, oats etc. 25 Pounds
  • Canned meats 5 Pounds
  • Canned margarine, powdered eggs etc. 2 Pounds
  • Dried beans, peas, lentils, etc., 6 Pounds
  • Dried fruit juice and concentrates 6 Pounds
  • Dried fruits or canned 25 Pound (if dried, then equal to this fresh weight
  • Comfort foods 3 Pounds
  • Non-fat dried milk 25 pounds
  • Peanut butter or substitute protein/fat source 3 pounds
  • Dried potatoes 12 pounds (equal to this fresh weight)
  • Salt 2 pounds
  • Shortening oils 3 quarts
  • Sugar or honey 12 pounds
  • Canned or dried vegetables 9 pounds (if dried, then equal to this fresh weight)

Please bear in mind that the above list is only a sample to help you get started, the most useful food storage list is the one that you put together yourself. After all who knows better than you, what you and your family, like to eat and in what amounts.

Where to Put All this Food?

After reading the above recommendations, you’re probably asking yourself where in the heck, you’re going to store all of this food. Well, that’s a good question and one that you alone can answer for your situation better than anyone else, but I’ll make a few suggestions that I hope will point you in the right direction.

The absolute best place in an underground bunker, root cellar or basement, unfortunately, most people don’t have any of those and have to make due with other less ideal storage options… Consider a spare bedroom, attached garage, detached storage building on your property, or as a last-resort a nearby storage unit rental.

If at all possible put in an underground storage area of some sort to keep you storage foods safe (and you) safe from weather extremes, as well as the main enemy of your food-storage shelf-life; heat. An excellent option, and inexpensive when compared to other suitable alternatives are the buried shipping container.

Long-Term Storage with Oxygen Absorber and Mylar Bags

I store all my grains, beans and other dry foods (besides sugar, salt or sprouting seeds) inside food-grade five-gallon plastic buckets. There is some controversy over what is and isn’t food grade. Most buckets with #2 inside a small triangle on the bottom are food grade, but not all – the only way to be reasonably certain is to contact the manufacturer and ask.

I buy mine from the local hardware store in the paint department. They also have them at my Wal-Mart, but, I prefer to buy from local business owners if possible. Sometimes they can even be gotten free from bakeries and restaurants, just be sure they only held food products – not paint, chemicals or other things that can make you sick or dead.

Foods packed in oxygen don’t store as well as those in an oxygen-free atmosphere. Oxygen absorbers work by removing the air from the enclosed container, leaving an atmosphere of 99% pure nitrogen in a partial vacuum inside the buckets.

Don’t open the bag of oxygen absorbers until ready to use because they will absorb oxygen from the surrounding air and become useless. Have everything ready to go before you open the package. Any unused oxygen absorbers can be stored in a small canning jar until needed.

Be sure to have everything ready to go before you start. Line the inside of the bucket with an appropriately sized Mylar bag these will help to keep light and moisture out extending the storage life of the foods inside.

The Mylar bag also offers a layer of protection between the food and the plastic bucket, if for some reason the bucket that you’re using isn’t considered food-grade.

Pour the food into the buckets a little at a time, shaking each bucket as it is being filled to settle and distribute the contents. Fill each bucket to about ½ inch from the top and throw in one 2000 cc oxygen absorber in each five-gallon bucket of food.

Now to seal the Mylar bag – first roll the top of the bag closed on one end leaving an opening at the other and press out any air that has been trapped inside, next place a 2×4 across the top of the bucket and pull the Mylar bag over the 2×4 and seal with a clothing iron set at the highest setting in a typical ironing fashion across the board.

Quickly put the lids on each bucket and pound shut by laying the board on the top and striking with a hammer or rubber mallet. After a few hours, the absorbers will create a vacuum that will cause the lids on the buckets to “pop down” indicating a good seal and a proper atmosphere for long-term storage. Be sure to label each with date, content, and weight, written on the front with a permanent marker.

Section Two: Tools For Cooking and Processing Your Long Term Food Storage

Most homes will already have most of what you will need to process and cook the foods from your survival pantry, items such as pots, pans, and other common household kitchen utensils. So we will not get into that. What we will cover are tools that most typical kitchens do not have on hand but that are necessary for the prepper’s kitchen. So let us get started.

Choosing a Grain Mill

You need a grain mill now. Don’t put it off another day. Even one of the least expensive models would be better than not having one at all. I know many of you want the best, and that is great. Get the best if you can afford it. Just do not put it off any longer. Get a mill now. If you cannot afford one of the better models, get a cheaper one; buy two or three of the cheaper models – that way if one breaks and cannot be repaired, you will still have spares to fall back on.

This goes along with my philosophy of the rule of three. Always have at least three independent sources of any survival necessity. Never put all your eggs in one basket. Too many things can happen which will leave you with nothing, which is what we are trying to avoid by prepping in the first place.

While I cannot give recommendations on all the models currently available today (because I have not owned or used them all), I can tell you what I have and my thoughts on these which should, at least, get you started in the right direction.

I currently own four different grain mills, The Wonder Junior Deluxe Grain Mill, a Corona Landers, a Back to Basics, and a Grizzly H7775.

Wonder Junior Deluxe Grain Mill

Wonder Junior Deluxe Grain Mill

If you read my book “Dirt Cheap Survival Retreat”, then you already know that I use the Corona hand grain mill for all of my day-to-day milling. It is a strong and well-built grain mill, and for less than $75 it is hard to beat. The Mill to Table Clamping System is a very strong feature included with the Wonder Mill. However, I have never liked having to run the meal through the Corona several times to produce usable fine-enough flour for baking. That is one reason I made my homemade sifter – to speed up the process. However, it was still always necessary to run the bulk of the flour through the mill two or more times.

Since I mill grain several times per week, I needed a more efficient mill. I considered the Country Living Grain Mill but never could find enough extra change for the purchase. Therefore, I started looking for an alternative. I eventually decided to order the Wonder Mill Deluxe from www.thewondermill.com.

I have used the Wonder Mill for the past three weeks, and so far I have been extremely pleased with my new mill. In fact, I think I’ll retire the Corona and use the Wonder Mill Deluxe exclusively. Yeah, it is that good.

The Wonder Mill comes with both stone and steel grinding heads as shown in the photo above.

I love the one-piece construction of the mill and hopper. There is no separate hopper that can fall off during operation or any pins or clamps that could be lost. This is one thing I never liked about the Corona, as there were several times that the hopper fell off during aggressive cranking of the handle.

Another big improvement over most hand-operated grain mills is the double clamping system used on the Wonder Mill, which is the strongest I have ever seen on any mill. When properly clamped to the table, I had no problems with the mill moving out-of-place or coming off during grinding.

However, since all of my grinding is done in the same place, I will likely remove the clamp altogether and bolt the Wonder Mill directly to the table. This will provide the strongest possible mill to table mounting system.

Another thing I loved about the Wonder Mill is the quick change head system that allows you to easily switch from grinding dry grains, beans, and legumes to oily grains, nuts, and even coffee in just a couple of minutes. The Wonder Mill Deluxe comes with both steel and stone grinding heads, which can be changed out in less than one minute.

Here are the product specifications:

  • Weight: 10 pounds
  • Height: 12 ¾ inches (without the clamp)
  • Hopper capacity: one quart
  • Crank handle: 10 inches

Best of all, the Wonder Mill produces excellent, fine flour (with no sifting or re-grinding required). This saves a lot of time and effort. Moreover, the consistency is easily adjusted using a simple knob to adjust from pastry flour to cracked grains.

In fact, 90% of flour files through the sifter screen after the first pass through the mill. Again, this is a huge improvement over the Corona. In addition, because of the excellent bearing system (that never needs lubricating) cranking the handle is much smoother, but still requires effort.

The flour guide directs the falling flour into the catch pan or onto the screen without any mess around the milling heads or thrown flour on the table and floor. This is always been a problem with the Corona when grinding pieces of grain and flour would be thrown all over the place. One solution was to secure a plastic bag over the grinding head of the Corona to catch the flour and grain particles.

I wish that I had a Country Living Mill to compare against the Wonder Mill. I am sure there would have been some interesting findings with the comparison. The folks at WonderMill.com did perform a speed comparison between the two and according to their website: In a test performed at the Wonder Mill test kitchen, the Wonder Junior was able to grind 1 ¼ cups of flour in a single minute *80 turns* (see our video speed test). This is 65% (about 1/2 cup) more than we were able to produce with the Country Living grain mill with the same flour setting and the same amount of turns *80 turns*, and for half the price.

I know what you are thinking, it sounds great but “can it be motorized?” Yes, it can. There is a motoring pulley available that will allow you to do just that; however doing so will void the warranty. They also make a special adapter which can be used with a power drill to make grinding any grains or beans a quick and easy process.

I only grind a small amount of flour at a time (why grind more than I need?). I will not be adding a motor, but it is an option to keep in mind.

Your next question is probably going to be “what will it grind?” I have used it to grind wheat, corn, and beans. It can also grind spices, herbs, oily grains, nuts, and seeds. See WillItGrind.com for more info on what the Wonder Mill will grind.

Based on my tests, comparisons, price, and use, I give the Wonder Junior Hand Grain Mill my highest recommendation for a grain mill. If you are looking for a hand grain mill this is the one you should get.

Corona Landers Mill

It is strong, robust, well made and my second favorite grain mill. The Corona is a hand-cranked unit that uses rotating steel burrs to crack and grind corn, beans, grains, nuts, and seeds.

It is manufactured using cast-iron parts with an electro-tinned finish to guarantee a rustproof and easy to clean tool. I give it my second highest recommendation following the wonder junior hand grain mill.

Back To Basics Mill

This mill works well and is actually very easy to use. My main complaint is the small hopper that needs to be refilled after a few cranks of the handle. It is lightweight when compared to the Corona and I do not think it would stand up as well to continued usage.

Grizzly H7775 Mill

The Grizzly H7775 mill it is not my first choice but it sure beats having nothing at all. It sits low on the table, low enough that getting a large enough bowl under the head to catch the flour is difficult. I have the same problem when using the Corona. This is the main reason I use a homemade sifter to catch the grindings.

My other complaint is the small hopper, refilling it every few cranks can be an annoyance, at least for me. On the plus side, the grinder is efficient and the grinding plates are easily adjusted to the desired consistency.

While this is a good mill, it is not of the quality of the Corona; but note that it is half the price, so buying two or more is an option.

Country Living Mill

While I do not own this mill, it is given the highest recommendations by those that do. A recent advertisement proclaims: The Country Living Grain Mill is one of the highest quality grain mills ever made.  Living Grain Mill is one of those high-quality items that could be passed on to the next generation.

How to Grind Grains and Beans

When grinding, it is often necessary to regrind the grain several times before reaching the desired consistency. Some of the meal will come out perfectly fine the first time through, while other parts remain coarse and need to be reground several times.

One way to make grinding easier is to use a screen to sift out the finer flour while leaving the larger pieces of grain behind. The sifter is simply a four-sided box with sides but no top, and a bottom made of nylon window screen from the hardware store. Mine is 15″ X 12″ with sides made of a ¾ inch by 3-1/2 wood.

Cut the wood to length, and nail or screw the pieces together. Lay the screen out on a hard surface, sit the box down flat on top of the screen, and cut to fit with a utility knife. Turn the box over and tack the screen to the box with several thumbtacks or small nails to hold the screen in place.

Take all-purpose cement from the plumbing department of the hardware store, and spread generously around the rim of the over the edge of the screen, forming a permanent seal between the wood and the screen.

When grinding, place a section of newspaper under the grinder head and set the box on top. Grind as normal but after each pass through the grinder, shake the finer meal onto the newspaper and transfer into a bowl.

Pour the coarser meal back into the grinder and regrind, repeating until reaching the desired constancy. This saves running the finer meal back through the mill, making grinding easier and quicker.

How to Clean Field Run Wheat

First off, never buy “seed” grain for human consumption. Seed grain is often treated with insecticides and fungicides. Seed grain is to be planted and grown not eaten. Buy untreated whole grain sold as “feed” that is meant to be eaten.

Look for “field run grain.” It is cheaper and because of fewer processing steps, it is less likely to be infected with mold or contaminated. Field run wheat will have dirt and detritus that will need to be removed before use, but cleaning wheat is not a big deal.

First, sort the grain by laying it out on a clean surface and pick out any chunks of dirt, rocks or darker grain. After sorting, you need to wash the grain. Place the grain on a sifter or screen and pour clean water over it until the water coming out the bottom is as clean as that poured in from the top.

After cleaning the grain, you will need to dry it before grinding. Pour the grain into a strainer and set it aside for about ten minutes. After it stops dripping, spread it out on a cookie sheet about ¼ inch deep, heat in oven at 180° degrees occasionally stirring until dry. Drying usually takes about an hour. If it takes longer that’s fine; just make sure it does not burn.

Alternatively, if you prefer you can dry it outside under the sun. This is better and cheaper but is dependent on the weather and time of day and the season. Just spread the grain out in a thin layer on newspaper or other suitable material in direct sunlight. A solar oven could also be used; however, I have never tried this method myself.

Sprout Seeds for Fresh Greens All Year

Fresh sprouts are full of vitamins and minerals that aren’t readily available in the unsprouted seed. Sprouting allows you to have fresh greens even in winter and will expand the bulk of your food storage many times over without any extra expense to you.

To start sprouting, you’ll need at least one wide-mouth quart canning jar (a quart mayonnaise jar will also work) and a 6×6 inch square piece of nylon window screen or cheesecloth. Both the screen and cheesecloth are easy to cut with scissors or a sharp knife.

sprout grains for food

how to sprout grains for food

sprouting seeds and grains for food

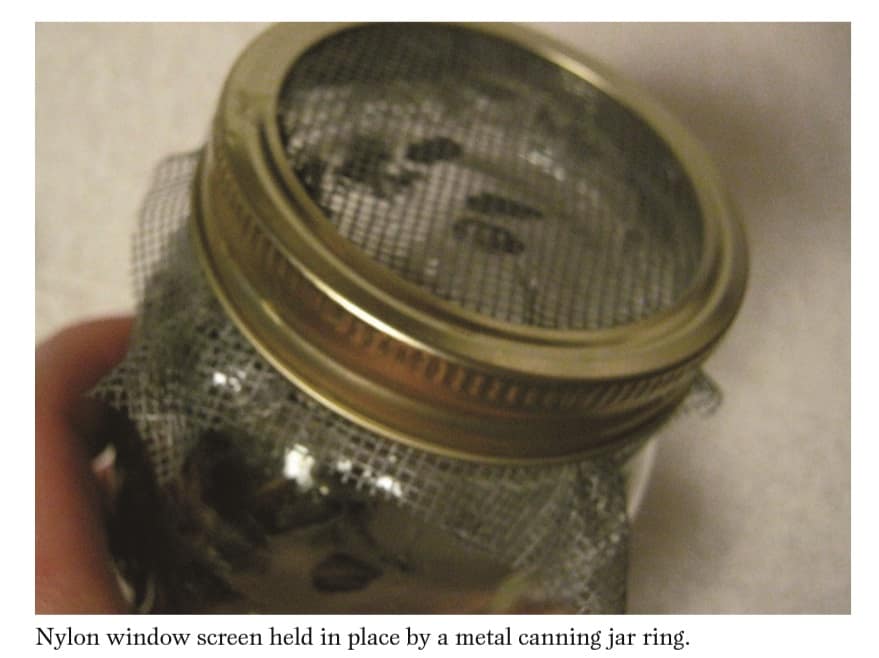
Next, put approximately 3 to 4 ounces of wheat, alfalfa, chickpeas, lentils, mung beans, pumpkin seeds, rye, sunflower seeds, or other sprouting seed in each jar and cover the mouth with the nylon window screen. You can use a large rubber band, string, or a canning jar ring to hold the screen in place over the mouth of the jar.

Fill each jar with water to within 2 inches of the top and let stand overnight. When you get up the next morning, pour out the soak water and tilt the bottom of the jar over the sink and leave for an hour or two so the rest of the water can drain off the seeds.

After this initial soaking and draining, you’ll want to flood the jars about every four hours and then drain any excess water by tilting the jar bottom up into a bowl or sink. Repeat two to three times per day.

how to spout seed for food and survival
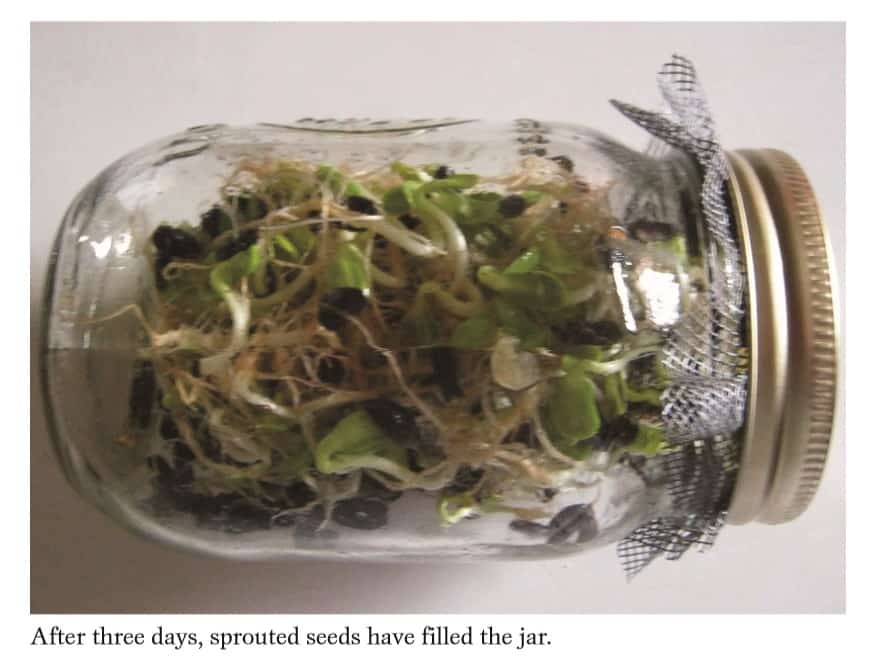
At this point, you want to keep the seeds moist but not covered with water. In a few days, the seeds will begin to sprout. When the sprouts reach 1 to 2 inches in length (for most seeds), they are ready to eat. Sprouts can be eaten raw, cooked, or dried. If dried, they can be ground into flour and used for bread or other baked items.

to keep a steady supply of fresh sprouts, simply start a new jar 24 to 48 hours after the last sprout jar has finished sprouting. Repeat cycle. This is a great routine that will keep you in fresh greens year round.

And that is all there is to it. If you want to learn more about sprouting, including in-depth but simple recipes using sprouts, order a copy of The Sprouting Book by Ann Wigmore. This excellent resource is a must-have for any serious survival seed sprouter.

Warning: Even though the risk is low because sprouts can contain bacterial contamination, people with compromised immune systems (e.g., individuals with AIDS, organ transplants, undergoing chemotherapy) are advised to avoid eating them.

Cooking Tools and Related Items

Listed below are some of the best cooking stoves and related tools for preppers. I have all of these and they are all well-made and useful; however, it should be noted that you do not need to go out and buy one of each type of cooking stove. Get what is best for you in your location. For example, if you’re located far north and don’t get all that much sunshine, then you’re probably better off skipping the solar oven and purchasing an EcoZoom rocket stove.

Zoom Versa Stove

The EcoZoom rocket stove is designed to burn wood, dried biomass (plant materials and animal waste used as fuel) or charcoal,  making it a truly versatile means of cooking, especially after the lights go out and other more conventional sources of fuel (like propane) are no longer available or are in short supply

My EcoZoom rocket stove has proven to be very heat efficient. It will bring a pan of water to a rolling boil in less than two minutes and fry an egg like nobody’s business. Having a means of cooking when the power goes out should be self-explanatory. Having a cooking source that uses easy to find, renewable fuel is an extra bonus.

Camping Stove

Having a standard camping type stove on hand for emergencies is one of those common sense things to do, and most folks in the country already have one or two of these for camping purposes.

If you do not have one, go out and buy one now. A top-of-the-line model will put you back around $100 at current prices, but the cost is well worth it. In addition, do not forget to pick up some extra fuel canisters. Put back at least 24 one-pound canisters, or better yet get a hook-up that will allow the use of the larger 20-pound tanks.

Sun Oven

If you are in an area that receives a sufficient amount of sunlight, then a solar oven is must have. With a solar oven there is no need to store or scrounge for fuel, and as long as the sun is hot in the sky you will have an unlimited “fuel” source to prepare food.

The best brand and the one that I recommend is The All American Sun Oven. It is best to get the package with the accessories included in your order to avoid having to buy these later.

Folding Camp Grill

A folding camp grill is another item like the camping stove that most folks in the country already have on hand. But it is still worth mentioning. Every prepared prepper should have one of these. So if for some strange reason you do not have one, go get one as soon as possible. I bought mine at Wal-Mart in the sporting goods department for under twenty-five dollars. They also have them at Amazon.com.

Outdoor Grill / Smoker

This is another one of those items that will make like much easier at least when it comes to preparing food after a disaster or a long-term grid-down situation. I bought mine at Wal-Mart in the lawn and garden department for less than one hundred dollars. They also have them at Amazon.com.

Extra Large Stew Pot

Even if you don’t anticipate having a large group to cook for you should still have at least one large stew pot because you never know who or how many family members or close friends will show up at your door, and most of us don’t want to shoot them, so we will have to feed them. I have a Bayou Classic 7406, 6-Qt. Cast Iron Soup Pot with Cast Iron Lid, but I am afraid that even this will not be sufficient for my needs.

Food Saver Vacuum Sealer

The Food Saver Series vacuum sealer is a great little machine that can greatly increase the shelf life of products. This is a highly recommended item for preppers – check Amazon.com for the current price!

Butchering Kit

Because most preppers are “knife collectors” of sorts, we often overlook the need for a good home butchering kit. Get the very best kit that you can afford. The Outdoor Edge Game Processor PR-1 12-Piece Portable Butcher Kit with the Hard Side Carry Case is a good product – Click here to check availability and the current price on Amazon.com.

Other On-Site Resources:

  • How Much Food Should A Prepper Have?
  • 21 Point Prepper’s Checklist For Stocking Up at Walmart

RECOMMENDED BOOKS THAT DEAL WITH FOOD STORAGE

  • Layton, Peggy. Emergency Food Storage & Survival Handbook: Everything You Need to Know to Keep Your Family Safe in a Crisis. New York: Clarkson Potter/Crown Publishing, 2002.
  • Layton, Peggy, and Vicki Tate. Cookin’ with Home Storage. Self-published, 1991.

Filed Under: Featured Articles, Prepping

Cooking With A Thermos Bottle (Can It Really Be Done?)

October 21, 2018 M.D. Creekmore

cook in a Thermos bottle
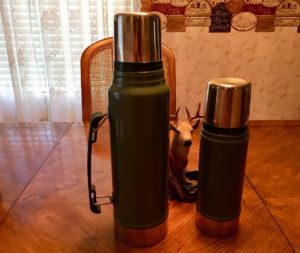
I first learned of Thermos cooking while reading Kurt Saxon’s The Survivor newsletter back in the late 1980s and have been using this thermal cooking method to save propane ever since. I have no way of knowing for sure, but I would estimate a savings of $40 to $50 per year from my doing this.

In a grid-down situation, using less fuel will be a top priority, and cooking with a Thermos (or other insulated vacuum bottle) will help you get the most from the smallest amount of fuel possible.

  1. All you’ll need is a small-mouth vacuum bottle (I prefer the Stanley vacuum bottle) and a funnel. Let’s take a closer look at how to cook this way.
  2. Start by preheating the vacuum bottle. Simply bring enough water to a boil to fill the bottle, screw on the cap, and set the bottle aside while you do the following steps.
  3. Heat the food in a pot on your stove until it is boiling
  4. Pour out the water used to preheat the vacuum bottle.
  5. Using your funnel so you don’t waste any, pour the boiling food into your preheated bottle, and let the heat inside finish the cooking.

That’s it . . . Simple, isn’t it? Here are several tips to make it even more energy efficient…

  • Lay the bottle on its side so the food will cook more evenly.
  • Wrap the bottle in a blanket to retain more heat.
  • I recommend a small-mouth Stanley (formerly Aladdin Stanley) bottle and not some cheap knockoff. But if you do get another type of bottle, be sure it has stainless steel insulation inside and not glass.
  • A gallon plastic bottle (e.g., milk, bleach, vegetable oil) cut in half makes an excellent free funnel. Just make sure it’s clean.
  • Shake the bottle every few hours so the contents don’t coagulate or stick to the sides.

Cooking time depends on what you are cooking, the type of insulated bottle you use, and the amount of preparation you do before adding the food to the bottle. You’ll learn by doing. But don’t get in any hurry, because your food will not burn or be overcooked.

You’re probably wondering what foods you can cook in a Thermos bottle. I cook whole-wheat breakfast cereal, steel-cut whole oats, rice, beans, lentils, and pasta. One of my favorite dishes is rice with chopped vegetables.

Thermal Cooking Without A Bottle

Thermal cooking can be done without using a vacuum bottle. This method is more convenient when cooking larger amounts of food, such as for beans. Thermal-Cooked Beans You need a large pot with a tight-fitting lid, a wool blanket, and a cooler with lid.

  • Sort and presoak beans overnight…
  • Bring the contents to a rolling boil for about 10 minutes, cover the pot with the lid, and quickly remove the pot from the heat and wrap it tightly in the wool blanket. Cover the pot completely because you don’t want any heat to escape…
  • Carefully set the wrapped pot of beans into the cooler, filling any remaining space between the cooler and blanket with the insulating material (e.g., old newspaper), and place the lid on the cooler.

Pinto beans take approximately three to five hours to cook this way.

If the beans are not done to your liking, simply reheat, rewrap, and let stand for another hour – this is also the case with thermos bottle cooking. 

Thermal cooking can be used to cook anything that you normally slow cook.

The advantages of thermal cooking are numerous: you get three hours of cooking time for only 10 minutes of fuel; food does not stick or burn if left unattended; water use is minimal because it does not boil away or need to be refilled while cooking. In short, thermal cooking is the most cost-effective and least labor-intensive method I know.

Note: Some of you may have heard about “cooler corn,” where you put raw corn on the cob in an insulated picnic-type cooler and then fill the cooler with boiling water. Then a couple of hours or so later (it keeps just right for a long time), you have corn on the cob.

The problem is that “cooler” plastics are made to take cold, not heat, and they may leach bad plasticizing chemicals into the cooking water at high temperatures. Now, if you have one of the old aluminum-lined Coleman coolers, you’re OK to cook this way.

Filed Under: Prepping

How To Make A Homemade Water Filter

October 21, 2018 M.D. Creekmore

homemade water filter girls drinkingWhen asked where they should start their survival preparations, most people answer food storage. Wrong. In fact, food isn’t even in the top three survival priorities.

The most important elements of survival are oxygen, shelter from extreme weather, and water. Depending on health, physical activity, and environment, and with limited activity, most humans can survive:

  •  Five minutes or less without oxygen
  •  10 days or fewer without water at 50°F (and even fewer as temperatures rise)
  •  Four to six weeks without food

Today’s task involves making sure your survival plan includes a reliable source of clean water. Imagine how disappointed you’d be after investing all that time and money to build your stockpile of survival food only to realize that you were about to die of dehydration because you neglected to adequately address your need for water.

Having food storage without a reliable source of clean water is like eating soup with a fork. You’re only getting some of what you need. Before getting started, a few words on terminology are in order. Sometimes the terms filtration, purification, and sterilization are used interchangeably in relation to water.

homemade water filter
This homemade water filter works as well as any commercial model and costs considerably less.

This is incorrect. Filtration removes solid matter (or in some cases emulsified liquids). Purification removes that which is not water (stuff in solution and/or emulsion). Sterilization kills microbes in the water.

The confusion of terms is understandable, as many commercial filter units also remove microbes by filtering them out, and many units include activated charcoal or other elements that both filter out solids and remove a lot of metals in solution by adsorption (as opposed to absorption).

In fact, they now have filters that are so specific and so fine they actually can filter out molecules: a “watermaker” that filters out salt from seawater would be an example. I’m a fan of the Berkey water filters. Having used a Big Berkey filter extensively for more than three years, I can personally attest to its performance.

However, a lot of people can’t or won’t spend $250 or more for a water filter no matter how critical it is to their survival. Fortunately, it isn’t difficult to make your own homemade water filter using only the Black Berkey Purification Elements and a few odds and ends you probably have lying around your house.

The total cost for such a unit at the time of this writing is less than $150, including the Black Berkey Purification Elements. Black Berkey Purification Elements can be ordered online from a number of vendors, including Amazon.com and LPC Survival (www.directive21.com), with current prices ranging from $99 to $110. I’ve found LPC Survival to be very reliable, with superfast shipping and great customer service.

WHAT YOU’LL NEED

  •  Two Black Berkey Purification Elements
  •  Two 5-gallon food-grade buckets with lids
  •  Food-grade spigot (available at most hardware stores or online; the type used for large water coolers works great)
  •  Drill with 1/2- and 3/4-inch bits

First drill two 1/2-inch holes in the bottom of one of the buckets and two 3/4-inch holes through one of the lids. The holes should be approximately 4 to 6 inches apart to facilitate changing the filters as needed. Both sets of holes in the bottom of the bucket and those in the lid should match up perfectly when mated.

preppers make a homemade water filter
Black Berkey Purification Elements secured through the bottom of the top bucket using 1/2-inch holes and supplied wingnuts. Note how the elements protrude through the bottom of the top bucket and align with the holes through the lid of the bottom bucket.

Next, drill a 3/4-inch hole in the side of the other bucket. This hole is for the spigot, so drill about 2 inches up from the bottom of the bucket. This way when it is set on a table or bench, the spigot isn’t touching the surface, where it can be damaged or broken.

homemade berkey water filter
This spigot was taken from a busted water cooler.

Install the Black Berkey Purification Elements securely through the 1/2-inch holes that you drilled in the bottom of the first bucket, using the supplied rubber washers and wingnut fasteners. Be careful not to overtighten the nuts or you could cause a leak or even break the tip of a purification element.

To use this unit, put the lid with the 1/2-inch holes on top of the bucket with the spigot and set the other bucket with the filters installed on top, aligning the holes so the Berkey filter tubes extend through the lid of the lower bucket.

Pour the water to be filtered into the upper bucket and cover with the remaining lid. The water in the top bucket will drip through the filter elements and into the lower bucket, filling it with clean drinking water. As you can see from the photos, it’s very simple. The whole process takes about 20 minutes.

Water Storage Tips

For water storage, I have six 5-gallon containers bought in the sporting goods department at Walmart. Thirty gallons of water isn’t much, but I don’t see water being a major issue at my location.

If you live in a drier region, such as the American southwest, water will likely be a major concern, which may necessitate the storage of hundreds or even thousands of gallons for an extended emergency. Don’t store water in used 5-gallon milk jugs. They’re not strong enough for long-term storage and eventually break down and leak.

The 5-gallon containers sold in the sporting goods section of most department or hardware stores work great, as do the 55-gallon plastic water drums sold by preparedness gear retailers, such as Emergency Essentials at BePrepared.com.

If you must use small containers, empty 2-liter soda bottles work well. They are stronger than milk jugs, have better lids, and are more convenient. Avoid glass containers because they break too easily.

Tap Water Tip

If you’re storing tap water from a municipal water system, there’s no need to add bleach as suggested by some. Water from the municipal tap already contains enough chlorine to thwart any bacterial growth, so it can be stored without any other additives.

Filed Under: Prepping

How To Survive A Zombie Apocalypse

October 13, 2018 M.D. Creekmore

zombie apocalypse survival guideby Marc White

All hell has broken loose. Society has crumbled. Your front lawn is filled with zombies. You might be wondering how this happened. That’s not the point. The zombie apocalypse is here and unless you plan on getting eaten alive, you are going to need to know how to survive. Don’t panic.  I’m going to teach you everything that you need to know.

I’m Marc White, the founder of Zombie Gear Dude where I teach people how to survive the zombie apocalypse and what zombie weapons and gear work best.

Zombie Outbreak Survival Tips For The Unprepared

To survive a zombie apocalypse, you need to be in great shape. If you get winded running a mile, you’re probably going to be eaten. Build up your cardio since the majority of your day will be spent running from zombies. Train in parkour, which can help you navigate a hazardous or obstacle-ridden environment.

Have an escape route for your home when the zombies inevitably break in. You will need two separate meeting locations for your family if you get separated in the chaos. You should also have an emergency contact who is out of state to keep your family updated on your status, assuming all technology hasn’t been destroyed.

Stick together. You’ll find strength in numbers and a good team can help you gather supplies and fight off zombies. If everyone goes back to back, you’re going to have 360 degrees of vision. Never let the zombies get out of sight.

You shouldn’t trust strangers. People who are unprepared to deal with the zombie apocalypse are prone to freak out and act irrationally. You want your team to be all die-hard survivalists. No cheerleaders.

You’re also going to need a survival kit: clean drinking water, 1 gallon per day; food, either canned or non-perishable; a first-aid kit with bandages, rubbing alcohol and any prescription medication that you might need; and utility items like a knife, duct tape, a flashlight with extra batteries, and a radio.

But even the most extensive survival kit will run out eventually. How do you find new supplies? In an urban environment, the best places to look are abandoned homes, gas stations, military surplus outlets, and outdoor stores. After you have confirmed that the room is clear of zombies, bring a large backpack or duffle bag and raid the place.

You can also find supplies in a forest. You might stumble upon an abandoned campsite with plenty of supplies. But before you wander too far into the woods, mark the trail with spray paint or duct tape. Be careful with any berries or vegetation that you find. Unless you know for sure they’re not poisonous, don’t eat anything.

The human body can only go a few days without water. The easiest way to get water in a zombie apocalypse is from sealed water bottles. But if you can’t find those, catch rainwater in an empty bottle. You don’t even need to purify it before you drink it. In a cold climate, note that snow or ice works great too. Are you somewhere that doesn’t get any rain? Raid hot water tanks and water from toilet basins. And please remember that it’s the top part of the toilet, not the bottom part.

But before you drink that water, you’re going to need to purify it. Bring the water to a boil for a minute and it should be safe to drink. If you don’t have access to fire, find some clean chlorine bleach and mix in 8 drops per gallon of water. Stir, and let it sit for 30 minutes. You’ve got yourself clean drinkable water, yum!

With zombies everywhere, you’re going to need to secure a base camp. The ideal shelter is made of a sturdy material like a brick with few windows that can potentially serve as entry points.

Dams, power plants, water treatment facilities, or any government buildings serve nicely. But don’t venture too far or spend too much time looking for the perfect spot. The more you’re out in the open, the more vulnerable you’re to a zombie attack.

You might think you should hold up in a mall or a big box retail store to be near supplies. But according to Zombie Research Society founder, Matt Mogk, that’s a terrible idea. Stores are the first place most people will go, and the more people there are in a contained area, the quicker and easier it is to spread the virus or disease that caused the zombie outbreak in the first place.

If you are in a pinch, can’t find any secure buildings, you can always try a boat. While the topic is hotly debated by Zombie fans, science says that zombies would lack the motor functions necessary to swim. This means that a boat would keep you safe from an attack unless you are in shallow water.

zombie-research-facility

Get some protective gear! A strong leather jacket or Kevlar motorcycle gear is ideal. Zombies are going to have a tough time biting through something that thick. Ditch your car! You are not going to fuel your gas tank in the middle of a zombie apocalypse.

Not to mention the fact that a loud engine would tip any nearby zombies off to your location. Find a bike instead. It’s a much more versatile and effective means of transportation in the new zombie infested world. Plus it’s better for the environment. In case we ever manage to rebuild society.

No matter how prepared you are, eventually, you are going to come face to face with zombies.

So, what’s the best way to deal with these murder machines?

Don’t fight, just run, fast! You have all heard the saying that it’s a marathon, not a sprint. Well, this is a sprint. So do your best and get the hell out of there!

If you can’t outrun the zombies, though, you still have a couple more options. Neuroscientist Bradley Voytek created a model of what a zombie’s brain would look like and found that damage to the zombie’s central corpus would give them terrible short term memory. This means that you can easily hide. Loss of the posterior parietal cortices means that zombies have trouble visually focusing on more than one object at a time, meaning that they are easily distracted.

Another option is to act like a zombie. Voytek speculates that zombies suffer from a form of illusion which means that they have trouble knowing whether a person is a human or a zombie. Don’t feel bad for them, just take advantage of it.

But if all else fails, you’re going to need to fight the zombies. This is the last resort as the only way to kill a zombie is to destroy its brain.

But what’s the best weapon to do that?

The answer is simple. Take a blunt or sharp object and hit them in the head. The best part is, these weapons are basically silent and won’t attract attention from any other nearby dead-ites or zombies.

Here is another thing to consider: don’t think that you’re used to playing video games, and it will help you score headshots when it comes to killing zombies. Studies have shown that in life situations, trained police officers have a shooting accuracy of just 25%.

Alright, you’re now in good shape to stay alive in a zombie apocalypse. Now just follow my advice for the rest of your life and you’ll be good to go.

Send me more suggestions in the comments down below. And until the next time, I am Marc White, wishing you a safe zombie killing adventure.

Top 10 Zombie Apocalypse Survival Tips

And don’t forget to check out the CDC’s Zombie Apocalypse Survival Tips

M.D. Creekmore adds: No we don’t believe that there is going to be an actual walking dead zombie outbreak – this article is written in a “fun way” and published here to make it more interesting for readers.

Filed Under: Prepping

How to Prepare Your Dog for Survival

October 13, 2018 M.D. Creekmore

by Millie in K

In the rush of prepping for your family, don’t forget the canine members (and other pets) of your family! I will be writing about dogs, much of this same information will apply to cats and other pets. I have owned and cared for dogs all my life, owned a boarding kennel, taught obedience classes and trained service dogs, I was a retail sales clerk in a pet department and was a groomer. I will try to cover things in a practical manner for you.

The first thing to consider is food. There are a couple of ways to approach this. You can buy and save commercial dog food for your dog. Or they can eat what you eat, in which case you want to make sure you buy for “another person”.

Dog food is processed and packaged to last 18-24 months. There is a date, somewhere on the bag that will indicate when the food expires. The little secret the dog food companies don’t tell you is that it will be good for at least a year afterward if the packaging is intact and you have not gotten bugs in it or mice.

So buy the food with the furthest expiration date you can and rotate, rotate, rotate! When SHTF you should not worry that Fido has the super-premium, all organic, all meat formula. Buy what you can NOW to meet his needs. If the super-premium food costs $60 a bag or the average food costs $40 a bag, save yourself some money and get extra food from the $20 you will save.

Most of the mid-priced foods are very nutritious, especially if you can find a brand that is not so nationally advertised. For example, you can buy Blue Buffalo which is a good food in so many ways but costs $50-60 for a 28 lb. bag.

Or you can buy Premium Edge (manufactured by Diamond) for about $40 a 35 lb bag. There isn’t really a whole lot of difference, nutritionally, the difference in the price is the heavy advertising that Blue Buffalo does.

If you buy your food, check the expiration date. If it is getting within about 6 months of expiring, find someone and ask for a big discount for you to take that food off their hands. You know it will last longer and you can use that food now, setting back food with a longer date for later use. They don’t want this food around because if it expires, they will have to throw it out.

This gets more complicated if your pet has a medical problem or allergies. In that case, you may want to think about feeding them what the family eats. Family dogs have eaten scraps for years, so long as you don’t overdo it on the fat, they will be fine. You can experiment now with two sources of nutrition.

One will be a protein source, one will be a carbohydrate source. Most of the allergens that dogs react to are the grains, second is the meat source. If they are on a trout and sweet potato based food, you can start with that. Find a fish that the dog can tolerate. You can stock a pond, if you have it, for fresh fish for everyone.

You can buy cans of fish for them for storage until you can figure out something else to do. You can fish for the dog every few days. Sweet potatoes can be grown in the garden and stored easily. Try and find other things your dog can eat in this case. Experiment by adding a singular kind of food to the regular diet for two weeks.

If no reaction, you probably have found something else they can have. This needs to be done NOW so you can be ready for the future and know what they can have.

How much to buy? My dogs on average, eat about a cup of food a day. Sometimes the bag will indicate how many cups are in the bag. Sometimes you have to weigh a cup of food, divide the pounds in the bag by that weight to get the number of cups.

Or you can take the kilocalories in the entire bag (don’t ask me why they put this on the bag) and divide that by the kilocalories found in a cup which will also be on the side of the bag. This will give you the number of cups in a bag.

One thing to keep in mind is that most dogs are somewhat overweight. Dog food takes up room. So figure out how much food every day that Fido can have and then buy appropriately. Go ahead and get him slimmed down to what he needs to be. Then you won’t be wasting prep room for an overweight dog that is certainly going to be developing some kinds of health problems over time.

I have bought enough food for my pack for a year. I figure by that time, I may be sharing the food we have with them, or we will have figured out what will work for us. I worked out how much oatmeal I would need for each dog and it was an enormous amount.

Oatmeal is a great thing to feed because it is one of the most nutrient dense grains there is. Corn, wheat or soy which often causes food sensitivities in dogs over time are not good choices, but rice is a good choice for most dogs, as is bread or macaroni. You can also explore other grains such as amaranth or milo.

When storing the food, it doesn’t matter so much if it gets cold. But it should not get hot. Most dog food is “extruded” meaning it is cooked, then made into a gooey mass and then extruded into nice little kibbles, which are then heated to “bake” them and sprayed with flavored oils to make them more appetizing for your pet. That oil can go rancid if the food is in a place where it is warm. Your dog will not eat it and nothing will make your pet eat that food if it smells bad to him.

Canned food should be kept from freezing, as any canned goods should, as well as not getting hot. If you have it in a pile with your supplies, be sure you have some sort of rodent protection around it. Mousetraps or poison (make sure Fido does not go in that area!) or mothballs work.

dog survival prepping

Dogs will eat mothballs and they are poisonous. They taste sweet to them. A better alternative is cedar oil or peppermint oil or dried leaves. Put the oil on cotton balls and refresh them every month, tuck them around the bags.

Plant a package of mint somewhere on your land. It can be very invasive so keep it away from your gardens or it will take over. It will reseed itself every year in that same patch; while you are about it, throw down a package of catnip for Kitty. She will appreciate the fun she can have with a fresh branch every day and you can dry it for winter fun or even tea for yourself if you desire.

When you run out of commercial food, Fido will have to rely on scraps, crows and other birds I can shoot, road kill and/or predator meat. If I shoot a coyote, I will put it to use. I probably won’t want to eat it but the dogs could. Any varmints, such as possums, groundhogs, foxes, feral cats, all could be useful for this. I am also working on a better chicken house so that my chickens are not being picked off by hawks, a cup of oatmeal and a fresh egg or two would make a fine meal for most dogs.

When hunting after SHTF don’t forget to save the bones for the dogs. Raw, uncooked bones will keep their teeth cleaner and provide some nutrition as there will be meat on the bones. If you still have electricity and can freeze them, they can be kept that way for a while, they can also be smoked.

Be aware that all bones can splinter and cause awful problems, especially the cooked ones, so look for the sturdier leg bones for them. Take them away after most of the meat has been removed, throw them on the roof to dry out better, pulverize them in the spring to put calcium in your garden. Bones of smaller animals should not be given.

However, if you decide to cook a whole rabbit or a chicken (or birds that have been shot for this purpose) in a pot of water, cook it covered on low (a la crockpot style of cooking) for 24 hours.

Take a potato masher and mash it all up. The bones will be fragile and disintegrate. I cook chicken this way all the time for my dogs in the crockpot. Remove the skin on the chicken and the rabbit. Dogs can also have tongues, brains, liver, heart, etc. of whatever you hunt. You can also teach your dog to help hunt. Right now my barns are filled with mice and I’m going to be taking one down every day and letting them learn the joy of catching and eating a mouse.

Make sure you have a water bowl and a food bowl in your BOB, with food, a sturdy leash, and collar for your pet. The water bowl can double as a food bowl if necessary and to save on weight. Kitties should always have a small crate; they get frightened and take off if you let them out. Some kind of litter box would be helpful and you can use just plain dirt for litter if necessary.

Water: A dog will need about 8 oz. of water (one cup) for every 5 lbs. of body weight. They will need a little more in hot weather. Dogs can and do drink some really scummy water and don’t seem to mind but some can be more particular. Mine really like the algae water that is in their swimming pool on a hot day, warm, green, very yummy apparently.

They do have a shorter digestion system, so many of the things that would affect us can pass through their guts quickly and without problems. But you cannot count on that; giardia comes to mind and coccidia. Those will cause digestive upsets and especially diarrhea. Make sure your water filter can make enough water for your pets, too.

Medicine, wormers and flea control: Please verify what I am telling you. I am not a vet nor do I play one on TV. Double check the dosages of anything you might need to give to your dog. Also be aware that many things that work well in humans and dogs will kill a cat, such as aspirin. Never give a dog Ibuprophen. Do some research on what you put in the kit for use in animals.

Also, NOW is a good time to be sure your pets are up to date on vaccinations and wormings. Get this on your to-do list now and keep an eye on the timing for this. There won’t be vaccinations for animals when SHTF. Rabies is particularly important, no one wants to see a redux of Old Yeller with their beloved family pet.

Make sure there are things in your medical kit that will help Fido, should he need it. Benadryl for insect bites, particularly bees and wasps, is helpful. 1 mg. per pound is the dosage. A couple of different antibiotics for fish is a good idea, tetracycline is not as effective for most things but amoxicillin and cephalexin are a good choice and easily obtained as fish medicine. Make sure you look up the right dosage for your pet’s weight.

You can buy tapeworm medicine made for fish, too, check the dosage and make sure it is written down. They will get tapeworms from fleas, they nibble the fleas and the fleas are ingested and then you have tapeworms. People can get tapeworms so it’s a good idea to keep on top of this.

You can keep flea preventative on hand, I’ve not seen expiration dates on the spot on type. You can also make a tea out of mint and spray that on your dog, it will repel the fleas at least. Diatomaceous earth can be rubbed into the coat and put in the dog’s bedding, it supposedly cuts the flea larva up and dries out the adult fleas. Pennyroyal is also good for repelling fleas but should not be used on pregnant dogs.

If you are in an area with heartworms (carried by mosquitoes) you will want to be sure you have preventative on hand. You can buy cattle Ivermectin, the 1% injectable kind. The recommended dosage of cattle Ivermectin for dogs to prevent heartworm is .0015 milligrams to .003 milligrams per pound of body weight once a month. Figure the dosage very carefully and measure out with an insulin syringe, be sure you know what you are doing.

This will be given ORALLY, not injected, once per month. Put it in something tasty to get it down your dog. You use the insulin syringe to get a more exact reading. Cattle Ivermectin is good for longer than the expiration date on the bottle. Never give Ivermectin to dogs that are of “collie” origin, collies, border collies, Australian shepherds, or mixes thereof. The measurements on an insulin syringe are in units.

There are 100 units to 1 cc or 1 milligram. The 40 unit syringes are easiest to work with and you can reuse them for this purpose only. Do not think you can make a mistake on this; Ivermectin poisoning can kill your dog. Do some research to be sure you know what you are doing.

Training: You may need to train your dog for various duties when SHTF. One may be that you want the dog to raise Cain and bark its head off any time it sees a stranger or something unusual. Barking vigorously gives the impression that the dog means business, even if it is a small dog.

Most people cannot read a dog’s body language and assume the dog means to bite if the dog can get to them and will give a wide clearance. Conversely, you may wish the dog to be silent. It may be best not to draw attention to what appears to be an abandoned house where you may be.

Training to bark is easier than training not to bark. You may need to have some help bringing in cattle or sheep. Be sure your dog has some instinct in this area, you aren’t going to be able to bring in cattle with a Maltese, but you can train a poodle to retrieve ducks, it’s what they were bred for.

Toys: At some time, there will be worn out toys and we all like our dogs to have some fun. Old socks, knotted together make a fine tug toy as does an old rope. The lid from a 5-gallon bucket makes a pretty fair Frisbee. Bones are always amusing. And it’s probably not a bad idea to lay in a small supply of tennis balls for the dogs who love those to play with, we never know when we may run across another tennis ball!

Filed Under: Prepping

Flood Survival Tips | How To Survive Before, During, And After A Flood

October 12, 2018 M.D. Creekmore

Flood Survival Tips | How To Survive Before, During, And After A Flood

by Joe Alton, MD of www.doomandbloom.net, co-author of The Survival Medicine Handbook

There’s a lot of information on the risks associated with storms, hurricanes, and tornadoes, but not as much about their consequences. Just about any storm can cause flooding, and many communities are not prepared to deal with it. As a result, water supplies are contaminated, emergency services are crippled, and important infrastructure can fail.

In Texas and Oklahoma, heavy rains caused major damage and a number of deaths, with more precipitation expected. Floods are not a rare occurrence, with a number of major disasters over the past few years: In 2013, Boulder, Colorado experienced 6 months of rainfall over the span of a week. Flooding in the wake of Hurricane Katrina (2005) was severe enough to cause a humanitarian crisis.

To respond appropriately to a flood, we should understand the various types of flooding and the steps we can take to stay safe.

What is a Flood?

A flood is defined as an overflow of water that submerges land which is normally dry. Flooding may occur from water bodies, such as a seacoast, river, or lake. The water overcomes levees, resulting in the inundation of populated areas. It may also occur due to an accumulation of rainwater on saturated ground.

Some floods develop slowly, while others (called flash floods), can develop in a very short time and rush into areas where it wasn’t even raining. As a result, flash floods often catch the population downriver by surprise, causing severe damage and loss of life.

Types of Floods

There are several types of floods:

Areal Floods

Floods can happen on flat or low-lying areas when the ground is saturated and water cannot run off quickly enough to prevent accumulation. Floods related to rainfall can also occur if waterfalls on an impenetrable surface, such as concrete, asphalt paving or frozen ground, and cannot rapidly be absorbed. In urban areas, it usually takes at least 1 inch (25 mm) of rainfall per hour to create significant ponding of water on hard surfaces.

Riverine Floods

Floods happen in rivers when the flow rate exceeds the capacity of the river channel. This happens particularly at bends in the waterway. The faster the flow rate, the more dangerous it is; people traditionally live and work by rivers due to access to fertile soil and trade routes.

Coastal Floods

Flooding on the coast is commonly caused by a combination of tidal surges caused by winds and low barometric pressure. Coastal areas may be flooded by storm events, such as hurricanes, resulting in waves over-topping seawalls and levees.

Failures of vital infrastructures, such as the collapse of a dam, may cause catastrophic flooding,. This exact event occurred in Johnstown, Pennsylvania in 1889, costing 2,200 lives. Major flooding may also be caused by the effects of an earthquake or volcanic eruption. These events often occur at sea hundreds of miles from the area affected, but result in tidal wave floods called Tsunamis.

Warning Types

Most people have heard of hurricane or tornado watches and warnings, but the U.S. weather service also tries to warn the populace of flooding. In order of imminent danger, they are:

• Flood Advisory: Flood advisories are issued when an expected weather event may cause some flooding, but not enough to be a major issue. Significant inconvenience may be possible and lead to dangerous situations if caution isn’t exercised.

• Flood Watch: Flood watches are issued when weather conditions become favorable to cause significant flooding. Although flood conditions are not imminent, steps should be taken to prepare for such an event.

• Flood or Flash Flood Warning: Flash flood or flood warnings are issued when hazardous flooding is imminent or has already begun. Action should be taken to avoid life-threatening situations.

Many people ignore these warnings at their own peril. If you live in a low-lying area, especially near a dam or river, then you should closely monitor and heed warnings when they are given and be prepared to evacuate quickly. Rising flood waters could easily trap you in your home.

Preparing for Floods

If you live in a floodplain, you should:

• Build an emergency kit with food, water (yes, water), and medical supplies.
• Have a way to communicate with family members.
• Elevate the furnace, water heater and electric panel
• Install special “check valves” to prevent water from backing up into the drains of your home.
• Consider having materials to make waterproof barriers to stop floodwater from coming into the building
• Seal walls in basements

When It Happens

You can’t stop the rain from falling and you can’t stop the tide from coming in, but you can weather the effects of flooding with some sound strategy and a little preparation. Here are some flood safety tips:

Get Out Early

Make the decision to leave for higher ground before extensive flooding occurs. Closely monitor public service announcements for warnings and advice from experts.

Be Careful Walking Through Flowing Water

Drowning is the most common cause of death during a flood, especially a flash flood. Rapidly-moving water can knock you off your feet even if less than a foot deep.

Don’t Drive Through a Flooded Area

As many people drown in their cars as anywhere else. Cars stall and roads/bridges could easily be washed out. Try to figure out now if there is a “high road” to safety before a flood occurs.

Beware Of Downed Power Lines

Electrical current is easily conducted through water. Watch for downed power lines; you don’t have to touch them to be electrocuted; just stepping in the water they’re in could kill you.

Turn Off The Power

If you have reason to believe that water will get into your home, turn off the electricity. Don’t use appliances or motors that have gotten wet unless they have completely dried. You might have to take some apart to clean debris out of them.

Watch Out For Intruders

Critters that have been flooded out of their homes may seek shelter in yours. Snakes, raccoons, and other unfriendly creatures may decide your home is now their territory. Human intruders may be interested in your property, as well.

Look Before You Step

After a flood, watch where you step; there is debris everywhere. The floors of your home may be covered in mud, causing a slip-and-fall hazard. There may be damage to foundations of flooded buildings, even if the water has subsided.

Check for Gas Leaks

Don’t use candles, lanterns, stoves, or lighters unless you are sure that the gas has been turned off and the area has been well-ventilated.

Exhaust Fumes Can Kill

Only use generators, camping stoves or charcoal grills outside. You can easily be overcome by the fumes they emit.

Clean Out Saturated Items Completely

Floodwaters are not clean! Don’t use floodwater as drinking water or to cook food unless you have thoroughly sterilized and filtered it. Make sure you have food storage in waterproof containers.

More Flood Preparedness Tips

by Paul North

flooding public domain imageAlthough it may not be the apocalypse, flooding is a serious threat to many areas of the world. Floods can come unexpectedly and wreak havoc quickly so it is important to be as well prepared as possible for them.

They can just as easily be caused by adverse weather conditions, such as the floods in the UK over the last couple of years, or unexpected accidents such as a burst dam. But how do you prepare for the unexpected?

Research your area

Whether it is somewhere you already live, and especially if it is somewhere you are potentially considering moving to, researching the potential flood conditions of an area are essential to determine how at risk you could be.

In the UK you can obtain the flood history of any property from the Environment Agency for free (unless the report takes over 18 hours to put together when there is a small fee associated with it). In the US you can check if your home is near a floodplain by accessing FEMA’s Flood Map Service Centre.

This is particularly useful if you are researching land to build a property on, and you can check as many different areas as you need to.

Have a plan

This may sound obvious but a lot of people who live in high flood risk areas accept this, and yet have no plan in place should the worst happen. Having a carefully considered plan can save you time and money in the event of a flood if you implement it quickly enough to alleviate any damage, or at least of the worst of it.

Sandbags are often used to block doors and create a barrier against floodwater. The best time to get your sandbags is, of course, before a flood has hit so make sure you have a supply of these ready to be used.

You will be able to respond quicker, resulting in less damage, if you have these at hand straight away. If you do not have any sandbags they can be made from old clothes and bed sheets and filled with gravel or even dirt if that is all that is available.

If preventing the flood damage is not possible you should also have prepared to leave your property as quickly as you can, taking important possessions with you. This means having a bag of essentials prepared so you can leave quickly, as well as knowing where anything is that you may want to take with you on short notice and ensuring it is somewhere that can be easily reached as you leave. Remember that you may need to be away from home for days, or even week depending on how bad the damage is.

It is also important to plan and prepare for staying in your home in certain conditions. A flood may wipe out your water and electricity supply, even if the water itself doesn’t reach you. Having a well thought out stock of candles, lamps, drinking water and other supplies could make all the difference between continuing to live comfortably or having to leave your home.

It is also important to have a supply of food in case you are stuck for any period of time. Tinned food is the best as it is not susceptible to flood damage like fresh food and can be kept and stored for long periods of time.

Essential items

As well as the obvious such as food and drinking water, there are several items that will make your life much easier if trapped in a flood. These include waterproof clothes, which will keep you comfortable and dry and waterproof containers for electrical items such as your mobile phones and torches. Torches are of course another essential item, as well as a small kit of medical supplies.

Most homes will have a basic first aid kit but it worth keeping on top of this and making sure this is always well stocked and ready to be used. If anyone in the house takes regular medication that they cannot do without then you should also ensure there is always a good supply of this in the house.

All items, where possible, should be stored on the upper floor of the house as high as possible, in order to keep them away from any potential flood damage.

Insurance

Whilst most people tend to be sensible enough to take out insurance for their home and contents, a lot of insurance policies do not cover floods. Instead of getting caught out, take the time to research your policy and if flood damage is not covered invest in a separate flood insurance policy too.

Although you may not want to spend the extra money if a flood does affect you then you could end up spending far more if you are not covered by a suitable policy. Having insurance in place will make your life easier during what is bound to be a stressful time.

Cleanup

As well as preparing for all eventualities of a flood you should prepare for the cleanup afterward. Cleaning after a flood can be complicated. To begin with, you may need to remove any loose dirt, rocks and other debris from your home.

It can be muddy where the water has been and anything touched by the mud is contaminated and should be cleaned thoroughly or disposed of if this is not possible. Anything that can be salvaged should be cleaned and dried, making sure no trace of the floodwater remains.

You will need to disinfect all surfaces so a good supply of bleach for this is essential, and any rugs, carpets or soft furnishings that have been damaged will probably need to be thrown out. No electricity should be used until it has been checked by a professional, and the foundations should be thoroughly checked for cracks and signs of any long-term damage that may cause problems further down the line.

Filed Under: Prepping

  • « Go to Previous Page
  • Page 1
  • Interim pages omitted …
  • Page 10
  • Page 11
  • Page 12
  • Page 13
  • Page 14
  • Page 15
  • Go to Next Page »

Primary Sidebar

Subscribe to Blog via Email

Enter your email address to subscribe to this blog and receive notifications of new posts by email.

Join 7,199 other subscribers
  • Amazon
  • Facebook
  • Substack
  • Twitter
  • YouTube

“Do more with less.”

– Minimalist proverb

Recent Posts

  • Just so you know
  • Weather Update for My Corner of Appalachia
  • Why I’m Ordering Ivermectin + Mebendazole Every Year
  • The Website’s Shutting Down (But Here’s the Plan)
  • You Are Hated! Start Training Like It!

Footer

Recent Posts

  • Just so you know
  • Weather Update for My Corner of Appalachia
  • Why I’m Ordering Ivermectin + Mebendazole Every Year
  • The Website’s Shutting Down (But Here’s the Plan)
  • You Are Hated! Start Training Like It!

More about me

Books I’ve written

Books I’ve read

Follow Me on YouTube

Follow Me on Facebook

Gear I Use and Recommend

Newsletter

Search this site

Follow me elsewhere

  • Amazon
  • Facebook
  • Substack
  • Twitter
  • YouTube

© 2008–2025 M.D. Creekmore · As an Amazon Associate, I earn from qualifying purchases.