• Skip to main content
  • Skip to secondary navigation
  • Skip to primary sidebar
  • Skip to footer

M.D. CREEKMORE

  • Blog
  • Books
  • Newsletter
  • Gear I Use
  • About
  • Contact
  • Facebook
  • YouTube
  • Blog
  • Books
  • Newsletter
  • Gear I Use
  • About
  • Contact
  • Privacy Policy
You are here: Home / Archives for Homesteading

Homesteading

Here you will find articles on small acreage homesteading and farming topics such as homestead setup and how to buy a cheap homestead. You'll also find articles on topics such as gardening, DIY projects, raising livestock etc.

Wildfire Survival Tips To Keep Your Homestead Safe

October 13, 2018 M.D. Creekmore

forest-fire-survival-tipsby Ron Melchiore

I had another post in mind to submit to you folks but forest fires are a subject that is near and dear to my heart. I’ve recently become aware of the fires burning in various areas particularly in the Southeastern United States. In fact, it finally made the National news tonight. I thru-hiked the Appalachian Trail many years ago and I can’t imagine the number of fires or amount of territory now burning through those areas.

As some of you know, we’ve had our share of forest fires out here. They’ve literally had us running for our lives. I can’t think of too many things that demand immediate attention more than walking out the door and seeing a billowing curtain of gray/black smoke rising skyward in the nearby forest.

The following paragraph is an excerpt from my book Off-Grid and Free: My Path to the Wilderness.

“It was like being in a movie theater, the big screen showing a large-as-life fire burning right in front of us, with black smoke billowing upward and a dense veil of white-gray smoke hugging the ground so thickly that the bright orange flames were visible only when they leaped skyward above the fracas.

A slight diminution in the smoke allowed just enough visibility to see an orange-red glow, much like opening the door to a furnace allows a view of the orange-red coals. And, like the furnace hungrily consuming its fuel, the intensity of the forest fire’s heat incinerated everything in its path. “

wildfire survival tipsI have a full chapter devoted to our fire experiences. I am not a fire expert. Rather I’m a guy who has dealt with at least 4 different fires in our 17 years of wilderness living in northern Canada. Two of those fires have gotten to within 90 feet of our homestead. All totaled those fires burned at least ¾ million acres around us.

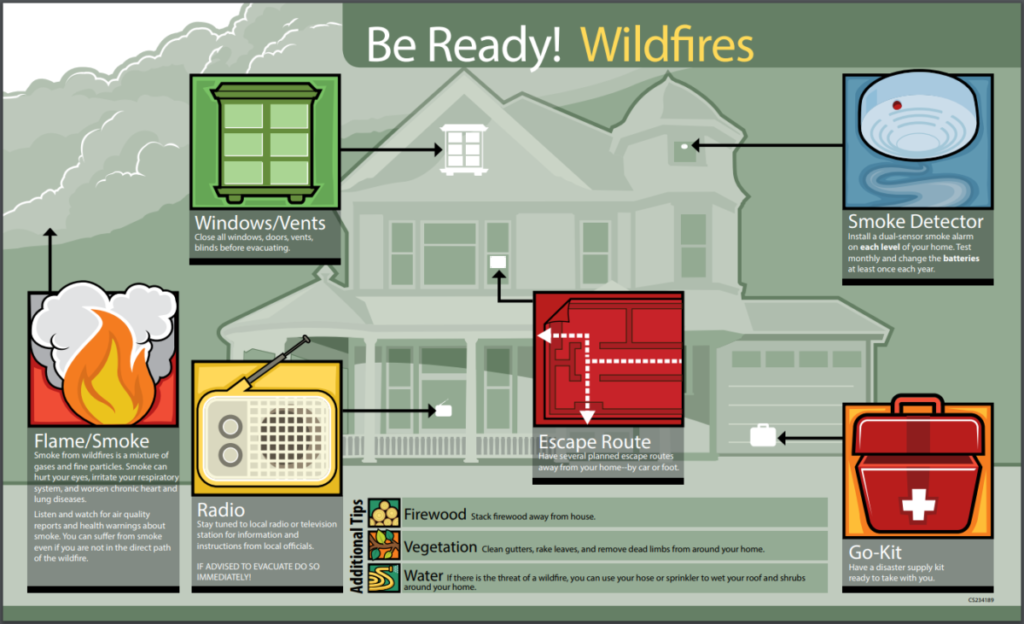
Here are some general tips anyone can do to prepare well ahead of time. They are not things to contemplate when the fire is ¼ mile away and working towards you. Have an escape plan having multiple paths of egress. If this road is blocked, where to now? Is there a lake to head to as a last resort? Is the vehicle fueled up? Is it pointed in the right direction?

The last thing you want to be doing is packing in a panic! Consider what items are of greatest importance. Purse/wallet, identification, important documents, medications, backup laptop computer, hard drive or USB with essential financial or other data? What is deemed essential will vary from person to person.

In our case, in spring, since we are only one lightning strike away from disaster, we have a survival bag by the door as well as our survival suits. We have smoke masks and goggles. We pack some food and water in the boat and have the water pump and boat fully fueled and ready to roll. Remember, we have the added factor we are alone out here so we plan accordingly.

Rake all combustibles such as leaves and debris far from buildings. Be aware fires will create their own winds so those leaves you raked to the perimeter will be blown around again. If I had a chipper, tiller or some device to reduce and shred and /or bury leaves, I would use it.

If you are in an evergreen forest, I would consider removing trees near buildings. At the very least, remove all lower branches in nearby trees which act as ladder fuels. (fuels that allow a ground fire to start climbing the trees)

The above are routine things we do every year to be prepared. Since we live on a lake, we have a sprinkler system set up preemptively. Forget trying to put the fire out. That’s not going to happen. All you can do is try to get combustibles away from any structures and take measures to bounce the fire around your property.

When we moved out here, we bought a water pump, fire hoses, garden sprinklers and garden hoses (which serve as sprinkler supply lines). Higher quality sprinklers and supply hoses are available and if I had to do it over again I would opt for those. Our spring ritual is to set up all our equipment long before the first thunder and lightning appear. By doing so, at the first sign of trouble, we’re ready.

wildfire survival tips
Sprinklers on the roof

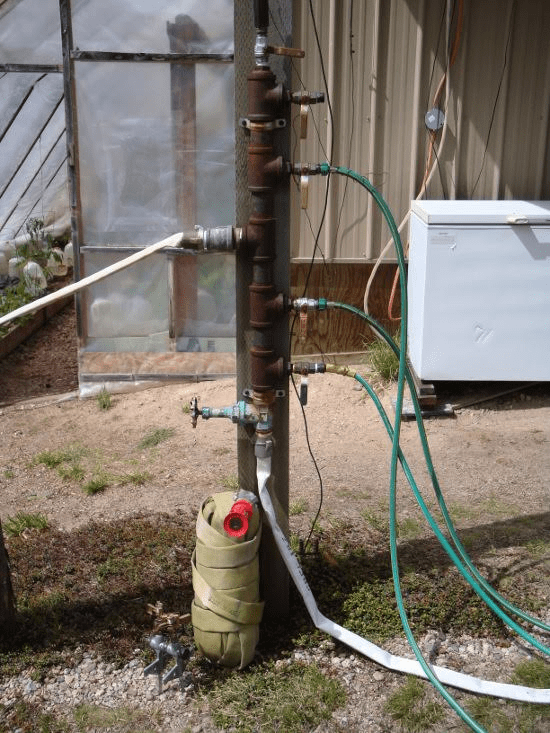
The first step is to set up the fire pump on our beach. By means of a quick coupler, a 2.5 inch PVC suction line is connected to the pump and extends about 12 feet out into the lake. On the end of the pipe that is in the water, I have a foot valve which allows water to flow one way to the pump but prevents water from draining back into the lake.

That’s important because you don’t want the water pump to drain of water and thereby lose its prime. The foot valve rests on a rock about 8 inches off the lake bottom so that sand and other debris isn’t sucked into the system.

On the output side of the water pump, there is a threaded coupler which ultimately connects to a standard 1.5-inch fire hose. Several 100-foot sections of hose are connected together to make the run up the hill to the house.

Mounted on a porch post is a manifold which takes the high-pressure water from the pump and redirects it out to smaller feed lines, the garden hoses I mentioned earlier. We have 5 outlets on this manifold which we can control via individual valves.

We can shut off or engage each sprinkler with the turn of a valve. Sprinklers can be mounted singly or in series, so there are some instances where one valve may control two sprinkler heads.

Our manifold also has an adapter and valve that allows us to continue a run of standard firehose out to our homestead’s perimeter to tackle any smoldering areas and hot spots. We have two nozzles that can be attached to the end of this fire hose.

The first is an adjustable spray nozzle capable of spraying water in a short, wide pattern or a jet of water that can shoot out one hundred feet if need be. Our second nozzle has a narrow opening that delivers a high-pressure jet of water capable of pulverizing the ground to reach fire that is smoldering in roots and moss.

Our home and outbuildings are top priority to protect so I head up to the roof of our two-story home and mount a sprinkler on a short pole at each end of the roof. A short hose connects them in series and then the feed line drops from the roof to the nearby manifold. Our house and outbuildings are now protected.

Forgive me for the cuts from the book but time is of the essence and I want to get this information out. The following is another excerpt from my book Off-Grid and Free: My Path to the Wilderness and has more specific information.

What has saved our home twice?

Sprinklers! Both our own system and those of the provincial fire crews. Part of my spring ritual is to head to the house roof and install two sprinklers, one at each end. I also have full-length trees cut, approximately 20- to 25 feet long, and have a sprinkler head attached to the top of each of those trees.

We pick locations around our house site where we can stand these trees back up, like big flag poles, and either wire each one to another smaller tree or attach a set of tripod legs to the pole, so that it can be free-standing. The higher these “flag poles,” the more coverage and the better the protection.

The Honda water pump with a 1 1⁄2 ” firehose delivers pressurized water from our lake to the input side of a manifold and all the sprinkler feed hoses come off the output of the manifold.

Once a fire gets into the crown of the trees, it’s hard to stop. So how do sprinklers prevent the property from being incinerated?

Manifold Setup
Manifold Setup

The basic premise of sprinklers is to bring up the humidity in the protected area as high as possible before a fire arrives. The dome of humidity has a tendency to bounce the fire around it, allowing the fire to bypass the protected areas. They most certainly will not extinguish a wildfire!

For anyone living in fire-prone areas, this concept will work for you as long as you have a reliable water source. A swimming pool, pond, stream, or even household tap gives you a chance at saving your home. At a minimum, a couple of sprinklers, proper water lines, and a water pump are all that is needed for some cheap insurance.”

Be Ready: Wildfires Infographic from CDC

When we first moved out here to build our homestead, we knew we would eventually have to deal with a forest fire. But we had no idea the scope and intensity a conflagration could possess. During construction, we flew in metal siding and roofing for our home’s exterior. It gives a great deal of fire resistance.

For anybody doing new construction, especially in fire-prone areas, consider metal or masonry exterior. And finally, never underestimate a fire. I have personally seen forest fires run 5 to 10 miles in a day! They will lob embers far in advance of themselves to start new fires. Good luck!

Bio: Ron and his wife currently live 100 miles in the Canadian wilderness on a remote lake. As part of the back to the land movement that originated in the 70’s, they have spent their adult years living the homestead dream. You can follow and contact Ron at https://www.facebook.com/offgridandfree.mypathtothewilderness or http://www.inthewilderness.net/

Filed Under: Homesteading

How to Make Trees Grow Faster [and healthier]

October 8, 2018 M.D. Creekmore

The Grandma White Method – From “The Complete Book of Composting” Copyright 1960 by J. I. Rodale

how-to-grow-trees-fast
Fruit trees will get off to the best start if fed a steady diet of compost. Humus is important if trees are to be productive, disease-free and fast-growing. Use your compost as a mulch as well as a steady source of nutrients to your growing trees.

Using Compost For Tree Growth

Start right from the very beginning. Use compost to start and nourish your tree. We cannot recommend commercial, chemical fertilizers which do not add humus to the soil. You must add organic matter to the soil if you want productive, disease-free trees. Soil that is well supplied with humus retains moisture and has good drainage and aeration.

As humus decomposes, it releases a continuous supply of plant food in contrast to the “flash” action produced by chemical fertilizers. It encourages the existence of beneficial bacteria and earthworms. It fights erosion and over-compactness of the soil.

Every tree grower must have a compost pile. Use your compost as a mulch around each tree. Your trees need nitrogen, phosphorus and potash and your compost pile should contain these nutrients in good proportion.

When organic expert Herbert Clarence White of Paradise, California, plants a tree, he doesn’t even glance at the little instruction sheet that the nursery sent with the stock. He proceeds to plant the tree using an unusual method handed down to him by his grandmother years ago.

Grandma White’s method has worked so well for Herbert over the years that he has used it to plant hundreds—possibly even thousands—of trees. He has seen fruit trees planted by Grandma White’s method show 3 or 4 feet of new growth in a year, and start bearing crops in only a couple of seasons.

You start out by digging a hole 3 feet wide and 3 feet deep in which to plant your young tree. That size hole is much bigger than is usually recommended, but a big hole is the heart of Herbert’s method and he insists on it.

Separate the topsoil from the subsoil that is dug from the planting hole. In the bottom of the hole place, a couple of pieces of 4-inch drain tile and plug up the ends with stones. Fill up the bottom foot of the hole with a mixture of equal parts of topsoil, peat moss and finished compost, plus about five pounds of phosphate rock or colloidal phosphate.

The top 12-inch layer—consisting of a mixture of compost, thoroughly soaked peat moss, leafmold, colloidal phosphate, and rich topsoil, is most important. This is the immediate “seedbed” where the tender young feeder roots will be working.

No raw manure or chemical fertilizer should ever contact this area. Such materials will seriously burn the roots, and perhaps even kill the tree outright. Even raw manure, used as a mulch at the top has often proved disastrous to newly planted trees. So go slow on the manure!

On top of that mixture place a layer of small rocks. The next one-foot layer consists of pure topsoil. Now put into the hole a large stone. Spread the roots of the tree over that stone, then fill the rest of the hole with the compost-topsoil-peat-phosphate-rock mixture.

As mulch over the planting, place one inch of compost, 3 inches of leaves, plus a layer of stones if desired. White also advises putting 250 to 500 earthworms in the top compost layer, and adds this postscript to the description of his method:

Does all this sound too weird and grotesque? Too utterly fantastic? If so, far be it from me to try and convince you. But if you are just a wee bit interested in watching a miracle, just try it out on one little tree—following the planting plan as indicated in the diagram carefully—and it will be hard for you to believe your own eyes when that baby tree starts growing.”

planting-trees-fast

Here is the “Grandma White” method for planting trees. Start out by digging a hole that is 3 feet wide and deep, separating topsoil from the subsoil. Place drain tile, stones at the bottom, filling the hole with topsoil, compost, peat moss, and mineral powders.

In treating a sick tree, or one which has failed year after year to produce a crop, use the same formula as used in planting a baby tree. In other words, make a “blend” or mixture consisting of ½ yard (12 bushels) topsoil; 2 bushels compost (completely decomposed); 2 bushels leaf mold (completely broken down); 20 pounds colloidal phosphate (or rock phosphate); and 20 pounds of rock potash.

The above formula will be sufficient for a young tree from 2 to 6 years of age that has shown little vitality and below average growth. This enriched earth will be used to fill the 20-inch holes that encircle the young tree. (Dig 8 holes, 8 inches in diameter and 20 inches deep, around the tree at the drip line.)

The next step in “treating” a sick tree is to level off the land around the trunk a little beyond the drip line of the branches and to build a sturdy dike just outside the ring of 20-inch holes. Ten pounds of each of the two above-mentioned minerals should then be spread from the trunk of the tree out to the rim of the basin and worked lightly into the soil with a rake.

One inch of compost and leaf mold (mixed) should then be added to the area within the basin and spread out evenly.

If domesticated earthworms are to be used in this “health-building” program, they should be spread over the compost (from 500 to 1,000) and covered with a 3-inch leaf mulch. A little cornmeal or coffee grounds spread on the compost before spreading the leaves would help to give the worms a good start in their new environment.

Filed Under: Homesteading

Backyard Beekeeping for Beginners – The Complete Guide!

September 21, 2018 M.D. Creekmore

Wooden Beehives. Natural Beekeeping in Your Backyard.

by  Petticoat Prepper

First let me say, I am no expert. I have been keeping bees for the past year. It’s been fun, frustrating, interesting and challenging. I’ll share what I’ve done and hopefully those interested will find a bit of help. Just keep in mind; it’s rather like herding cats.

I am setting up to add 3 more hives to my backyard this year. I just placed my order for two more starter kits as I have one empty which I got for a swarm that left before I got back with it and then I have the original one (bees are still there).

Once I have all of them set up I will have 4. The maximum number allowed by my city is 5.

By law, if I have 5 or more I am required to register them with the State Agriculture Department. I don’t care to have the government in my backyard so I’m stopping at 4. The fee is very small and they check for diseases to help keep all the honeybees healthy.

I am prohibited from selling any of the bees, honey, etc. as that would make them ‘livestock’ and I’m not zoned for livestock…gotta love ‘em!

I would strongly suggest you look for a local beekeeping club to join. I would also suggest getting a decent book. My club suggests Beekeeping for Dummies. There are lots of YouTube videos that are very helpful and tons of websites too.

The first thing you need to understand is that it’s December 30, 2012, as I write this and that means you’re almost behind if you want to get going this coming year. Even if you don’t have a hive set up and clothes; get your bees ordered. You have no idea how hard it is to get them if you wait. My bees will come in April but I have to order them now.

Bees come in 3-pound boxes. Yes, that’s 3 pounds of bees and one mated queen shipped with a can of food. 3 pounds of bees will be about 11,000 bees. Yes, 11,000 that’s a lot of bees and you’re going to let them out of that box! My bees are Italian; they are yellow-brown in color with dark bands.

They are gentle, produce a good amount of comb and large brood which results in quick colony growth. They winter over a large amount of bees so they need a good amount of food storage. Italian bees are the most popular followed by Carniolan.

Ok, you’ve ordered your bees and now you need to start looking at a home for the ‘girls’ and a place to put them. There are several options for homes but I’m only talking about mine. I use the Langstroth method named after the ‘Father of Modern Beekeeping’.

I order my supplies from Ruhl bee supply as they are about 45 minutes from me. You can see their products at www.ruhlbeesupply.com depending on where you live you may want to order closer to home.

I order their PNW starter kit assembled. I have no desire right now to put this stuff together and I pay them the extra $50 figuring it’s worth the loss of frustration. Plus I don’t have to make a second ‘oh crap!’ trip to get something I broke.

This gives me everything I need to get the girls going. I also get a second medium super (terms are coming up hang in there), a queen excluder, mouse guard, and plastic feeder.

Raising Honey Bees Terminology on Hive Parts:

  • ‘Super’ this is the box sections.
  • ‘Deep Super’ this is where the girls live or stockpile food.
  • ‘Medium Super or Shallow Super’ is where they make YOUR honey.
  • ‘Frames’ this is the wood or plastic part that hangs from the super and to which foundations are attached.
  • ‘Foundations’ this is a flat plastic or beeswax form that is held in place on the frames. They are stamped with a honeycomb pattern and the girls will draw comb on this.
  • ‘Draw Comb’ this is where the girls make wax honeycomb.
  • ‘Queen Excluder’ a plastic grate that keeps the queen from reaching the medium supers so you don’t get brood in the honey.
  • ‘Brood’ baby bees.
  • ‘Entrance reducer’ a small board with a notched section. This gives a new hive a smaller area to defend.
  • ‘Plastic Feeder’ this is a small flat dish if you will that a canning jar of syrup fits into to feed the girls.
  • Ok, the kit will/should have:
  • 1 screened bottom board with a sloped front (don’t get the solid flat ones)
  • 1 entrance reducer
  • 2 deep supers
  • 20 frames (10 each super)
  • 20 foundations
  • 1 medium super
  • 10 frames
  • 10 foundations
  • 1 inner cover
  • 1 telescoping or English garden cover

I also get cinder blocks from the lumber yard for the hive to sit on. I want them off the ground to help keep them dry. I want them up so any invading animals will have to stand on its back legs thus exposing their tender tummies to painful stings.

When you site the hive you want dappled shade. The sun will wake them so you want them to get some but you also want to protect from the heat of the day. A windbreak is important too as is a water source. I’m on a creek so the girls have plenty of water and the shade from my fruit trees helps keep them cool when we get hot.

A 5-gallon food grade bucket with a line of holes drilled a couple inches from the top and filled with water and a couple inches of packing peanuts will work fine if you don’t have water within half a mile. Peanuts give the girls something to stand on so they don’t drown and the holes let rain water drain out so you don’t lose the peanuts.

Wet bees are sick and unhappy bees. Take care to adjust the blocks or pallets so the hives lean forward a bit to help drain out any moisture. In the valley here we get lots of rain so I worry about drainage a bunch.

The last I’m covering for this part is clothing and hand tools. Look through the style and types of beekeeping clothing and pick out what appeals to you. I bought a one piece pull over jacket with hat and veil. I like it as there is no zipper opening for a bee to find.

The ‘hat’ part slides around a bit and I’m sewing a ribbon inside to tie under my chin to see if it will be still on my head. I find a bandana helps to keep my long hair contained and sweat out of my eyes while working the bees.

I added painter’s coveralls for my pants. It’s a disposable one and I found it hot to work in during the heat of summer. I like it because the pant cuffs have elastic and I wear them outside my boots. I may look for just pants. I bought bee gloves with mesh at the wrist to help cool me off.

The thing to think about when trying on the official outfit is being able to bend and stretch. AND how many openings are there? Bees will search you while you work and I for one do not want one inside with me!

Raising Honey Bees Tools

Get a good hive tool. Don’t scrimp here you use this for just about everything. A smoker and fuel is a must. Learn to keep the smoker going. You want cool smoke for the girls never hot. A bee brush is nice. I used a small fresh branch with leaves before I got my brush and it worked fine, but I like the brush.

A frame holder is great to have. This hangs on the side of the super and you remove the first frame and place it there while you work your hive. This gives you a bit of space to move the remaining frames forward.

A frame grip is one of those things you think is stupid to have until later in the season when you’re trying to pull up a frame filled with pounds of honey and bees. Trust me you never want to drop a frame of bees. This stupid little tool is a must!

The big day has arrived; your bees are ready for pickup!

I was both nervous and excited when mine came. Something I wish I’d had and will for this next group of bees is a sprayer bottle of water. You know those plastic plant misters? It was hot the day mine came and I picked up in my car. The girls rode in the trunk.

I was worried about them overheating and stopped often to cool them down. I was afraid some police officer would see me on the side of the freeway fanning my open trunk frantically and think something was amiss…. I think lightly spraying them may have helped. They use their wings as fans and boy were they trying to cool down.

When you pick up your bees be sure to get a container of Terramycin. American and/or European Foulbrood isn’t something you want. Make sure you’re getting bees from a seller with a good reputation. If they get American Foulbrood your bees and hives will most likely need to be destroyed.

I gave the girls two tablespoons shaken over them when I first hived them. After that you treat spring and fall, follow the package directions. Also, pick up some pollen patties to feed them as this will give them a good start.

Your hive should be set up already. You’ll only need one deep super for now. The bees will build up and you want to make them almost fill each super before adding another. Store your second deep and the honey supers until later in the season.

When you arrive home with them place the box near the hive unless it’s raining then put them out of the wind and rain. Give them a spray of water and let them sit. They can stay in the box for a day or two just be sure to spray with water off and on. The can hanging inside is their food.

This day or two of rest will give them time to become acquainted with their queen. Each queen has her own pheromone scent and there may be some confusion during shipping as many boxes of bees will have been shipped together thus mixing the pheromone scents.

You will need to feed them at first until they have their house set up. 2 parts sugar to 1 part water. Bring your water to a boil turn off heat and add sugar, stir until dissolved, cool completely. This will be the food for them. Pour into canning jars or old mayo jars and screw into the plastic feeder.

Now let’s get ready to hive your bees hopefully on a sunny day with no wind. First, take a shower. Don’t use scented soaps, perfume, cologne or deodorants. Take off any rings just in case you get stung, don’t want to have your favorite ring cut off a swollen finger.

If you do get stung, scrape off the stinger never pull it out as there are venom sacks and you’ll only add to the amount in the bite. Stay calm and smoke around yourself quickly. There is a pheromone released by the bee when it stings that signals others to follow and defend the hive; smoke and step away for a minute.

Ok, the smoker is working nicely with cool puffs of smoke and you’re showered and ready to don your official outfit. Sprinkle some baby powder on your hands, according to the dummies book the bees like it. I figure it helps for sweaty palms.

Dress in your beekeeper suit making sure to close any openings at ankles, neck, and wrists. Take your hive tool, sugar water sprayer and smoker with you; spray the girls with the sugar/water mix. Don’t saturate them but give them enough to get them busy cleaning each other.

Pick up the box and give it a sharp rap or two on the ground to force the bees to drop to the bottom. See the little wooden cage inside the box of bees? This is your queen bee and her attendants. You want to remove this box first. Locate the metal tab that holds this cage in place next to the can.

Carefully pry the can of food up while holding onto the metal tab keeping the queen cage in place. Do Not Drop The Queen! Once the can is out, quickly remove the queen cage and replace the can in the box, don’t worry about the bees that escape they’ll stay near the queen.

Remove one frame from your deep super and store until next week. Hopefully, the place you got your bees from gave you some mini marshmallows to plug the queen cage with. If not, I guess you’d better have bought some. The queen cage will have a candy plug in the end.

You want to remove this plug, use a screw to get a hold on and then gently pull out and replace with 2 mini marshmallows. Don’t let the queen or her attendants escape.

Take a really good look at your queen; you’ll need to be able to locate her next week. If you managed to buy one that’s marked it’s a lot easier to find her. .Once you replace the candy plug fit the queen cage between the two middle frames.

There is generally a metal tab on her cage that you can bend over the top of one frame to help secure it in place; if not then wedge between the two frames in the middle. Make sure to angle the plug end up in case one of the attendants dies so its body doesn’t block the queen’s escape route.

Also, be sure the screened side is facing down so the bees can bring her food. The bees will eat through the marshmallows to free the queen. Once you’re sure you’ve got the queen secured, it’s time to let the bees out and into their new home.

If they are very active inside the box, spray them again and rap box to drop them to the bottom. Pry out the feed can and set aside. Then shake and pour the bees over the queen’s cage. Some will stay in the hive around the queen and others will fly around.

Stay calm and work slowly; it’s scary to be surrounded by this many bees but remember, they are looking for the queen right now and have no honey to defend. You can give puffs of smoke around to help calm them if needed. Once you have most of the bees out of the box sit it at the entrance to the hive, opening facing up. The remaining bees will smell the queen and move into the hive.

If they are very active you can smoke them to calm them down just don’t overkill with the smoke. Shake two tablespoons of the Terramycin over the bees and frame tops in the hive. Place half a pollen patty on top of the frames; you don’t need to remove the paper.

Take the inner cover and starting at the back of the hive, slide it carefully into place. This will allow the bees to move out of the way and you won’t squish any. Place the telescoping cover on top of that.

Insert the plastic feeder with filled food jar into the front of the hive at the entrance. I find with the slope of my hive I have to shim the feeder to make it leveler. If I don’t then the food seems to flood out instead of dripping out slowly. The entrance reducer will most likely not fit with the feeder in place.

Stuff the entry with grass or leaves to reduce the area leaving only about 2 inches of opening. This will give the girls a smaller spot to defend from invaders.

They will remove this on their own as they feel more confident in their ability to defend their new home. Once you see they’ve done this you can clean the remaining grass and leaves out with your hive tool. You’ll use the entrance reducer later to help combat stealing. In the morning you’ll be able to remove the box and return it for the deposit.

Congratulation! You’ve hived your first bees!

Now leave them alone for the next week, no peeking. Just be sure to keep the food jar filled and enjoy their gentle hum. Part three will go over the types of bees in a hive, their jobs, and your first inspection. Your bees have been coming and going now for a week and if you’re like me you’re dying to take a look inside.

Before you do, however, I want to explain what’s going on inside so you’ll know what to look for and what to expect. I’m listing the bee’s jobs in the order assigned as the bee gets older.

Your bees have been coming and going now for a week and if you’re like me you’re dying to take a look inside. Before you do, however, I want to explain what’s going on inside so you’ll know what to look for and what to expect. I’m listing the bee’s jobs in the order assigned as the bee gets older.

Housekeeping – is the first job a new bee has from the moment it crawls from the cell. They clean the cell they emerge from as well as any others that need tidying up for more babies, pollen or honey.

Undertaking – the hive is a very clean environment and the most sterile in nature. During the first couple of weeks of life, one of the tasks is to remove as far as possible from the hive any bee that’s died. If you sit and watch the comings and goings you’ll see a dead bee being dragged off. Sometimes the best the little bee can do is move to the entrance and push off to the ground.

Nurse bee – the young worker bee tends to her baby sisters by feeding and caring for the developing larva. On average up to 1,300 times a day for each developing bee.

Royal duty bees – because the queen isn’t able to tend to her most basic needs, she has attendants. They not only groom, feed and ‘pooper scooper’ for her; they also coax her to keep laying eggs. While she may be queen she is a slave to her job.

Stockpile bees – these are bees inside the hive that greet the forager bees and take the nectar and pollen from them. They deposit the nectar or pollen in the designated comb cell. If nectar they add an enzyme and fan to evaporate moisture to turn it into honey. Both honey and pollen are food for the colony.

Fanner bees – workers take turns cooling the hive and reducing the humidity. You may see during honey flow or high heat days a line of bees at the entrance facing the hive. They will be fanning their wings drawing cooler air into the hive and others inside will fan to move it through the hive. They also have a gland that releases a pleasant sweet odor into the air. You may be able to smell it as you approach. This signals the bees an orientation scent to help them find their home.

Builder bees – these are the bees that make the wax and draw comb.

Guard bees – these are the bees at the entrance to the hive. You’ll know who they are if you sit and watch for a bit. Every returning bee will check in with the guards before entering. If a bee from another hive were to try to gain entrance the guard would fight and kill them.

Forager bee – these are middle-aged bees. You’ll see them hovering up and down and side to side in front of the hive to orient before taking off to find food. This is the most dangerous job in the colony.

Aside from maybe being eaten by a bird, they must visit about 5 million flowers to produce one pint of honey. And they will forage a two to three-mile radius from the hive in search of provisions.

They literally work themselves to death, you see them returning with torn wings and battered bodies but they keep at it until the very end of life.

The Drone – the only males in the colony! There are only about 100 in the entire colony of probably 60,000 bees. His only purpose is to mate with the queen. Now before you guys cheer him on, come fall when the weather cools and mating season is over…the girls toss them out to die 🙁 .

The Queen – She controls the hive. She lays eggs to keep the colony alive and if needed signals half the colony to swarm away with her.

So now you know who’s who on the playing field. Let’s go over what you’ll be looking for on each inspection.

Repeating the prep on shower, outfit, smoker, and tools grab your one frame you took out when you hived your bees and head to the girls. Let them know you’ve arrived by giving a few puffs of smoke at the entrance. Then after a minute, pry the telescoping lid up and give a couple of puffs of smoke there and close the lid.

Wait a minute before removing the lid. Carefully, lay it on the ground inside up. Now a puff or two of smoke through the hole of the inside cover. Gently pry the cover up and lay it across the upturned lid.

If the girls are still topside drift a bit more smoke over the frames and into the hive. This will make them think there’s a fire and they will busy themselves by gobbling provisions in case they need to bug out. Position the frame holder on one side of the hive and place the frame you brought back there. T

ake hold of the queen’s cage and gently slide the frames so you can remove the queen cage. Have they eaten the marshmallows and is she out? If she’s out ….yippee! If not go ahead and release her. If you have to release the queen then slide all the frames to one side and add the frame you brought back.

Position the frames together and evenly spaced from the super on the end frames. Replace the two lids and wait a week to check for the information below. Your queen needs time to work.

If your queen was released you want to slide the frames to one side and start checking each frame; both sides of the foundation. You’re looking for drawn comb and eggs and larva. The eggs will look rather like a very small piece of rice in the middle of each honeycomb cell.

You only want to find one per cell. If you’ve two then the queen may have left/died and you have a laying worker and will need to re-queen right away. It’s the same procedure as installing the first queen; other than the bees are already in the hive.

While you work your inspection listen to the girls. There should be a gentle hum from them, happy busy bees. If you hear them start to rev up, stop and look at them. Are they lining up and looking at you? If they are then they’re becoming upset with you.

Give them a bit more smoke to calm them down. I always carry my lighter and additional smoker fuel just in case. Sometimes it seems I can’t keep the smoker going and have to relight it or I take too long and need to refuel.

They will start working on drawing comb and laying eggs in the middle frames and work their way out. You want to check the egg pattern of your queen. There should be few cells she’s missed and there should be pollen and honey/nectar around the perimeter although not so much the first week.

Remove each frame, shift the lower edge slightly towards you so you can see the surface of the foundation but not so much that the nectar drips out. Then to view the other side, raise your left arm straight up so the top of the frame is straight up and down, then turn the frame to show the other side (rather like turning a book page)and lower your arm again.

You have to keep the foundations fairly straight or any nectar will fall out. The dummies book has a good picture in it.  When you pull the frame out of the hive the wood top will be on top of the foundation and when you flip it to view the other side it will be on the bottom.

Reverse the procedure to right the frame and replace in the super. Each frame goes back in the same spot you took from. Work over the hive in case the queen is on the frame you pulled to check, she may jump off to hide and you don’t want to drop her in the grass as she may not be able to find her way home.

Later in the season, you can move the far outside frames one or two spaces towards the middle to encourage them to draw comb but never move to the center of the hive.

Try to find the queen as you work through the hive. If you can’t find her but see eggs then you know she was there at least two days ago. She’s hard to find especially if you’re looking through a full colony of 60,000 bees. If you have a queen that has a bad laying pattern, lots of skipped cells then you might want to dispose of her after acquiring a new queen.

Once you’ve checked all the frames gently slide them as a single unit back across the super and re-add the one frame you removed last week. Every week check your bees for eggs, larva and brood.

Here’s a photo I found on one website http://www.arkive.org/honey-bee/apis-mellifera/image-A22601.html of eggs, larva, and capped brood. As the season progresses you also want to check for pollen and honey stores. Smoke them once more and replace the inner and telescoping cover. Check the food jar and top up as needed.

The first few weeks have passed and your bees have been busy. You’ve kept the 2:1 sugar syrup in the feeder and they’ve built comb and the queen has laid thousands of eggs. As you’ve done your weekly check you’ve noticed they started in the middle and began to work their way out.

Once your bees have filled 7 out of the 10 foundations it’s time to add the second deep super. There’s no big procedure; you just add it when doing your weekly check, the inner cover goes on top followed by the telescoping lid.

The next couple of weekly checks you may find they’ve moved into the second deep and haven’t finished filling the lower deep.

You can move a frame in one or two spaces in the lower deep to help encourage the girls to fill them. Just be sure not to break the brood area.

You can continue to feed them the sugar syrup mixture. It encourages wax making, comb building, and egg-laying. Once you’re into your local nectar flow, you can stop. In my area we have a dearth of flow for about 3 weeks; I may feed them during that time. I have planted many helpful flowers in my yard but it’s not enough to really assist them.

On your weekly hive check keep an eye on the second super. The Dummies book said 7 out of 10 frames drawn was when you added your honey super. I felt I’d been a bit early on adding the second deep so I made myself wait until 7 were drawn.

I should not have done so. I should have listened to my gut as it was telling me to add that honey super.

The next week, I was getting my gear ready to go down and check the girls only to see them swarming. Amazing sight but sickening at the same time. I did collect them from my neighbor’s yard but didn’t have a second hive and by the time I could drive to the store and return with one…they were gone.

This began the frantic attempt to re-queen. Queens are expensive, I still won’t tell my DH what they cost but he does know I made two attempts to requeen. They killed each one off and made their own. From now on, I’m letting them make their own.

The advantage to a swarm is that it disrupts the brood cycle which helps with varroa mite control.

The disadvantage is it disrupts the brood cycle and impacts honey production as the girls leaving gorge on honey to help start the new hive. The only good thing about a swarm is when it’s someone else’s bees and YOU got them.

This year once the second deep is 5-6 frames filled, I’m adding my queen excluder and honey super. The queen excluder keeps her highness out of the honey supers so you don’t have to worry about eggs and larva.

I found the girls didn’t work on the honey supers until after the two deeps were filled so honey supers are going on the hives before they need them. An old beekeeper told me (after my swarm) ‘gotta give them something to keep them busy.’

Swarms happen to all beekeepers. It’s a natural way for honey bees to reproduce. However, we should work hard to keep the girls home. Fewer bees mean less honey for you.

So remember to:

  • 1 Avoid congestion. A crowded hive is one that will swarm.
  • 2 In overwintered hives, reverse the bodies. (info on this in the next part)
  • 3 Add the queen excluder and honey supers
  • 4 Provide good ventilation. This is one reason I like the screened bottom board.
  • 5 If your inner cover doesn’t have a notch on the edge for additional airflow, glue small sections of Popsicle sticks on the four corners

So aside from seeing the second deep nearly full, what could I have seen to know the bees were readying to swarm? When you’re inspecting you’re looking for the egg pattern, brood, etc. but you also want to watch for crowded bees and supersedure cells/queen cells.

If you see these cells you must remove all of them. 100% of them, if you leave even one then the hive have the signal to bug out. I didn’t take any photos of my girls and their supersedure/queen cells and I didn’t want to link to anyone’s photos due to unknown copyright issues. Just do a photo search, there are tons of pictures out there.

If you find they are still moving forward with swarming then the other thing to try is to remove ALL the frames with capped brood and the bees on them to a new hive, try to assure the queen isn’t on those frames. Then replace those removed frames with new, empty frames.

A hive won’t swarm if they don’t have capped brood equal to the number of bees leaving. Move the new hive as far from the old one for at least 24 hours. Two miles would really be good but for me not really practical so off to the other side of the yard.

After a week check to see if you’ve eggs in the old hive. If you do then yippee, the queen is there and working! If not, then you need to re-queen. So, order a new queen and go through the same procedure as installing her when hiving your first bees.

Check the new hive to see if they have queen cells. If they do then the girls are making a new queen and you can sit back and enjoy. I’d remove all but 2 or 3 queen cells. The first queen to emerge will kill off the others but I don’t want her to have to expend too much energy for that as I want my virgin queen to take flight and mate as soon as possible.

Things are moving along nicely in your hive and you’re doing your weekly checks. You notice there is a brown, sticky substance appearing on the frames, covers, your hive tool and maybe you. This stuff is like super glue what the *#$@ is this? It’s propolis.

The girls gather this super stick stuff from trees and plants and use it to seal the hive, strengthen comb and sterilize their home. You want to remove as much as you can every time you inspect.

As you gather this uber sticky stuff save it to a small container. Propolis has amazing antimicrobial qualities that help fight bacteria and fungi. The Chinese have been using it for thousands of years. You can make a tincture with it. You can even make a fine wood furniture polish with it.

Many beekeepers use a propolis trap to encourage their bees to make more. This trap looks rather like a queen excluder and goes where your inner cover usually fits. In cold weather, propolis is hard and easy to crack and scrapes off your traps much easier.

Propolis tincture from the Dummies book:

  • Measure the crumbled propolis and add an equal measure of 100 proof vodka or grain alcohol. (For example, one cup propolis, and one cup alcohol). Place in oven proof bottle with lid.
  • Heat the closed bottle in a 200 degree F oven. Shake the bottle every 30 minutes. Continue until the propolis has completely dissolved in the alcohol.
  • Strain through a paper coffee filter or nylon stocking.
  • Bottle the tincture into dropper bottles.

It’s now the end of your season and the bees have been hard at work laying in their winter provisions. Depending on your area they may need more than other warmer locations. My understanding for MY area is that the girls need 80 lbs of honey to make it to spring.

Beekeeping in Your Backyard

Remember they visit about 5 million flowers to make one pint of honey. One pint of honey is about one pound; 80 pounds is a #$%@ load of flowers! I tried to be very grateful and respectful when I harvested my honey.

There are lots of different types of equipment for extracting honey. But given that I’m cheap or more nicely said ‘frugal’ and given the expense of startup (and two dead queens) I refused to buy any harvesting equipment. I will add to my supplies this season.

The girls will be very, very defensive of their honey and who can blame them? I did use a ‘fume board’ but found it didn’t do anything for me. It’s supposed to with the addition of some smelly stuff, drive the girls out but that didn’t happen for me.

I ended up just gently brushing the girls off each honey frame. I then quickly removed that frame from the area. This year I’m going to get a plastic file box to hang the frames in so I only have to make one trip.

Honey is dried and ready to harvest when it’s capped. The girls will have a white wax cap over the openings. Again, there’s a piece of equipment you can buy to test the moisture content but cheap me…

I figured the girls wouldn’t cap if it wasn’t ready. Robbing can be a problem and if you see strange bees fighting with your girls you should probably add the entrance reducer now. This will help them keep the thieves a bay.

I decided not to buy/rent an extractor as people have been harvesting honey for centuries without this little helper. I used one of my 5-gallon food grade plastic buckets to collect the honey in. A cap scrapper would be helpful or a hot knife better. I’m hoping for the hot knife. I, of course, had neither, so I used my freshly washed and dried fingers to break open the honeycomb.

I left each frame in the bucket at a slight angle and let the warm honey drip slowly into said bucket. Yes, this took way more time than a machine that spins the frames really fast to fling the honey out.

Once both sides of a frame were done dripping I took it out to the girls and let them clean up the messy honey that remained. They made short work of it.

Once I had harvested all the honey I strained it through a fine sieve although you could use a paint strainer. Save the wax as there are many things to be done with it. I poured it into clean, dry pint canning jars with lids. This is the best honey I’ve ever had. No processing, no heating just pure honey from my girls.

In preparation for winter, I gave the girls an extra half of a pollen patty. The deep supers were so very heavy that I stopped checking the bottom deep. The last check on the bottom one I realized I was in trouble when lifting the top deep super. It was extremely heavy for me.

I did take it to the inner cover on the ground but thought it was a mistake as I did so. (See, listen to your gut!) When I went to replace it I KNEW it was a mistake as I couldn’t lift it up more than knee high. Of course, the bottom super on its stand is about waist high.

So, what’s a girl to do? Well, if you’re going to work with honeybees you’re going to get stung. I figured I just had to take the stings. I lifted the deep super weighing in at close to 80 pounds and gently slid my leg from the outside corner along the super’s edge to help me lift it the remaining distance. Imagine my surprise when the girls all moved out of the way and I didn’t get even one sting! I will not be lifting them filled again.

To help with mite control I gave the girls a heavy dusting of powdered sugar. Yes, I powdered the bees. This makes them groom each other and that helps to knock off the mites. If you have a screened bottom board the mites will fall to the ground and not be able to get back to the bees.

If we were bees with mites it’d be like having rats on us that we couldn’t get rid of. I treated for foulbrood with terramycin following the package directions. I covered the hive with an insulating wrap, removed the entrance reducer and placed the mouse guard over the entrance.

I also ran a tie-down strap (like for a boat cover) over the entire hive to help keep the top on in case of winds.

My girls were buttoned up for winter and on their own. Great now I can worry till spring…..

During winter bees stay inside and do not use the ‘restroom’ so on nice days when the sun is shining, there’s little wind and temps are close to 60 degrees F. they will do a ‘cleansing flight’. This means they fly outside to poop, try not to be in their line of fire.

Many hives die as they approach spring due to lack of food. If you have a nice day and the girls are out you can do a quick peek to see how their stockpile is holding up. If you fear they are getting low you can give them sugar cakes and pollen patties. Do Not give sugar syrup.

If you’re going to give them sugar cakes you’ll need a taller inner cover which you can get from your local supplier.

Sugar cake

  • 5 pounds of granulated sugar
  • 7 ½ ounces water
  • 3 tablespoon of lemongrass and spearmint essential oil mix (see below)

Pour everything over the sugar and stir to mix well.

Pour into a wax paper lined 9 x 13 pan. Cut into 4 sections, pushing the sugar mix to give about ½ inch between each section. Place in oven with the oven light on. Leave the light on for 24 hours to dry out the cakes. Do not turn on the oven….

Place on the top of the frames to give emergency food to the bees.

Essential oil mix

  • 100% pure food grade spearmint and lemongrass essential oils
  • 1/8th teaspoon Lecithin granules (local health food store)
  • 2 ½ pounds sugar
  • 5 cups water

Bring water to a boil add sugar, stir until dissolved. Remove from heat and add lecithin stir well. Once this is cooled add 15 drops each of the essential oils.

To help combat tracheal mites you can give grease patties…

Grease Patties

  • 1 pound of granulated sugar
  • 1 ½ tablespoon corn oil
  • 1/4 pound Crisco (not lard)
  • 1/4 pound honey
  • 2 ounces pink salt (can use rabbit wheel salt ground up)
  • 3 teaspoons lemongrass essential oil

Mix all together with gloved hands. Scoop into about 2-ounce portions and form into ‘hamburger patties’. Extra patties can be frozen until needed. Place two around the frames tops.

A few weeks before the first blossoms appear you’ll want to treat for Nosema and Foulbrood. Follow the package directions. Keep an eye on their general health. Again, the Beekeeping for Dummies is a great book and will give more detail than I’m going to.

The final topic for this series is reversing hive bodies. Again, springtime only and there is some discussion as to the importance of this. Your apiary, you decide.

On a nice sunny fairly warm spring day of not less than 50 degrees F. smoke the bees. Remove the outer lid and lay upside down on the ground. Then without removing the inner lid, lift the top deep super and move it to the upturned outer lid.

Look inside the lower super, it will probably be close to if not empty. Lift if off the bottom board and set it crosswise on the upper super. Scrape and clean the bottom board. Then lift the super that was the lower super and set it on one end on the ground.

Take the original upper super and set it on the bottom board. Smoke the bees and then remove the inner cover. Place the old lower super on top of the new lower super; replace the inner cover and outer lid.

This is supposed to help with distribution of brood, honey, pollen etc. Plus bees like to move up so it gives them that too. In about three or four weeks you do this again, returning the hive to its original superpositions. When you do, you can add your honey supers, assuming, of course, the bees bring nectar and you’re not medicating any longer.

Remember, this is a very, very short tutorial on beekeeping.

The book “The ABC and XYZ of bee culture” is considered to be the bible of beekeeping. You can find free downloads of it here: http://archive.org/details/abcxyzofbeecultu00root it’s very detailed and for the beginner, the ‘Dummies’ book is much easier; at least in my humble opinion.

How do you eat an elephant? One bite at a time. Hopefully, I manage to give you bites on this elephant of a subject. Honey bees are very important to our food crops, 2/3’s of them need the bee for pollination without which they can’t produce the food. Colony Collapse Disorder, not disused here is a huge issue.

There are several thoughts about what’s causing this problem and the EPA doesn’t want to hear that corn and soybean farmers, GMO’s, insecticide usage etc, could be the issue. One thing is pretty certain. If something isn’t done to help the little honeybee…by 2035 North America will not have any.

So with that thought, I want to encourage everyone to practice backyard beekeeping. If you can’t do that, how about landscaping with the girls in mind? Thanks for hanging in there with me on this how to raise honey bees series.

Filed Under: Homesteading

Identifying and Harvesting Wild Berries for the Homestead

September 16, 2018 M.D. Creekmore

Mulberries (early June)

by Bobcat-Prepper

“Warning – Positively identify any food in the wild as safe before collecting. Some berries that are dark purple (like pokeberry) or black (like nightshade) are TOXIC.”

I have been hiking and running around an abandoned 16 acre field near my home for the last year for exercise, and this spring I started paying attention to some familiar spouts popping up – raspberry and blackberry canes.

That got me thinking about how much my family likes fresh berries, and the high cost of them at the store, so I decided to go berry picking this year.

Wild Berries are great for preppers, homesteaders, bushcrafters, and fans of self-sufficiency because they are low/no maintenance plants that propagate themselves.  In addition, these berries are full of vitamin C, and can be stored in several ways for use in normal times, or for when SHTF.

Blackberry leaves were chewed by Roman soldiers in ancient times for their vitamin C and tannin content, and today blackberry leaf tea is helpful in reducing the symptoms of diarrhea, a dangerous condition when medical help may not be available.

I have also found a mulberry tree and elderberry bushes in public parks in my area, so I have been collecting their harvest as well.

Mulberry trees are easy to identify, and a large one can provide tens of gallons of dark purple ½” to 1” berries.  Here to how I have figured out the best way to harvest them:

  1. If the tree is in a public park, pick a time when few people are around. It’s probably legal to collect berries from it, but why take a chance, and why alert other people to free food?
  2. Dress in an old t-shirt and shorts, preferably dark or red-purple. Mulberries stain like crazy, so don’t go picking dressed in anything nice – boots included.
  3. Bring a 5-gallon pail, a 10’x10’ tarp or plastic sheeting, and a stick or scrap wood about 10’ long.
  4. Lay out the tarp or sheeting under the first large branch, and tap or strike the branch to make the berries fall.
  5. Have a friend help collect the tarp corners, and pour the berries into the pail.
  6. Move to the next branch, and repeat.
  7. When the tree has been thoroughly harvested of ripe berries, come back in a couple of days, and get a whole new harvest. They ripen over about 2 weeks, so you will be very busy if you want them all.
  8. Note: do not pick up berries off the ground, as deer love mulberries and will poop on them as they graze. Watch your step!
  9. When you get home, carefully wash and clean the berries, and keep cool until processed.

Raspberries in my area near the woods, so I dress in an old t-shirt, jeans, boots, and a wide-brim hat.  I apply bug spray to my pant cuffs, arms and neck to keep the ticks and chiggers off. Wash your hands after applying the spray, so the odor doesn’t get on the berries.

Raspberries (early-late June)

Keep your eyes peeled for these black beauties on thin green canes– black raspberries are smaller than blackberries and may be hidden by the leaves.  If raspberry canes have thorns, they are usually small enough I don’t worry about them.  Collect in a modified 1-gallon milk jug or two, strapped through your belt.  This method allows you to collect with two hands.

You probably won’t collect many, due to their small size and lesser frequency, but they are worth it, as they are sweeter, and the smaller seeds are much easier on the teeth than blackberries.

Jug for collecting wild berries

Blackberry canes are thicker, taller, and have sturdy thorns that tear the !@#$ out of your clothes and skin.  Prepare yourself the same as for raspberries, but if you can stand the heat, you may want to wear long sleeves to protect your forearms.  I just grin and bear it in a t-shirt, and stay cooler.

Blackberries [early-late July]
Try to pick strategically, standing in one spot, picking every black berry in reach 360-degree blackberry move to the next unpicked area. Yes, the thorns hurt, but you’ll get over that and I have yet to get an infection for a thorn scratch.

With luck and enough canes, you should be able to pick about three quarts an hour during the peak picking days.  I go back to the patch every two days to get the newly ripened berries.

Elderberries [early-mid August]Elderberry bushes don’t have thorns, and for that I am grateful.  The berries are cleaner to collect, as they tend not to burst when picked, which is another big benefit.   The downside – unripe elderberries contain the mildly toxic sambunigrine, so only eat the really ripe ones.

Elderberry flower tea is said to boost your immune system, and a daily tablespoon or two of elderberry syrup can shorten your flu or cold.  Dried elderberry leaves can be used to keep mosquitoes away too.

  1. Select only elderberries that are dark purple/black.
  2. Place the head into a plastic bag for collection, then cut the stem that holds it to the bush.
  3. When done collecting the heads, take home and wash.
  4. Use a fork to pull the berries off the head.

Now, What Do I Do?

Now that you have your berries, you need to decide what to do with them.  I like to diversify my berries, so that I can enjoy them in a variety of ways and times: either fresh, frozen, baked, canned, or dried.

Fresh – Fresh raspberries and real whipped cream are the best, while fresh blackberries tend to be too tart to enjoy.  The mulberry flavor is OK, but its biggest benefits are volume and sweetness (now that I think about it, mulberries used for wine would be a pretty good use, but that’s for another post). Elderberries should be heat-processed in some way, for safety’s sake.

Frozen – If you enjoy them fresh, but have too many, why not freeze them?  I just place clean dry berries in a quart Tupperware container, and when thawed they are passable as fresh, but better is then baked or otherwise heat-processed.

Baked – All of these berries are delicious in tarts, pies, and cobblers.  I used a blackberry pie recipe last night, but make it into tarts.  It’s cleaner to eat, and the kids loved it.

Canned – The canning method is probably the favorite of preppers and homesteaders alike for the durability of the resulting food.  It keeps for years, and the jelly/jam/preserves are full of sugar for preservation and calories when they are needed.

Berries tend not to jell without pectin, but pectin is pretty expensive – about 75 cents/canned pint.  For that reason, I’ve been experimenting with ways to have it jell without store-bought pectin.  Here is my recipe:

Raspberry Jam

  • 8 cups clean berries
  • 5 cups sugar
  • 10 small green (unripe) apples – I have a couple apple trees on my property, so it worked out well
  • ¼ cup lemon or lime juice (the acidity raises the ability to jell – if I didn’t have those in SHTF, I’d try vinegar)
  • 1) Mash the berries in a large saucepan. Add sugar and juice, place on medium heat.
  • 2) Core apples, slice thinly.  Tie up in a cheesecloth bag (or don’t – this adds more pectin), and place in same pan.
  • 3) Bring to a boil, watching carefully so it doesn’t boil over (happens easily).
  • 4) Cook for 15 minutes on low, then let cool while prepping and heating canning pot.
  • 5) If you bagged the apples, remove the bag from the pot.  If you didn’t, scoop the apple slices into a ricer, and rice the apple/raspberry glop back into the pot.  Dispose of the solids caught in the ricer.
  • 6) Fill the 6 to 8-pint jars with ½” headspace, close, and process for 15 minutes.

Your jam will not jell at first, but within 2 or 3 days the pectin will do its thing, and it should be firm enough for toast, sandwiches, or whatever.

Elderberry Syrup

Good for immune system reduces sick time.

  • 8 cups clean berries
  • ¼ cup water
  • 5 cups sugar
  • 1) Place the berries and water in a saucepan, bring to a boil, cook for 15 minutes.
  • 2) Rice the berries with the “fine” plate to remove the numerous seeds, into another saucepan. Dispose of the seeds in the ricer.
  • 3) Bring the elderberry juice back up to a boil, and add the sugar. Reduce to low heat. Prepare the canning pot.
  • 4) When the syrup starts to thicken, turn off and fill the pint jars with 1/2 “ headspace, close, and process for 15 minutes.

Dried

berries drying at the homestead
Berries drying at the homestead…

I have a second batch of blackberries in the dehydrator right now, as I write this. The first batch of 2 quarts fit onto 4 trays and took about 18 hours to dry.  Now they are about 2/3 of a quart of crunchy tart nuggets, ready for snacking, pemmican, or rehydration with boiling water at some later date.

You could also dry them by placing those 2 quarts on a lipped baking tray, and put it under a screen in the hot sun for a few days.    You could also plant them, I guess, if you were starting a post-SHTF garden, or trade them with someone else who wanted to start a garden.

Blackberries turn red as you dry them, so don’t be surprised.

Berries are a perennial source of fruit that keeps giving all summer, so keep your eyes open when you walking around empty lots and parks in your neighborhood, and get picking!


Filed Under: Bushcraft, Homesteading

What is the Best Dog Breed for Homesteading?

September 16, 2018 M.D. Creekmore

Pyrenean Mountain Dogby Goat Mama 12

I am writing this article to give people some ideas regarding using livestock guardian dogs for protection of livestock, property, and people.  My husband and I moved to East Texas about 10 years ago to live my country dream.  We acquired 25 acres for my horses and soon thereafter I started raising goats.  It was love at first sight so to speak, of goats.

My long-suffering husband has had to put up with a lot of crazy ideas, with goats being one of those ideas.  Anyway, we live out in the boonies and have a lot of coyotes and even a cougar that comes through the area occasionally.

I knew I had to figure out what I wanted to get in the way of a livestock guardian.

There are several options to choose from in the guardian category, everything from dogs, to llamas and donkeys.  The idea is to have something that will keep your livestock from being killed by predators.  Donkeys are used a lot as they normally do not like dogs or coyotes and will attack any that come in the pasture. 

They usually need to be the only equine in the pasture as they can bond with other equines instead of the goats they are protecting.  Llamas are another option.  They are curious and can behave assertively towards trespassers in their pastures.

My understanding, since I don’t have llamas, is that they advance toward the predators which is not normally prey behavior.  This can make the predators retreat.  The downside to llamas is that they are just as vulnerable to predators if they are attacked by more than one.  Other peoples experience or opinion may vary regarding the use of llamas or donkeys for predator control.

I did a lot of research about livestock guardians prior to deciding what I wanted.  A factor to take into consideration is the threat level of the predators in your area.  Are they very aggressive, have they killed your livestock or just looked?

Something that I read during my research stated, in relation to coyotes, if you don’t have a strong threat from a pack in your area, don’t try to eliminate the current pack.  If you do, then you may get another pack that is more aggressive to fill the void.

Nature abhors a vacuum is how the saying goes I believe.  I strongly feel this is true.  If your current predators know your livestock is protected and leave them alone, why would you want to take a chance that a more aggressive pack could move in to take advantage of the buffet you have provided for them?

I decided to use livestock guardian dogs (LGDs).  I had several reasons for choosing dogs. I have had dogs for over 30 years, was a veterinary technician for 12 years.  I also trained and showed dogs for 20 years, mostly herding dogs.

I am very familiar with dogs and comfortable with them.  Once I decided on LGDs then I had to decide what breed to get.  Just an FYI here, herding dogs are not livestock guardians.  They are bred to work with humans to guide and work a flock of animals.

They also have too much prey drive which means they will more likely chase the stock.  Livestock guardians are bred to be independent thinkers and protect the flock.  Some people confuse the two, thinking that herding dogs will work as LGDs.

There are several different breeds of LGDs with different traits, temperaments, and abilities.  Before you decide on a breed, DO YOUR RESEARCH!  Especially if you are not familiar with dogs or different breeds.

Talk to people, read books, search the web.  There are several good books on LGDs available.  A great website to look at is www.lgd.org.   They have a good library of articles.  I decided to get the Great Pyrenees for their personality traits.

I did not want a breed that was very people aggressive as I have great neighbors that visit often and I wanted to keep my neighbors happy.  I obtained an adult Pyr from Texas Great Pyrenees rescue.  By the way, check out LGD breed rescues.  The people that run these are familiar with their breeds and can answer questions.  My Pyr had lived with goats but had no human socialization.

Great Pyrenees dog

He is a wonderful dog that knows his job and does it well.  I also acquired a puppy at the same time.  Thor (adult rescue) discovered the joy of having human interaction and having a dog buddy.  He taught the pup, Odie, who has, in turn, trained my 2 younger dogs.

Anyway, since I knew what kind of threat level I had, I obtained dogs that are very capable of protecting my goats without being overly assertive.

Don’t underestimate them though, cause if push comes to shove, they will take care of the problem.  There are breeds that are stronger, or more assertive, to predators and/or people.  I have a friend with a large goat herd that has lost a lot of animals to coyotes.  She has a very different threat level than I have.

She obtained llamas but they were not enough.  I encouraged her to get some strong dogs to deal with her predators.  You have to have an idea of what threats you are facing to make a decision on what is right for your situation.

I know this is getting longer than I intended but bear with me, I’m almost done!  Part of my point is also about using LGDs not only to protect your livestock but also to protect your property and your family.  I know about protection dogs such as German Shepherds, etc.

I have had Dobermans, which I love.  However, if you are not sure about having a “protection” dog, I would recommend you consider a livestock guardian dog.  They are not just for livestock.

They have been bred for centuries for their guarding instincts and believe me, watching their instinct kick in is wonderful.  You don’t have to train them to do their job, they already know how.

That doesn’t mean you don’t have to do some training but the basics are already there.  One other thing I should mention is LGDs are independent thinkers.  They are bred to analyze the situation/threat and decide what to do about it.

That means that sometimes, ok a lot of times lol, they can/will ignore your request/directions/commands.  If you can’t handle that, don’t get an LGD.  However, I wouldn’t take anything for my LGDs.  They are the sweetest, best dogs I have had.  Challenging at times, but they keep my on my toes.

They love their people, livestock and property.  My crew is Thor, Pyr; Odie my big teddy bear, Pyr; Alesta, Akbash (Turkish)/Maremma (Italian) LGD and her full sister Ellie, my sweet girls.  They keep my goats safe and they keep me entertained.

Please keep in mind all this is my opinion and your mileage may vary.  I hope this article has given you something to consider in choosing protection options for your livestock and family.

Filed Under: Homesteading

How to Raise Chickens at Home for Eggs and Meat

September 15, 2018 M.D. Creekmore

chickens on the homestead property

by Jane W

My interest in chickens began at age three when my grandmother would allow me to gather eggs from the nests in the chicken house at their farm. I learned from her to be observant and gentle with animals. When my own child reached that age, I wanted to share some of that magic with him and began considering raising chickens.

As an avid reader of Mother Earth News, Organic Gardening magazine and other Rodale Press publications, I felt I had enough information to begin.

I knew I had to protect the chickens from the weather and predators so I purchased a large roll of one inch chicken wire and 1 X 4 X 8 boards to fence a small area outside an old building that had previously been used as a chicken house on our “postage stamp sized” farm in the mountains of Virginia.

When the outdoor ” cage” (it was covered with wire also, so hawks could not fly in and so the chickens could not fly out) was finished, I built nest boxes out of scrap 2 X 4s and plywood and filled them with hay, and built a small ramp for the chickens to use to enter and exit the building through a 8 X 8 inch hole in the outside wall.

A heat lamp was hung from the existing light socket, automatic feeder, and waterer, and the four chickens I purchased from the local flea market were added.

I realized after a few days that chickens do not pick a nest as their own and use that one for themselves. They pick a “community” nest or two. It is not necessary to have a nest for each chicken which can save a lot of work and money if you have a large flock of chickens.

It pays to spend some time in the chicken house in the mornings when the hens are laying to see how many nests are being used at the same time. Some chickens will wait their turn for a chosen nest if it is busy instead of using another nest.

I would wear a mask ( you can get seriously sick from breathing dust from chicken droppings) and gently rake and sweep up the hay, shavings and droppings on the floor (this was composted along with the horse and cow manure from the barn and later used on the garden as “organic fertilizer”) , wash out and refill the waterer and feeder and observe the chickens.

I got the hens used to me reaching under them to gather the eggs and I never got seriously pecked. Some would gently peck at my hand but I never got injured. One hen would even hop on my lap to be petted if I squatted down.

The chickens settled in pretty well. However, I soon realized, all I needed to know about them wasn’t in the neat little articles I read in magazines.

A few days after settling the chickens into their home, my son left the gate open to the fenced outside area and the chickens all got out. The herding dog we had, thought it was great fun to chase them and the chickens ended up in a tree. Who knew chickens could fly!

I put the dog in the house and used a broom to encourage the chickens to come down out of the tree and back in their yard. This took at least an hour and I began to realize “chicken training” and “dog training” were both in order.

On another day later that week, the dog was taken in the chicken yard on a leash and properly introduced to the chickens and not allowed to chase them or be aggressive toward them.

chickens for self-reliance

Over the next week they became used to each other and the “chasing game” never happened again. My neighbors, all over 80 years of age, had first-hand experience with chickens and suggested clipping the wing feathers on only one wing of the hens.

This created an imbalance so the chickens could not fly easily. The chickens could still run and escape any threat when outside their area, but not get 12 feet up in a tree. To do this you hold the chickens upside down by their feet.

They essentially “go to sleep” and are easy to handle this way. If you run after a chicken, it will outrun you and unless you have a net (which I did have later to catch the roosters). The easiest time to catch them is when they are on a nest after laying.

Just slide your hand under them and grab both feet at the same time, They will flap their wings and try to get away, but holding them by the feet with their heads hanging down will stop this readily and you are ready to work on a calm chicken.

It is best to have a helper to do this. One person holds the chicken and the other cuts the feathers. Take one wing, spread it out and using scissors, carefully cut the feathers a few inches from the wing itself. Chickens do get mites and this is a good time to dust them with organic insecticide to prevent them. This process has to be repeated every few months, as the feathers do grow back.

I also began scattering feed in the chicken yard while clucking and calling to the chickens instead of just using the auto feeder and waterer. This both encouraged the chickens to scratch and eat natural feed, such as bugs and worms and weeds, but to also eat small grains of sand and dirt which they need to process their food.

Chickens that are only feed chicken feed have to be provided something like oyster shell which not only helps with their digestion but also provides calcium which helps them form hard egg shells. Chickens that naturally forage for food, better meet their nutritional needs without supplements.

Being able to call the chickens to me instead of having to chase and herd the chickens back into the chicken yard saves a lot of time and work.

Eventually, at the urging and help of my neighbors, I was able to allow the chickens to free range in the garden and barnyard during the day and call and gently herd them into the chicken yard before dusk… chickens really do go to bed just as the sun is setting and it is best to get them into their area before then.

They will roost (sleep) wherever, but once they are allowed to sleep outside of their nesting area, they will lay eggs elsewhere also. Finding an egg in the barn in the haystack, possibly weeks after it was layed, is not a good thing.

I was careful to not let the chickens out until all eggs were laid for that day, so early afternoon until about an hour before dusk was long enough. Also, eggs need to be gathered each day and not left in the nests for long periods of time as some chickens will peck at the eggs and once a chicken cracks and eats some of it, it is almost impossible to stop this.

Many animals will eat eggs and eggs can draw animals such as fox, raccoon, snakes, opossum, and hawks to your area and potentially put your flock at risk.

Chickens in the garden need to be supervised to be sure they are not eating the vegetables and fruits themselves. I was usually hoeing weeds, loosening and bringing fresh soil up around plants, or picking vegetables while the chickens were enjoying their time in the garden.

If I saw a chicken eating something it shouldn’t I would simply correct that behavior and encourage the chicken to move away from that area. I found the chickens would follow me and “work” where I was working. If I was in the barn cleaning out a stall, the chickens were there, because I was uncovering bugs and worms for them!

I had read that modern chickens did not have a nesting instinct anymore because they had been caged and not allow to raise chicks for generations. By this I mean, they did not lay a number of eggs and sit on them and keep them warm until they hatched into chicks. Grandma called this “being broody”.

I did not have a rooster, so the eggs my hens were laying were not fertilized. I could not add to my flock by this method, so I decided to buy an incubator with an automatic egg turner and buy fertilized eggs from the flea market to incubate.

This was a fun experience and was not too labor intensive. If I had not had the automatic egg turner I would have had to manually turn the eggs once or twice a day which was more time consuming than anything. Keeping the temperature and moisture levels correct was relatively easy; waiting the 20 some days till the eggs started hatching was the hard part!

Once the chicks starting hatching young and old would spend hours watching and listening to a chick peep while still in the eggs and peck a hole in the eggs shell large enough to get out. It was tempting to try and help a chick get out of the shell, but it is better to leave it up to nature in this case.

Don’t expect all of the eggs to successfully hatch. That is not natures way, hard as it is to see an animal perish before it actually lives. Once the viable chicks have hatched, keeping them fed and watered in a cardboard box with a heat lamp (or old-fashioned light bulb that gives off heat) until they started sprouting their big chick feathers.

At this time they could be put in a small bottomless cage on the ground during the day for several hours at a time.

They need to be back in the box and under the heat at night even in summer… Some people advocate clipping the beak of young chicks so they will not peck and injure each other. This can be done with fingernail clippers but I never had to do it to my chicks.

I think overcrowding and not handling the chicks could possibly be contributing factors. I handled all the chick by picking them up and cupping them in my hands and never had any aggressive chicks to deal with.

One thing I did not know is that day-old chicks get very tired very easy and will fall asleep and spread out like they are dead. I had a couple fall asleep with their head in the water tray and felt like I saved a few from drowning by picking them up out of the water.

They do stop this after a couple of days after hatching, but it pays to keep a close eye on them or remove the water when you cannot watch them the first couple of days after hatching.

The box itself should be large enough so the heat lamp or light you have over the cardboard box will not heat the entire box. The chicks will move toward and away from the heat as they need it so be aware of whether or not your chicks are getting too hot or cold.

Once the chicks are losing their “baby feathers” and growing their larger feathers I introduce them to the other chickens by putting them in a wire box in the chicken yard. Chickens have a pecking order and you don’t want to risk a small chick being injured by a big chicken by just turning them loose to defend themselves.

After a few days of their being in the chicken yard for a few hours protected by their wire box, I release them in the chicken yard with the other chickens. By this time they have long legs and heads nearly as large as adult chickens. I have never had a problem with a chick being caught and injured by a larger chicken.

I did find that after a year of being “free range” chickens that natural instinct kicked in with one of my hens. She was sitting on about four eggs one morning and was a little more bothered than usual when I went to get the eggs.

I had kept one rooster from the chicks I had hatched and wondered if he was doing his job. He was certainly a good alarm clock, crowing and flapping his wings while on the highest spot he could find in the chicken yard every morning.

I left those eggs for the “broody” hen and she successfully hatched 8 chicks. I was very happy to see that natural instinct would take over if given the chance.

I failed to mention the wonderful eggs we got from our chickens. I learned to make many things I would not have learned to make without them. Everything from mayonnaise to angel food cake to quiche became things enjoyed by my family as well as by the helpful neighbors.

I was able to barter eggs for butter with one neighbor that had a milk cow. I no longer have the chickens, that farm or the neighbors but still, have the incubator. I thoroughly enjoyed learning about chickens and maybe someday soon I will start another flock.

In the meanwhile, I hope my experiences will be helpful to any of you with chickens or thinking about getting started with chickens.

Filed Under: Homesteading

  • « Go to Previous Page
  • Page 1
  • Interim pages omitted …
  • Page 6
  • Page 7
  • Page 8
  • Page 9
  • Page 10
  • Go to Next Page »

Primary Sidebar

Subscribe to Blog via Email

Enter your email address to subscribe to this blog and receive notifications of new posts by email.

Join 7,197 other subscribers
  • Amazon
  • Facebook
  • Substack
  • Twitter
  • YouTube

“Do more with less.”

– Minimalist proverb

Recent Posts

  • Just so you know
  • Weather Update for My Corner of Appalachia
  • Why I’m Ordering Ivermectin + Mebendazole Every Year
  • The Website’s Shutting Down (But Here’s the Plan)
  • You Are Hated! Start Training Like It!

Footer

Recent Posts

  • Just so you know
  • Weather Update for My Corner of Appalachia
  • Why I’m Ordering Ivermectin + Mebendazole Every Year
  • The Website’s Shutting Down (But Here’s the Plan)
  • You Are Hated! Start Training Like It!

More about me

Books I’ve written

Books I’ve read

Follow Me on YouTube

Follow Me on Facebook

Gear I Use and Recommend

Newsletter

Search this site

Follow me elsewhere

  • Amazon
  • Facebook
  • Substack
  • Twitter
  • YouTube

© 2008–2025 M.D. Creekmore · As an Amazon Associate, I earn from qualifying purchases.