• Skip to main content
  • Skip to secondary navigation
  • Skip to primary sidebar
  • Skip to footer

M.D. CREEKMORE

  • Blog
  • Books
  • Newsletter
  • Gear I Use
  • About
  • Contact
  • Facebook
  • YouTube
  • Blog
  • Books
  • Newsletter
  • Gear I Use
  • About
  • Contact
  • Privacy Policy
You are here: Home / Archives for M.D. Creekmore

M.D. Creekmore

Hello, I’m M.D. Creekmore. I’ve been interested in self-reliance topics for over 25 years. I’m the author of four books that you can find at Amazon.com as well as Barnes and Noble. Over the years, I’ve learned a lot about prepping, homesteading, and self-reliance topics through first-hand experience and now I want to share what I’ve learned with you.

Do It Yourself Long-Term Bushcraft Survival Shelter Ideas

September 13, 2018 M.D. Creekmore

long-term bushcraft shelterby Alex P

Veteran bushcrafters innately understand the Rule of Threes. The Rule of Threes is as follows: humans will die after 3 minutes with no air, 3 days without water, or 3 weeks of going without food. At least, those are the most commonly known rules.

One that is equally essential and that gets glossed over is the fact that people can die in three hours without shelter that thoroughly protects them from fatalities in harsh conditions.

You may not think the weather in your area is harsh enough to kill you but you might be surprised. During a 1964 race in England, three competitors were cut down by the cold even though it never dropped to freezing temperatures.

Even without the threat of imminent death, you can still face abundant health risks if you spend an extended period of time exposed to the elements. You name it, Heat, UV rays, cold, rain, snow, all these and more can quickly shorten your lifespan if you are continually exposed to them without a proper shelter to safeguard yourself.

In this world full of uncertainty, there’s always value in being prepared. Knowing what to do in a survival situation could literally determine life or death. If you know how to create survival shelters in the wild you could survive a situation you would have died in otherwise. That’s why we are sharing our top 6 ideas to creating survival shelters in the wild.

Lean-To

Lean-to is probably the most well-known option for creating a survival shelter. You need to find two trees that are close together and a thick stick that can be wedged between the trees. If you can’t find trees and sticks of the right size, you can hammer two sticks into the ground and secure a third between them.

If possible you should then tie the main pole to the supports to prevent a collapse. From there you simply lean a large number of sticks against the pole to create something that looks like half of a roof. Sticks are essential but they aren’t enough, you’ll need to fill in the open spaces between the sticks with moss, leaves, twigs, and other flora to act as a sort of insulation.

Overall, since the lean-to is open on one side the heat that can be kept in is minimal, the lean-to is mainly for achieving a basic level of protection.

Quinzhee

Getting trapped on a mountain with nothing but snow in sight is in many ways a worst case scenario, but that doesn’t mean it’s hopeless. Survival structures can be constructed using snow.

You’ve probably heard of igloos, and the idea here is similar. It’s just that in our idea you don’t need to have the expertise used by Northern natives to create homes from packed snow. You can create what is known as a Quinzhee must faster. You begin by piling up your supplies over an area that is larger than your body.

You then pile snow up around your supplies and pack it down until it’s about 30 inches thick all the way around. Try to keep the snow packed smoothly and evenly to prevent collapse. You then dig your way through the side and to your supplies, remove said supplies carefully, and take shelter in the cave you’ve created. Just make sure to poke a small hole in the top for air to come in or else you might be trading exposure for suffocation.

Basic Teepee

For this famous shelter, you need to start by either finding a thin but sturdy tree or a long pole that you can secure down in the ground. From there you will want to find as many long, straight branches as you can and circle the pole with them, leaning them up against it until you have a completely closed cone of empty space in the middle.

You should then somehow secure the pieces of wood together, tying them at the top with rope or fashioning a sort of cord from materials you find in the woods. Finally, you need to add the insulation, packing on anything you can to contain the heat without leading a collapse.

Debris Hut

The debris hut requires two sticks that stretch a bit beyond the length of your shoulders and one long stick that is larger than your height. You begin by sticking the two short sticks into the ground and leaning against each other so that they form a triangle.

You then place one end of the long stick on top of the triangle sticks and the other on the ground around 6 feet away. You then find as many sticks as you can and lean them up against the one long stick to form a sort of wooden pyramid that leaves just enough room for your body in the space left open. Small debris huts may feel claustrophobic, but that can actually be a good thing.

A small shelter may feel cramped at first but it actually seals in your body heat more effectively. And on the topic of body heat, don’t forget to insulate it, the debris in debris hut refers to the sticks used for the skeleton of the structure and the leaves and grass used for insulation.

Tarp Tent

One of the most helpful things you can have in a survival situation is a tarp. It makes shelter construction so much more simple, all you need to do is find a way to prop it over yourself and secure it down so that it will cover you safely through the night.

The second most helpful thing to carry is probably some sort of rope. If you can tie a rope between two trees and toss your tarp over the rope, you’ll have a tent ready. If you don’t have a rope, then you can wedge a sturdy stick between two trees to create the necessary support.

You can actually make just about any of the structures we’ve listed using a tarp, you simply have to put the tarp on top of the basic support instead of leaves, grass, and other natural types of insulation. Just make sure to secure the tarp with heavy rocks or logs to keep it from being blown away by winds.

Find Natural Shelter

The final of our top 6 ideas to creating bug out survival shelters in the wild offers something to think about in all the previous five scenarios. When creating survival shelters you don’t have to do everything yourself, and in most cases the less you can get away with doing the better off you will be.

Time and energy are everything when it comes to survival, you don’t want to waste time getting fancy with your construction ideas in a survival situation. That’s why it helps to start out with an existing foundation you can build on. If you can find a cave, cliff wall, large leaning tree, or some other sort of natural wall or enclosure then half of the job will be done for you.

The average entirely self-built structure might last a night but if you could be stranded for a longer period of time then finding something solid and natural to build around will save you time and effort in the long run.

Though at that point, you also need to consider things like access to freshwater and sources of nutrition when choosing where to set up your survival base camp. For your convenience, we put together a List of Emergency Essentials for you to check off. Survival is about planning ahead so life doesn’t catch you off guard.

Related and Recommended:

  • Shelters, Shacks, and Shanties: The Classic Guide to Building Wilderness Shelters
  • The Complete Survival Shelters Handbook: A Step-by-Step Guide to Building Life-saving Structures for Every Climate and Wilderness Situation
  • The Bomb Shelter Builders Book
  • The Secure Home

Have you built a shelter in the wild? Why? How did it turn out? Please leave a reply in the comments below…

Filed Under: Bushcraft

How to Make a Tripwire Trail or Camp Alarm

September 13, 2018 M.D. Creekmore

camp or trail alarm
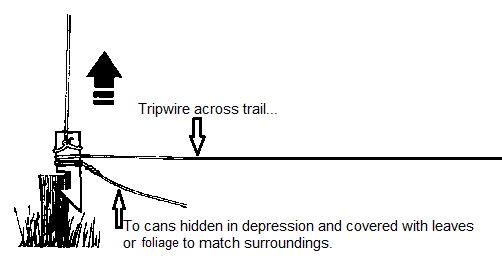
Many of you, have watched the old war movies where the approaching enemy trips an alarm made of tin cans, which in turn alerts the good-guys to their approach. The advancing troops trip the wire and the cans fly up into the air, making enough noise to alert the good guys to the approach, allowing them time to mount an effective counter.

In the real world there are better, more effective alarms that can be made to guard the entry points to your position, but since we love movie magic, I thought this infamous contraption would be a good place to start.

First, find the most likely area of approach and one offering enough cover to effectively hide the trap and wire. One of the best places is where the trail makes a sharp turn in another direction, this makes it more difficult for the target to spot the wire before tripping the trigger and sounding the alarm.

Try to make everything look natural, avoid breaking branches, turning over leaves or loose dirt, clean up all wood shavings etc. You want everything to look just like it did before you set the alarm.

It’s best to dig a slight depression to hide the cans, do this on the opposite side of the tree away from the approaching intruder. Add two or three rocks to inside each can then cover with natural cover to hide them from view.

This design and trigger can be used with other “noise makers” one of my favorites is a cowbell or goat-bell, a bell is louder and easier to hide. The main problem is that they may not be available when needed. But I’m sure you can come up with more ideas.

If you are interested in learning more about traps and path guards I recommend the Trapper’s Bible: Traps, Snares & Pathguardssurvival trapping by Dale Martin. This book includes pest snares, large animal snares, and transplant traps, plus camp alarms that alert you to intruders and deadly pathguards that could save your life.

Filed Under: Bushcraft

Archery Tips For Beginners

September 13, 2018 M.D. Creekmore

bow hunting tips for beginners

by Morgan

I’ve been an archer for around 14 years. I learned to shoot with a recurve when I was in college and I immediately fell in love. After that class ended, I ran to the nearest bow shop and picked up a compound bow. It was a Browning and it was beautiful. I shot a lot, but I never took it seriously and my accuracy was always way off, but I didn’t care as I was doing it for fun.

I moved to a new state and the movers lost my bow. I was so devastated, I loved that bow, I had had it for years and now it was suddenly gone. I didn’t pick archery back up for many years after that. It’s unfortunate that Browning doesn’t make bows anymore. A friend of mine was generous enough to gift me a Browning Recurve which I love and use as often as I can.

I digress; I love archery. Everything about it is so soothing. I am totally zen when I’m shooting my bow. The whole world just disappears and all that’s left is the target in front of me.

The primary bow that I shoot is a compound by Bowtech, the Eva Shockey Signature Series. It’s a light, fast, quiet bow. I practice with it at least once a week.

I love my compound, but I know in a true survival scenario that a compound may not be the best option for long term.

Here’s what we should consider about archery before choosing it as one of our main sources to hunt or for defense or whatever else.

Types of bows:

–Compound: The compound bow has a lot of moving parts that we must maintain to keep it running smoothly. Even if you keep extra pieces on hand, it would be difficult to maintain if you’re not at home with the necessary tools.

On that same note, it’s impossible to change the string of a compound bow without a press. So if you must change out the string (which you will have to do at some point, no matter how well you maintain your string), you need a bow press in order to get it off and get a new one back one. So even if you keep an extra string on hand, you’ll still need some way to get the new string on.

Some compounds are kind of heavy and bulky as well. Mine is lightweight and doesn’t feel bulky, but it could be a hindrance to some.

Deer at Cades Cove TN
Some nice deer at Cades Cove – Great Smoky Mountains TN.

The arrows are another concern. Unless you have a lot of arrows, they could get lost or break and you’d quickly run out of arrows. You can’t just make new arrows for a compound because of the sheer force that it would put on the wooden arrow, the arrow would simply shatter.

Lastly, you need a release to properly operate; if your release breaks, it’s gonna be difficult to macgyver a new release or to fix whatever happened to your existing release.

For the short term, as long as you wax your string and don’t dry fire it, it should last quite a while. But it wouldn’t be a super long-term solution. I haven’t changed my strings out in 2 years and they’re still perfectly fine, but they are getting to the point where it wouldn’t hurt to change them out.

–Crossbow: They have full-size crossbows and more ‘handheld’ crossbows. I’m personally not a fan of crossbows in general because they are heavy, bulky and it takes a lot of time to re-nock an arrow (bolt). Not only that, but it can be quite difficult to even nock a bolt depending on your strength. They do have crossbow assists that will help you nock your bolt, but even so, it can be difficult.

Many people may still choose this option because they’re kind of like a rifle, they come with a scope, you aim and pull a trigger and it’s a lot quieter than a rifle. So if you’re looking for something that it quiet but still want that point and shoot, a crossbow may be a good option.

However, just like with a compound, you have a lot of moving parts that you’ll need to maintain and/or fix.

Not only that, but it may not be possible to make bolts out of wood for your crossbow. The crossbow has so much power behind it that simply trying to make some wooden arrows for it probably wouldn’t work out too well.

Short term, a crossbow may be a good option, just make sure you have the appropriate tools and plenty of bolts. Those bolts have a habit of disappearing!

–Recurve/Longbow: I’m putting these into the same category because while they are difficult, they’re also kinda basically the same.

Whether it’s a takedown bow or all one piece, the recurve/longbow have very little downsides. They’re wood and string, that’s about it! It’s easy enough to make arrows out of wood and use them with basically any recurve or longbow, depending on the weight.

Make sure you can string and unstring the bow yourself. Also make sure that you can properly pull back the string, that it’s not too heavy. Unlike a compound, with a recurve/longbow you’re holding back all of the weight. If it’s a 35-pound bow, you’re pulling and holding back 35 pounds.

It’s also fairly easy to make a recurve/longbow and the arrows out in the field out of wood. I would highly suggest making a few before SHTF just so you know what you’re doing. There are a lot of tutorials online.

The recurve/longbow are definitely great options for short term and long term.

–Survival bow: I’ve heard mixed reviews about the foldable survival bows. Some people rave about them and others think they’re garbage.

In theory, a foldable, lightweight bow is ideal. In some cases, even the arrows fold.

Just be sure to do your research on this type of bow. I wouldn’t recommend getting this as your first bow, but more as a bow that you get after you’ve practiced a lot and feel confident in your archery abilities.

Even if you feel confident, if this bow is going to be your SHTF bow, you’ll need to practice with it regularly.

Considerations:

Bow Hunting Skills

Archery is a perishable skill. Don’t believe anyone who says that they can stop shooting for 13 years then suddenly pick it back up and still be able to shoot a dime 50 yards away. I’m sorry, that’s not how it works. It is a perishable skill and needs to be treated as such by practicing as often as you can.

Whether you plan to be using archery for just SHTF purposes or whether you want to get into bowhunting, bowfishing or 3D shoots; you need to practice. As I mentioned, I practice at least once a week, but you can choose to do more or less depending on your time. Just make the time. It takes only 10 or so minutes to sling a few arrows down range.

Learn how to properly shoot a bow. Take a lesson or two and gain the proper knowledge. A YouTube video is ok, but you’ll gain a lot more insight if you take a class in person.

Being good at archery isn’t just about accuracy. Of course, we all want to be amazing and hit the bullseye every time, but practicing will also help you get to know your bow; how to troubleshoot problems, what works, what doesn’t, your strengths and weaknesses, etc.

Archery also teaches you patience. Nobody is an expert right off the bat, so it’s going to require dedication and focus to be able to hit the target exactly where you were aiming.

This is especially true for recurve/longbow. They are a lot harder to master than a compound or crossbow. With a compound and crossbow, you have sights that you can adjust in order to make the right shots. You don’t have those devices on a recurve/longbow. All you have is practice and your intuition!

It’s not necessarily hard to learn how to shoot with a recurve/longbow, it just takes a bit more time and effort.

Learn how to maintain your bow and then properly maintain it. The better maintained it is, the longer it’ll last.

Never dry fire your bow. Dry firing means to pull back the string and let it go without an arrow. Without an arrow, instead of the energy pushing the arrow, all of the energy transfers to the bow and could damage your bow.

Make sure you wax your strings before and after each time you shoot.

Be sure to check the limbs for any cracks regularly, even if you don’t dry fire it, your bow could still become damaged over time.

Be sure to check your arrows for any cracks or damage. A damaged arrow can break before it’s even released and cause a lot of harm.

Make sure that you find a bow with the appropriate pull weight. You don’t want it to be too heavy or too light.

Relax and have fun! Even if you miss your intended spot, it’s ok! Not the end of the world. Just keep practicing and have fun. You’ll get better in time.

Aim small, miss small. As you get better with your archery, try to aim at smaller objects. It’s a fun challenge and the smaller the objects that you can hit from various distances, the better off you’ll be when you’re trying to hit your intended target. If you’re hunting rabbits, for instance, they are small and quick and require a lot of practice to accurately hit in an appropriate spot.

And it’s worth repeating: practice, practice, practice! Practicing consistently will help you to better use your bow in stressful situations, especially while hunting. Consider a mantra to help you relax and focus. My mantra is:

Aim – Focus on the target and where you want the arrow to go.
Breathe – Take a deep breath and as you’re letting it out…
Pull-Pull the trigger/release, this helps you to relax your shoulders and everything else.
Follow Through – Don’t yank the bow down so you can see your shot; let it drop naturally and hang there for a second. Then pull your bow down and look at your shot.

Dedication will be required if you choose archery for hunting, or survival purposes. But try not to take it too seriously, archery is a ton of fun and there are a lot of great archery events to participate in all across the country.

Filed Under: Archery

8 Things You Need To Know About Bushcraft

September 13, 2018 M.D. Creekmore

Bushcraft and survival skills to learn nowby Angela Williams

Civilization and advancements in technology have reduced to the minimum manmade disasters. Even some natural disasters can be foreseen and adequately planned for. However, Mother Nature sometimes has its way and, leaves a catastrophic aftermath. In such a case, your level of preparedness is the single most important determinant of your survival.

Such preparedness also comes in handy if you are in the wilderness.

To survive in the woods, you must possess some unique bushcraft skills, skills that the best preppers have perfected over the years. In this tutorial, we will provide you with 8 basic bushcraft survival skills that you ought to know to be a successful survivor.

1. Sourcing and Purifying Water

Over 70 percent of your body is water. For that reason, you cannot survive for more than three days without drinking water. In an extreme environment, it may not even be possible to survive that long. Perhaps the most important survival skill is locating and purifying water. It is always good to store sufficient water at all times and carry some prior to leaving for an exploration.

Mother Nature is another good source. You can actually extract clean drinking water from certain plants, especially those with large, green leaves. However, you have to learn to do it properly as some plants may be poisonous. Learn how to extract water from plants in time for adequate preparedness. If there is a ready source of water such as stream, river or pond, use the water only after filtering and boiling it.

2. Starting and Fueling Fire

The next basic but important skill is starting and fueling a fire. This skill is only second to sourcing and purifying water. Hypothermia, a medical emergency that occurs when your body is incapable of producing enough heat to cope up with heat loss, is a real threat if you do not find a way to start a fire to warm your body.

Fire is also essential for water purification, cooking of food, warding off deadly predators, cauterizing wounds following injury and in signaling help in case of an emergency. Ideally, it would be good to have matches or lighter in your person at all time. However, you must also equip yourself with skills so you can start a fire from scratch. Learning how to start a fire from scratch and tend to it is a vital survival tactic all survivors must undergo.

3. Building a Temporary Shelter

The basic needs for human survival are water, food, shelter, and clothing. If you leave to wander in the woods for a day and return to civilization in less than a day then building a temporary shelter should be the least of your worries. However, the story is different if you were to be lost in the wilderness for a couple of days. You would want to build a shelter to protect you from the elements and for peace of mind.

The risks and dangers of emergency are compounded by extreme weather including rain, snow, thick fog and cold. The manner of building shelter depends much on the surroundings and the environment where you are. Learn the best types of temporary shelter to build in emergency situations. Examples include Round Lodge (wickiup, teepee, or wigwam) and Lean-to.

4. Foraging and Hunting For Food

In a survival situation, the usual sources of food are no longer available. Once your food reserves are gone, you are left with the option of trusting Mother Nature to take care of your nutritional needs. You must learn to find and catch food to keep yourself and your loved one alive.

You can use various methods to forage and hunt for food. Such methods include hunting game using self-made weapons, trapping via small game survival snares, and fishing using a line and a hook and foraging for edible fruits, seeds, and herbs.

Concerning the latter, there are many helpful resources that can guide you on the particular plants to go for.

5. Proper Use of Survival Tools

Since most individuals cannot afford all the survival tools currently available in the market, the wise thing to do is pick the appropriate ones for your needs. Survival tools will help you in making a temporary shelter, fetching and preparing firewood, hunting, and cooking among other needs.

The most common survival tools to have in your possession include a flashlight, tactical folding knife, a backpack, scissors, hammer, splitting maul or ax, nails, pliers just but to mention a few. However, it is not enough just to have the tools; you must also know how to use them properly. This will not only make your work easier but also prevent accidents or nasty failures.

6. Psychological Preparedness

Survival means staying safe and functional by mitigating the effects of the disaster or emergency situation at hand. It takes a lot to manage your attitude and personality in an emergency situation. One of the most important survival skills is psychological preparedness. You must have confidence that you will survive despite the difficulties presented by the situation.

Think of what might happen to you if you were to lose hope along the way. It could prove fatal in the end if you cannot get your act together and approach the situation with confidence. It takes a lot of practice and soul searching to prepare psychologically for any eventuality in an emergency situation.

7. Predicting Weather

In most cases, we do not have to worry about the weather conditions of our immediate environment unless there is an impending natural calamity such as hurricane or floods. Nevertheless, being able to forecast weather is a vital skill every prepper should learn. The lessons will become handy in an emergency situation.

Any sudden change in weather conditions if you are in the wilderness can prove disastrous to you because you will not have the necessary skills to mitigate it. Among the weather predicting skills to learn include air pressure, cloud types, animal behavior and variations in temperature. While you can use weather prediction gadgets such as barometer, thermometer and so forth, you must also be able to make approximations from these natural phenomena.

8. First Aid Basics

First Aid is a fundamental skill everyone, especially preppers, must learn as part of disaster or emergency preparedness. In case of emergency, this skill can help you get out of a deadly situation. For instance, you might get a cut that leads to severe bleeding. In such a situation, you can use your First Aid skills to stop the bleeding before you access a medical facility for a more robust treatment. It also means you must have a small First Aid Kit.

Bottom Line

Acquiring the 8 bushcraft skills discussed is the first steps in learning outdoor survival bushcraft skills. Bushcraft skills are easy to learn with practice and incredibly helpful. If you do not possess these skills, chances are that you will fail if lost in the woods for an extended amount of time and I believe that’s something you do not want – so get to work.

Filed Under: Bushcraft

Is The Lever Action A Good Bug Out Rifle?

September 9, 2018 M.D. Creekmore

Lever action rifle ready to bug out By Jim Ballou

For a lot of potential wilderness survival emergencies, a lever-action carbine of one variation or another chambered for a versatile hunting/defense cartridge seems especially practical in my view. With such a weapon you’d have rifle-like accuracy and power in a comparatively compact, portable platform, and for this reason, I believe the carbine lends itself well as the basis for an emergency survival or bug out kit.

I chose to make my own such survival kit out of a Winchester Model 94 “Trapper” carbine with a legally minimum 16-inch barrel, chambered for 44 Remington Magnum (an earlier glimpse of this same project is featured in my book, Arming for the Apocalypse.

I like this gun for this particular purpose because it’s a fast-handing repeating lever-action of a conveniently short and handy size, and its cartridge is not only interchangeable with my favorite revolver but is also quite versatile.

The 44 Magnum has been used since its introduction in the mid-1950’s to successfully hunt every species of North American big game if my information is correct. My little carbine holds nine loaded rounds in its magazine tube, plus one in the chamber.

For me, this is the perfect sit-around-the-campfire kind of gun. If some beast were to suddenly burst into my camp in the middle of the night and threaten my being or the safety of anyone else in the camp, I believe I would feel fairly secure having nine or ten fast rounds of 44 Magnum at my disposal to answer the threat with.

I am aware that this particular variation of the Model 94 is no longer manufactured by Winchester, but I still frequently see plenty of used ones offered for sale. I purchased mine new in 2002 when they were still in production, and I paid around $300.00 for it at that time.

butt sock survival kit
Plate removed, showing small cavity in butt of stock for housing small survival gear.

The used ones I’ve seen lately have been priced considerably higher. By the way, this same model was also offered in .357 Magnum, and I believe one in that chambering would also be an excellent choice for this purpose. Additionally, there are at least a few other lever-action rifles and carbines chambered for 44 Magnum currently available from other gun makers.

No doubt readers will think of other viable or possibly even more suitable carbine designs for their purposes, but whether we opt for a lever-action, semi-auto, pump-action, single-shot, or bolt-action, I think the general idea of a survival carbine would be basically the same.

I began my project by removing the butt plate and drilling a 5/8” diameter hole into the wooden stock, just deep enough to hold a few wooden matches, a hobby knife blade, some sewing needles with a length of thread, a cotton ball (for emergency fire starting tinder), and some fish hooks.

I avoided the temptation to drill a larger hole that would house more gear, being careful to avoid compromising the stock’s structural integrity. After screwing the plate back on, I decided to sew a tiny pocket to the gun’s sling for stowing a short key-shaped screwdriver with the gun that fits the screws used to hold butt plate to the stock.

sling swivel on lever action rifle
A tiny pocket made from leather scrap was stitched to the sling to house the key-shaped screwdriver for the butt plate.

Next, I wrapped the entire buttstock of the carbine with several sizes of utility/survival cord. If there is one type of product more generally utilitarian to a wilderness survivor than cordage, I am not aware of it. When I visit the woods I invariably end up using the cord in shelter building or tent raising, tying down the gear, repairing items, hanging supplies from tree branches, replacing boot laces, etc.

The task of wrapping a rifle stock with cord can be tricky, but I’ve learned a few little tricks that make this process easier and more successful.

First, it is much easier when attempting to tightly wrap any tapered object with cord to start the process from the smaller diameter end of the thing and progress toward the larger portion, because the windings of cord have a tendency to slide apart while wrapping them on a body tapering downward. You will want to keep your wraps even and tight together.

A second trick involves using a wrapping technique commonly employed in whipping the ends of rope with small cord, and this is how you can avoid entirely the use of bulky knots that eventually unravel, while also maintaining a more permanent and tighter wrap.

cordage wrapped around rifle stock
Close up view of the wrist area. Note also that the lever itself has some cord wrapped onto it.

This can be done simply by forming a bight in the standing end of your cord and laying this bight stretched out along the length of the item you want to wrap, and wrap your windings of cord over it together with the (gun stock, in this case) until your windings approach the remaining eye in the end of the bight.

At that point, you feed the running end through the eye and pull on the standing end of your cord to draw the bight and running end under the tight wraps. I sometimes use two pairs of pliers to firmly grip and keep both ends of the cord taut during this finishing stage.

Finally, I discovered that by adding a furniture tack at the comb of the stock I was able to provide a much-needed ledge to hold back the wraps of cord at that point. Without something like this, there is nothing to prevent the windings of cord from merely slipping over the edge of the comb.

Wrapping the wrist area of a Model 94 Winchester requires some care because there is a safety button in the lower tang that must be depressed by the closed lever before the gun will fire. So, any wraps of cord around that area must not be too thick or interfere with that little button, because if they do the weapon won’t work.

lock bladed knife attached to rifle stock
A lock blade knife with a belt clip fits conveniently onto the stock’s shell holder.

After I had wrapped several layers of small cord on the carbine’s stock, I decided that a cloth shell holder that goes over the buttstock could be a handy thing. After adding that, I found that a lock-blade knife with a belt clip that would firmly slide under the back end of the shell holder could also be very handy to have in the woods. I eventually secured this knife into position more permanently by tying it on using several lengths of small diameter cord.

At some point, it occurred to me that the gun’s sling would lend itself quite well as a shell holder as well as a pouch for more small survival gear. The sling I had purchased for the carbine came with a few cartridge loops already, but I wanted a few more.

bug out survival kit
Examples of lightweight survival gear that can be carried on a rifle sling: 1) small knife, 2) sparking tool, 3) wire saw, 4) button compass, 5) #6 barbed fish hooks, 6) needles & thread for emergency repairs, 7) birthday candle, will sustain small flame for 35 minutes, and 8) band-aids and butterfly sutures.

I discovered that a belt slider with six cartridge loops could be positioned in a convenient section of the sling and stitched into place to prevent it from sliding around. I also discovered that this created a sort of convenient pocket between the belt slider and the sling, inside which I managed to fit a small bag of some basic survival items like a ferrocerium sparking tool, a small knife, a wire saw, bandages, more small-diameter cord and fishing tackle, a button compass, etc.

To make all these goodies thus mounted on the sling (including those spare rounds stowed in the cartridge loops) more secure, I ended up wrapping a handkerchief around the whole works and binding it up with a few lengths of small cord. While the sling may now be a tad bulkier and heavy with all of these things on it, it is still nevertheless usable as a carry sling.

Sling on lever action rifle and ready to bug out
A handkerchief tied on helps to protect the ammo in cartridge loops and all the survival gear on the sling.

Ultimately I ended up with not only a handy little 44 Magnum carbine to take along camping and scouting around in the woods, with its spare ammunition stowed “on board”, but in fact a survival kit system of its own. So, will this resulting mess of outdoor gear form part of my emergency Bug-Out Bag arsenal? You bet it will. With a set-up like this, a survivor would have plenty of possibilities available to him in an emergency.

Bio:  Jim Ballou has worked as a self-employed, independent insurance agent and a freelance writer for over sixteen years. More than sixty of his magazine articles on a variety of topics ranging from primitive and early American crafts and tools to wilderness survival skills have appeared in five periodicals since 2000, including Backwoods Home Magazine, The Backwoodsman, Wilderness Way Magazine, Primitive Archer Magazine, and Modern Survival Magazine.

Mr. Ballou’s first non-fiction book titled: Long-Term Survival in the Coming Dark Age was published by Paladin Press in 2007, and it quickly became a Paladin best seller. This was followed by four other popular non-fiction titles with Paladin Press, including Makeshift Workshop Skills for Survival and Self-Reliance, MORE Makeshift Workshop Skills,Arming For The Apocalypse, and the most recent title, The Poor Man’s Wilderness Survival Kit.

Ballou’s interests are too varied to list here but include blacksmithing, gun collecting, target shooting, reading and learning about history, writing, camping, hunting, fishing, treasure hunting, exploring, experimenting with tools and creative processes, survival and self-reliance related topics, plus all of the primitive skills, among numerous other interests and hobbies. He lives with his wife and two kids in Idaho.

Filed Under: Bugging Out

What’s The Best Rifle Sling For The AR-15?

September 9, 2018 M.D. Creekmore

photo showing a two-point sling configuration
by Joe Nobody

One extremely important accessory for a shoulder-fired weapon is frequently overlooked by preppers. It is unpretentious, cheap, readily available, and easy to install. It’s the sling.

Suffering from a lack of sex appeal, lost in a plethora of available furniture, and definitely not the cover-girl of gun porn, the lowly sling often suffers from a lack of appreciation – until your body has paid the price.

Through the years, I have conducted numerous training sessions and can now easily identify the guys and gals who have experience in the field… the folks who have carried a long gun for an extended period of time. Their slings are functional and comfortable – like an old pair of well-worn blue jeans or a seasoned pair of boots.

They fit, function, and perform critical tasks without fanfare or ritz. Those who have ignored this critical component suffer – sometimes badly. More on that down-article.

No doubt some of you are wondering, “Why is Joe ranting on and on about something as simple as the humble sling? It’s just a length of material that you use to attach a weapon to your body – right?”

Not really. Not in a practical application:

In the gun-candy store, it’s easy to get distracted by lights, lasers, and fancy optical doodads. At the range, other shooters rarely stroll over and say, “Wow, what a nice sling.” In the gun safe, they tangle and annoy. But if you ever have to keep a shoulder-fired weapon on your person for extended periods of time, there is nothing you’ll appreciate more than a good sling.

photo showing how to use a sling as a plumb lineMany of the folks I work with haven’t spent a lot of time with a weapon in the field. That’s not a criticism or a sin; it’s simply a fact that few occupations or lifestyles demand the need or naturally deliver those experiences. Most of us do not walk into corporate America carrying a long gun.

Even the gents who have served for years in the infantry may not consider that their military experience will likely differ from that of a post-event prepper. Protecting the homestead while accomplishing daily activities, chores and movements is different than the routine of a soldier who is a component of a fighting unit.

I often challenge my friends to perform one simple task without leaning their rifle against a tree – set up camp. Pitch the tent, build a fire, and empty the packs while wearing your blaster. The experience can be a real eye-opener.

Take that exercise one step further; envision a typical post-event day from dawn to dusk with security as part of your plan. This mind-movie will help you realize the need for comfortably accommodating your weapon. Unless you find yourself surviving in a densely populated urban area, you’ll most likely spend a lot more time carrying your rifle than shooting it. This is a critical point. You probably won’t be fighting, sweeping, clearing, or defending all the time. (If your environment requires such diligence, it might be time to consider another location.)

Photo of Joe Nobody climbing a ropeYou will, most likely, be spending countless hours gardening, gathering, harvesting, and performing manual labor. If there is no rule of law, you’ll probably want a firearm close by, or on your person. You may spend considerably more time traveling by foot than you do now. There’s a reasonable chance you’ll be outside and exposed for significant portions of the day.

All of this translates into the lowly sling playing an important role. The wise prepper will evaluate this humble piece of kit now, rather than later when it’s too late. Prove that you can carry that blaster comfortably, securely and in a manner that is “mission configurable.”

Types of Rifle Slings

For years, there were two basic types of slings: Single-point and 2-point. (For a short time, there was a 3-point sling, but it faded from the market quickly.)

A few years back, the single-point sling was all the rage. It debuted as a cool accessory, and droves of shooters wanted to convert their battle rifles to accept this option. For most, this was a huge mistake.

Single-point slings are for SWAT teams, hostage rescue units, and other outfits that are expecting short duration encounters of intense violence. Single-point slings are great for moving a weapon to the weak-side shoulder, close-quarters combat, and other tactics that require a lot of movement of a weapon.

They, however, suck as a way to secure a long gun for extended periods while on the move.

Infantry soldiers, hunters, search and rescue responders, and probably preppers need slings that secure the weapon tightly against the torso. This configuration allows running, jumping, climbing, walking, and picking berries without the rifle banging into knees, thighs, or more personal regions between a male’s legs. A hot barrel can make this capability even more critical.

Consider that you may need to slide the rifle around to your back if you have to use your hands to carry something heavy or to climb. You’ll want to be able to tighten and tuck that fancy AK either in front or across your shoulders and do so in a way that doesn’t rub off significant swaths of flesh.

Recently, a new design has eliminated the need to make a choice. Several vendors now offer what I call “hybrid” slings that easily convert from single-point (when you’re expecting to fight) to a more comfortable two-point arrangement. This nifty invention gives us preppers the best of both worlds.

When shopping for a sling, consider these factors:

  • Be aware of the strap width and thickness. When you have a pack, body armor, load-rig, jacket or other paraphernalia on your shoulders, strap-pollution can be an issue. Wide and thin slings are typically the best option.
  • At least one connection point should swivel. This avoids tangles, twists, and hang-ups.
  • Metal rings, clips, and buckles will hold more weight than their plastic counterparts.
  • Look for quick adjustment straps. These are extremely handy.
  • Quick Detach (QD) connectors are also great innovations. Over the years, I’ve been in numerous situations where I wanted to get the weapon off my body in a hurry. QD mounts work well.
  • The company Magpul probably offers the most configuration/options: http://store.magpul.com/category/slings

But wait. Carrying the weapon is only part of the equation:

photo showing a sling converted into a single point sling

Have you ever read those great articles on a gazillion uses for paracord? Well, a good rifle sling has its own list of secondary applications. Not as many as 550-cord, but more than many people realize.

A sling can be used to provide a brace for several different shooting positions. Used correctly, it can steady a shooter’s aim.

Or how about an angle indicator for non-level shots? If you live in a mountainous or hilly country, you know that making a shot 40 degrees down into a valley requires some adjustment. Often, it’s difficult to judge the correct angle. This handy little accessory can help you with the estimate by creating a plumb line.

Properly selected, a sling can form a tourniquet, elevate an injured arm, tow something, fashion a stretcher or drag bag… the list could go on and on.

Essentially, a sling is a fancy 4-foot section of very strong rope. What could you do with that in an emergency situation?

Consider a scenario where you have three people in your group and need to climb a tree in order to scout. Three of these cords attached end-to-end would yield a 12-foot section of climbing rope.

In my fictional series, Holding Their Own, the protagonist uses his rifle sling and backpack straps to make a safety harness for a dangerous climb.

What I have come to respect most about preppers is a mindset of adaptability and creativity. I’m sure if you put 50 like-minded individuals in a room, they would devise dozens more innovative uses for this little length of material.

All the best! Visit Joe’s website, www.joenobodybooks.com, for more articles, reviews, books, and other resources for those who believe in the self-reliant lifestyle.

Recommended Reading

  • AR-15 Rifle Builder’s Manual: An Illustrated, Step-by-Step Guide to Assembling the AR-15 Rifle
  • AR-15 Skills & Drills: Learn to Run Your AR Like a Pro
  • How To Shoot Your M16/AR-15 In Training And Combat

Filed Under: Uncategorized

  • « Go to Previous Page
  • Page 1
  • Interim pages omitted …
  • Page 66
  • Page 67
  • Page 68
  • Page 69
  • Page 70
  • Interim pages omitted …
  • Page 79
  • Go to Next Page »

Primary Sidebar

Subscribe to Blog via Email

Enter your email address to subscribe to this blog and receive notifications of new posts by email.

Join 7,202 other subscribers
  • Amazon
  • Facebook
  • Substack
  • Twitter
  • YouTube

“Do more with less.”

– Minimalist proverb

Recent Posts

  • Just so you know
  • Weather Update for My Corner of Appalachia
  • Why I’m Ordering Ivermectin + Mebendazole Every Year
  • The Website’s Shutting Down (But Here’s the Plan)
  • You Are Hated! Start Training Like It!

Footer

Recent Posts

  • Just so you know
  • Weather Update for My Corner of Appalachia
  • Why I’m Ordering Ivermectin + Mebendazole Every Year
  • The Website’s Shutting Down (But Here’s the Plan)
  • You Are Hated! Start Training Like It!

More about me

Books I’ve written

Books I’ve read

Follow Me on YouTube

Follow Me on Facebook

Gear I Use and Recommend

Newsletter

Search this site

Follow me elsewhere

  • Amazon
  • Facebook
  • Substack
  • Twitter
  • YouTube

© 2008–2025 M.D. Creekmore · As an Amazon Associate, I earn from qualifying purchases.