• Skip to main content
  • Skip to secondary navigation
  • Skip to primary sidebar
  • Skip to footer

M.D. CREEKMORE

  • Blog
  • Books
  • Newsletter
  • Gear I Use
  • About
  • Contact
  • Facebook
  • YouTube
  • Blog
  • Books
  • Newsletter
  • Gear I Use
  • About
  • Contact
  • Privacy Policy

Blog

How To Trap A Cat and Havahart Trap Review

August 24, 2018 M.D. Creekmore

By JD

I don’t like cats. Okay, maybe that’s an understatement. I hate cats. Especially the “free range” variety that you so often find in suburban America. We lived in an area where they were becoming a real problem that animal control wasn’t able to keep up with.

I’d wake up in the middle of the night to cats fighting in the street, find cat crap in my garden and see them just about everywhere on evening walks. The time had come to take a stand.


From previous experience, I knew that cats were difficult to eliminate in urban/suburban settings where your options are limited so I did my research and settled on the Havahart live trap (model 1079-B).

I found a combo set that included a squirrel size trap (model 1078) as well, so I bought the set hoping to also reduce strawberry theft in my garden from the local tree rats that most people call squirrels.

My wife was at peace with the purchase because the animals were being relocated. She never asked any questions and I never volunteered any more information. We have an understanding…it works for us.

My first sets were nothing fancy, just laid on the porch in the backyard or in one of the garden rows. The eradication quickly became a hobby and I started researching ways to make my sets more effective.

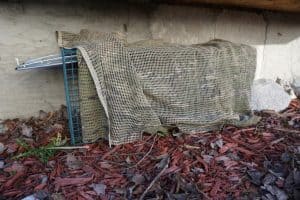
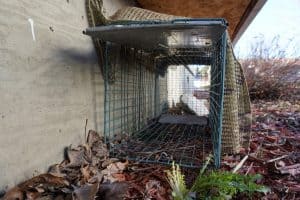
I learned that by placing some burlap over the top of the trap and putting it against a wall or under a bush helped the animals to feel safe entering the trap. My success rates continued to climb.


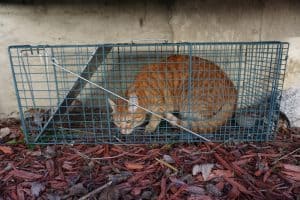
I tried a number of different baits in the beginning, but canned tuna in the large trap and peanut butter in the small trap were the most successful in luring the game.
After the first month, I had captured 4 cats, 1 small dog, 2 raccoons and 1 possum in my large trap and 6 squirrels in the small trap! Over the years, I’ve even loaned these traps to family and friends to solve their critter complaints and they’ve had similar success rates.

Construction

After 10 years of ownership, both traps have continued to impress me. They have a solid door with steel reinforcements that keep even the smartest animals from escaping (I’ve never had a single animal escape). One piece wire mesh utilized in the body of the traps means there are no seams that can be exploited by the animal. Additionally, the galvanized coating on the trap body prevents rust and corrosion.

I’ve only had 2 problems with either trap: 1- Some minor bending of the spring that activates the door. This is easily bent back into place without the use of tools and with no negative effects. 2- The trigger rod and catch on the pressure plate have needed a little fine-tuning every year or so. Again


this adjustment is made by some simple metal bending (no tools needed).

The solid design on these traps incorporates a minimal amount of moving parts (read: fewer parts to break). I was also impressed with the metal hand guard near the carrying handle that keeps the captured animal from attacking your hand while being transported in the trap.

Durability

These traps are well-made (in the USA) and come with a one-year warranty. I have not had to carry out any maintenance other than the minor fixes to the spring on the door and simple adjustments to the trigger. During a decade of use, my traps have spent a considerable amount of time outdoors in both rain and snow without adverse effects. They work as well today as they did the day I bought them. I feel confident they will easily provide many more years of reliable service.


Ease of Use

I’ve employed a good variety of traps through the years like the Conibear, coil-spring foothold and all sizes of snares. Without question, the Havahart traps are the simplest design I have ever used. They can be used in almost any application, are super easy to set and are just as portable as their more challenging cohorts.

The beauty of this variety of trap is that the animal is unharmed in any way which gives you the option of relocating the animal if


you desire. You should know that releasing an angry possum in your neighbor’s tool shed forges a bond that really stands the test of time!

Even though it’s marketed as a live trap, the Havahart gives you the option of dispatching the animal by providing a secure way to hold it until you are ready to take care of business. In restrictive urban environments, this can be accomplished with a pellet gun or by submerging the trap in a barrel of water.

Sizes and Styles

22 different sizes are available for animals as small as chipmunk and mice or as large as dogs and bobcats.

In additional to the traditional one-door traps, Havahart offers a collapsible variety, a two-door model and an Easy-Set style that makes setting and releasing a simple one-handed operation. Check out their site to learn more: http://www.havahart.com/

Cost and Availability

I cringed when I first learned the cost of these traps, but after 10 years of dependable use and given the ease of employment, I feel the price point is very reasonable. If you crunch the numbers, these traps can provide meat for your pot for pennies on the dollar.

This style of trap has been around for a long time and can sometimes be found used at flea markets or garage sales. The new variety can be found at your local farm and feed type stores or Amazon of course!

Alternatives

Here are some alternative traps that are available:

• Conibear or body grip style-
Pros: Inexpensive and very effective.
Cons: User needs more advanced skill to place the trap, kills the animal (no live option) and are more dangerous to set.

• Coil Spring foothold style-
Pros: Live style trap and can be very effective.
Cons: User needs more advanced skill to place the trap, the animal can be damaged by the trap or chew their leg off to escape. This style is also more dangerous to set.

• Snares-
Pros: Very inexpensive, easy to make your own.
Cons: User needs more advanced skill to place snare, usually kills the animal (no reliable live option).

The Bottom Line

I would highly recommend the Havahart live trap to anyone. If you are new to trapping or live in an urban or suburban environment, there is nothing easier to employ than the Havahart trap. It’s safe to use, extremely effective, quietly works for you 24 hours a day and gives you options on releasing or dispatching your catch.

They’re so user-friendly, anyone can operate these traps. Providing meat for your pot while simultaneously solving your nuisance animal issues has never been easier!

About the Author: JD is the founder of I Will Make You Hard to Kill. His site is dedicated to a wide variety of skills that improve survivability in emergency situations as well as everyday life. He is a SERE Specialist with 18 years of military service teaching aircrew and special operations personnel how to survive, evade, resist and escape at the U.S. Air Force Survival School located at Fairchild AFB, WA.

M.D. Creekmore adds: In my book 31 Days to Survival: A Complete Plan for Emergency Preparedness I give detailed how-to-do-it plans with photos on building a homemade version of the Havahart Live Traps. I also recommend that you get a copy of Being Kind to Animal Pests: A No-Nonsense Guide to Humane Animal Control With Cage Traps.

Filed Under: Bushcraft

What’s The Difference Between Military and Civilian Firearms?

August 22, 2018 Jesse Mathewson

The more it changes, the more it is the same thing. Alphonse Karr 1849

Arguments against civilian ownership of firearms have been debated as far back as the innovation of firearms. I am certain at some point a Roman Cesar or Egyptian Pharaoh also launched campaigns against the evils of the civilian owned swords or spears as well. There is a reason “civilized” nations tend to want no non-government employee ownership of firearms. It is a balance of power, and this is exactly why the astute individuals who refused to sign the Constitution unless it ensured continuing ownership of firearms for all citizens did so.

Interestingly it was the delegate from Vermont who was the initial refuser of the Constitution without the Second Amendments inclusion. It is interesting because Vermont has long been a staunch ally of individual liberty, and only recently has begun to cave into Yankee demands of regulation of natural rights of self-defense. I use the term Yankee to describe those individuals who desire absolute dedication to the state and its employees regardless of the cost. I am a civilian who lives in Arizona and yes, I do not much like what has been occurring most recently in this regards.

However, before we get too far off course, I want to delve into what makes a “military grade” firearm and what makes it civilian. Military grade is a term recently coined to make up for the losses that have occurred by those intent on regulating our natural right to self-defense with their use of the term “assault rifle”. Assault rifle was coined in the 80s by a Californian legislature (Reagan’s legislature) who desired to demonize the idea of semi-automatic, magazine fed firearms. The use of military-grade as a term is actually even more ridiculous and can be easily countered with simple facts.

Military grade applies to firearms that come in military standard calibers, NATO (North Atlantic Treaty Organization) or STANAG (STANdardization AGreement) calibers are as follows.

  • Handgun is 9×19 or 9 mm luger otherwise known as 9 mm parabellum
  • Small rifle is 5.56×45 (civilian standard .223 remington)
  • Large rifle is 7.62×51 (civilian standard .308 winchester)
  • There are other military grade calibers, however, they are not NATO/STANAG calibers but rather calibers used by Eastern Bloc and non-NATO signatories –

Now here is where things become a bit more interesting, military-grade the real definition of this term would mean that a firearm that is used by the military with military standard calibers is military grade. So if you use the United States Army for a point of reference, M16a2 and the M4 carbines are military grade small caliber rifles, SigP320 is a military grade handgun and the Remington 700/M14/Mk14/AR-10 are military grade large caliber rifles. It should be noted that with the exception of the handgun and the Remington 700 bolt action rifle the firearms themselves all have single shot per trigger squeeze and burst or fully automatic capability.

These firearms by definition are the only military-grade firearms in the United States. However, this also means that anything that may look similar may fall under that definition on a legal basis. This is where things get difficult, realistically what preforms the same is different than what looks the same. If looks were all it took to convict an individual than you would have a biased/discriminatory system of justice, right? So why are we okay with using how something looks to judge it in any approach? It is essential to remember a simple reality, not everyone is the same, not everyone has the same or similar circumstances. I am someone who is physically unable to flee from a threat and as I have shown in The article, Why you need to be trained and armed: or how to prevent a fire before it starts; the threat of real violence is greater than even a vehicle accident. This means that if you purchase vehicle insurance, wear seat belts and have working airbags and have no life insurance or plan for self-defense there is a gap in your preparations for life.

Civilian firearms that look like military firearms have been demonized for decades and longer. However, they are very different in function. The civilian AR15 carbine/rifle looks like the M16a2 or in some case the M4 carbine/rifles, though its function is quite a bit different. The AR15 is only capable of shooting one round per trigger squeeze/press. The AR15 is almost always built to exacting measurements, but in performance is not expected to meet or exceed rigorous military expectations. While some manufactures prefer to ensure their firearms are tested to the same specifications, they still cannot perform the same functions as a military grade firearm. Between 3 round burst (3 rounds fired with a single trigger press) and fully automatic (all rounds fired with a single trigger press) the civilian version cannot accomplish these tasks and without massive amounts of background checks and expensive licenses, the average civilian cannot own a rifle that does these things. The civilian AR15 is built without certain key changes to allow it to do these things.

The receiver of an AR15 civilian rifle does not have the appropriate cutouts for installation of the mechanical differences that allow for burst or fully automatic fire. The reality is the civilian AR15 is not designed to go to war or fight long drawn out battles. In fact, in many cases where criminals were shooting at people to cause harm using civilian AR15s they had malfunctions occur because of this reality. Military grade are designed specifically to function under adverse conditions and during drawn-out engagements. The essential thing to remember is that these are tools, and honesty are far more civilized than using a sword or bow and arrow to dispatch attackers. On a personal note I would rather be shot than stabbed. There are other minor changes that occur with some military firearms, though the large percentage of differences are based in volume and rate of fire.

Quite simply the differences between military grade and civilian are extreme. And the average civilian will never use a military grade firearm or own one. They are expensive to own and use and illegal without large fees and background checks that take several months to complete. The next time you read an article from any major news source that talks about assault rifles and military grade, remember this simple reality of journalism, what is reported is the rare event not the regular event. Normal and standard does not sell papers or airtime for advertisers. Rather it is what can be seen as extraordinary and amazing that is what you will see most often in media reports. It is important to always know facts and have access as much raw unfiltered data as possible. I suggest using FBI statistics and weigh data used against other sources to come up with a median that you can base decisions in.

Understanding that the use of AR15s in criminal activity is actually quite low when compared to overall ownership of these same firearms will make things much easier for you. In looking at concealed carry applications if others wish to use the term in reference to evil machines, than simply purchase and use handguns that are not used by your military. For the United States this means, the SIG M17 or M18 (civilian version is the SIG P320) and the phased out Beretta M9A1 or the Glock 19M (which is not available for civilians). Military grade firearms are almost always different designations and include a variety of changes from civilian. On handguns you will find that military grade handguns have a lanyard ring at the grip for securing the firearm to self in case it falls out of the holster. Additional requirements for military-grade handguns are as follows.

  • Integrated rail
  • External safety
  • Adjustable for ergonomics by means of grip inserts
  • grip panels
  • front or back straps
  • different triggers available
  • higher benched accuracy requirements

The question posed was, what is the difference in firearm types? The answer is, military arms are designed for military use, civilian arms are designed for civilian use! Since 1934 it has been illegal without special permits and background checks to own or use fully automatic firearms eg., military grade firearms. There have been dozens of small and major gun control acts passed since the founding of this country and the ratification of the Constitution. The reality is simple, guns scare people who do not have them or have experience with them. In today’s world, we want to blame anything – other than our own decisions – for events that occur. This results in several generations that believe everyone else is the problem, and they are victims.

As always thank you for reading and if I missed anything as I am certain to do, do not hesitate to comment and make suggestions. I learn from you as much as you may learn from me.

Free the mind and the body will follow – and please check out TN Concealed Carry right now!

Filed Under: Uncategorized

What Animals Should I Keep On A Small Homestead?

August 20, 2018 M.D. Creekmore

The chicks are growing up fast and should start laying in a couple more months… Yea!

Have you always dreamed about starting your morning with farm fresh eggs and fresh milk from your own cow or goat? Even on a small homestead, you can make that a reality.

And you will be happy you did. Raising animals will not only provide a source of food and milk for your family, it will provide you with a sense of independence as well as life experiences you can pass down to your children.

Before you begin, we will help you with the questions you need to ask and the planning that goes into bringing farm animals to your homestead.

1. Can you have farm animals on your property?

For obvious reasons, this is the first question you need to go over. Earlier in the series, we talked about purchasing your homestead. And one of the questions to look into was whether you can have farm animals, or anything beyond cats and dogs, outside. But maybe you are inheriting land or want to turn your current property into a homestead.

Many cities and HOAs will have covenants against any type of farm animals on your property. Make sure you aren’t on the wrong side of the law.

2. What do you have space for?

The size of your property will limit what you can have on your homestead. While you will likely see or hear differences on how much space each animal needs, just take this in to consideration.

As you plan what you want, make sure your property can handle it.

3. What animals do you want?

After you have figured out what you have space for, consider what animals you want on your homestead. And for what purpose.

For a smaller homestead, chickens are probably the most common or popular animal, to begin with. They will provide eggs and meat. Ducks will do the same, while rabbits will provide meat.

As you expand your homestead, animals like goats and sheep will be a great addition. Not only do goats provide milk and cheese, they will also clear land for you. And sheep will provide wool as a bonus.

Cows will provide a source of milk or meat. But they will also require more space and more feed. And then there are pigs. They are more work than traditional livestock, but they are both helpful for your homestead and provide great meat.

A wildcard is bees. They are great to have around your garden and, of course, you get free honey. Just make sure you know what you are doing as bees are pretty dangerous. You can learn more about beekeeping here. (affiliate link)

4. How big should I start?

It’s easier to start with smaller animals, like chickens and ducks, before moving up to cows or goats.

We understand the urge to start as big as you can but recommend taking your time. You will likely face your biggest obstacles in the first couple years. It will just be easier to correct that with a smaller flock or herd and then build up with time.

5. How can I involve young kids?

There is just something about young children and animals. For most children, their connection to animals will be picture books or an occasional trip to the zoo. But not on the homestead.

Kids can help by collecting eggs, filling up livestock waterers, feeding the animals, cleaning the chicken coop and milking the family cow. And the bigger kids can help with processing meat. Along the way, they will learn where food comes from and the values of hard work and responsibility.

By preparing, and taking your time early on, the animals on your homestead will provide a great source of food, milk, and pleasure for you and your family for years to come.

If you want even more in-depth prepping then please check out my best selling 176-page book “How To Survive The End Of The World As We Know It – Gear, Skills, and Related Know-How. It’s available in paperback and well as Amazon Kindle.

Filed Under: Homesteading

Homesteading and prepping open discussion forum

August 18, 2018 M.D. Creekmore

Well, folks, it’s pouring the rain here as I write this but I’m not complaining because, well, I like the rain. It’s relaxing and most of the time it has a positive effect on my allergies. So it’s a win for me… well until I have to mow my grass which grows faster after it rains and the grass messes with my allergies… I just can’t win…

Anyways, I’ve read a few comments (on another site) that suggest that I’m getting rich running a website, and even though I wish that it were true the reality is far from it.

Below is a pic of my earnings from Amazon… most days are in the $2 to $5 range…

And here is one for my book earning for the month (for all 4 books)…

Also, keep in mind that this is from two sites! I could make more money working part time at a fast food restaurant but I continue to do it because I want to share information that I hope will help someone.

Anyways, over to you what did you do to prep this week?

Filed Under: Uncategorized

How To Compost at Home For Beginners

August 9, 2018 M.D. Creekmore

Plastic composter in a garden - filled with decaying organic mat

When you are starting life on the homestead, you quickly learn that common food and yard scraps that most people throw away can be very beneficial.

That is certainly true with composting. If you don’t know how to compost, it’s not difficult and we can guarantee it will be well worth your time and energy.

What are the benefits?

First, you are reducing waste. Estimates say that common food and yard waste make up anywhere between 25 and 50 percent of what people throw away. That means we’re using energy and fuel to transport this waste to a landfill, potentially releasing methane gas. When we don’t have to.

But it will also help your homestead. Applying compost to your soil will make your vegetables and trees very happy and help them grow. It is free fertilizer. Now, you can purchase compost from any big box retailer or nursery, but this is free. And when you have a large garden, it certainly adds up.

If you’re sold on composting but don’t know where to begin, read on.

1. Choose the right location

The location won’t necessarily make or break your compost, but there a couple points to consider to make this easier for you. One, choose a location relatively close to the house. We don’t mean one step from the back door, but when you will be taking regular trips from the house to the compost, I like to make life easier on myself.

The amount of sun won’t necessarily help or hurt your compost, but sun increases the temperature and can cause your pile to dry out. You can remedy that by watering more frequently, but it’d be easier to just choose a different location. We recommend partial shade.

2. Know what goes in a compost

As we have said, most food scraps and yard waste can go in your compost. The eligible items are generally broken down into brown material and green material. And you can probably guess what that includes.

The most common “browns” include dead leaves, pine needles, straw, hay, twigs or bark, sawdust, wood chips and pine cones. With the browns, make sure you chop them up as they tend to break down pretty slowly.

The most common “greens” include grass clippings, fresh leaves, fruits and vegetable peels, coffee grounds, melon rinds and even Christmas greenery.

Your post can be layered, one-row green, one-row brown, or mixed, where the browns and the greens are mixed together. And we recommend an equal amount of browns and greens.

3. It’s easy to build

You can purchase a pre-made compost bin from a big-box retailer or Amazon. This will be the quickest and easiest way to begin.

But if you want to save money, this is something you can do yourself in little time. You generally want a wood frame and wood or wire sides. If you’re looking for free materials, four pallets and some type of twine or wire will do the trick.

4. Maintaining your compost

Use a shovel or pitchfork to regularly turn your compost and mix the layers. A way that people ensure they’ve reached the entire pile is to move it into a new bin. You should turn your compost about once a month. Some do it more frequently, some less. But that is a good average number.

You also need to make sure the compost is kept moist, especially in the dry summer months. We recommended a shadier area so you don’t have to water as much, but you will still need to water in most climates.

5. Using your compost

Now that you’ve put this work into your compost, it’s time to make it work for you. If you have kept a regular schedule of turning the compost, your compost will probably be ready in three or four months depending on your climate and the time of year.

Once your compost is ready, you can now add it to the soil of your vegetable gardens, trees or other plants and shrubbery. Just how much compost you should add will depend on your soil, but we generally recommend adding about one to two inches to the soil.

If you follow these easy and practical steps, you will be composting in no time. And you will be happy you did.

If you want even more in-depth prepping and homesteading information then please check out my best selling 176-page book “How To Survive The End Of The World As We Know It – Gear, Skills, and Related Know-How. It’s available in paperback and well as Amazon Kindle.

You might also like:

  • Start Saving Today and Live Your Homesteading Dream Tomorrow
  • Smart Spending for Preppers Looking for Financial Freedom
  • How Do You Handle Emergency Food Storage?

Filed Under: Homesteading

Homesteading 101 – Prospective Homestead Priorities

August 8, 2018 M.D. Creekmore

by Patient Momma

LOG HOME HOMESTEAD

I have heard of and read some sad accounts of people purchasing property to begin their dream of homesteading, only to find thousands of dollars of expenses facing them. I’ve watched some of those ‘Homestead Rescue’ programs on TV and wondered what in the world were those people thinking?  This article is based on the premise that you’ve decided to get out of the city, to purchase some land with an existing on-grid residence and start homesteading in the country.

Life Style Change

Moving to the country and establishing a homestead is a major lifestyle change for the entire family.  I strongly suggest a family meeting and the reality of the situation be discussed before you even think about looking at property. If you have to work outside the homestead, how long will the commute take?  If children are part of the family visit the appropriate schools and find out if there is bus service to the prospective homestead or decide if you want to homeschool.  If your spouse is not in total agreement with to moving to the country you might be better off just getting yourself some acreage with a hunting cabin for a BOL.

Are you healthy and physically strong enough to do the work a homestead requires?  How far are the closest gas station, grocery store and doctor?   What are the roads like?  The further away from civilization you get, the worse the roads are.  Many country roads are gravel and oil or just gravel or dirt with blind curves and hills.  The countryside is dark…there are no street lights, no painted lines or curbs. Just realize that you leave convenience behind when you move to a country homestead. The road I have to travel is dangerous in the daytime and deadly at night.

When You Decide to Make the Move to the Country

You have been looking for your country property for a while and you made the effort to look at the property in person, not just on the internet. You have finally narrowed your choices down to two places you think would make a good homestead. This article is about taking a serious look at the homestead you are about to buy, so you can put some contingencies in your contract, if needed, to protect yourself.

No offense meant, but most city folks are somewhat oblivious to how things work and what goes on in the country on a regular basis.  Not because they are stupid; but because they are used to the city proving water, electricity, sewage, trash removal, etc.; all for a hefty fee of course.  They are also used to the landlord fixing the all the problems in their abode.  Unless folks were raised in the country, they usually don’t have any experience with well pumps, septic tanks, propane stoves/heaters, wood stoves, plus big bugs, mice, snakes and predators, etc.

Ask Questions

Is the property within city limits or is it just part of the county? It is possible to have a city mailing address but not be in city limits.  So what; why do you care?  If you are within city limits you are subject to city taxes plus all the little annoying rules; like you can’t have chickens, you can’t burn your trash, you can’t fence your property, you can’t build an outbuilding or anything without a permit, etc.  Most country properties are zoned as farm or ranch; but some are not.  You should have a list of questions the seller or the realtor needs to answer so you can make an informed decision.

If you are negotiating with a For Sale By Owner (FSBO), make sure you are familiar with the standard real estate contract for your state.  If you are purchasing a FSBO in a new state, you should consider having a real estate attorney work your contract for your protection.  Country folks are not as dumb as TV makes them out to be.

Inspect the Property

Looking at pictures on the internet is not accurate enough to base a purchasing decision on. You must have an in-person visit to see if 13 of the 15 acres advertised are up a mountain and only suitable for goats. When you see a photo of a beautiful view of a river and rolling hills, remember that the view is looking down and the advertised property has been carved out of a mountain that you have to drive up and down on a dirt or gravel road in all types of weather.

When you go to look at the homestead walk or drive the property (ATV or 4-wheel drive truck) and have the seller point out all the water sources. Is there a pond or lake? Does it flood over in the spring runoff or go dry in the summer heat? Is there a stream moving through the property; if so what is upstream and does it flood during the spring runoff?  Are there natural springs on the property or waterfalls off the hill or mountain? Is there wildlife roaming the property or is it strictly cattle pasture?

Inspect the Residence

When negotiating on the property, make sure you know the condition of the residence’s structure, roof, electrical wiring, plumbing, water well and septic system.  If you are not knowledgeable, you will need to get specific people to do these inspections as the average city home inspector, who charges $400-$700, does not do structural, wiring, pipes, wells or septic. The team of experts you need to do each inspection (structural, roof, electrical, plumbing, water well, septic) will add up to about the same cost but it would cost you more if you use a standard housing inspector plus the team of experts. These inspections can save your sanity and thousands of dollars.

Do not purchase anything without knowing the particulars of these categories. If you are purchasing a vacant property and using a realtor, insist that the realtor find out information from the seller or from public records.  The realtor is paid on commission so make s/he do some work.  If s/he cannot find the information on these critical systems, insist on the seller buying a Home Warranty Insurance Package covering all of these areas. A country package covering well and septic etc., is more expensive than the usual appliance package because they are extra riders to the basic policy.  This protects you for a year. Maybe you want the property in spite of the failures or unknowns, but at least make sure you are aware of the true condition so you know what you’re facing.

Get a Structural Inspection

If the residence is more than 15 years old, first on your priority list should be a structural inspection. Earth settles and the structure moves with it.  Sometimes older residences were built without spec and codes so determine whether the house sits on a cement slab, footers or other type of foundation. If you set a ball on the floor and it rolls across the floor that is a problem. The structural engineer will tell you what the problems are, which could be anything from foundation cracks to failed supports, sinkholes, crooked walls, warped beams, even fire damage. Sometimes the seller is not aware of the structural problems but you need to be before you sign on the dotted line.

Have the Roof Inspected

Make sure you get a reliable company to inspect your roof.  Depending on the location and age of the house it could be a lot worse than it looks. There is no substitute for an expert walking the roof for inspection. In my case the roof had to be replaced because of hail damage and the seller’s insurance paid $10,000 for the replacement.

Beware of DIY Seller Projects

A lot of country properties have homeowner DIY projects done to them; so you need to have experts look at the different things.  My brother bought a 23-year-old house only to late find it had aluminum wiring which could not handle the load of a modern home.  It cost him $15,000 to have the house rewired.

I anticipated the wiring needed updating in the 40-year old house.  I had an electrician come to inspect the wiring and give me a quote on what needed to be replaced, to install new outlets and to put in an another circuit breaker box to safely carry the additional load of newer appliances and multiple refrigerators and freezers. While he was there we found the wiring to barn was run underground from the over-loaded house circuit and without a protective PVC pipes.  The entire system for the tool shed to the barn had to be rewired to meet county code. If the work is required to meet county code, the seller usually has to pay for the update; but it is negotiable.

Inspect the Plumbing and Pipes

If your prospective home has a crawl space somebody needs to get dirty and look at the pipes and vapor barriers to see if they need fixing.  If your location gets cold snowy winters, you really need to have the plumbing pipes wrapped before you move in. It will save you from having to drip the faucets and spigots when the temps drop way down and the pipes are liable to freeze.  In my location we have very mild winters with very few nights below freezing so I decided I didn’t need every pipe in the crawl space wrapped and insulated. However, I found out I did need the exposed outdoor pipes protected and had to do that myself the day before the temperatures dropped to record lows in my area.

Check Out the Water Well

Most country homesteads use well water not city water.  Of course, you ask the seller how old is the well pump and how deep was the well drilled.  Some counties require paperwork when a well is drilled and installed; some don’t.  But checking the records in the county courthouse may give the date the well was drilled or motor last replaced, which is a big help to you.  Unfortunately, the well guy cannot stick a camera down the pipe and see if something is wrong. The well is either pumping or it isn’t.  Changing out the well pump is time-consuming and if the well guy is going to pull 100’ or 140’ of pipes to get to the motor, you might as well have the entire system replaced.   If the property does not have electric power to test the well, just assume it is not working and negotiate the price of a new pump and/or well drilling in the offer.

The more use the well gets the faster the pump wears out.  For example, if your well is used by two people for house water and washing cars it may last 10-12 years.  But if you have 5 or 6 people in your family and are additionally turning the spigots on and off by watering the garden, the animal barns, outbuildings or filling pasture water troughs from one well, the pump will wear out much faster. Depending on where you live, replacing just the well pump can run you around $1,000 to $4,000 depending on the depth of the well. Drilling a new well can cost between $3,000 to $15,000 or higher depending on your location and geology of the ground.  It’s important to be informed before you buy.

What is Your Backup for Water Delivery?

Another priority is your water backup system(s). Ask the seller if they have a backup if the electricity goes out (most well pumps run on electricity) or the pump fails.  We added two backup water systems after we moved in. Our DIY rainwater catchment system is a simple series of gutters, downspouts, and barrels. The rain rolls off the metal roofs of our outbuildings into gutters which have downspouts into 55-gallon food grade barrels. Each barrel sits up on concrete blocks and has a spigot to drain water or attach a hose.  Our redundant off-grid water system is a separate well with a Simple Pump, which is out of sight in an outbuilding.

Know the Age and Condition of the Septic Tank

The age and condition of the septic system is important to know.  The older the septic the stronger the chance of having trouble; which is something you don’t ever want to experience. The size of the septic depends on how many bathrooms, the number of people living in the home and how new the kitchen is; meaning is there a dishwasher, garbage disposal, automatic ice makers, etc. If you don’t know when the septic was last serviced, go by these fabled words: when in doubt, pump it out!  It is better if you can negotiate this action as a part of the selling contract, just like you would a termite inspection.

If the septic system is really old, it is possible the tank may be compromised. A friend purchased an older property and found out the hard way that tree roots had damaged the tank and over run the drain field. An instant $15,000 bill, which homeowners insurance may not pay unless you have a rider. The property I purchased did not have a septic tank; they had the old country system of a pipe running out to the woods.  I refused to buy the property unless they put in a septic system, which the seller did.  On average, a septic tank needs to be cleaned out every 4 or 5 years; but, if you have a house full of females, it only takes 2-3 years to fill up.

Inspect the HVAC System

If the residence has an HVAC system, have it checked out by a reputable person/firm. Just because you can feel hot or cold air coming out the registers doesn’t mean the system works properly.  A new heating/cooling system costs from $5,000 to $13,000 for the average 3 bed/2+bath house, depending on the quality you purchase.  Getting it repaired vs buying a new system can be negotiated with the seller.  When you call for a vendor inspection appointment be sure to ask what the service visit costs; because driving an hour each way to the country is not free.

Check Out the Wood Stove

Depending on the age of the wood stove it may or may not have a blower system.  It may or may not have fire bricks.  If it has tempered glass on the door, check the stuff that is holding the glass in. I say stuff because it varies by age, brand and if it meets current code. If the stove is free-standing, the stove pipe to the outside needs to be checked for cracks or holes so you don’t die in your sleep from carbon monoxide poisoning.  If the pipes are rusted they should be replaced. The insides should also be cleaned to avoid a stove fire which could burn your house down.

If the wood stove is in a fireplace, make sure the flue lining is cleaned and solid. If it has blowers have the wiring inspected and the motor cleaned. It is not very expensive to have the stove, pipes and motor serviced and it is worth it!  Depending on where you live and who your insurer is you may have to have a special rider to your policy if you have a wood stove.

Look at the Barn and Out Buildings

Does the property have an existing barn?  Does it have existing outbuildings? What condition are they in? If you are planning to farm or ranch you will need these structures.  A small metal barn can start at $20,000 and go upwards.  Building an 8’x10’ wood outbuilding will cost you around $500 for materials if you build it; more if you hire a helper.  If you buy a pre-built 10’x16’ metal shed it can run between $1800 to $3000, depending on quality.

Security of a Storm Shelter

High on your list of priorities should be a storm shelter or safe room.  Once you have been through a severe storm that rips your house apart while you cower in the bathtub with a mattress over your head, you won’t live anywhere without one.  Your location will determine whether it is a deep basement, a mid-house safe room or an outside storm shelter.

My location gets a lot of thunderstorms, which can spawn tornadoes.  The existing shelter was an outside concrete and steel framed storm shelter dug in the hillside. I also had a small basement dug as a backup.  I recently saw a new house being built near a town which had a concrete block safe room built in the middle of the house.

How Far is the Fire Department?

You should ask the seller or the realtor how far away is the nearest fire station and does it have a water truck.  There are very few fire hydrants out in the country so the fire department needs to bring the water.  Other items that are critical for country living are fire extinguishers and lots of them.  The further away from a town you are, the more fire extinguishers you should have.  I currently have about 8 scattered throughout the house and barn and I’m ordering a few more for the outbuildings. It is better to get the rechargeable ones; they cost a little more but don’t expire.

If you are buying in dry, wild fire country, you should identify methods of protecting your property.  I know people who lost a home and then rebuilt using concrete block and slate roof.  I have also read about folks who use sprinkler systems in the woods around their houses.  That old phase better-safe-than-sorry applies when you live in the country because your house could burn to the ground before the rescue/fire department/sheriff gets to you.

Backup Power Systems

Many country homes get their power from an electric cooperative via above-ground wires, aka telephone poles, which are prone to failure during any type of a storm. During storm season our power goes out, but usually for less than 48 hours.  Having a backup power system keeps everyone calm and systems working.  Again, it depends on your location on what you get.  Do you have enough sun for solar, wind for turbines or do you want to use a generator?  For short-term emergencies (+/- 3 months) we have a propane standby generator for the house and a portable generator for the barn.  The smaller outbuildings are solar powered.  We are still trying to figure out the best system or method for a long-term grid-down electrical outage.

Is There Protective Fencing?

Another item I consider a priority is fencing.  Living out in the country you are going to have loose critters; e.g., dogs, cats, goats, pigs, raccoons, armadillos, foxes, opossums, coyotes, deer and the occasional lost cow.  Those who choose to be in or near the mountains will have more dangerous critters such as wolves, big cats, bears, etc.

There are no leash laws in the country and some folks let their animals free range.  Many domestic animals roaming free are not vaccinated and wild animals carry a host of diseases.  A 5’ or 6’ agra fence will keep your family and animals safely inside your compound and most of the stray critters away from your house.

If you have deer in your area you will need an 8’ fence around the garden; a plastic deer fence will do.  A friend of mine used a couple of strands of hot wire which kept the deer out, but not the smaller critters.  At a previous home I had an 8’ plastic deer fence around my garden. One morning I looked out and saw a raccoon trying to climb the plastic fencing. The fencing swayed back and forth from the weight of the critter and the coon finally gave up and jumped off.

Around your chicken coops, I recommend a 5’ agra fence plus hot wire at 2 levels. The top-level hot wire discourages the owls, hawks and falcons from waiting for a chicken dinner, while the lower hot wire fends off the raccoons, skunks and opossums. For pigs we use 4’ agra fencing with a low-level hot wire. For goats you need strong fencing and multiple ways of locking the mischievous buggers in. Believe me; a stray goat can destroy any garden in one day!  If you run cattle or keep horses you will need 4 or 5 strand barbed wire fencing to contain them.  All this fencing costs money which adds up so if the property has existing fencing that is a plus.

Check Out the Closest Neighbors

Out in the country, the nearest neighbors might be across the road or 10 miles down the road.  I strongly urge you to make the drive and stop by.  Pull in the drive and blow the horn a couple of times until someone gets up off the porch or comes out of the house.  Stand by the car, wave and say hello.  If s/he waves or says hello go and talk to him/her.  If s/he seems contentious or yells for you to get off the property, seriously consider if you want that person as a neighbor.

Inquire about Communications

Depending on the population of the area, the communication systems will vary.  If you are phone, TV and Internet-dependent you need to ask where the closest cell phone tower is and if there is cable laid nearby.  You may have to get satellite TV/internet service and maybe a landline phone.  In my area, we are 12 miles too far from cell tower range and while in sunny weather we can call out and receive text messages, most of our incoming calls roll directly to voice mail.  Satellite internet out in the country is priced by data amounts so if you have game addicts in your house you need to figure out an alternative to online gaming.  If you go over your allotted data amount it slows to dial up speed or you can buy more data at sky high prices.

Be Aware

I hope this article has helped you to consider some of the variables involved when purchasing a country homestead. While setting up and running a homestead is challenging; it is also exciting. Thinking through these basic issues will help you negotiate your purchase.  Be wise and be aware before you buy!

You should also read:

  • Moving Toward Self-Reliance for the Working Poor
  • You Don’t Need To Be Wealthy to Homestead
  • Start Saving Today and Live Your Homesteading Dream Tomorrow
  • The Philosophy Of Tiny House Living – Things To Consider Before Going Tiny

Filed Under: Homesteading

  • « Go to Previous Page
  • Page 1
  • Interim pages omitted …
  • Page 73
  • Page 74
  • Page 75
  • Page 76
  • Page 77
  • Interim pages omitted …
  • Page 87
  • Go to Next Page »

Primary Sidebar

Subscribe to Blog via Email

Enter your email address to subscribe to this blog and receive notifications of new posts by email.

Join 7,202 other subscribers
  • Amazon
  • Facebook
  • Substack
  • Twitter
  • YouTube

“Do more with less.”

– Minimalist proverb

Recent Posts

  • Just so you know
  • Weather Update for My Corner of Appalachia
  • Why I’m Ordering Ivermectin + Mebendazole Every Year
  • The Website’s Shutting Down (But Here’s the Plan)
  • You Are Hated! Start Training Like It!

Footer

Recent Posts

  • Just so you know
  • Weather Update for My Corner of Appalachia
  • Why I’m Ordering Ivermectin + Mebendazole Every Year
  • The Website’s Shutting Down (But Here’s the Plan)
  • You Are Hated! Start Training Like It!

More about me

Books I’ve written

Books I’ve read

Follow Me on YouTube

Follow Me on Facebook

Gear I Use and Recommend

Newsletter

Search this site

Follow me elsewhere

  • Amazon
  • Facebook
  • Substack
  • Twitter
  • YouTube

© 2008–2025 M.D. Creekmore · As an Amazon Associate, I earn from qualifying purchases.