• Skip to main content
  • Skip to secondary navigation
  • Skip to primary sidebar
  • Skip to footer

M.D. CREEKMORE

  • Blog
  • Books
  • Newsletter
  • Gear I Use
  • About
  • Contact
  • Facebook
  • YouTube
  • Blog
  • Books
  • Newsletter
  • Gear I Use
  • About
  • Contact
  • Privacy Policy
You are here: Home / Archives for Prepping

Prepping

Here you will find articles about emergency preparedness and prepping including articles on prepper food, prepping checklists, home defense, bugging out, bugging in, and the best prepper gear ideas.

How to Make a Faraday Cage (An Easy Illustrated Guide)

July 17, 2019 M.D. Creekmore

by Dr. Arthur Bradley

how to make a Faraday cageThere is a great deal of confusion about DIY Faraday cages and Faraday Boxes. Not only about how to build them, but also what they actually protect against. In this article, Dr. Arthur Bradley, author of Disaster Preparedness for EMP Attacks and Solar Storms, answers a few basic questions and perhaps debunks a few myths.

What is a Faraday cage?

A Faraday cage (a.k.a. Faraday shield or Faraday box) is a sealed enclosure that has an electrically conductive outer layer. It can be in the shape of a box, cylinder, sphere, or any other closed shape.

The enclosure itself can be conductive, or it can be made of a non-conductive material (such as cardboard or wood) and then wrapped in a conductive material (such as aluminum foil).

There are also readymade military-grade Faraday Cages that are meant to protect large electronics and gear such as portable gas or solar home-use generators, compact solar panels, computer towers, radios, electric medical equipment, smart home appliances, power tools, lights, and other large devices – check out this one to see what I’m talking about. These are even more effective than anything you can build at home.

What does it do?

Simple and Effective Faraday Cage Construction

A Faraday cage works by three mechanisms: (1) the conductive layer reflects incoming fields, (2) the conductor absorbs incoming energy, and (3) the cage acts to create opposing fields. All of these work to safeguard the contents from excessive field levels.

A Faraday cage is particularly useful for protecting against an electromagnetic pulse that may be the result of a high-altitude nuclear detonation in the atmosphere (a.k.a. EMP attacks).

Despite rumors to the contrary, a Faraday cage is not necessary to protect against solar coronal mass ejections because the frequency content of such disturbances is at much lower frequencies—they don’t couple energy efficiently into small-scale electronics, except through conducted paths (e.g., wires coming into the system). A better precaution against solar events is to unplug electronics and use quality surge suppressors.

How does field cancellation work?

Field cancellation occurs when the free carriers in the conductive material rapidly realign to oppose the incident electric field. If the cage is made from something non-conductive, the free carriers are not mobile enough to realign and cancel the incident field.

How thick should the conducting layer be?

The conductive layer can be very thin because of something known as the skin effect. That term describes the tendency of current to flow primarily on the skin of a conductor. As long as the conducting layer is greater than the skin depth, it will provide excellent shielding because the absorption loss will be large.

The skin depth is a function of the frequency of the wave and the conductor material. As an example, consider that for a frequency of 200 MHz, the skin depth of aluminum is only about 21 microns. EMP pulses can have a frequency content that ranges up to 1,000 MHz.

Therefore, wrapping a box in a couple of layers of heavy-duty aluminum foil (typically about 24 microns thick) provides the necessary conductor thickness to protect against high-frequency radiated fields.

Does it matter what type of conductor is used?

Not much. The conductivity of nearly any metal is good enough to allow the carriers to easily realign to cancel external fields. For example, if silver (the best conductor) is used in place of aluminum, the skin depth at 200 MHz is reduced to about 4.5 microns. Of course, the high cost of silver would prevent using it for such a purpose.

Can a Faraday cage have holes?

Yes, as long as the holes are small with respect to the wavelength of the incident electromagnetic wave. For example, a 1 GHz wave has a wavelength of 0.3 meters in free space. As long as the holes are significantly smaller than that dimension (i.e., a few millimeters), they won’t let in much of the incident wave. This is why fine conductive mesh can be used when constructing a DIY Faraday cage. In practice, the cage’s lid or door usually causes the most leakage. Taping the seam with conductive tape helps to reduce this leakage.

Can you use existing conductive enclosures?

Yes, there are many conductive enclosures that can be used, including ammo cans, metal garbage cans, anti-static bags, and even old microwave ovens. Each has its own level of effectiveness as covered in my book, Disaster Preparedness for EMP Attacks and Solar Storms. The key criterion is that the gaps and seams remain very small.

Must the cage be grounded?

There is a great deal of confusion regarding grounding of a Faraday cage. Grounding of the cage (i.e., connecting it to some Earth-referenced source of charge) has little effect on the field levels seen inside the box. Grounding primarily helps to keep the cage from becoming charged and perhaps re-radiating. The bottom line is that an ungrounded cage protects the contents from harmful electromagnetic fields as well as a grounded one.

Anti-static Bags

Static-Bags-EMP
Static Bags

Anti-static bags are readily available to protect electronic components against electrostatic discharge. They can be purchased in many different sizes, including some large enough to hold radio equipment. While they do offer shielding from EMP, not all products are created equal. Testing confirmed that products certified to MIL-PRF-8170 and/or MIL-PRF-131 offer the greatest protection from an EMP.

The results from testing three different types of bags are provided in Disaster Preparedness for EMP Attacks and Solar Storms. When selecting an ESD bag, consider not only the shielding effectiveness but also the physical ruggedness of the bag. A tear or large hole can compromise the bag by allowing EMP energy to enter.

Larger Faraday Cages in a House

Large Faraday Cage in a House
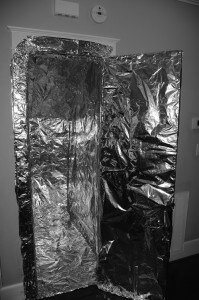
Storing a larger set of electronics might require an entire room. Engineers who work in electromagnetics often use “shield rooms” to conduct experiments because they do an excellent job of filtering out interfering signals, providing in excess of 100 dB of shielding. A poor man’s Faraday shield room can be made inside a house by lining a small closet with heavy-duty aluminum foil, covering all four walls, the floor, the ceiling, and the inside of the door.

Overlap and tape the seams using either conductive or regular cellophane tape. There can be no conductive penetrations into the room, or it will seriously degrade the shielding. Cover all electrical outlets, light switches, etc. with aluminum foil. Do not plug anything into the electrical outlets. Also, lay a piece of plywood or cardboard on the floor so that it can be walked on without damaging the aluminum foil. Rooms built in this way have been shown to offer more than 50 dB of shielding up to several hundred MHz.

How To Protect Red-Dot and Laser Sights From EMP

This video shows how to use RF cloth to protect red-dot, laser, and other electro-optical sights from an EMP. Testing was done in my laboratory to determine which RF cloth performed best for EMP protection. This particular cloth is made with stainless steel fibers. You can use this for guns that are kept outside of a metal safe, or as an additional layer of protection for those kept inside of a safe.

Protect Generators and Cars from EMP

This video describes how to protect generators and cars from EMP using a conductive cloth to protect cars and generators from a high-altitude nuclear EMP attack.

Testing the Shielding Effectiveness of a Metal Garbage Can

Many people are looking for an inexpensive Faraday cage to protect personal electronics from a nuclear-generated EMP. Unfortunately, it requires quite a bit of test equipment to determine shielding effectiveness.

On the transmit side, it requires a signal generator, a high-power amplifier, and a broadband antenna. The receive side requires a small, battery-operated spectrum analyzer. I’ve done quite a bit of testing on various makeshift Faraday cages, and this article discusses the effectiveness of a metal garbage can.


faraday-cage-trash-can
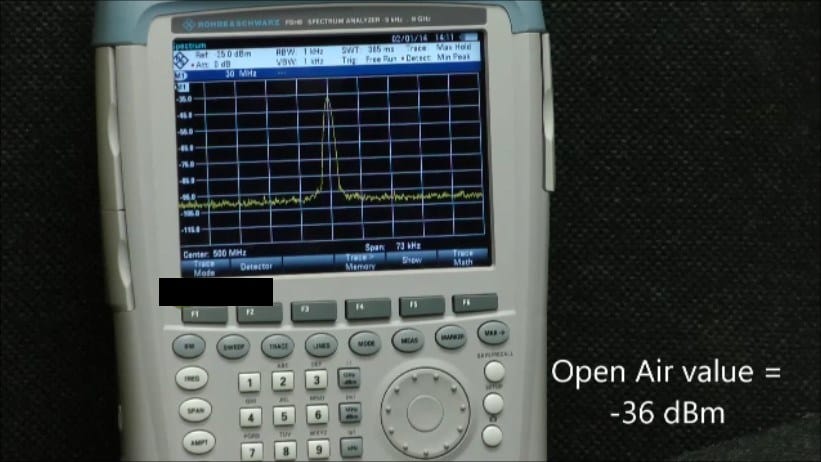
A baseline open-air measurement is first taken to determine the ambient field levels at some predetermined frequency (i.e. 500 MHz in this case). The levels at the spectrum analyzer are shown to be at -36 dBm.

faraday-cage-trash-can-1
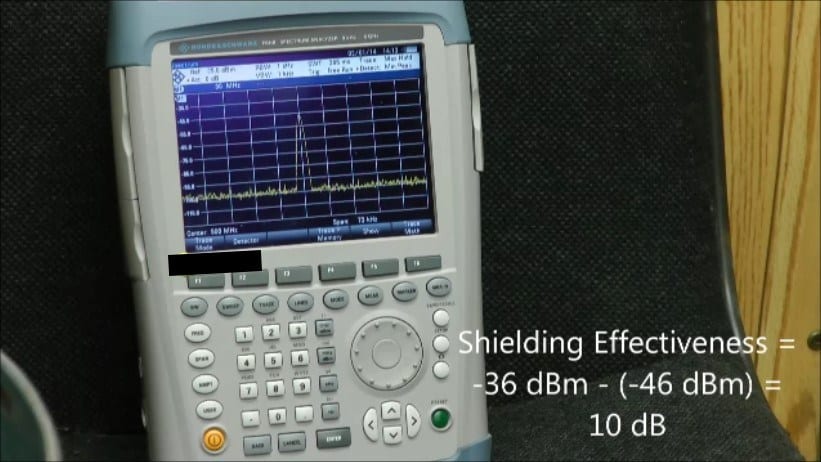
When placed inside the garbage can, the measurement is shown to be -46 dBm, meaning that the can offered 10 dB of shielding. Not too great!


faraday-cage-trash-can-readings
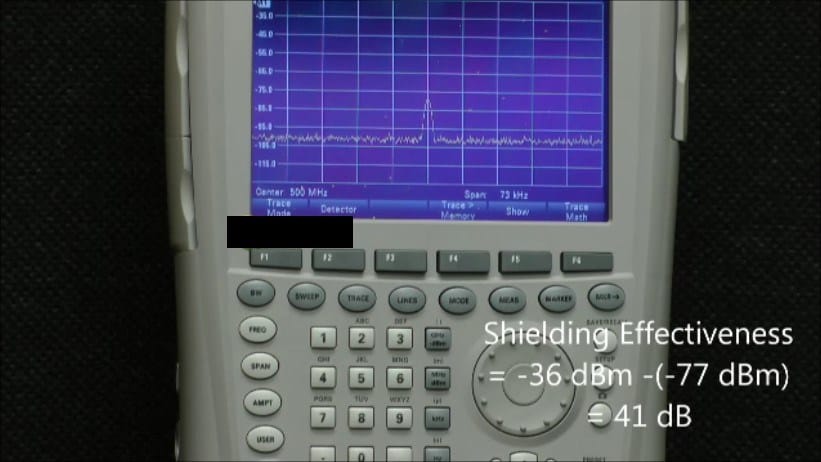
Much of the energy was believed to be coming in through the seam around the lid. It was, therefore, taped with conductive tape and the measurement repeated.

Next, the spectrum analyzer is placed into a metal garbage can, and the measurement is repeated.

The new measurement was shown to be at -77 dBm, meaning that the taped can offered 41 dB of protection. Much better!

Faraday-cage-trash-can-testThis experiment showed that a metal garbage can can serve as a very good Faraday cage, but only if the seams are taped. Remember, it is not small holes that matter most, but rather long narrow slots, such as those around the lid’s seam.

faraday-cage-trash-can-shelding-effectivnessExpensive EMI copper tape and cheap aluminum duct tape both worked equally well, so a quick stop at the hardware store will get you what you need.
To learn more about EMP protection, check out Disaster Preparedness for EMP Attacks and Solar Storms. Also, to find the highest quality EMP bags, see http://disasterpreparer.com.

To order Dr. Bradley’s EMP book please go to Amazon.com. To sign up for his free Practical Prepper Newsletter, Email: newsletter@disasterpreparer.com .

Remember, true survival isn’t merely about making it through – it’s about effectively navigating and thriving in challenging circumstances. Equip yourself well, stay informed, and always be prepared.

Filed Under: Featured Articles, Prepping

What’s The Most Likely SHTF Event?

July 14, 2019 M.D. Creekmore

what is the most likely shtf evenby Dave

I like to read a lot of self-reliant and prepping blogs and articles, as we all likely do. Toward the beginning of my self-reliant venture, these articles and blogs were critical in my education. I am in no way an expert in this field, but I am comfortable enough that a lot of this information for me now is review, and it is always good to review the basics.

I love reading articles and blogs simply for the fact that there is usually more than one way to skin the proverbial cat, and I’m always looking for ways to improve my knowledge base or tweak existing techniques. This self-reliant community is often very willing to share their experiences, both positive and negative, so that others may learn from their successes as well as their failures.

To say this community is rich in comradery would be an understatement, to say the least.

I have never written for another blog other than my own, so this is a new venture for me. I hope I will be able to give something back to someone here and return the favor that you have all given me over the last several years.

As I continue to read and search the self-reliant and prepper communities, I run across multiple hits regarding making fire, storing and gathering water, weapons, and ammunition, just to name a few.

It’s not that these things aren’t important, they should be the staple of anyone’s self-reliant plan, however, there is one particular aspect that I rarely see mentioned, and yet it is likely one of the most commonly overlooked ways to prepare for bad times ahead.

I’m not talking about having 10,000 rounds for each weapon you possess, or the most fail-safe knife ever(or two or three of them actually, remember two is one, and one is none).

Most Fail-Safe Knife Ever… maybe… but for sure the best for the price point!

If we could all just take a step back and forget about all the stuff we have and all the stuff we think we still need and take an honest look at where we are, I think you may agree. Considering all of the possible adverse scenarios that can seriously impact our future, what seems the most likely?

An EMP? Absolutely, but for most of us this may never happen. Solar flares are possible but highly improbable. With a little investigation, you may feel as I do that a significant terror event in the US could likely come from crippling our power structure as opposed to a dirty bomb. EMP’s are not that difficult to make with the right resources and are a lot easier to conceal than a nuclear or biological weapon.

Again, possible, but not probable. (Read this article to learn how to build a Faraday cage.)

A Natural Disaster? Absolutely, as some of our coastal friends have already lived through. Hurricanes, tornadoes, long power outages are facts of life for these folks. If I lived in these areas, you better believe this is a priority for me.

Living in rural Pennsylvania, there is some minor threat of a tornado, or catching the tail of a hurricane, but very unlikely. Having said that, I’m in the kill zone for a little place called Three Mile Island, you may have heard of it. It made the news a few years ago.

Foreign invasion? Zombies? Another Civil War? I guess these are possible, but not likely probable. It doesn’t matter what adversity is handed to you, it is never good nor is it convenient. The only defense we have is to be reasonably prepared for multiple scenarios, prioritizing them accordingly to likelihood, and be willing to be flexible with our solution.

What I want to talk about today is something that is far more likely to cause a devastating event in our lives, and if it hasn’t already, it will, it’s just a matter of time. I think it is interesting that what I’m about to discuss is rarely if ever talked about in this community, but when it happens, and if you are not prepared for it, can significantly impact your life forever.

Get to the chase will you? I’m sure most of you are thinking that right about now if you haven’t mentally checked out already. What I’m eluding to here is financial hardship or disaster. Who here hasn’t had some significant life event involving a financial hardship? Some of us may live with this every day. For some of us this hardship is self-induced and for others it’s just plain old bad luck.

The thing to understand is that financial hardship comes in all shapes and sizes and is almost always unforeseen. No matter how it happens, we need to be prepared.

How many times in the last year have you checked your bug out bag? Your food stores? How about your get home bag or weapons safe? My guess is we all check these things at least once or twice a year, if not more.

When is the last time you checked your credit? Do you have an emergency fund? How much are you putting away for retirement? In case you were wondering, the answers to these questions should be Yearly-Yes and 10%.

It is likely that you will never have an issue with a stolen identity, at least I hope you don’t. I had my identity stolen almost 15 years ago after someone stole my wallet. It only took 3 hours for this misfit to charge almost $3,000 in my name to various brick and mortar stores, as well as opening several thousand dollars worth of credit to a big box store and a cell phone company.

As soon as I realized my wallet was missing, I notified the credit card company and reported it. It was then that they started to review “my” most recent charges and my jaw dropped.

After signing several affidavits, completing what seemed like a million forms, and running credit checks I thought I had this mess cleared up, but I was mistaken. There were outstanding credit accounts that were a year behind and I didn’t even know about them until I checked my credit again almost a year later.

In my stolen wallet was a credit card, my driver’s license, some cash, and a few pictures. This is all this creeper of the night needed to open these bogus accounts.

That was 15 years ago, it’s easier now for thieves to take your identity, and misuse it, than ever. It doesn’t matter if you don’t have a credit card or carry a wallet and only pay with cash. I have a friend that had someone open a credit in his name and had checks with his name and address mailed to his house. This thief knew when they were arriving and picked them from his mailbox before he ever got home from work to check the box himself.

There is too much data out there on you that is poorly protected. Are you a veteran? The VA had a laptop stolen several years ago and exposed 100,000 vets to identity theft because this laptop had access to date of birth, SSN, name, address, etc. Have you ever shopped at Target?

There was a huge data breach there almost two years ago. Don’t even get me started on Wells Fargo and their customer account reps opening bogus accounts simply to get the bonus credits. Have you ever been to the doctor or ER? Filled a prescription?

The list goes on and on…….the bottom line is, check your credit at least yearly. Anyone can get a free yearly credit report from annualcreditreport.com.

Do you have an emergency fund? A few years ago, my wife suddenly, and unexpectedly got sick with a life-threatening illness and was unable to work for three years. Since losing her job, our family lost 40% of its annual income. Take a minute to do the math right now, how will you survive with 40% less money today than you had last month?

Fortunately, we are believers in being good stewards of our money and we were able to ride the storm. We had over 6 months worth of expenses in the bank and lived a frugal lifestyle. At this point, it didn’t matter that I can start a fire 13 different ways or had a bug out bag for every person in the family.

There are several key components to being financially prepared. (1) Have an emergency fund of 6 months savings in liquid form (cash) ready to be used at a moment’s notice is where we start. What this doesn’t mean is having a few hundred ounces of silver in your safe in the basement.

Silver is not liquid enough, and selling silver when you have to as opposed to when you want to will likely mean you are not getting its full value in transactions.

Having 3 months of liquid savings in cash and 3 months in precious metals is reasonable, but still risky, especially these days. Have you seen the spot prices of gold over the last 6 months? The spot price of gold has been $1,130 – $1,350 during this time period.

That’s a 13% variance in just 6 months, way too risky for an emergency fund, cash is king here. We were able to comfortably utilize our emergency fund to offset our living expenses for a year, which gave me time to create additional paths of income to offset the loss.

Living a frugal lifestyle, aka (2) living below your means, is also a major key to financial survival. Having 6 months of expenses in the bank goes a whole lot further if you are free from debt and can manage your daily expenses comfortably.

Having frivolous debt (credit cards, high-value auto loans, student loans, extravagant mortgage) will eat through an emergency fund quicker than you can possibly imagine. Emergency funds and living below your means is the 1-2 punch that is absolutely crucial to survive any financial disaster.

Thinking toward the future, we should all be (3) investing 10% of our income for retirement. Emergency funds and living frugally will get us through hard times, investments will get us through the rest of our life. What’s that you say, have a pension plan so you don’t need to save?

I have an uncle that worked for many years and then the company went bankrupt, he lost almost everything he put into his investments. Pension insurance paid pennies on the dollar, so it wasn’t a complete loss, but an 85% loss of his pension was catastrophic.

You work for the government so your pension is safe? Tell that to the government workers in Detroit. Many of them may have only recouped a fraction of their losses and continue to struggle every day. This is not an isolated case, many teachers unions, state, and government pension plans are top-heavy, they are not sustainable past 10 years.

Don’t even get me started on the government theft program called Social Security.

Starting at age 25, saving $200 a month will accrue $790,000 at retirement based on an 8% return rate. The average rate of return of the stock market is about 10.5% over the last 100 years, so your 790k will likely be worth even more when you hit the golden years. As you get older and can afford more savings, your end of life preparedness only gets better.

Here is the icing on the cake, placing that $200 a month into a Roth IRA, means that every penny of that money after the age of 59 ½ is yours to keep, tax-free. Want to take all 790k out at once when you are 60? By all means, go ahead, not one penny will go back to the government.

There are many other advantages of the Roth IRA and I highly suggest looking into this. By the way, maximizing the $5500 a year contribution cap to a Roth IRA for the same time frame above will leave you with almost 2 million dollars at retirement, conservatively speaking.

So there you have it, a financial plan for your preparedness basket. The next time you find yourself forking over $50 for that cool new prep, think about your financial prep, is it up to par?

The likelihood of an EMP, government collapse, or zombie attack is slim to none (admittingly not beyond reason, however, that’s why we prep for multiple scenarios) yet we prepare for these to the extreme.

Take some time to prioritize your preparedness scenarios and be honest with yourself, financial jeopardy should be in the top tier of probabilities.

Filed Under: Prepping

Is Prepping Keeping You Poor?

June 30, 2019 M.D. Creekmore

Is Prepping Keeping You Poor?

Face it, you probably don’t have the financial resources of the fictional survivalist character ‘Burt Gummer’. Most of us don’t, but that doesn’t mean you can’t be prepared for disaster, but I’ll admit, it would be nice to have all the toys and survival gear the character has on the Tremors movies and television series…

The underground bunker with hardened panic room and escape tunnel, the five-year supply of MRE’s (meals ready to eat), 1,000-gallon fuel storage, backup generators, percussion grenades, tricked out four-wheel drive truck, Barrett .50 caliber and a room full of other firearms, weapons and other assorted gear.

I’m getting excited just thinking about all of that stuff. But, getting back to reality, (yes, I know it sucks) I know I’ll never be able to afford all that stuff and chances are you won’t either. But that’s okay because we can be prepared for disaster without spending a lot of money. I’ve done it and you can too.

The truth is, you don’t have to be rich or spend a lot of money. Unfortunately, emergency preparedness has been commercialized to the point where most people give up before they start, thinking what’s the use, I’ll never be able to afford all this stuff. Why should I even try…

I often hear this from new readers who have just started reading the blog. Like I tell them, there is no need to spend a lot of money, there are alternatives to big-budget survival planning.

Let’s take a look at three areas that we all must consider…

Survival Food

There is nothing wrong with commercial survival foods (I have some myself), they take up little space, are lightweight and have a long shelf life – but they are expensive. A basic years supply can cost several thousand dollars and most of us don’t have that kind of cash.

Most of what you need can be bought at your local supermarket or grocery and best of all you don’t have to buy it all at once. Since most canned foods from the supermarket shelf have a listed self-life of two years or more if stored properly you can add to your supplies as finances allow.

The key to keeping a fresh supply is to eat what you store and to rotate – first in, first out. You can build a rotating canned food shelf or you can buy one prefabricated but these are expensive.

What should you buy at the supermarket you ask. That depends on your particular needs and tastes, but this post “10 Things To Do Now!” should start you in the right direction. Be sure to read the comments as there’s some great advice given by readers there too.

The bulk of my food storage consists of whole grains, however, a lot of people aren’t interested in processing their own foods from basic grains. That is a shame because stocking up this way is the most cost-effective way of building your food storage and saving money now on your food budget.

Even if you skip the farmers market and buy your grain pre-packaged for long-term storage through one of the commercial survival food vendors the saving can still be huge compared to an equal amount of other commercial survival foods.

Just be sure to use what you store in your everyday meals to avoid the shock that can result from a drastic change in diet and be sure you’re not allergic before stocking up on large amounts of wheat.

Water Filters

A source of clean drinking water is essential to survival and while there are many ways to go about this, from boiling to purification with sunlight, I think an effective water filter still makes a lot of sense, especially for a family, but they can be expensive.

I’m a fan of the Berkey Water Filters but most of us can’t afford to spend $258 for a water filter (I got mine through a barter deal with an advertiser) luckily it isn’t difficult to make your own for less than half the cost. I give full details, with photos of how to make your own filter in my book “31 Days to Survival“.

Firearms For Foraging and Defense

I recommend starting with a reliable .22 caliber rifle. A .22 rifle will allow you to take both small and large game with proper shot placement and it can be used for self-defense if needed. Best of all ammunition is cheap enough to allow the stockpiling of thousands of rounds without emptying your wallet.

As to budget rifle choices, I’ve received good reports from several readers about the Romanian M-69 .22LR Training Rifle, however, I can’t vouch for these myself, because I’ve never owned one, but I think they are worth looking into if you can still find one for sale.

If anyone has any experience with these rifles please share with us in the comments below.

A good used break open single shot shotgun such as the 12 gauge H&R Pardner can often be found in used / like new condition for under $100. I’ve seen several recently at the local pawn shop priced for under $75. A 12 gauge shotgun is a very versatile survival tool.

Any retailer selling ammunition will carry at least a few different sizes and weights of shotshells, but in my option #, 6 shot offers the most versatility for hunting small game. Slugs and #00 buckshot work best for larger game and self-defense (check local laws).

The Smith & Wesson Model 10 Military & Police Revolver is the most successful handgun of all time. This revolver has been manufactured since 1902 and has been produced with many variations for both commercial and military use.

Even after a full century of technological advancements the Model 10 is still hanging in there as a reliable weapon with respectable stopping power. As a survival handgun one could do much worse than having a model 10 strapped on your side. Used ones start at around $275 in my area but are getting hard to find.

As you can see you don’t need a lot of money to prepare for disaster but you do need realistic expectations. In the words of Burt Gummer; “You have to do the best you can with what you’ve got”.

We would love to hear your ideas on how to prepare on a budget in the comments below… I’m sure we can all learn something new from each other…

Filed Under: Prepping

The First 50 Things to Disappear from Store Shelves During an Emergency

June 30, 2019 M.D. Creekmore

The Top 50 Things to Disappear from Store Shelves during an EmergencyBy Tom Sciacca

Have you ever noticed how, whenever a big storm is predicted, people start rushing to stores to clean them out of every food item and supply they have on the shelves? In one sense, it’s probably good that they are trying to anticipate the emergency, despite being last-minute about it. It sure beats those people who don’t bother to prepare at all, then complain when emergency services are overwhelmed by requests for assistance.

But why panic in the first place? Why not have a stash of necessary items always ready for such an emergency? Even if there isn’t a storm approaching, it’s nice to know that you don’t have to rush out to the store every time you run out of toilet paper. Keeping some extra around the house is always a good idea!

With this in mind, I decided to ask CampingSurvival.com’s Facebook fans what they felt were the emergency supplies that stores were most likely to run out of when people start to panic. Then I compiled the top comments in various categories so I could share it with you.

Since this list is based on the comments of our Facebook fan page, some of the items (canned meat, for instance) may not be the absolute first things for a store to run out of but are still items that you should consider having among your emergency supplies nonetheless.

Without further ado, here the list of the Top 50 Things to Disappear from Store Shelves during an Emergency, compiled by yours truly:

FOOD

1.Bread
2.Butter
3.Cereal
4.Coffee
5.Eggs
6.Flour
7.Fruit, canned and fresh
8.Honey
9.Meats, canned
10.Milk
11.Peanut butter
12.Pet food
13.Salt
14.Sugar
15.Vegetables, canned and root vegetables
16.Water

POWER AND LIGHT

17.Batteries
18.Candles
19.Charcoal
20.Coolers
21.Flashlights
22.Gasoline
23.Generators
24.Glow sticks
25.Ice
26.Lamp oil and oil lanterns
27.Lighter fluid
28.Matches
29.Propane, propane stoves

FUN

30.Alcohol, drinking
31.Beer
32.Cigarettes
33.Condoms

FIRST AID

34.Alcohol, rubbing
35.Antiseptic
36.Aspirin/pain relievers
37.Cold medicine
38.First aid kits

HYGIENE

39.Feminine hygiene products
40.Paper plates/napkins
41.Shampoo
42.Soap
43.Toilet paper

BABIES

44.Baby food/formula
45.Diapers

IMPROVISATION

46.Duct tape
47.Plastic bags
48.Plywood
49.Radios
50.Rope

Now, before you file this away as mildly interesting reading, take this list and compare it to what you have stocked up. Check to see what you may be missing or what you need more of. And don’t forget that this is only a Top 50 list, so there are plenty of other items that I don’t have space to talk about in this (already long!) blog entry.

Tom Sciacca is a former US Marine, a veteran of the Gulf War, a survival enthusiast and President of CampingSurvival.com.

Filed Under: Prepping

Are You Living in a Nuclear Death Zone? Find Out with the U.S. Nuclear Target Map

June 27, 2019 M.D. Creekmore

U.S. Nuclear Target Map

A few days ago I was doing research on nuclear war, world war 3, and potential nuclear targets and safe distances from those target sites when I came across the NUKEMAP.

The U.S. nuclear target map is an interesting and unique program unlike other nuclear target maps because it lets you pick the target and what size nuclear device that the area you chose is hit with and then shows the likely effects and range of damage and death that would be caused by that nuclear device if it hit and detonated on your chosen target area.

The NukeMap looks to be fairly accurate as to the blast area, fallout and damage but of course all any  U.S. Nuclear Target Map can do is represent an educated guess as to effects of a nuclear blast from and to a given area.

If you’re curious to know if you’re living in a nuclear death zone then go over and give the NukeMap a try if nothing else you’ll be entertained for a few minutes. Be sure to scroll down to the bottom of the page and look to the right side and click the “Don’t log usage data” before choosing and nuking your target.

I used the NukeMap set to the closest possible nuclear target to my location, that is Oak Ridge Tennessee and according to the map I’m safe from the detonation blast of the largest Russia bomb the Tsar Bomba, however, thermal radiation could be an issue.

According to the site Thermal radiation can cause:

Third-degree burns extend throughout the layers of skin and are often painless because they destroy the pain nerves. They can cause severe scarring or disablement and can require amputation.

Not good… however, there is some “good news” according to the U.S. Nuclear Target Map below from Wikimedia Commons…

U.S. Nuclear Target MapAs you can see Oak Ridge Tennessee isn’t shown as a target on the map, but then the nuclear target map is from 1984 so those targets might have changed and or more target areas added to the list, and who knows where the bombs will land during a nuclear exchange, one could go off course and land right in my bedroom…

But, then with nuclear detonations, it’s usually not the blast that but the radioactive fallout that kills the most people, and as you can see from the map below the most likely path of radioactive fallout across the U.S. from potential target areas. However, radiation can and will spread around the globe if it enters the jet stream.

Fallout_map_USAHave you considered and planned for nuclear war? Are you living in a nuclear target area? What are your plans if and when a nuclear world war three begins?

✅Recommended books

Nuclear War Survival Skills: Lifesaving Nuclear Facts and Self-Help Instructions
No Such Thing As Doomsday: How to Prepare for Earth Changes, Power Outages, Wars & Other Threats

How To Prepare For and Survive a Nuclear Attack ?

Radioactive nuke attack survival

Added by Joel Skousen

First, let’s be clear about one thing:  nuclear war is very survivable, even with minimal preparations, so don’t believe the “everyone is going to die” claims about nuclear winter and total destruction.  50% of Hiroshima survived without any preparations, though many were very sick.

Keep in mind too that even Russian and Chinese war doctrine doesn’t include nuking American cities on a first strike, despite the verbal threats.  In reality, they intend to nuke US and NATO military facilities first and blackmail the West into submission.

There are 3 phases of nuclear war that you must be prepared to confront:

1) Initial blast and radiation.  The blast area of destruction is only 5-7 miles from any nuclear target, so don’t prepare against blast effects, which is very expensive—relocate instead.  Avert your eyes immediately from even a distant explosion and duck behind anything that will shield you from the instantaneous line of sight radiation and intense heat and light.

Most will never see any blast effects, but almost everyone will have to deal with residual radiation from anywhere from 2 weeks to a month, which is not that difficult if you prepare in advance.

2)  Immediate panic and cut off of electricity and supplies.  Because both Russian and Chinese nuclear doctrine dictates the use of high attitude Nuclear Electromagnetic Pulse weapons (EMP)  just before a physical nuclear strike, the electric grid will go down—which guarantees a lot of panic as people are plunged into darkness, lack of communication, and the cessation of all government services, like sewer and water.

Don’t believe the hype about Iran or North Korea doing an EMP strike.  It takes six simultaneous high altitude nuclear weapons exploding to blanket the entire US grid, not one.  So, only Russia and China have that capacity.

Remember too, that a total loss of electricity, including all TV and Radio may be your best immediate warning that a physical nuclear strike is about to fall within 15 or 20 minutes.  That’s not a lot of time, but it may allow you to get a head start out of town or make a quick call to warn the family.

This threat requires preparation to get to your secured home or retreat very quickly without getting caught in major traffic snarls.  Don’t get on a freeway that is already packed.  Use secondary roads, and map out routes that allow you to cross any freeways at an over or underpass NOT associated with an on-ramp or an exit.  Those will be the only ones not blocked with traffic.

3) Long-term famine and Social Unrest:   This gets into full swing within 3 days of an attack and may last more than a year depending on how quickly parts of the grid can come back up and how well industry can re-establish supplies lines.  While it’s hard to predict how these things will play out, this is where your long-term food and water storage supplies come in.

Don’t expect to be able to grow a garden that first year in a suburban area during high levels of social unrest without lots of theft. That will only be possible in rural and secluded areas.   That’s where having a rural retreat is a good long-term solution.

This article will deal mainly with the first threat—surviving the radiation.   It takes a heavy mass of materials to shield from gamma radiation, which is much more potent than X-rays, so forget about using medical grade X-ray shielding materials. Your wooden house and roofing materials are like paper to gamma rays, so not much shielding there either.

Nuclear protection purists would demand a reduction in radiation that is almost total requiring  13.8 feet of water, 10 feet of earth, 6 feet of concrete, or about 1.3 feet of lead—a Protection Factor (PF) of a billion, all of which are very costly to achieve.  This Survival Blog article discusses the relative protection factors for various materials.

As a practical matter, we have to arrive at a compromise between the cost of construction and shielding.  You need less shielding the farther you are away from an explosion since radioactive dust starts to fall out from the sky closest to the detonation and only the finer high altitude particles travel longer distances, depending on the wind direction.

In short, you get less radiation the farther from blast zones you are located.

For example, Immediately to the West of Seattle, which has multiple nuclear targets around Puget Sound including the Trident submarine base, you would probably need a PF of 1000 to shield against several inches of radioactive dust on your roof.

That amounts to 22 inches of concrete or 3 feet of dirt. But, further to the West in Idaho, the radioactive dust from Seattle would be a fraction of that, requiring much less shielding.

Many experts demand a “one size fits all” PF of 1000, but that means that very few could afford to build a shelter or safe room—and they don’t.

Because most areas of the country, not directly downwind and within 50 miles of a blast one, are not subject to those high levels, most people can survive with a protection factor of only 32, meaning that that radiation level is reduced to 1/32 of normal.  That involves 12” of concrete over your basement shelter—not 22”, which is doable, and not too costly.

Because of the much higher costs of protection close into target areas, in my book Strategic Relocation, I recommend that your money is better spent relocating, even within the same general area, to avoid being directly downwind or close to a nuclear target.

In the book, I have maps of all the nuclear target areas for guidance, but also indicate the one or two prevailing wind directions in your area necessary to mapping out an avoidance strategy.

Choosing the type of shelter

Your two basic choices are to buy a prefabricated tank style shelter that is buried underground, or to build a basement style shelter within your own home, or as an extension.  The only advantages to the buried tank shelter are that it is quicker to install, and covering with dirt is cheaper than concrete.

However, they are more expensive per square foot of usable space, and they often come designed with expensive blast doors and valves, which you don’t need outside of a blast area.  Sadly, many also are designed with costly NBC or HEPA filters inside the shelter, but the sheet metal filter enclosures are not thick enough to stop radiation trapped in the filter from reaching those inside the shelter. The average cost is $50k-$75k, and you can build a lot of basement for that price.

But the worst problem with buried shelters is the fact that you have to go outside and open a hatch to get inside.  The notoriety of bringing in a huge tank shelter on a semi-truck and burying it in your backyard with a crane guarantees that the whole neighborhood is going to know about it.

How do you get in if that entrance is surrounded by others wanting shelter?   All your loading of supplies and equipment is down through that vertical ladder well, which is not easy.  In addition, the ventilation pipes emerge from the ground and are subject to tampering or blocking.  If you do use a buried shelter, put a shed or building over it.

That way the vents are protected from view and tampering.  Still have to cross open ground to get into the shed, which is a security risk.

The basement shelter avoids all of those disadvantages since you access it and stock it with supplies from within your home.  No one can view any of that activity.  Vents go up through walls into the attic, and HEPA air filters can be concealed in or under normal cabinets.

The basement safe room or shelter (never call it a “bunker”) is also easier to conceal, and it should be concealed.  In cases of massive social unrest, you want to have the option of avoiding confrontation by hiding out in a concealed safe room with a steel security door, communications, and alternate battery-powered electricity.

If you do an extension to your home with a basement shelter underneath, label the basement part as non-livable “storage” only, and don’t show any of the plumbing that might pertain to a future shelter.  Install all that after the occupancy permit is granted.  My book on the Secure Home has all of the architectural details on how to do that plus detailed listings of all the equipment necessary to outfit the shelter.

But, if you have an existing basement the best way to achieve total privacy without a permit or inspection, is to build a concealed shelter within the basement.  We have engineered plans to do just that here.

As a minimum, prepare your home to give you added protection without a formal shelter.  In a basement, that would involve building two addition stacked walls of concrete block (6ft high and 8ft across) into a corner of a room away from any window, but leaving a 24” entryway. & Cover that with a makeshift ceiling of 2×4 on 12” centers with ¾” plywood.

Then stack 3 levels solid 4” concrete blocks on top of that makeshift ceiling.  That will give you the minimum radiation protection you need.  Have a port-a-potty inside as well as some food and stored water.  It will be tight, but at least you’ll survive.  If you don’t have a basement, you’ll have to do four block walls inside an above ground room to get the sidewall protection. Do the lowered ceiling on top of those 4 six foot high walls.

It takes about two weeks for gamma rays to dissipate so you will need to buy a radiation meter to tell when it is safe to come out or to go back into a shelter (since in a war, there may be multiple nuclear events).  KI4U.com has a range of nuclear meters at good prices.

Resources:

  • https://www.ready.gov/nuclear-blast
  • Are You Ready – FEMA Guide
  • Nuclear War Survival Skills – Cresson H. Kearny
  • U.S. Nuclear Target Map (Do You Live In a Death Zone?)

Joel Skousen has designed high-security residents and retreats for over 40 years.  He is the author of Strategic Relocation, the Secure Home, The High-Security Shelter, 10 Packs for Survival, and is the publisher of the weekly World Affairs Brief, which analyzes the week’s top stories from a perspective of what the government and the mainstream news won’t telling you.

Surviving a nuclear attack – Irwin Redlener

How to Protect Yourself from Nuclear Fallout and Survive an Atomic Attack – 1950s Educational Film

Webb Pierce – more and more – love this song.

I know that most of you don’t want to think about it but we are heading towards a nuclear world war three, possibly within the next few months, but more likely within the next five years.

  • Urban Survival Basics: How to Survive in the City When Disaster Strikes
  • The Best Urban Survival Kits and Get Home Bags For Preppers

Here are some of my favorite prepping gear

Thank you for investing your time in this article, and I sincerely hope it has provided valuable insights to strengthen your survival preparedness. As a survivalist, I make use of a variety of tools and gear, many of which have proven to be indispensable in my journey. Here, I’ve compiled a list of some of my favorite survival gear, which I believe you will find beneficial as well.

These are affiliate links, meaning if you decide to use any of them, I’ll earn a commission at no additional cost to you. However, I assure you that these recommendations come from personal experience – these are the exact tools I trust, use, and confidently recommend to everyone, including my own family.

  1. Long-Term Food Storage: ‘My Patriot Supply‘ is my top choice for emergency food supplies. Their selection caters to long-term storage needs, ensuring you’re always prepared.
  2. Water Filter: Clean, safe drinking water is a priority in any situation. This water filter has served me well, and I trust it will for you too.
  3. Versatile Cooking Solution: The Zoom Versa Cook Stove is a reliable, versatile cooking solution perfect for outdoor and survival scenarios.

I’ve compiled an extensive, frequently updated list of my top survival gear recommendations for your convenience. Equip yourself with the best and latest gear here.

Remember, true survival isn’t merely about making it through – it’s about effectively navigating and thriving in challenging circumstances. Equip yourself well, stay informed, and always be prepared.

Filed Under: Prepping

How to Be A Vegan Prepper (and still survive TEOTWAWKI)

January 22, 2019 M.D. Creekmore

how to be a Vegan prepper

by DocJ

I have passed my 70th birthday.  A year ago, I ate lean meat, dairy products, eggs, and olive oil.  It was an overall healthy diet.  I was a controlled diabetic dependent on medication, not insulin, statins for high cholesterol, and an ace inhibitor, blood pressure medication, to protect my kidneys from diabetes.

Last February, two sisters and two cousins contacted me about starting a program developed by Dr. Esselstyn from the Cleveland Clinic to clear a blockage in a sister’s neck and diabetes, high cholesterol, and high blood pressure in my brother-in-law.

Knowing I also had the same medical issues, I was invited to join the group and today I can report that neither my brother-in-law nor I have any signs of diabetes, high cholesterol, or high blood pressure and everyone in the group has lost 25-45 pounds.

It also looks as though the blockage in my sister’s neck is decreasing in size.  I now know if TEOTWAWKI (read MD Creekmore’s book on how to survive TEOTWAWKI) happens I am no longer dependent on medication for survival.  The first step to survival; get healthy! Then stay with the program!

Always begin prepping by assessing skills and resources.  I am a long-time gardener now retired from teaching special education of children with more severe disabilities.  I left the classroom at 71 years and began a backyard business of propagating landscaping plants through cuttings, germinating seed and growing herbs, perennials, and vegetable plants.

I broker blackberries, raspberries, jostaberries, currants, strawberries, etc. each January and February which gives me access to affordable additional berry plants when I begin enlarging the garden this year. I am also at home with woodworking and general carpentry.

I bought my “walking, talking, singing, dancing” table saw for my 70th birthday. I love tools.  If I cannot be found in a store, look in the tool department.  My only daughter is like me so the two of us are learning electricity, plumbing, general maintenance, and new woodworking skills together.  But the main skill I have is growing food in the garden and putting back food.

As I need a diet based on grains and beans and my garden is in the process of being enlarged, I began buying 25-pound bags of winter wheat, oats, buckwheat, white rice and brown rice several varieties of beans including soybeans for soy milk and tofu.

I prefer Almond milk but if TEOTWAWKI happens, Almond milk will not be available.  In Arkansas, we cannot buy dry ice for treating storage grains and beans.  I layered edible DE in about 6 layers in each 5-gallon tub.

The amount is 1 cup per 5-gallon bucket.  Buckwheat, brown rice, soybeans, and rolled oats are stored in their bags in the deep freeze to prolong their shelf life.  If and when TEOTWAWKI happens, I will not be able to keep the oils in those foods from turning rancid after a while.  From some of the literature, I have been told 6 months to a year in storage is all I will probably get with those foods.

While building my supply of the above staples, I started buying frozen vegetables on sale-mixed vegetables, peas, peas and carrots, baby limas, and corn.  I am the bugout point for the family so I need enough vegetables for a year to allow the year’s garden to replace what has been saved.  I held the vegetables in the freezer until I started dehydrating them.  My Excalibur dehydrator does 9 trays at a time and the 3 round dehydrators can dry 5 trays each.

Stores often have sales on vegetables and fruit in the fall.  I bought lots of potatoes, onions, carrots, celery and dehydrated them as diced vegetables. Coleslaw mixes are dried as.  The dried vegetables are stored in half-gallon containers for soup and additions to any cooking to increase nutrition. I often put a handful of vegetables in many of my bean dishes.

I prefer one-pot meals.   I bought lots of apples and some were given to me.  They become applesauce or dried slices.  Christmas oranges are peeled, sliced, and frozen until I start making apple/orange preserves.  Any fruit I can slice and dehydrate is fair game.  Grapes, I cut in half and dry flesh side up. Dehydrating grapes is much easier that way.

At this time, I am redesigning my garden to increase 20 fold.  I now have the plant stock for apple, apricot, cherry, peach, fig, pomegranate, and nectarine trees to plant this coming spring.  The blueberries are 15 years old, but I want to double the number this spring.

I have some primocane (2-year-old canes ready to produce this year) blackberries and raspberries to transplant into the new area. The strawberry bed will be increased.  I potted up 3 varieties of seedless grapes recommended for growing in NW Arkansas.

They also will be planted this spring.  Plus, I am growing mulberry, elderberries, gooseberries, jostaberries, currants, hardy kiwi, wild roses (for hips), and any other edible plant I can find around the cleared area.  Now for the hard part; growing enough dried beans to feed me and at least four other adults using heirloom seed so I can keep seed for the following year’s crop.

I am opting for pole beans whenever possible; otherwise, I will be planting beans in blocks or wide rows. I have had tremendous production using square foot gardening planting seeds 3 inches each way-9 plants to the square foot.

My raised beds are 4 feet by 8 feet.  I like raised beds as they are more productive and easier on the back.  A good portion of the garden will be for all the different types of beans I like and use-black turtle, pinto, chickpea, navy, northern, small red, Vermont cranberry, etc.  I eat a lot of lentils, but I have never grown them.  My goal this year is to learn how to grow this very nutritional food.  My granddaughter’s new husband is from India and tells me lentils, dal, is the first food of babies because of its protein level.

Tomatoes are vital in prepping.  I plan on using tomatoes at least 4-5 times a week in dishes.  I grow mostly paste/sauce heirloom tomatoes. I want to save all my vegetable seed.  Until things are bad, though, I will continue to use some favorite hybrid seeds, but not depend on them.

I sauce or dice for canning and I dry a good portion of the available tomatoes.  A large number of cherry tomatoes was given to me that was too much to eat right now.  I washed, blanched, sliced in half and then put the tomatoes in the dehydrator.  I just chopped some for a dish a couple of weeks ago and they were quite tasty.

The soup mix as I call them all take to being grown in the raised beds.  These are the onions, garlic, celery, carrots, parsnips, and potatoes etc.  I dry most of these including some of the potatoes as this climate is not good for keeping vegetables long term.

I will be growing Irish potatoes for the family, but my diet depends on sweet potatoes and winter squash.  Both keep well in an unheated room in my house.  I also dehydrate and can some sweet potatoes for quicker use.  I tend to be too busy to spend a lot of time in the kitchen cooking.

I think about what will I do if a disaster is so serious, I run out of grains. As a diabetic, I am better with wheat, buckwheat, and oats than with corn.  Yes, I add frozen, canned, or dehydrated corn to the bean dishes, but I do not eat a lot of cornbread.

The family will eat lots of cornbread so I will need to address their needs.  I am learning about growing grain crops by planting small areas and processing to learn what to do if necessary.

A vegan preparing for TEOTWAWKI is no different except for the increased almost double the amount of beans, grains, fruits, and vegetables that are put into storage.  As I eat no fat added to my foods and no eggs, baking is non-existent except for pancakes made with applesauce for oil and egg replacer for the eggs, whole grain bread, and maybe cornbread.

Grains and root crops are increased or decreased to lose, maintain, or gain weight. The beans, vegetables, and fruit provide the basic foundation to the diet. I eat from my storage daily so everything is always in rotation.  The doctor has been testing me quarterly and is amazed with my bloodwork.   He tells me to continue whatever I am doing so I know this works for me and for 11 other members of the family.

My children and grandchildren want the traditional diet which means I also prep with their needs in mind.  My late husband and I homesteaded on this property for 11 years without utilities.  During those years I raised reject chicks from the local brooder houses supplying chicks to the farmers with the huge broiler chicken houses.  I had no electricity so it was necessary to can the meat.

Also during those years, I worked a 35 doe rabbitry producing 3200-3300 kits a year to a local company.  I also raised a herd of milk goats.  Starting this spring, I will begin growing laying hens for eggs and new chicks and I will get a small rabbitry up and going again.

Starting after the SHTF is not the way to go.  I want a flock of birds and at least 3 breeding does and 2 bucks in the rabbitry well in advance. I learned the hard way; never settle for one breeding buck.  If the buck dies and he might, no more kits!

There is also a one-acre pond with abundant fish, turtles, frogs, etc. and a herd of about 25 deer with loads of small game on this land.  The family will have the meat and eggs to eat with the beans and grains to supplement the meat.  This is the difference between prepping for a Vegan and the more traditional American diet.

Here are a few of the books I go to often for reference:

  • ‘The Resilient Gardener” Food Production and Self-Reliance in Uncertain Times by Carol Deppe.
  • ‘Gardening-when it counts’ by Steve Solomon.
  • Any book by Eliot Coleman dealing with growing vegetables the year around using frost fabric and low tunnel hoop houses.

Filed Under: Prepping

  • « Go to Previous Page
  • Page 1
  • Interim pages omitted …
  • Page 5
  • Page 6
  • Page 7
  • Page 8
  • Page 9
  • Interim pages omitted …
  • Page 15
  • Go to Next Page »

Primary Sidebar

Subscribe to Blog via Email

Enter your email address to subscribe to this blog and receive notifications of new posts by email.

Join 7,199 other subscribers
  • Amazon
  • Facebook
  • Substack
  • Twitter
  • YouTube

“Do more with less.”

– Minimalist proverb

Recent Posts

  • Just so you know
  • Weather Update for My Corner of Appalachia
  • Why I’m Ordering Ivermectin + Mebendazole Every Year
  • The Website’s Shutting Down (But Here’s the Plan)
  • You Are Hated! Start Training Like It!

Footer

Recent Posts

  • Just so you know
  • Weather Update for My Corner of Appalachia
  • Why I’m Ordering Ivermectin + Mebendazole Every Year
  • The Website’s Shutting Down (But Here’s the Plan)
  • You Are Hated! Start Training Like It!

More about me

Books I’ve written

Books I’ve read

Follow Me on YouTube

Follow Me on Facebook

Gear I Use and Recommend

Newsletter

Search this site

Follow me elsewhere

  • Amazon
  • Facebook
  • Substack
  • Twitter
  • YouTube

© 2008–2025 M.D. Creekmore · As an Amazon Associate, I earn from qualifying purchases.