• Skip to main content
  • Skip to secondary navigation
  • Skip to primary sidebar
  • Skip to footer

M.D. CREEKMORE

  • Blog
  • Books
  • Newsletter
  • Gear I Use
  • About
  • Contact
  • Facebook
  • YouTube
  • Blog
  • Books
  • Newsletter
  • Gear I Use
  • About
  • Contact
  • Privacy Policy
You are here: Home / 2018 / Archives for October 2018

Archives for October 2018

Cooking With A Thermos Bottle (Can It Really Be Done?)

October 21, 2018 M.D. Creekmore

cook in a Thermos bottleI first learned of Thermos cooking while reading Kurt Saxon’s The Survivor newsletter back in the late 1980s and have been using this thermal cooking method to save propane ever since. I have no way of knowing for sure, but I would estimate a savings of $40 to $50 per year from my doing this.

In a grid-down situation, using less fuel will be a top priority, and cooking with a Thermos (or other insulated vacuum bottle) will help you get the most from the smallest amount of fuel possible.

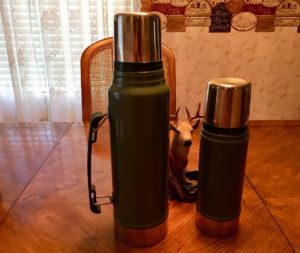
  1. All you’ll need is a small-mouth vacuum bottle (I prefer the Stanley vacuum bottle) and a funnel. Let’s take a closer look at how to cook this way.
  2. Start by preheating the vacuum bottle. Simply bring enough water to a boil to fill the bottle, screw on the cap, and set the bottle aside while you do the following steps.
  3. Heat the food in a pot on your stove until it is boiling
  4. Pour out the water used to preheat the vacuum bottle.
  5. Using your funnel so you don’t waste any, pour the boiling food into your preheated bottle, and let the heat inside finish the cooking.

That’s it . . . Simple, isn’t it? Here are several tips to make it even more energy efficient…

  • Lay the bottle on its side so the food will cook more evenly.
  • Wrap the bottle in a blanket to retain more heat.
  • I recommend a small-mouth Stanley (formerly Aladdin Stanley) bottle and not some cheap knockoff. But if you do get another type of bottle, be sure it has stainless steel insulation inside and not glass.
  • A gallon plastic bottle (e.g., milk, bleach, vegetable oil) cut in half makes an excellent free funnel. Just make sure it’s clean.
  • Shake the bottle every few hours so the contents don’t coagulate or stick to the sides.

Cooking time depends on what you are cooking, the type of insulated bottle you use, and the amount of preparation you do before adding the food to the bottle. You’ll learn by doing. But don’t get in any hurry, because your food will not burn or be overcooked.

You’re probably wondering what foods you can cook in a Thermos bottle. I cook whole-wheat breakfast cereal, steel-cut whole oats, rice, beans, lentils, and pasta. One of my favorite dishes is rice with chopped vegetables.

Thermal Cooking Without A Bottle

Thermal cooking can be done without using a vacuum bottle. This method is more convenient when cooking larger amounts of food, such as for beans. Thermal-Cooked Beans You need a large pot with a tight-fitting lid, a wool blanket, and a cooler with lid.

  • Sort and presoak beans overnight…
  • Bring the contents to a rolling boil for about 10 minutes, cover the pot with the lid, and quickly remove the pot from the heat and wrap it tightly in the wool blanket. Cover the pot completely because you don’t want any heat to escape…
  • Carefully set the wrapped pot of beans into the cooler, filling any remaining space between the cooler and blanket with the insulating material (e.g., old newspaper), and place the lid on the cooler.

Pinto beans take approximately three to five hours to cook this way.

If the beans are not done to your liking, simply reheat, rewrap, and let stand for another hour – this is also the case with thermos bottle cooking. 

Thermal cooking can be used to cook anything that you normally slow cook.

The advantages of thermal cooking are numerous: you get three hours of cooking time for only 10 minutes of fuel; food does not stick or burn if left unattended; water use is minimal because it does not boil away or need to be refilled while cooking. In short, thermal cooking is the most cost-effective and least labor-intensive method I know.

Note: Some of you may have heard about “cooler corn,” where you put raw corn on the cob in an insulated picnic-type cooler and then fill the cooler with boiling water. Then a couple of hours or so later (it keeps just right for a long time), you have corn on the cob.

The problem is that “cooler” plastics are made to take cold, not heat, and they may leach bad plasticizing chemicals into the cooking water at high temperatures. Now, if you have one of the old aluminum-lined Coleman coolers, you’re OK to cook this way.

Filed Under: Prepping

How To Make A Homemade Water Filter

October 21, 2018 M.D. Creekmore

homemade water filter girls drinkingWhen asked where they should start their survival preparations, most people answer food storage. Wrong. In fact, food isn’t even in the top three survival priorities.

The most important elements of survival are oxygen, shelter from extreme weather, and water. Depending on health, physical activity, and environment, and with limited activity, most humans can survive:

  •  Five minutes or less without oxygen
  •  10 days or fewer without water at 50°F (and even fewer as temperatures rise)
  •  Four to six weeks without food

Today’s task involves making sure your survival plan includes a reliable source of clean water. Imagine how disappointed you’d be after investing all that time and money to build your stockpile of survival food only to realize that you were about to die of dehydration because you neglected to adequately address your need for water.

Having food storage without a reliable source of clean water is like eating soup with a fork. You’re only getting some of what you need. Before getting started, a few words on terminology are in order. Sometimes the terms filtration, purification, and sterilization are used interchangeably in relation to water.

homemade water filter
This homemade water filter works as well as any commercial model and costs considerably less.

This is incorrect. Filtration removes solid matter (or in some cases emulsified liquids). Purification removes that which is not water (stuff in solution and/or emulsion). Sterilization kills microbes in the water.

The confusion of terms is understandable, as many commercial filter units also remove microbes by filtering them out, and many units include activated charcoal or other elements that both filter out solids and remove a lot of metals in solution by adsorption (as opposed to absorption).

In fact, they now have filters that are so specific and so fine they actually can filter out molecules: a “watermaker” that filters out salt from seawater would be an example. I’m a fan of the Berkey water filters. Having used a Big Berkey filter extensively for more than three years, I can personally attest to its performance.

However, a lot of people can’t or won’t spend $250 or more for a water filter no matter how critical it is to their survival. Fortunately, it isn’t difficult to make your own homemade water filter using only the Black Berkey Purification Elements and a few odds and ends you probably have lying around your house.

The total cost for such a unit at the time of this writing is less than $150, including the Black Berkey Purification Elements. Black Berkey Purification Elements can be ordered online from a number of vendors, including Amazon.com and LPC Survival (www.directive21.com), with current prices ranging from $99 to $110. I’ve found LPC Survival to be very reliable, with superfast shipping and great customer service.

WHAT YOU’LL NEED

  •  Two Black Berkey Purification Elements
  •  Two 5-gallon food-grade buckets with lids
  •  Food-grade spigot (available at most hardware stores or online; the type used for large water coolers works great)
  •  Drill with 1/2- and 3/4-inch bits

First drill two 1/2-inch holes in the bottom of one of the buckets and two 3/4-inch holes through one of the lids. The holes should be approximately 4 to 6 inches apart to facilitate changing the filters as needed. Both sets of holes in the bottom of the bucket and those in the lid should match up perfectly when mated.

preppers make a homemade water filter
Black Berkey Purification Elements secured through the bottom of the top bucket using 1/2-inch holes and supplied wingnuts. Note how the elements protrude through the bottom of the top bucket and align with the holes through the lid of the bottom bucket.

Next, drill a 3/4-inch hole in the side of the other bucket. This hole is for the spigot, so drill about 2 inches up from the bottom of the bucket. This way when it is set on a table or bench, the spigot isn’t touching the surface, where it can be damaged or broken.

homemade berkey water filter
This spigot was taken from a busted water cooler.

Install the Black Berkey Purification Elements securely through the 1/2-inch holes that you drilled in the bottom of the first bucket, using the supplied rubber washers and wingnut fasteners. Be careful not to overtighten the nuts or you could cause a leak or even break the tip of a purification element.

To use this unit, put the lid with the 1/2-inch holes on top of the bucket with the spigot and set the other bucket with the filters installed on top, aligning the holes so the Berkey filter tubes extend through the lid of the lower bucket.

Pour the water to be filtered into the upper bucket and cover with the remaining lid. The water in the top bucket will drip through the filter elements and into the lower bucket, filling it with clean drinking water. As you can see from the photos, it’s very simple. The whole process takes about 20 minutes.

Water Storage Tips

For water storage, I have six 5-gallon containers bought in the sporting goods department at Walmart. Thirty gallons of water isn’t much, but I don’t see water being a major issue at my location.

If you live in a drier region, such as the American southwest, water will likely be a major concern, which may necessitate the storage of hundreds or even thousands of gallons for an extended emergency. Don’t store water in used 5-gallon milk jugs. They’re not strong enough for long-term storage and eventually break down and leak.

The 5-gallon containers sold in the sporting goods section of most department or hardware stores work great, as do the 55-gallon plastic water drums sold by preparedness gear retailers, such as Emergency Essentials at BePrepared.com.

If you must use small containers, empty 2-liter soda bottles work well. They are stronger than milk jugs, have better lids, and are more convenient. Avoid glass containers because they break too easily.

Tap Water Tip

If you’re storing tap water from a municipal water system, there’s no need to add bleach as suggested by some. Water from the municipal tap already contains enough chlorine to thwart any bacterial growth, so it can be stored without any other additives.

Filed Under: Prepping

How To Build A Live Animal Trap (An Easy Illustrated Guide)

October 21, 2018 M.D. Creekmore

homemade box trapNo doubt many of you have read about various improvised and homemade traps in one of the many outdoor survival books and thought, Wow, what a great idea—I could do that. Indeed, many of the ideas and diagrams shown are ingenious, and a few of them actually work to trap game—with practice.

After seeing all these trap designs in these books, you might think you need to learn how to make them all yourself, or that these homemade traps are somehow more proficient than commercially manufactured traps at putting food on the table or keeping pests out of your garden. You don’t, and they’re not.

The main (and possibly only) advantage homemade traps have over most of their store-bought counterparts is that they can be built from scrounged materials. That is a huge advantage and the reason you should learn how to make several different types of do-it-yourself traps.

But don’t go overboard here or discount a factory-made trap as somehow inferior for survival because you did not carve it out of three twigs that are held together by a strand of your own hair. Generally, factory-made traps are superior to most homemade designs, and you should take full advantage of their use.

When you are planning for survival, the last thing you want to do is limit yourself in any way. The best course of action is to blend primitive techniques and tools with modern advancements, therefore increasing your chances of survival.


small game trapping

For best results when trapping small game, I recommend that you invest in a good supply (at least 10 traps, with 20 or more being ideal) of #110 Conibear body traps. They are easy to use for most people and are very effective for filling the stew pot.

Plus, they are quick-kill traps and are therefore more humane. With that said, the best homemade trap for the average survivor is the wooden box or cage trap, as they are commonly called. I am sure most of you have seen or heard about the live traps made by Havahart (www.havahart.com). These traps are lightweight (compared to the homemade version illustrated here) and work great, but they’re expensive, running upwards of $30 for the smallest trap.

Sizes for larger animals, such as raccoon, can cost $100 or more depending on the retailer. I didn’t have the money to purchase several of these traps, and it didn’t make good economic sense to do so anyway since I could make as many as I need for little or nothing. Box traps are cheap and easy to build using plywood or scrap lumber that can easily be found while scavenging through construction site Dumpsters or around abandoned structures or other locations in the country.

These traps are easy on the critters trapped inside, unlike other traps that rely on killing or maiming to secure the animal. An added plus is that game caught in a box trap is kept safe from hungry predators until the trapper returns to check the trap.

When I was growing up in the Appalachian Mountains of Tennessee, just about every boy knew how to build a homemade box trap out of scrap wood. Now kids are more interested in watching TV or playing video games than learning such useful skills.

This is sad because one day this type of skill could make the difference between going to bed hungry or on a full stomach. To construct this trap, begin by putting together a box using outdoor plywood, lumber, or other suitable material.

Each end is left open and should be approximately 6 or 12 inches square, depending on the intended game. The top piece should be 2 or 3 inches shorter on one end— or if you intend to build a trap with double doors, make the top piece 2 or 3 inches shorter at both ends—which will allow room for the sliding door(s).

homemade live animal trap

For larger animals, such as raccoon, opossum, and woodchuck, the box should be at least 36 inches long and have at least a 12-inch doorway. For smaller game, such as squirrels, rabbits, muskrat, and mink, a 24-inch box with a 6-inch opening works well. You have to construct a slideway for the doors to fall through and lock-in.

You can make the trigger system out of branches or other improvised materials. Explaining here in writing how the pieces go together is difficult, but it should all be clear when you look at the photos.

Use the heaviest wood you can find for the doors, as the weight will cause them to close faster and go all the way down and lock into place when the trigger is tripped.

trap trigger

close up of trigger
Close-up view of key trigger points that hold the door in the open position until dislodged by an animal, at which time they collapse, dropping the door and trapping the animal inside.

How To Use

Most traps of this type are set with bait. If you are baiting for raccoon, use peanut butter or fish guts; for opossums, use cut-up apples, peanut butter, or just about anything with a strong odor. Cats like fish guts; squirrels like acorns and corn; pheasants and quail like wheat or crushed dried corn.

When in doubt, use a spoonful of peanut butter, as most animals seem to be attracted to it. Many of us who keep chickens know how frustrating it is to watch our prized hens disappear one at a time to a seemingly invisible predator.

Catching the phantom culprit can be a bewildering problem since in many cases we don’t know exactly what we are trying to catch or when it will make its next foray into the henhouse. I keep two of these traps set and against the outside walls of my henhouse.

I conceal the traps with hay to look like a naturally occurring run or passage and usually catch several would-be chicken thieves (mostly raccoons) each month. They seem to just meander into the traps while searching for a way inside the coop. A dandy rabbit-producing method is to set out boxes in known rabbit country, with brush piled on top of the trap to make it look like a natural hiding place.

Make sure that the brush you use doesn’t interfere with the trigger assembly or keep the door from closing all the way. I like to funnel the rabbits into the trap by placing “wings” made from scrap lumber in a V pattern that lead from the entrance of the traps.

This seems to guide the animals naturally into the traps. These winged traps do not even have to be baited; the rabbits just wander into them while looking for a place to hide. Be patient: don’t expect to catch anything in the first couple of weeks.

The rabbits need to become accustomed to seeing the traps before they will start to come in. If you can find a copy, I suggest you buy Being Kind to Animal Pests: A No-Nonsense Guide to Humane Animal Control with Cage Traps by Steve Meyer (the book is out of print, but

Filed Under: Bushcraft

Les Stroud SK Mountain Ultimate Survival Knife Review

October 13, 2018 M.D. Creekmore

survival knifeby Randw

My recent gift/purchase of a Les Stroud SK Mountain, Ultimate Survival Knife by Camillus, gave me an opportunity to do a review on a product that at first glance seems rather contrived and panders to the “Survival/Prepper community” by its very design and nature.  These types of fluff/specialty items usually leave me feeling exploited and preyed upon by the “Sax Fifth Ave” types who come up with various marketing tools to separate us from our hard-earned money through slick marketing and gimmickry that seldom leaves us feeling good about a potential purchase.

Check Latest Prices: Amazon.com | BladeHQ

Since I had been given a gift coupon to a big box hardware store during the recent Christmas Holiday I was feeling rather adventurous and wanted to see what was available in their knife selection.  I was somewhat in need as a few years back my favorite survival knife and I had said “good-bye” as someone was in need of the knife a whole lot more than me, but I digress.

Can you really have too many good knives?  After all, they are always “loaded”, and fit nicely in the palm of your hand.

I had intended to go with a Gerber, Buck, or other easily recognized quality American made knife or hatchet but was compelled to see what was available in the “survival expert Arena” (Bear Gilas, Less Stroud, Dual Survival, Cody Lundeen, etc.).

Since I am a strong advocate of “two is one and one is None” when it comes to bugout or survival gear, I knew I needed a back-up to my 8-inch “Dive knife” perched atop my BOB in the storage area of our home.  I was not certain what I was searching for but had not bought a good mid length, fixed blade knife in a long time and was certainly in the market for a backup, survival tools, and am always searching out other items to augment my outdoor gear when shopping in outdoor or sporting goods section at any retail market.

While browsing in the knife section I was first attracted to Gerber and Bear Grylls knives as well as Buck and Camillus.  As I was looking at the fixed blade knives, I noticed there was a survival knife in my price range ($40-$60.00) with a large plastic sheath and tons of advertising that Camillus put on their packaging of this Les Stroud SK style knife.  I was kind of mildly impressed by its versatility and the sheath’s “survival tool” integration, as well as the bladed weapon, they offered in this obviously contrived yet cleverly engineered product.

At first glance it is quite obvious that the knife is effective in design although not as robust as many Hunting/bush-craft or other survival knives I have looked at (blade is too thin on the front inch of the shank and needs additional spline reinforcing as well as spin thickness, in this area, as Buck and other premium Knife builders use)”.  This cutting tool would certainly offer many utilitarian as well as self- defense options for the end user.

The cutting edge of the knife itself includes a rather wide 1.5 inch by 5 inch blade with a Titanium coating that is proprietary to Camillus but has a similar coated appearance to the black (anodized) coatings put on the Buck, first generation, Knight hawk 6.5” black, anodized stainless steel blade, tactical  knife I owned and carried for years.  In addition, the sheath-knife has as its core, a super sharp, black tungsten treated, stainless steel blade, a  with a 1-inch serration for cutting bone or wire, and an integrated striking notch for starting fires using the flint, cut into the knife spine/back.

I knew in my heart that it would be very hard to replace the Buck, Night Hawk tactical knife I carried for years that I generously gave away as a token of appreciation.  The Buck and is now residing in the hands of an amazing man of God in the Himalayan Mountains of NE India, but that is another story, (I sort of still miss that knife but I know it was the right thing to do in giving it away).

In addition to this rather utilitarian, SK knife, I really was drawn to the innovation/redundancy that was offered in the sheath of this “survival” tool.  The assortment of survival trinkets incorporated in the sheath, include:  integrated signal whistle, LED flashlight, signal mirror, blade sharpener, flint striker and para-cord, like, cordage found on the knife’s sheath.  This combination of survival gear fit nicely into my duplication principle mentioned earlier (two is one…).

I currently and have for the last 3 years, incorporated all of the sheath mounted items (signal mirror, whistle, fire steel, flashlight, and para-cord) in my BOB but was intrigued by the fact that I was able to double dip on my preps in one single purchase, of a knife I would be carrying anyway.

One minor detail about the use of materials on the handle and the sheath that could be a potential drawback is the plastic construction of the sheath housing and accessories, as they are made of plastic and should not be kept too close to a campfire or heat source of any kind for fear of a melting event, but if you have most any modern knife or sheath with plastic components, being left too close to a fire there would probably result in adverse consequences.

As an additional plus for those living in a nanny state like I do anything over 6 inches in a fixed blade and 3.5 inches in a folding knife is illegal.  The blade of this SN knife is about five inches long and is therefore legal to carry openly.

In a grid down situation, to me, this would not be an issue (WROL SITUATION) but if I am pulled over tomorrow and the knife is laying on the seat beside me I would not be face scrutiny or worse for carrying a “scary” if not illegal, weapon.

While I have not had time to fields test every aspect of the props integrated into the knife sheath, I can tell you the whistle works with some practice and would be better that yelling for help for an extended period of time (intended purpose of any whistle),

The mirror is tiny; about 1.25 x 2.25 inches with a burnished rather than truly reflective surface like a mirror, but it might work in a pinch to check on a facial wound or to shave by.  It would certainly be able to reflect light to signal an aerial spotter and there is an incidental hole at the blade sharpening port found below the mirror that would allow a person to align the mirror with the sun in order to achieve the correct angles for optimal, signaling using the sun reflection.

The flashlight would work for up-close, detail work or reading a map in a low/no light situation, but would not offer a lot of illumination or security if you would need lighting for walking a trail on a cloudy night since it is a single LED bulb.

The flint/striker is only about 1.5 inches long but once the black paint/coating is scraped off, will create ample spark to ignite dry tinder or a prepared “fire wick” of some kind.

The integrated edge/blade sharpener is underpowered at best but in a wooded setting with no other stones to use as a blade, sharpener, it is good to know you have it available as a failsafe.

The so-called “Paracord” is about ½ the diameter of normal para cord but looks to be of similar construction to the real thing.  This 10 ft. cord would be a good place to start if all you had was shoelaces and not much more for cordage but would not be enough to hang a large shelter, tarp from.

There is also a small flip-up compartment housed in the sheath under the mirror that could store a small fishing line or some strike anywhere or waterproof matches but it is not truly water prof so additional packaging with a baggie/plastic wrap would be in order if used for a match safe.

The sheath has a good retention system for the knife, using a plastic clip that engages the knife at the hilt (there is a corresponding indention on the handle where the latch engages) and a Velcro strap is integrated in the top of the sheath to secure the upper portion of the handle when sheathed.  In addition to the black rubber grip materials on the knifes handle there is a knuckle contour for the index finger (this increases purchase and control when the blade is forced away from the user in skinning or whittling of shavings or tinder making).

This black rubber overlay embedded in the handle may not bear up to excessive use or abuse but should hold up for light to medium abuse as a back-up “zombie poker”. The head of the handle of this sheath knife contains an anvil/metal cap that would lend itself to cracking hard nut shells, tapping small tent stakes into the ground or in a pinch could be used as a club to fight off the occasional squirrel if the need should arise.

On the back of the plastic sheath, a portion of nylon webbing covers the case and extends along the length of the entire blade for a length of around 10 inches.  At the back of the nylon webbing is 3-inch webbing, belt loop about ¾ inch wide so a person can run a belt through the sheath and carry the knife on the waistband or their pants.

The relatively thin spine of the knife would probably hold up to moderate use such as splitting pine or less dense wood, if using a mallet or baton to help drive the blade, and is certainly sharp enough to skin small or even large game if need be, and to filet a fish.

In the configuration of the blade, this knife would certainly act as a deterrent to a marauder or two, but, is at best a compromise or backup Bush-craft tool when stack against a Bouie knife machete, or hatchet.  But then again most medium sheath knives would have the same or similar drawbacks for heavy outdoor use.

The Camillus (Les Stroud) SK knife would meet most camp outing needs, most of the time and has a lot going for it with the added trinkets found on the sheath.  While a compass is very sensitive to metallic objects in close proximity, an integrated compass might have been a welcome addition to the arsenal already included in the sheath.

The small net pouch on the back of the sheath is more of a gimmick and is rather smallish for a topo map (advertised use) but could carry a book of matches or handkerchief or ½ bandana section in a pinch, in order to retain usefulness.

One additional option that has been included on the sheath that might prove useful is the two eyelets/grommets, one at each corner of the flared top, nylon portion of the knife sheath.  These could be used to secure a thigh lanyard for extra securing or even be used as a neck lanyard to carry this tool over the shoulder or at the chest should one feel so inclined.

The Les Strand SK knife can be purchased separately with only a nylon sheath, from Camillus for around $50.00, but for the additional $10.00 or so for the survival equipped sheath (whistle, flashlight, cordage, mirror etc.) makes an affordable American knife an even greater barging, as a companion tool for those who are venturing out in the wilds for recreation or possible survival.

Would I recommend this purchase to a friend?  Yes if they were going to use it as an addition to a fully equipped (Bug out bag) BOB,    since I believe the sheath, integrated items are not robust enough for a total long-term, grid down, situation I would recommend this as a standalone tool.

For the money, I believe anyone purchasing this item, as intended, for bugging out bag, would be well served in a short-term survival situation.  Would I rely on the small integral tools in the sheath for my sole preps in a long-term, Grid down, Mad Max situation?  Probably not but would this knife and sheath come in handy in an emergent, evacuation, “you bet” and for the Money (around $60.00) one would have to look long and hard to come up with a better compromise package that meets most of the basic requirements of a BOB, survival knife than this product.

Pound for Pound strapped to your waist or fastened to your BOB I do believe this tool would be worth its weight in usefulness.  I do not regret the initial purchase of this tool and feel confident that even with the contrived design and miniaturized versions incorporated in the sheath, this tool would make life more bearable in a “Lost and Alone In the woods situation” that hikers, outdoorsmen and weekend survivors might find themselves in during a recreational outing or heaven forbid a SHTF event.

Filed Under: Knives and Blades

How to Drive On The Interstate And Survive (Maybe)!

October 13, 2018 M.D. Creekmore

How to drive on the interstateby BCtruck – YouTube

Hi folks, I’m going to give writing an article, another try. While reading the rules for the writing contest I noticed where MD was encouraging people to submit articles, the words “we all have something to offer” struck a chord with me. I spent the largest part of my life driving an 18 wheeler long-haul (over the road). I started in 1977 when I joined the army and I’ve driven one till just recently when I decided to hang it up. Consequently, I’ve learned a thing or two about surviving, driving.

The first thing I will do is break the dangers down that we all face while driving. Those are:

  • Weather
  • speed
  • Impatience
  • egos
  • drunk/drugged drivers
  • inattentiveness
  • sudden equipment failure
  • Construction
  • Complacency

First, If you don’t mind, I would like to toot my horn just a little in the hopes that I can convey to you, what I think qualifies me to give advice on a subject that is often a matter of life and death. From 1980 until 1990, I drove about 120,000 miles a year for a total of 1.2 million miles.

From 1990 until 2010, I drove with my wife sharing the driving duties. In those 20 years, my wife and I put over 4 million miles on several different trucks. One truck we put 1.6 million miles on before we sold it. In all those miles I only had a couple of speeding tickets, no accidents or wrecks of any kind, no log book violations.

My wife had one speeding ticket (57 in a 55 in Littlerock) One incident with a deer in Jackson Mississippi and no logbook violations. I’m proud of my driving record and I’m proud of how well I maintained my equipment.OK, thanks for indulging me. Now let’s get after it!

Weather:

We can’t control it so we have two options. Don’t drive in it, or drive in a fashion that is commensurate to the danger presented by the weather. For instance, rain requires less concern than snow, and snow less than ice. However, I’ve been on roads that had been rained on all day and as the sun went down the road surface froze making it not just a possibility, but a likelihood that a skid off would occur.

My solution to ice, was never ever drive on it unless it turned to ice while i was driving, and then I drove only long enough to find a safe place to park to wait for warmer temps or salt trucks to work their magic.No destination, no type of freight was so important that i would risk the lives of other folks, my equipment, or my own life. You can’t drive safe on the ice. It can’t be done without risk that is greater than the need.

Snow:

There are different types of snow. Snow that is wet and heavy is actually fairly easy to drive safely on, provided you use good judgement when choosing a speed and being prepared to adjust that speed as conditions change. Also, planning your lane changes and exits from the highway well in advance and in such a fashion that your need for lane changes doesnt affect the speed or direction of travel of other motorists.

Maintaining your own safe speed and planning your moves in advance is equally as important as not forcing others to make sudden changes in lane or speed. Snow that is very dry is much easier to lose traction on. My philosophy about snow was, if I can drive without endangering others or my equipment, ill drive.

If it was bad enough for chains, I didn’t drive unless it was to cross a mountain pass like Donner, or get to a safe place and wait for conditions to improve. There is an old truckers adage that goes like this,” you can to slow as often as you like, but you can only go to fast once”. I lived by that.

Speed:

We all get in a hurry. We all have had things that happened to make us late for appointments. The problem with speed is, no one else knows about, or for that matter really cares what problem you had that made you need to speed, and speeding actually does very little to negate the problems you had that you feel necessitate the need for speed.

My advice to those that are in front of an angry late person who wants to go faster than you, is move over and let them go. Passivity on the highway goes a long way in making a problem driver go away and perhaps save you from being a victim of road rage.

I’ll tell a short story about speeders. For the last 11 years of my driving career, my wife and i ran a grueling 6800 mile a week route over and over on the same highways at the same times. We found the same people passing us over and over throughout the day and we almost always ended up at the same stops, at the same time. slow and steady saves fuel, stress, and wins the race.

Impatience: Again, most of us have had things that make us late, but there are people out there that completely fall apart mentally when they are under the stress of facing a boss who will want to know why, or a potential client that will be getting a bad first impression based lateness. I’ve seen first hand, impatience make people do absolutely unbelievable things on the highway. Ive also seen a lot of death caused by impatient folks who made driving decisions based on anger. My advice is the same with angry speeders, move over,  don’t make eye contact. That is a challenge to some people. It’s about arriving in one peace, not about saving face or fighting back.

Egos:

All those years of driving taught me one thing that is incontravertible: you can find out anything you ever wanted to know about persons psyche, by watching them drive. There is something about the anonymity of a car and the power of a steering wheel, that brings out people’s truest, most inner character that they might otherwise try to keep hidden.

Driving allows Out of control egos, people who are otherwise constrained by society and its basic need for politeness, to let out their inner demon. these people are to be avoided at all costs and ive actually seen first hand one out of control ego meet another out of control ego, at 80 miles an hour. Its never pretty.

Be safe, don’t fall victim to the “by God, I know my rights” mentality. It will get you killed by those who couldn’t care less about your rights, life, or anyone else on the highway. If they don’t care about their own life, they certainly don’t care about yours.

Drunk/drugged drivers:

In this modern society, with a pill for everything and alcohol in convenient containers. Drunks and druggies are driving amongst us every mile of any highway we are on. Some of these drugs are prescribed by doctors so people who have mental disorders can function in a society that recognizes immediately if someone “aint quite right”. Unfortunately, these drugs that might help some folks, are easily and often abused and consumed with alcohol.

car-accident

Over the years I developed a keen eye for picking out drivers who were clearly under the influence of something that altered their behavior and judgement. Sudden lane changes for no reason, extreme speed fluctuations.

I even noticed that people who drove cars that were in obvious states of disrepair, were more often the ones that would be under the influence of something. I’m not saying having an older, payed for car means you’re a druggy or drunk, but it is one of the things I used to determine the likely hood of impairment and I was correct, more often than wrong.

Someone who gets on the interstate with broken shocks, cracked windshield and lights not working, are often spending their money on drugs or booze and not car repairs or for that matter, INSURANCE! Be very wary of them. They have nothing to lose and could not care less about damaging your car or leaving you with enormous hospital bills.

Inattentiveness:

If you have a phone, I will call you a liar if you say you’ve never made a call or accepted a call while rolling down the road……. ok , just me? The fact is, as the world changes, we have to adapt to those changes by being extra alert and vigilant. Texting, talking on the phone, messing with complicated stereos and navigation equipment, takes attention from the most important thing you are doing.

I think we’ve all realized this and maybe some of us have even made efforts to try to make ourselves safer from the inattentiveness that goes with technology by looking closely at people in our mirrors and glancing at them when they pass. You can do a lot to enhance your safety, just by recognizing those who aren’t paying attention to their driving and may have a cell phone stuck to their ear.

Increase following distance if your behind them, slow down to a point where they just have to pass you if you are in front of them and don’t be beside them when they realize they are in the left lane and want to turn into the walmart on their right.

Equipment failure: It happens to every machine eventually. Its just the nature of machinery to occasionally fail. For instance, you are driving over a two lane bridge with no emergency lane and suddenly your car stalls. There you are, can’t go forward, rolling backward will make it even worse.

What do you do? Fist and foremost is get your family out and in front of your vehicle by a couple hundred feet. Then do what ever it takes to get the attention of cars coming up behind you to recognize that there is a problem (of course you’ve already put your emergency flashers on). When you are certain that folks coming up behind you, see your car is disabled, then you can make repairs or call the police to direct traffic until a tow truck gets there.

This reminds me of something that non truckers might not realize. Tires on 18 wheelers are prone to Throwing their caps off, while going down the road. I hated caps and never ever used them. It was quite a bit more expensive, but i alway bought new tires.

Sadly, recapped tires are a fact of life and what you don’t know can kill you. I drive on the highway in my pickup and i never “hangout” near an 18 wheeler. I either pass quickly, or if i cant pass, i wait for traffic to clear beside him and pass only when I can get all the way around him. Those caps coming off will go clean through a windshield and do major damage to a vehicle.

Don’t follow an 18 wheeler any closer than you feel you can react if one comes off. Trucks see a lot of miles everyday and the profit margin is so slim that there are a lot of drivers who choose cash in their pocket over properly maintaining their equipment. It’s just human nature I suppose.

There aren’t many who get away with bad maintenance for very long before they are caught by the DOT, but in between those time, a lot can happen. Dont ever be afraid to call the state police and report a truck that has obvious defects that could hurt folks. Other truckers do it, and we all want to be safe on the road.

Construction: Its everywhere! Its everywhere!! You have two types of people whenever you lose a lane or come up on sudden construction. You have those that immediately recognize the need for a decrease in speed and enhanced attentiveness, and you have those who see an easy opening to get ahead of a whole bunch of people who care about others. Don’t fight them. Don’t react to them. let them pass and just keep doing what you know is right. You can’t change the world, its evilness or right a wrong, with your car.

Complacency: When you do something over and over, a part of your brain that manages redundant tasks, takes over the mundane repetitive act of driving and allows the rest of your brain get up and roam about the cabin. DON’T DO IT!!! Truckers fall prey to the natural way the brain works frequently.

When (not if) you find yourself falling victim to complacency, you lose your edge, your attention to what lays around the next bend or a car on the side of the road that just had its hood closed and the driver door shut. Always Always, look as far down the road as your eyes can see and never-never never fall into complacency.

Thanks for reading folks. I think I’ll do an article about staying safe from bipedal predators while on the road at a later date and if its something you might like to hear about. peace love and groovy, BC.

You can find my YouTube Channel Here.

Filed Under: Uncategorized

We Are All Going To Die! Here Is How To Prepare For It.

October 13, 2018 M.D. Creekmore

how-prepare-for-deathby Lake Lili

None of us really ever want to believe that our lives will end.  We prep so that we have covered our bases for our survival and that of our loved ones.  Most of us hope that we have put things right with our families and right with Our Heavenly Father before our time comes.  Sometimes it is not possible to do, and sometimes we are forced to rely on the decision making of others, at a time when we most want control of those decisions.

As you age, who do you want making your decisions for you?  Think about it hard.  Sit down with a pad and pen and do some planning.  Do you have your will put together?  Who is inheriting all your preps?  Do you want to live on a respirator?

Have surgery for cancer at the age of 95?  Do you have one child who will let you go and another who wants you to live through every heroic measure?  Time to think it through…  Time to do some communicating…

Look at this as another form of prepping.

  1.  Make an appointment with your doctor and get a baseline on your health.  Make sure that your doctor knows your family history and that you follow-up on all the tests the doctor wants done.  Then stop fooling yourself and accept the hand you are dealt.
  2. Work with your doctor to make yourself as healthy as possible and start doing the things that you know you need to be doing anyways – eat right, quit smoking, lower your alcohol consumption, and exercise regularly – and no fooling yourself into thinking that walking the dog down to the end of the block and back is exercise.  It’s not.  It doesn’t count.

So when you have got all of those basics under control the next conversation you need to have with your doctor is about the laws in your province or state regarding medical powers of attorney and living wills.  In Newfoundland where I live you need to have an Advance Health Care Directive (AHCD) written that names your Substitute Decision Maker (SDM), and a back-up.

In it you need to address issues like blood transfusions, organ donations, surgical interventions, long-term care options and Do Not Resuscitate (DNR) orders.  DNRs, however, do require a separately completed form, which you can get from your doctor.  The AHCD will not apply in the event of an emergency (car accident) or if you are involuntarily committed for psychiatric care.

If your SDM declines the role at the time, then the Province will appoint your doctor as your SDM.  So, all the more reason for you to have a good relationship with your doctor and for him to know what you want.  In Newfoundland, Living Wills & Powers of Attorney do not apply to medical issues.  Newfoundland will recognize the legality of the paperwork completed in other Provinces if you are visiting, but if you live here for longer than 6-months then you need to get the proper paperwork completed.

In Ontario, you need to have a Power of Attorney for Personal Care (POAPC) that covers your personal decisions, such as housing and healthcare.   However, you will require a living will to communicate your wishes should you become sick and unable to communicate your wishes.

Most often people write a living will saying that they do not want to be kept alive by artificial means should they have no hope of recovery. Technically this makes the living will an “advance directive”.  Even with an advance directive, Ontario still requires the completion of a DNR form.

When the Power of Attorney and an advance directive living will are combined it is called a Proxy Directive.  All of which tells you that when it comes to healthcare and possible end of life scenarios, governments will make it as complicated as possible so as to ensure that they cannot be held liable by your heirs.

In Tennessee, the laws allow for advance directives for health care decision making.  The directives can be called the “Living Will” or “Advance Care Plan” and the “Medical Power of Attorney” or “Appointment of Health Care Agent”.  The forms that need to be completed are here: https://health.state.tn.us/AdvanceDirectives/

We are a transient society and laws seem to change and evolve quickly in this area, so check your paperwork and ensure that it still meets your provincial or state laws. They are all different too.  So if you live in Tennessee but spend large amounts of time in Florida or Arizona, then you need to make sure the correct forms are completed for those locations too.

You may also need to check and ensure that the medical coverage you are denying in your AHCD will not invalidate your health care coverage.  It may be in writing somewhere in the fine print but talk to your medical insurer and get it in writing.

Once all of that is done sit down with the family member you want to designate your substitute decision maker.  If they agree make sure that they understand your reasoning and that your request will not conflict with their personal or religious beliefs.  Have them sign-off on all the paperwork, so that it is understood that you have reviewed these directives with them and that they are understood.

Now it’s time to go talk to the rest of the family.  Some will be offended but most will understand and be relieved that they will not be required to make end of life decisions.  But now is the time to find out if someone is going to make a fuss about your directives and get it ironed out.

So you have been to the doctor, you are working to get healthy, you’ve talked to all the family, and you have all your paperwork completed.  There are a couple of things you now need to do with that paperwork.

  1. File a copy with your lawyers so they have it with your will (and get one of those if you don’t have it.  After all you have worked so hard on your preps, make sure they will go to a good home)
  2. Give your SDMa copy for their records.
  3. Make sure you talk with your family and friends so that they know who you have designated as your SDM.  Also, tell them about your medical decisions – again argue it out now so that are not fighting you SDM.
  4. Give a copy to your doctor so that it is in your medical file.
  5. Contact your health insurer and give them a copy.
  6. If you have a file at a local hospital, walk into their admissions area and ask them to add a copy of the paperwork to your file.
  7. In Canada, our passports have a scan feature that can hold files.  My sons contains his custody paperwork.  Mine contains the custody paperwork and my AHCD.  The Passport office was quite obliging about adding it onto the file when I renewed my passport.

In other words, cover all your bases so that the medical decisions you make, and the person you have chosen to ensure they are implemented, are recognized and taken into account.  Do it now before you are diagnosed with something that could legally incapacitate your decision-making abilities.  None of us want to end up like Casey Kasem.

Filed Under: Uncategorized

  • Page 1
  • Page 2
  • Page 3
  • Interim pages omitted …
  • Page 6
  • Go to Next Page »

Primary Sidebar

Subscribe to Blog via Email

Enter your email address to subscribe to this blog and receive notifications of new posts by email.

Join 7,202 other subscribers
  • Amazon
  • Facebook
  • Substack
  • Twitter
  • YouTube

“Do more with less.”

– Minimalist proverb

Recent Posts

  • Just so you know
  • Weather Update for My Corner of Appalachia
  • Why I’m Ordering Ivermectin + Mebendazole Every Year
  • The Website’s Shutting Down (But Here’s the Plan)
  • You Are Hated! Start Training Like It!

Footer

Recent Posts

  • Just so you know
  • Weather Update for My Corner of Appalachia
  • Why I’m Ordering Ivermectin + Mebendazole Every Year
  • The Website’s Shutting Down (But Here’s the Plan)
  • You Are Hated! Start Training Like It!

More about me

Books I’ve written

Books I’ve read

Follow Me on YouTube

Follow Me on Facebook

Gear I Use and Recommend

Newsletter

Search this site

Follow me elsewhere

  • Amazon
  • Facebook
  • Substack
  • Twitter
  • YouTube

© 2008–2025 M.D. Creekmore · As an Amazon Associate, I earn from qualifying purchases.