• Skip to main content
  • Skip to secondary navigation
  • Skip to primary sidebar
  • Skip to footer

M.D. CREEKMORE

  • Blog
  • Books
  • Newsletter
  • Gear I Use
  • About
  • Contact
  • Facebook
  • YouTube
  • Blog
  • Books
  • Newsletter
  • Gear I Use
  • About
  • Contact
  • Privacy Policy
You are here: Home / Archives for 2019

Archives for 2019

DIY Homemade Mosquito Trap [That Actually Works!]

June 27, 2019 M.D. Creekmore

Homemade Mosquito Trap - girl spraying on mosquito repellent

By Matt D

You can keep mosquitoes away from your home for good with a few homemade mosquito traps and other simple and easy DIY steps that you can do at home cheaply and quickly…

(Note: If you want to skip all of the details about mosquitoes and how they can spread sickness and disease and get right to the details of how to make a homemade mosquito trap then simply scroll half-way down the page to get all of the nut and bolts details about how to make a DIY homemade mosquito trap…  

Okay, then let’s get started…

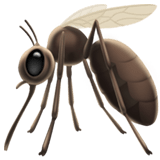
Anyone who loves the outdoors knows mosquitoes can be a nuisance. Their relentless search for blood and whining buzz can drive even the toughest outdoor enthusiasts indoors with ease. Along with the allergic reaction that causes itchy red bumps, mosquito bites pose numerous health risks to humans all around the globe.

From the West Nile and Zika viruses to malaria and yellow fever, illnesses spread by mosquitoes can be serious and even potentially deadly (such as microcephaly and encephalitis).

How do mosquitoes spread disease?

mosquito bugMosquitoes are primary vectors for numerous human diseases, which together infect and kill millions of humans each year. The female mosquito sucks blood because it provides nutrients for its eggs. Besides drawing blood when they bite, female mosquitoes also inject an enzyme to prevent blood from clotting.

Therefore, there’s an exchange of fluids between your bloodstream and the mosquito. Mosquitoes are vectors which carry infections between animals and humans.

When the mosquito feeds off an animal or person with a disease, it passes on the infection when it bites another person or animal. The itchy red bumps are an allergic reaction to this enzyme. Mosquitoes find their targets using chemical signals, observing our movements, and by detecting the infrared radiation emitted by warm blood.

Learning how mosquitoes spread disease and how to control them is an important step toward protecting yourself and your loved ones from mosquito bites and the diseases they spread.

The dangers of mosquitoes

According to the WHO (World Health Organization), mosquitoes infect more than 300 million people per year with Dengue and malaria, just two of the most dangerous illnesses mosquitoes can carry. Of those 300 million people, 800,000 die from malaria, and another 20,000 people from Dengue.

West Nile virus deaths illustration

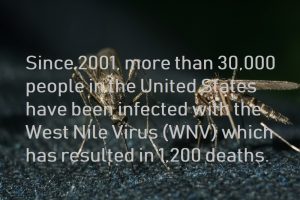
Since 2001, more than 30,000 people in the United States have been infected with the West Nile Virus (WNV) which has resulted in 1,200 deaths. In 2002, the cost of West Nile Virus-related health care alone in the United States was estimated at $200 million.

Besides carrying infections that can be transmitted to humans, mosquitoes can also transmit several parasites and diseases that dogs and humans are very susceptible to (such as West Nile Virus, eastern equine encephalitis, and dog heartworm). Mosquitoes have a 4-stage life cycle (egg-larva-pupa-adult) and they lay their eggs in different breeding areas such as:

  • Ponds
  • Lakes
  • Tree holes
  • Toys
  • Old tires
  • Tarpaulins or plastic covers
  • Buckets
  • Potted plant saucers and trays

These sites are also potential breeding areas for some of the most dangerous species such as the Asian tiger mosquito.

What types of illnesses do mosquitoes spread?

? Chikungunya

Most commonly found in North and South America, Africa, the Indian subcontinent, Asia and Europe, the chikungunya virus is now spreading in the United States. Chikungunya is transmitted by a mosquito species known as the Aedes aegypti mosquito.

It causes fever, severe muscle and joint pain, nausea, tiredness, headache, and a rash that may last several weeks. Patients usually need fluids and rest until symptoms go away. Doctors may also suggest pain relief medication.

? Zika

Zika Virus is transmitted by the Aedes albopictus (Asian tiger mosquito) and Aedes aegypti mosquito. These mosquito species breed entirely around the home. Zika is found in the Pacific region, Mexico, South East Asia, Africa, and North and South America. Symptoms include joint and muscle pain, mild fever, irritated eyes (pinkeye), a skin rash and headache.

The symptoms are usually mild and run their course in less than 7 days. However, if a pregnant woman is infected, Zika can also impact the unborn child. Zika has also been linked to more serious health problems such as a birth defect known as microcephaly and a nervous system disorder called Guillain-Barre syndrome.

Microcephaly: This is a birth defect that causes the baby’s head to be abnormally small and not fully developed. Babies with Microcephaly may have intellectual and developmental delays.

Guillain-Barre: This nervous system disorder usually causes general weakness and mild paralysis. However, most victims recover over time. There’s no vaccine to prevent Zika virus.

? West Nile Virus (WNV)

West Nile Virus is found in Asia, Africa, Europe, North and South America, and the Middle East. WNV is transmitted by the Southern House Mosquito (Culex quinquefasciatus) and the severe version of the virus (neuroinvasive WNV) can be fatal.

Homemade Mosquito Trap

Although some people who get WNV do not have any symptoms, 1 in 5 will have flu-like symptoms such as mild fever, headache, a stiff neck, and weakness of the muscle. Some of the severe symptoms of WNV include confusion, convulsions, and coma.

However, the fatality rate of WNV is less than 1%. The virus usually starts out as a bird disease which is then spread from bird to bird by mosquitoes. WNV spreads to humans when a mosquito feeds on an infected bird and then bites a human.

However, man is the dead-end host (the virus cannot be spread from human to human). Neuroinvasive WNV can also cause more serious infections that cause meningitis or brain swelling.

? Malaria

Malaria is the oldest illness that is caused by mosquito bites. The disease is transmitted by the female Anopheles mosquito. Areasa that have the most cases of malaria include the Pacific islands (such as Papua New Guinea) and Sub-Saharan Africa. Malaria causes over 400,000 deaths worldwide per year. Its symptoms include headache, fever, and vomiting.

? Yellow fever

Yellow fever is found in Latin America and Africa and it is transmitted by a mosquito species known as the Aedes aegypti mosquito. Although some people who get the disease won’t notice anything, some may notice symptoms such as muscle and back pain, headache, fever, vomiting, and lack of appetite.

Yellow fever can be fatal and some people may feel tired and weak for several months. Some people who notice mild symptoms at first may develop serious symptoms such once they start feeling better, including bleeding, jaundice and high fever. Yellow fever can cause kidney and liver failure, and it can be fatal.

? Encephalitis

Mosquitoes can transmit viruses that can cause inflammation around the brain and spinal cord. The type of encephalitis you get usually depends on your location:

  • LaCrosse encephalitis: States on the eastern side of the Mississippi River
  • Eastern Equine encephalitis: the Caribbean, South America, and the Gulf Coast, Atlantic, and Great Lakes States.
  • Saint Louis encephalitis: Throughout the United States, especially the Gulf of Mexico and Florida states.
  • Japanese encephalitis: Western Pacific and Asia.

Some of the mild symptoms of encephalitis include sore throat and mild fever. However, you should seek immediate medical attention if you experience symptoms such as seizures, muscle weakness, and confusion, to help prevent brain damage and other serious complications. Encephalitis can be fatal.

? Dengue Fever

Found in Asia, Africa, Europe and North, and South America, Dengue Virus is transmitted by a mosquito species known as the Aedes aegypti mosquito. Symptoms of Dengue fever include joint and muscle pain, nausea, headache, and a fever. Some people may get a high fever and bleed a little from the gums or nose.

Dengue can be very uncomfortable and the only things you can do is treating the symptoms and resting.

Some victims may develop a more severe form of dengue fever, called dengue hemorrhagic fever, which causes the small blood vessels to become leaky. If fluid starts building up in the lungs and belly, the patient should seek medical care immediately. In the last 15 years, there have been dengue fever outbreaks in the Florida Keys, South Texas, and
Hawaii.

? Dog Heart Worm

This is a parasitic roundworm that affects various animals including dogs. The heartworm takes residence in the heart as it grows. This worm is a major concern in dogs.

What can you do to keep mosquitoes away from your home?

Eliminate stagnant water ?

Many female mosquitoes lay their eggs in stagnant water. Make sure there is no stagnant water anywhere around your house including in open cans, buckets, old tires, toys, plates under flower pots and even in bottle caps.

Improperly drained yards, kiddie pools, and ponds can also be breeding spots for mosquitoes.

Since most mosquito breeds can’t fly too far, eliminating breeding grounds can help reduce the number of mosquitoes that plague your home. It is also important to change the water in your bird bath regularly and ensure your yard has proper drainage.

Check hidden spots ?

Inspect areas such as gutters, which can easily collect water and become mosquito breeding spots. It’s also important to replace any window screens that are broken, ripped, or nor fitting well, especially if you live in a hot, humid area.

Clean up debris ?

Some mosquito species lay their eggs in damp soil and debris such as leaf piles and decaying logs. Be sure to get eliminate debris and leaves around your home and from gutters, too. You may also consider mowing your lawn regularly and trimming your trees to increase light levels, reduce shade in your yard and make the landscape less habitable to mosquitoes.

Make mosquito-repelling plants part of your landscape ?

The essential oils and fragrances in some plants such as marigolds and lavender naturally repel mosquitoes. Therefore, if you really enjoy spending time on your patio or deck, plant some of these plants around the perimeter of your yard or simply pot them up and place them around your home to ward off mosquitoes and improve the aesthetic appeal of your yard.

Other plants that can help keep mosquitoes at bay include lemongrass, catnip, peppermint, sage, basil, citronella, bee balm rosemary, and ageratum.

Use backyard mosquito and bug control ?

Treating your yard can also help reduce mosquito infestations. You should spray during the day because this is when mosquitoes tend to hide in humid areas such as thick brush, tree hollows, grass, and shrubs.

Light lanterns or candles that contain oil repellents ?

You can keep mosquitoes away from your porch or patio by lighting lanterns or candles that contain essential oils that repel mosquitoes. These essential oils include lavender, eucalyptus, geraniol, clove, cedarwood, and lemongrass. However, it’s essential to keep in mind that mosquito-repelling candles and lanterns work best in small areas with very little air movement.

How to make a homemade mosquito trap

You can also set mosquito traps to keep these annoying pests away from your patio or porch. However, most types of mosquito traps need to be changed on a regular basis.

If you’re having a barbeque or outdoor party, mosquito traps can be a very effective way of protecting guests from mosquito bites, especially when the traps are used along with other mosquito control methods such as repellents.

Here are some simple DIY mosquito trapping ideas that really work:

Photo Instructions of How to Make a Homemade Mosquito Trap 
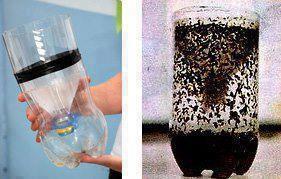
Homemade Mosquito Trap bottle and bait

Items needed:

✅ 1 cup of water

              ✅ 1/4 cup of brown sugar

✅ 1 gram of yeast

✅ 1 2-liter bottle 

HOW:

1. Cut the plastic bottle in half.
2. Mix brown sugar with hot water. Let cool. When cold, pour in the bottom half of the bottle.
3. Add the yeast. No need to mix. It creates carbon dioxide, which attracts mosquitoes.
4. Place the funnel part, upside down, into the other half of the bottle, taping them together if desired.
5. Wrap the bottle with something black, leaving the top uncovered, and place it outside in an area away from your normal gathering area. (Mosquitoes are also drawn to the color black.)

Change the solution every 2 weeks for continuous control.

If you don’t like making things or can’t get this thing to work correctly for some strange reason, then you can always try one of these that are guaranteed to work.

Video Explanation of a DIY Homemade Mosquito Trap

i.Use limes and cloves ?

Slice limes in half and adorn them with cloves. Surround your outdoor area with the fruits to create a mosquito-free zone.

ii.Trick mosquitoes into drowning ?

Fill a bucket with water and add detergent into it. Mosquitoes will be attracted to the stagnant water you’ve provided because they need it to lay their eggs in. However, the water will have no surface tension due to the detergent you’ve added and the mosquitoes will drown.

You can increase the efficiency of this trap by aiming a light source to the water because mosquitoes are also attracted to light.

How can you stop mosquitoes from biting? ?

Whether you’re swimming, riding your bike, hiking, or enjoying other outdoor activities, mosquitoes will always find a way to ruin the fun. You can make yourself less desirable to mosquitoes by trying some of these ideas:

·Skip the perfume ?

Many lotions, perfume, deodorant, and even hairspray, attract mosquitoes to us. If mosquitoes seem to be particularly attracted to you, try wearing scents that have a strong eucalyptus, lavender, basil or even rosemary scents.

·Wear long sleeve shirts and pants ?

If you’re planning an outdoor adventure, wear clothes that will help keep away mosquitoes. Loose fabrics and light colors work best. A light-colored hat can also help keep mosquitoes away from your head and face.

·Apply repellent ?

Sprays or lotions containing IR3535, DEET, lemon oil, eucalyptus oil, or Picaridin are particularly effective when it comes to keeping mosquitoes away. Mosquito repellents usually wear off after a few hours and you may have to apply again when necessary. Lotions and sprays containing DEET are safe even for children when used as directed.

·Spray yourself with vanilla ?

Add three teaspoons of vanilla to a cup of water and put the solution in a spritz bottle. Simply spray yourself when you’re outside biking, hiking or enjoying other outdoor activities. Vanilla will mask your body odor and help keep mosquitoes away.

·Cover your feet ?

Mosquitoes love bacteria and sweat, making your feet one of the prime blood sucking spots. In fact, the mosquito species known as Aedes aegypti, which is responsible for spreading the Zika virus, tend to bite the lower parts of the body. You can consider wearing high socks or high-top sneakers.

Human and mosquito movement is to blame for transferring uncommon mosquito-borne diseases to new areas. Climate change also contributes by pushing mosquitoes into more suitable areas.

However, these simple ideas can help you keep mosquitoes away from your home and prevent them from biting.

Filed Under: Bushcraft

Best Throwing Tomahawks [SOG Tactical Review]

June 27, 2019 M.D. Creekmore

tomahawk reviewby Mike

I’m always on the lookout for new and better gear.  We should all be doing that, and for most of the readers of MDCreekmore.com, I think that statement holds true. Today I’d like to talk about the SOG Tactical + Throwing Tomahawk. I saw it for sale on Amazon and decided to snap it up for the following reasons:

  • The cheap hardware store hatchet I bring backpacking with me is heavy, dull and clumsy. The SOG Tactical Tomahawk is listed as much lighter and I wanted to see if it could cut branches and wood as well or better than the average cheapo hatchet.
  • I wanted something that could also be used for self-defense if need be. I reasoned that if the tomahawk was used successfully by both the Native Americans AND later the American military, there had to be something to that.   This holds especially true because as a Canadian, I cannot bring firearms into provincial parks and conservation areas where I typically backpack, and as of late the bears, coyotes, and wolves have been getting more aggressive as they get hungrier.
  • I’ve read good reviews of it elsewhere and:
  • It was very reasonably priced.

Before I go on any further, let’s get a look at this thing.  It looks pretty mean, and it also looks pretty functional in my opinion:

Let’s look at some cold facts about this device.  The overall length is 15.75”, and it weighs in at less than 2 lbs (24 ounces).  The blade length is 2.75” and 0.26” in width and it’s made of 420 stainless steel with a black finish (except for the end of the blade). It has a fiberglass reinforced nylon handle and comes with a nylon sheath with a belt loop in it.

SOG-Tactical-Tomahawk

The uses of this device listed on the website include “… breaching operations, excavation, obstacle removal, extraction, and other utility applications.”.

So, my first impressions were good. Anybody with any kid left in them will look at this thing and exclaim “COOL!” I’m pretty sure that’s exactly what I did. It does have a mean look too it, something that when you pull out in the company of friends, they want one, and in the company of enemies, they might think twice about messing with you.

Aside from the aesthetics, this is a fairly light axe but it does have heft.  SOG claims its well balanced and I agree. Gripping it at the end of the shaft it has a natural swing to it. I feel that it follows the proper path with my stroke. It seems well designed for the mechanics of the human swing.

There’s quite a bit of meat to the blade. As you can see from the picture above, it’s quite thick and should stand up to quite a bit of abuse.  Just like the shaft.  The fiberglass reinforced nylon is very light, provides excellent grip and it seems to be very strong.

There are videos on the SOG website showing them propping the shaft on a piece of wood and driving over the shaft with a truck. The shaft flexes but does not break. Sorry folks, but we’ll just have to take SOG’s word on that one unless you want to buy one of these and do it for yourself.

Still, I tried bending it in my hands and beating the shaft against some concrete and it held up with no breaking and no marking up.  That should give us some clue on to the longevity.

The blade is attached to the shaft with what seems to be a tang of fair length. It’s hard to tell but I’d say it’s about 3”.  The blade is held onto the shaft by what looks like two screws as well as a tight metal band that is about 1.5” in length.  It is attached with a lot of strength and I feel zero give or wiggle to it.

I really just got this Tomahawk so I haven’t had a chance to use it much. However, I wanted to try it out as best I could before actually taking it into the field (my next backpacking trip isn’t until August 12th, sorry).  I did beat up a big stump pretty good and I did bury the end of the blade into a tree with minimal effort.

But to show you how it works, I put together a video showing what it does to both a 2×4 and a pineapple.

The 2×4 is pretty self-explanatory.  How well does it split wood?  The pineapple, well, I wanted to show how well it would work in a self-defense application. The example I use in the video is for protection from animals and nothing else just for the sake of the YouTube moderators.

Be that as it may, I selected a pineapple while feeling both my head and different fruits in a grocery store and it seemed to me that the pineapple best felt like my Neanderthal skull.  For your viewing pleasure:

The SOG Tactical + Throwing Tomahawk retails for about $65. I bought it on sale from Amazon.  I’m sure there are better axe devices out there, but how much money are you going to spend? This thing seems solid, VERY solid and well worth the price if you’re in the market for one.

Also, the pineapple was delicious. Just thought I’d let you know… please share your thoughts in the comments section below. Thank you!

Filed Under: Knives and Blades

Are You Living in a Nuclear Death Zone? Find Out with the U.S. Nuclear Target Map

June 27, 2019 M.D. Creekmore

U.S. Nuclear Target Map

A few days ago I was doing research on nuclear war, world war 3, and potential nuclear targets and safe distances from those target sites when I came across the NUKEMAP.

The U.S. nuclear target map is an interesting and unique program unlike other nuclear target maps because it lets you pick the target and what size nuclear device that the area you chose is hit with and then shows the likely effects and range of damage and death that would be caused by that nuclear device if it hit and detonated on your chosen target area.

The NukeMap looks to be fairly accurate as to the blast area, fallout and damage but of course all any  U.S. Nuclear Target Map can do is represent an educated guess as to effects of a nuclear blast from and to a given area.

If you’re curious to know if you’re living in a nuclear death zone then go over and give the NukeMap a try if nothing else you’ll be entertained for a few minutes. Be sure to scroll down to the bottom of the page and look to the right side and click the “Don’t log usage data” before choosing and nuking your target.

I used the NukeMap set to the closest possible nuclear target to my location, that is Oak Ridge Tennessee and according to the map I’m safe from the detonation blast of the largest Russia bomb the Tsar Bomba, however, thermal radiation could be an issue.

According to the site Thermal radiation can cause:

Third-degree burns extend throughout the layers of skin and are often painless because they destroy the pain nerves. They can cause severe scarring or disablement and can require amputation.

Not good… however, there is some “good news” according to the U.S. Nuclear Target Map below from Wikimedia Commons…

U.S. Nuclear Target MapAs you can see Oak Ridge Tennessee isn’t shown as a target on the map, but then the nuclear target map is from 1984 so those targets might have changed and or more target areas added to the list, and who knows where the bombs will land during a nuclear exchange, one could go off course and land right in my bedroom…

But, then with nuclear detonations, it’s usually not the blast that but the radioactive fallout that kills the most people, and as you can see from the map below the most likely path of radioactive fallout across the U.S. from potential target areas. However, radiation can and will spread around the globe if it enters the jet stream.

Fallout_map_USAHave you considered and planned for nuclear war? Are you living in a nuclear target area? What are your plans if and when a nuclear world war three begins?

✅Recommended books

Nuclear War Survival Skills: Lifesaving Nuclear Facts and Self-Help Instructions
No Such Thing As Doomsday: How to Prepare for Earth Changes, Power Outages, Wars & Other Threats

How To Prepare For and Survive a Nuclear Attack ?

Radioactive nuke attack survival

Added by Joel Skousen

First, let’s be clear about one thing:  nuclear war is very survivable, even with minimal preparations, so don’t believe the “everyone is going to die” claims about nuclear winter and total destruction.  50% of Hiroshima survived without any preparations, though many were very sick.

Keep in mind too that even Russian and Chinese war doctrine doesn’t include nuking American cities on a first strike, despite the verbal threats.  In reality, they intend to nuke US and NATO military facilities first and blackmail the West into submission.

There are 3 phases of nuclear war that you must be prepared to confront:

1) Initial blast and radiation.  The blast area of destruction is only 5-7 miles from any nuclear target, so don’t prepare against blast effects, which is very expensive—relocate instead.  Avert your eyes immediately from even a distant explosion and duck behind anything that will shield you from the instantaneous line of sight radiation and intense heat and light.

Most will never see any blast effects, but almost everyone will have to deal with residual radiation from anywhere from 2 weeks to a month, which is not that difficult if you prepare in advance.

2)  Immediate panic and cut off of electricity and supplies.  Because both Russian and Chinese nuclear doctrine dictates the use of high attitude Nuclear Electromagnetic Pulse weapons (EMP)  just before a physical nuclear strike, the electric grid will go down—which guarantees a lot of panic as people are plunged into darkness, lack of communication, and the cessation of all government services, like sewer and water.

Don’t believe the hype about Iran or North Korea doing an EMP strike.  It takes six simultaneous high altitude nuclear weapons exploding to blanket the entire US grid, not one.  So, only Russia and China have that capacity.

Remember too, that a total loss of electricity, including all TV and Radio may be your best immediate warning that a physical nuclear strike is about to fall within 15 or 20 minutes.  That’s not a lot of time, but it may allow you to get a head start out of town or make a quick call to warn the family.

This threat requires preparation to get to your secured home or retreat very quickly without getting caught in major traffic snarls.  Don’t get on a freeway that is already packed.  Use secondary roads, and map out routes that allow you to cross any freeways at an over or underpass NOT associated with an on-ramp or an exit.  Those will be the only ones not blocked with traffic.

3) Long-term famine and Social Unrest:   This gets into full swing within 3 days of an attack and may last more than a year depending on how quickly parts of the grid can come back up and how well industry can re-establish supplies lines.  While it’s hard to predict how these things will play out, this is where your long-term food and water storage supplies come in.

Don’t expect to be able to grow a garden that first year in a suburban area during high levels of social unrest without lots of theft. That will only be possible in rural and secluded areas.   That’s where having a rural retreat is a good long-term solution.

This article will deal mainly with the first threat—surviving the radiation.   It takes a heavy mass of materials to shield from gamma radiation, which is much more potent than X-rays, so forget about using medical grade X-ray shielding materials. Your wooden house and roofing materials are like paper to gamma rays, so not much shielding there either.

Nuclear protection purists would demand a reduction in radiation that is almost total requiring  13.8 feet of water, 10 feet of earth, 6 feet of concrete, or about 1.3 feet of lead—a Protection Factor (PF) of a billion, all of which are very costly to achieve.  This Survival Blog article discusses the relative protection factors for various materials.

As a practical matter, we have to arrive at a compromise between the cost of construction and shielding.  You need less shielding the farther you are away from an explosion since radioactive dust starts to fall out from the sky closest to the detonation and only the finer high altitude particles travel longer distances, depending on the wind direction.

In short, you get less radiation the farther from blast zones you are located.

For example, Immediately to the West of Seattle, which has multiple nuclear targets around Puget Sound including the Trident submarine base, you would probably need a PF of 1000 to shield against several inches of radioactive dust on your roof.

That amounts to 22 inches of concrete or 3 feet of dirt. But, further to the West in Idaho, the radioactive dust from Seattle would be a fraction of that, requiring much less shielding.

Many experts demand a “one size fits all” PF of 1000, but that means that very few could afford to build a shelter or safe room—and they don’t.

Because most areas of the country, not directly downwind and within 50 miles of a blast one, are not subject to those high levels, most people can survive with a protection factor of only 32, meaning that that radiation level is reduced to 1/32 of normal.  That involves 12” of concrete over your basement shelter—not 22”, which is doable, and not too costly.

Because of the much higher costs of protection close into target areas, in my book Strategic Relocation, I recommend that your money is better spent relocating, even within the same general area, to avoid being directly downwind or close to a nuclear target.

In the book, I have maps of all the nuclear target areas for guidance, but also indicate the one or two prevailing wind directions in your area necessary to mapping out an avoidance strategy.

Choosing the type of shelter

Your two basic choices are to buy a prefabricated tank style shelter that is buried underground, or to build a basement style shelter within your own home, or as an extension.  The only advantages to the buried tank shelter are that it is quicker to install, and covering with dirt is cheaper than concrete.

However, they are more expensive per square foot of usable space, and they often come designed with expensive blast doors and valves, which you don’t need outside of a blast area.  Sadly, many also are designed with costly NBC or HEPA filters inside the shelter, but the sheet metal filter enclosures are not thick enough to stop radiation trapped in the filter from reaching those inside the shelter. The average cost is $50k-$75k, and you can build a lot of basement for that price.

But the worst problem with buried shelters is the fact that you have to go outside and open a hatch to get inside.  The notoriety of bringing in a huge tank shelter on a semi-truck and burying it in your backyard with a crane guarantees that the whole neighborhood is going to know about it.

How do you get in if that entrance is surrounded by others wanting shelter?   All your loading of supplies and equipment is down through that vertical ladder well, which is not easy.  In addition, the ventilation pipes emerge from the ground and are subject to tampering or blocking.  If you do use a buried shelter, put a shed or building over it.

That way the vents are protected from view and tampering.  Still have to cross open ground to get into the shed, which is a security risk.

The basement shelter avoids all of those disadvantages since you access it and stock it with supplies from within your home.  No one can view any of that activity.  Vents go up through walls into the attic, and HEPA air filters can be concealed in or under normal cabinets.

The basement safe room or shelter (never call it a “bunker”) is also easier to conceal, and it should be concealed.  In cases of massive social unrest, you want to have the option of avoiding confrontation by hiding out in a concealed safe room with a steel security door, communications, and alternate battery-powered electricity.

If you do an extension to your home with a basement shelter underneath, label the basement part as non-livable “storage” only, and don’t show any of the plumbing that might pertain to a future shelter.  Install all that after the occupancy permit is granted.  My book on the Secure Home has all of the architectural details on how to do that plus detailed listings of all the equipment necessary to outfit the shelter.

But, if you have an existing basement the best way to achieve total privacy without a permit or inspection, is to build a concealed shelter within the basement.  We have engineered plans to do just that here.

As a minimum, prepare your home to give you added protection without a formal shelter.  In a basement, that would involve building two addition stacked walls of concrete block (6ft high and 8ft across) into a corner of a room away from any window, but leaving a 24” entryway. & Cover that with a makeshift ceiling of 2×4 on 12” centers with ¾” plywood.

Then stack 3 levels solid 4” concrete blocks on top of that makeshift ceiling.  That will give you the minimum radiation protection you need.  Have a port-a-potty inside as well as some food and stored water.  It will be tight, but at least you’ll survive.  If you don’t have a basement, you’ll have to do four block walls inside an above ground room to get the sidewall protection. Do the lowered ceiling on top of those 4 six foot high walls.

It takes about two weeks for gamma rays to dissipate so you will need to buy a radiation meter to tell when it is safe to come out or to go back into a shelter (since in a war, there may be multiple nuclear events).  KI4U.com has a range of nuclear meters at good prices.

Resources:

  • https://www.ready.gov/nuclear-blast
  • Are You Ready – FEMA Guide
  • Nuclear War Survival Skills – Cresson H. Kearny
  • U.S. Nuclear Target Map (Do You Live In a Death Zone?)

Joel Skousen has designed high-security residents and retreats for over 40 years.  He is the author of Strategic Relocation, the Secure Home, The High-Security Shelter, 10 Packs for Survival, and is the publisher of the weekly World Affairs Brief, which analyzes the week’s top stories from a perspective of what the government and the mainstream news won’t telling you.

Surviving a nuclear attack – Irwin Redlener

How to Protect Yourself from Nuclear Fallout and Survive an Atomic Attack – 1950s Educational Film

Webb Pierce – more and more – love this song.

I know that most of you don’t want to think about it but we are heading towards a nuclear world war three, possibly within the next few months, but more likely within the next five years.

  • Urban Survival Basics: How to Survive in the City When Disaster Strikes
  • The Best Urban Survival Kits and Get Home Bags For Preppers

Here are some of my favorite prepping gear

Thank you for investing your time in this article, and I sincerely hope it has provided valuable insights to strengthen your survival preparedness. As a survivalist, I make use of a variety of tools and gear, many of which have proven to be indispensable in my journey. Here, I’ve compiled a list of some of my favorite survival gear, which I believe you will find beneficial as well.

These are affiliate links, meaning if you decide to use any of them, I’ll earn a commission at no additional cost to you. However, I assure you that these recommendations come from personal experience – these are the exact tools I trust, use, and confidently recommend to everyone, including my own family.

  1. Long-Term Food Storage: ‘My Patriot Supply‘ is my top choice for emergency food supplies. Their selection caters to long-term storage needs, ensuring you’re always prepared.
  2. Water Filter: Clean, safe drinking water is a priority in any situation. This water filter has served me well, and I trust it will for you too.
  3. Versatile Cooking Solution: The Zoom Versa Cook Stove is a reliable, versatile cooking solution perfect for outdoor and survival scenarios.

I’ve compiled an extensive, frequently updated list of my top survival gear recommendations for your convenience. Equip yourself with the best and latest gear here.

Remember, true survival isn’t merely about making it through – it’s about effectively navigating and thriving in challenging circumstances. Equip yourself well, stay informed, and always be prepared.

Filed Under: Prepping

What Are The Best Survival Knives For The Money [2019 Hands-On]

June 26, 2019 Jesse Mathewson

what is the best survival knife for the moneyWritten by – Jesse Mathewson

One of the most underrated and over marketed essential components of a bug out, survival, bushcrafters kit are the knife, or in my case knives. Since the rollover in 2000 and failure to collapse of anything at that time, the prepper, survival world has blossomed as an entirely new industry.

This has led to knife builders getting into designing knives for large production companies versus the plethora of smaller individual builders that used to exist. There are now machine shops producing show-stopping advanced design knives, however, are any of these modern art pieces really worth the money you pay for them?

And do they have a purpose outside of looking pretty when you post an Instagram of your never used daily carry?

As a lifetime prepper/bush crafter who has lived for over two decades in the High Deserts of North America having a useful knife on hand is not only essential, it is a life or death decision. There have been numerous times in my life where a simple Opinel #8 kept me from going hungry, allowed me to start a fire and set up camp.

Knives are tools, essential tools. If you live where you are not allowed to carry a knife, move; honestly it is the height of political arrogance, that people not be allowed to carry even a simple folding or sheath knife.

This being said, time for the basic reviews of three manufacturers I recommend to people wanting to start their kits on the cheap, or even for experienced individuals looking at expanding their tool chest.

Mora of Sweden – manufactures the famous Morakniv line of knives. There are dozens of models available though I have found that for most tasks the simple Companion in either stainless or high carbon works just fine and at an average of $13 apiece on Amazon, they are worth buying in bulk.

1.  These are fixed blade, sheath knives and come with a standard working plastic sheath. Modern polymers have proven time and again to be as strong as many steels so don’t let that deter you. The stainless version most commonly seen is made of Sandvik 12C27 a Swedish steel that is almost naturally occurring and well known for its longevity.

The HC or high carbon version is made of laminated high carbon and softer external steel.

2.  The edge bevel or grind is called the Mora grind, and is a very shallow, thin grind that allows easy cutting and shaving of kindling. It is NOT a good knife to use for chopping, though you can do so, as the bevel of the blade itself lends itself to edge rolling and it will need a quick strop before continuing on.

3. Stainless steel models do not hold an edge as well as compared to the high carbon models; however, they are far more rust resistant than the latter. So it is a toss-up as both easily work for the same tasks when called upon. One simply needs more touch up than the other.

4. The grip is a rubberized plastic and they are a ¾ tang, which is quite strong. Initially, upon testing I hammered two into a tree about 5 feet off the ground, I then hung from the handles and put my full weight on them for as long as I could hold it several times. I have also pried with them, putting them in a vice and bending the blades almost double without any harm occurring in the handles themselves.

5. Speaking of the blades, they are relatively thin running .078” to .098” of an inch wide, however, this is a good thing as it means they will work very well for cooking, camping, picnicking, cleaning game, filleting fish and much more. And yes I have done this with them.

6. Over time they will get a patina from use, this is a benefit, of course, if you want to prevent rust upfront and add a little personal touch, there are hundreds of videos about using mustard through vinegar. My preferred method is heating apple cider vinegar up to boiling and placing the blade in this for 5-10 minutes, rinsing with cold water, repeating until quite dark. Than using mineral oil or really any gun or knife lubricant/ cleaner you wipe the blades down well and store them away. It works and they look very tactical after you are finished.

knives-budget-Ganzo

7. Lastly the spine, these blades do not have a 90-degree spine, however, with a hand file you can quickly put one on and even the stainless model with throw sparks from a Ferro rod!
Ganzo Folding Knives – A Chinese manufacturer of folding knives that has grown in popularity and is very well made using solid steel and well fit parts for a low price.

1.  Again there are several models; they have automatic folders, flippers, frame locks and the much talked about the Chinese version of Benchmade’s famous Axis Lock. For the purists, I have several Benchmade knives and love them all.

The axis lock that is being used on the Ganzo is nothing like the lock Benchmade originated. The design is similar, however, it is not as smooth or easy to use.

2. The blade material is 440C stainless steel, with the plethora of modern super steels and machinist designed blades in existence this steel has lost ground. However, for those of us who understand the purpose of a folding knife and tend to use it for that, buying one or more of these for $13-$31 apiece versus a Spyderco, Benchmade or high-end Kershaw at $100-$1200 apiece is the intelligent approach.

3. I tested several models including one auto version, my favorites are the G738 and G724 and lastly the G7212 (auto) model. They come quite sharp, hold an edge as well as most of the other high-end comparable size, styles available and easily take an edge or retouching if needed.

4. I have destruction tested these as well, nearly cutting my thumb off with one test (it was the Spyderco that failed) where I was testing lock strength. I carry one of the above three as my daily user in my left pocket; my right pocket has a defensive styled folder (Fox Karambit, Benchmade Emerson CQC7, Spyderco Paramilitary) and carry this way every day.

5. They are worth the money and easily among my favorite carry knives these days.
Lastly the large bush crafting blade – my first choice (non-khukri style or blade) is Ontario Knives of the USA. You can get a well-made machete, large butcher knife or the Ka-Bar made by Ontario and all of the above will fit well in the large blade category.

1. I highly recommend any of their machete styles though I am personally a fan of the Parang style for its cutting ability.

2.  The butcher knife is a 7” blade length, inexpensive handle, and no sheath though the ka-bar styled sheath will fit it easily and can be found for under $10 on Amazon. The knife itself runs $10-$12 on Amazon and is worth every penny. You can chop with it and do all sorts of things with it, it is inexpensive enough that even if it breaks (the handle is not attached well) you lose nothing and can try your skills at re-handling.

3.  The Ka-Bar well, it has proven itself as a fighter and for many, myself included as a large bush crafting blade as well.

4.  The steel most commonly used by Ontario Knives is 1095 high carbon which is treated properly, takes and holds an edge well, though I do have my blades chip regularly. (Easily fixed, but still something to consider)

So there is three of my favorite low budget bush crafting knives for your consumption. What say you? Which do you like and why? And remember, this is low budget, not bad knives simply under $100 bucks for the three types of knives every bush crafter should have (to begin with).

Filed Under: Knives and Blades

How to Pack a Bug Out Bag

June 16, 2019 M.D. Creekmore

packing a bug out bag

by Everyday Prepper

Bug Out Bags (BOBs) have been hotly debated on the internet for some time and while I don’t expect my post on how to pack a bug out bag to put an end to the discussion I thought I would throw in my two cents for those readers out there that are just getting started.

Why do we need a BOB?

Let me start of by saying that if you’re searching for information on survivalist or preppers then chances are you already realize the need to get ready for situations that may be out of your control.  These situations can include anything from a problem with your house to a world crisis.

As preppers, we generally say you need to get ready for what you consider to be the most devastating realistic event you can think of.  If you honestly believe that the worst thing that can happen is a tornado touches down and blows away your house then you should start preparing for that.

When you prepare for the worst you can think of you generally cover a whole broad spectrum of smaller things that you can’t think about or don’t want to think about.

When prepping for any event whether great or small one thing that is most likely needed across all situations is a way to leave wherever you are quickly and without too much thought about what you will need.  This is where the BOB comes in handy.

If prepared before an emergency then when an emergency comes you don’t have to think about what to grab.   Now you may ask “What about the situations where I don’t need to leave and I need to stay instead?”

Well, you see, having the BOB didn’t hurt you and the supplies in the BOB can still be put to use where you’re at and you don’t have to scrounge around to find them.  Having one just makes sense and by creating one early in your prepping adventure you will find this to be one baby step toward your ultimate goal.

The .gov folks have stated that in any national emergency you should be prepared to get by for at least 72 hours by yourself without any assistance.  For a horribly real example of this look at what happened after hurricane Katrina.

As far as I can tell the .gov had been telling people about the 72 hour waiting period for some time and still, people didn’t believe or they chose not to listen.  We can look back and see what crazy things happen in the aftermath of the storm and while not every location lost control (although the media didn’t talk about the calm and reasonable people) some did.  I went to Mississippi shortly after Katrina to help in the relief effort on the coast and got to see what shelter life was like.

I can promise you that you don’t want to be in that situation, especially with a family.  Where we were staying was a campground about 30 minutes outside of the national guard lines that blocked the coast and there were tarp houses set up in the “primitive living” campsites.

We didn’t understand what that was about when we were there but looking back after visiting the shelters and hearing stories about what was going on at some of the shelters I can see how sleeping in a tarp house would be better than sleeping in a shelter.

I say all of this to make you understand that if you buy gear now for a BOB and prepare for a 72 hour period extending that period becomes an easier and easier job.  You simply get more gear and also (more importantly) you get more knowledge about what it will take to survive an emergency.  The more prepared you are the less freaked out or panicky you will be in the time of emergency.

Who needs a BOB?

In my opinion, every member of your family should have a BOB just for them.  Yes, there will be duplicate supplies but as the saying goes “two is better than one” or as the survivalist saying goes “two is one and one is none”.  Having a BOB for each member of your family will ensure that you have the supplies you need to make it through a short-term emergency.

Where do we get a BOB?

There are several prebuilt solutions available but in general, I would stay away from them.  I personally believe your BOB should be tailored to you or your family members and the generic solutions just can’t promise that.  Also with a generic version you are paying for someone to assemble a group of cheap supplies.

You can build a good BOB suited for you with good gear for around the same price or less most of the time.  Not only will you possibly save money but you will know the gear that is in your BOB instead of just reading about it in the printed 8.5×11 piece of paper that comes with your prebuilt BOB.

When to use your BOB?

One of the most difficult questions to answer is “When do I use my BOB”.  There are many theories and many arguments but it really all comes down to what you and your family plan to do during the emergency at hand.  With many emergencies staying at home and sheltering in place might be a necessity.

With other situations, you may be forced to leave your home.  Having plans for what you will do beforehand makes the decision of when to use your BOB much easier because all the information doesn’t need to be weighed while you are stressed and going through the situation.

If you already know that in the event of a blizzard you will stay home, ride it out and contact some out of state relatives to let them know what you are doing then the decision to not use the BOB has already been made for you.

The same is true for the situation where you know you will use your BOB if someone knocks on your door at 3 am and tells you that you must be ready to leave your house in 5 minutes because you are being evacuated to a “safe” location because a wildfire threatens your house.

Planning is what will help you determine when to use your BOB.  Planning for every possible event that might happen is very important and can make your life much easier and a little less stressful during very stressful circumstances.

With that said however you can’t plan for all situations so you need to be ready to make a split second decision under stress at any given moment.

 Here are some things you may want to consider when deciding to use your BOB.  (These are in no particular order)

  1. Is your family safer at home or elsewhere
  2. Are you worried this event could lead to lawlessness or vandalism
  3. Is this a personal, community, state, national or world level crisis
  4. How long will this emergency last
  5. Is your family healthy enough to travel or be moved currently
  6. Is the weather good enough to change locations
  7. When you get to the other location will you be able to survive with only what you are bringing
  8. Is there a way to not only survive but to thrive and prosper when you get to site b (not meaning get rich but meaning live and continue living once your BOB supplies run out)

Packing a bug out bag:

There are a lot of list on the internet about what items you should pack in your BOB.  I don’t offer any individual items most of the time because it really all depends on your comfort level with the locations you will be bugging out to and through.

For instance, if you are a seasoned backpacker and your plan is to escape 60 miles through the woods to a cabin that you own then your supply list may be very small.  The more you know the less you have to carry on your back.  This is especially true with bushcraft related skills but also applies to urban environments.

Here is a basic overview of what type of items you should have for most scenarios.

  • Shelter
  • Clothes
  • Water
  • Fire
  • Food
  • Hygiene

Conclusion:

While you may be feeling overwhelmed or intimidated by building your first BOB it’s really not as bad as you think.  Going to the library to find books on backpacking or even going to a store and talking to the “experts” there will help you quite a bit.  Just remember the people at stores are there to sell you lots of stuff.  Most of it you won’t need and much of it will just be dead weight that you have to carry on your back.

Overall you should really be looking to carry only about 25%-30% of your total body weight.  At first, you will probably buy cheaper heavier equipment and that OK.  Don’t put off building a BOB just because you’re on a budget.

My first BOB weight almost 50% my total body weight and nearly killed me my first 10-mile hike.  Slowly but surely you’ll find lighter gear and you’ll learn what you don’t really need to carry.  All this will add up to a lighter and better BOB.

Get started today and you’ll be hooked, just don’t forget to actually practice some hiking and overnight stays with your BOB every once and awhile.

Filed Under: Bugging Out

10 Tips to Secure Your Apartment for Under $30

June 16, 2019 M.D. Creekmore

Tips to Secure Your Apartment

by Charlie

If you’re looking for simple and effective tips to secure your apartment without breaking your bank account then you’ve come to the right place……

Buying a ready-to-occupy or customized apartment is just one part of the story. There also is the need to ensure that the apartment remains in the best of the condition and also is safe and secure. It is common for most homeowners and tenants to hire professionals to take care of apartment security.

While there is no doubt that this could be a good decision, there are also many other options that could help you to secure your apartment without having to burn a big hole in the pocket.

How Do The Minds Of Burglars Work? ?

No burglar would like to get noticed as he or she attempts to rob or burgle a home. Hence, if they find that the home has surveillance cameras and other such monitoring systems, they would like to stay away from such homes.

Contrary to opinions and beliefs, robbers find day-time the most appropriate for burgling. This is because in most cases, the apartments and homes remain unoccupied and totally empty of human beings because of obvious reasons.

Robbers are intelligent in guessing whether an apartment is occupied or not. They look garbage bins, recycling containers and trashcans. A lawn that is unkempt and overgrown is a definite sign that the apartment in question could be unoccupied at a particular point in time.

Burglars always love to enter into a home without forced breakages as much as possible. They prefer improperly sealed or closed windows and doors as the easiest and safest means to break into a house and rob it.

Checking and testing the waters is a tactic that is often used by robbers and burglars. They knock at the front door or ring the bell and if there is a response from within, they come out with some vague and false stories. Professional robbers and burglars will not just break into the homes suddenly.

They certainly try and understand the overall plan of the home. They would rather break into the master bedroom instead of the kids’ bedroom. This is because they know for sure that some of the most valuable household belongings could be kept in the master bedrooms.

When we talk about intelligent security tips, we should bear in mind that robbers would not like to risk entering homes where there is the sound of a television or sound system running.

Now that we have some idea as to how the minds of the robbers work, we are happy to share some useful and pertinent information that could be quite efficient and useful. These ideas and tips will not cost a fortune and it could be completed just under $30. We firmly believe that they will be useful for all those apartment owners, who are running on a tight budget.

Further, it could be useful for those who are moving into an apartment on rent as a new entrant. Once a person decides to buy an apartment, in almost nine out of ten cases, he or she would have spent almost their entire savings and would also be in a big debt because of mortgage loans.

In such situations, spending a few thousand dollars more on answering for the question of how to secure an apartment could certainly be a tough ask.

They certainly would be on the lookout for cost-effective tips. We are sure that the following tips could be useful in more ways than one. They are all affordable but at the same time, we also believe that they are also efficient and perhaps even foolproof.

Get Inputs From The Local Police Station ?

Expenditure: Free – No Cost

There is no doubt that each and every neighborhood has a police station. It contains complete information about the law and order situation, in general, It has full details regarding the number of successful and attempted break-ins robberies and other such criminal activities.

They also will be able to give specific details about the specific localities that are at higher risk for such break-ins and robberies. This will help you to plan your apartment security accordingly and incorporate special features in areas that are more at risk.

Quality Window Locks

Expenditure: Under $10

According to cops and also experts who research burglaries and robberies, windows are considered to be the most vulnerable when it comes to home security. The job for robbers becomes easier if your window is located near a fire escape ladder.

Hence, you must try and find out ways and means by which it is possible to strengthen your windows. Simple and low-cost window locks can do the job adequately well. You have many options to choose from, including window wedge, sliding window locks and burgle bars.

You must do your research and then choose the right taking into account the exact needs and requirements depending on the type of windows that you have in your apartments. They are easy to install and by following simple DIY tips, anyone should be able to install the same.

Window And Door Alarms

Expenditure: A Pack Of 4 would cost around $20

This is another extremely cost-effective way of protecting your apartments from burglaries. It takes just five minutes to install these alarm systems. They work the same way as window and door alarms that are installed by security companies.

You don’t have to pay anything extra for monitoring the same. The siren or alarm is built right into the sensor. The sensors also have keypads. These keypads help in arming and disarming the system.

When you are home, you could disarm the system and open the windows and doors and enjoy some fresh air, especially during summer. They are extremely useful and robbers are paranoid about touching homes that have door alarms and windows.

Glass Break Alarms

Expenditure: around $12 or $25 for four.

Glass break alarms are considered extremely useful and effective in preventing robberies and burglaries. You could go in for window bars, or even choose a shatterproof film. These make it extremely hard for robbers to break the glass of your windows.

There are also vibration alarm systems that can be placed right to your glass window and is capable of detecting vibrations. If there is an attempt to break the window or open the window when the alarm is set, it will send a warning signal.

This will alert your neighbors and will also deter to robber to carry on further with the robberies. I like these ones that you can get at Amazon.com.

Door Barricades

Expenditure: Below $30

It takes just around a minute to install door barricades. The door is the most common place where intruders try their luck out. Just locking the doorknob may not be enough to completely secure your home.

Unless you have a deadbolt lock, it is quite easy for robbers to break through your door. These days even deadbolt locks can be easily broken open using sophisticated bump keys. This is where door barricades could come in handy. Check out current pricing here.

This is a device that helps to physically keep the door closed. They are much more effective than deadbolt locks. They could be perfectly suitable for rented apartments where the owners do not permit drilling holes in the floor.

Door Stop Alarms

Expenditure: About $7

If you are not keen on choosing the barricade route and are looking at some other efficient security tips then going in for door stop alarms could be the right choice. There are many apartment inhabitants who do not like to use the barricades even during the day.

This has a simple technology and it does work quite effectively and efficiently as far as securing your home is concerned. The alarm sits on the floor and a lever is pushed down when somebody tries to open the door.

Once the lever is pushed down, it sets off an alarm and sends an alert that somebody might have entered through your door. You can check out the ones that I use at Amazon.com.

Dummy Security Cameras ?

Expenditure: Under $8

If you cannot spend big money on real security or surveillance cameras, it would be always better to look for something that is less expensive but also effective at the same time. You could install something that is not real but looks almost real.

This will make the intruders believe that they are entering a high-risk area. In nine out of ten cases, it has been found that intruders would prefer keeping away from homes. At the end of the day, burglars know that there is no point in robbing or burgling if the chances of getting caught are extremely high.

Just the thought that the home is a high-risk target is enough to keep the intruders away. We are talking about a dummy camera. They are low-cost but they look almost like real. In fact, at times even experts find it difficult to differentiate the dummy cameras from the real ones.

It comes with a blinking camera and it blinks, thereby giving it a near-natural look. The battery that powers the LED blinking lights lasts for many months. Yes, it is a fact that dummy cameras are not like real ones in terms of functionalities and features. It can have the desired impact on the intruders and robbers and act as a powerful deterrent.

You can, later, if you wish to go in for a real camera so that the real needs and requirements are taken care of. There are different models and makes of dummy cameras and if you do your research, you will be able to come across some of the best ones.

As mentioned above, they look as good as real cameras and it takes quite a bit of time and effort to make out that they are dummy ones. Robbers work under a lot of stress and time is against them always. Hence, it is almost impossible. These ones at Amazon are low-cost for a set of four.

Home Security Stickers

Expenditure: Just $8 for a whole pack.

Home security stickers, work almost like dummy security cameras. You can place stickers that talk about security systems on your doors and windows. In most cases, it will act as a deterrent and will shoo away possible intruders.

This is because they will be convinced the particular apartment may not be the right one to break into. You could install the security camera up there and back it up with a warning sticker stating that “the home is under camera surveillance”.Robbers will for sure be terrified and would rather try their luck elsewhere.

Hence, by spending a small amount, you could keep your home safe and in good condition. It would be better to buy these stickers along with a dummy camera. These are generally sold as a bundle along with dummy cameras.

Even if the intruders miss out on the cameras will most certainly not miss the colorful and eye-catchy stickers that have big words stating the fact that the home is under surveillance. You could also do away with the dummy cameras and instead go in for stickers making bold and fearful announcements.

You could use stickers that talk about the cameras and monitoring devices being placed out of sight and in indiscreet places

Solar Spotlights

Expenditure: $26

These are easy to install and cost-effective ways to protect your apartment from unwanted intruders and robbers. They offer around 45 feet of illumination range. They come in weatherproof casings. They certainly can work on the psyche of robbers and intruders.

This is because they would always like to carry on their work without being seen. These outdoor solar spotlights could give everything away as far as the robbers are concerned. However, it may not work on cloudy days and dark winter months because of the lack of sunlight that is needed to power the solar spotlights.

Also installing these could be against the rules at some apartment complexes. 

Etched Glass Window Film

Expenditure: Under $15

This could be helpful for keeping prying eyes away from the insides of the apartment. It could keep valuables like jewelry, clothing, electronics, and furniture out of view. It will reduce the temptation psyche of the robbers.

It is user-friendly and can be installed using simple DIY steps. These window films while ensuring privacy do not hinder the flow of light inside the rooms. They are available both in readymade sizes and also customized sizes.

They do not have a sticky adhesive that could damage the window glasses. You must research and buy only fully opaque ones failing which may not serve the purpose.

Conclusion

The above are some simple hacks and tips to secure your apartment that will go a long way in enhancing overall apartment security. The inhabitants of the apartments or the apartment owners can do it on their own without the need for professional help (and the cost).

Finally, these tips are extremely cost-effective and could prevent big and gaping holes in your pocket in the name of professionally thought out and implemented apartment security tips and solutions.

Filed Under: Security

  • « Go to Previous Page
  • Page 1
  • Interim pages omitted …
  • Page 20
  • Page 21
  • Page 22
  • Page 23
  • Page 24
  • Interim pages omitted …
  • Page 31
  • Go to Next Page »

Primary Sidebar

Subscribe to Blog via Email

Enter your email address to subscribe to this blog and receive notifications of new posts by email.

Join 7,202 other subscribers
  • Amazon
  • Facebook
  • Substack
  • Twitter
  • YouTube

“Do more with less.”

– Minimalist proverb

Recent Posts

  • Just so you know
  • Weather Update for My Corner of Appalachia
  • Why I’m Ordering Ivermectin + Mebendazole Every Year
  • The Website’s Shutting Down (But Here’s the Plan)
  • You Are Hated! Start Training Like It!

Footer

Recent Posts

  • Just so you know
  • Weather Update for My Corner of Appalachia
  • Why I’m Ordering Ivermectin + Mebendazole Every Year
  • The Website’s Shutting Down (But Here’s the Plan)
  • You Are Hated! Start Training Like It!

More about me

Books I’ve written

Books I’ve read

Follow Me on YouTube

Follow Me on Facebook

Gear I Use and Recommend

Newsletter

Search this site

Follow me elsewhere

  • Amazon
  • Facebook
  • Substack
  • Twitter
  • YouTube

© 2008–2025 M.D. Creekmore · As an Amazon Associate, I earn from qualifying purchases.