• Skip to main content
  • Skip to secondary navigation
  • Skip to primary sidebar
  • Skip to footer

M.D. CREEKMORE

  • Blog
  • Books
  • Newsletter
  • Gear I Use
  • About
  • Contact
  • Facebook
  • YouTube
  • Blog
  • Books
  • Newsletter
  • Gear I Use
  • About
  • Contact
  • Privacy Policy
You are here: Home / Archives for M.D. Creekmore

M.D. Creekmore

Hello, I’m M.D. Creekmore. I’ve been interested in self-reliance topics for over 25 years. I’m the author of four books that you can find at Amazon.com as well as Barnes and Noble. Over the years, I’ve learned a lot about prepping, homesteading, and self-reliance topics through first-hand experience and now I want to share what I’ve learned with you.

What is the Best Dog Breed for Homesteading?

September 16, 2018 M.D. Creekmore

Pyrenean Mountain Dogby Goat Mama 12

I am writing this article to give people some ideas regarding using livestock guardian dogs for protection of livestock, property, and people.  My husband and I moved to East Texas about 10 years ago to live my country dream.  We acquired 25 acres for my horses and soon thereafter I started raising goats.  It was love at first sight so to speak, of goats.

My long-suffering husband has had to put up with a lot of crazy ideas, with goats being one of those ideas.  Anyway, we live out in the boonies and have a lot of coyotes and even a cougar that comes through the area occasionally.

I knew I had to figure out what I wanted to get in the way of a livestock guardian.

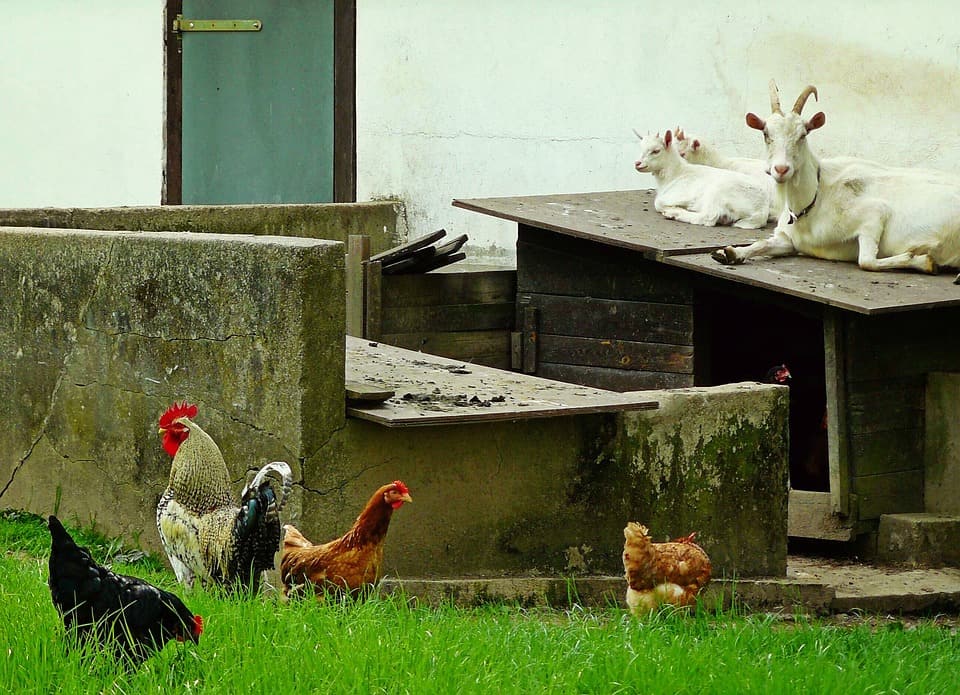
There are several options to choose from in the guardian category, everything from dogs, to llamas and donkeys.  The idea is to have something that will keep your livestock from being killed by predators.  Donkeys are used a lot as they normally do not like dogs or coyotes and will attack any that come in the pasture. 

They usually need to be the only equine in the pasture as they can bond with other equines instead of the goats they are protecting.  Llamas are another option.  They are curious and can behave assertively towards trespassers in their pastures.

My understanding, since I don’t have llamas, is that they advance toward the predators which is not normally prey behavior.  This can make the predators retreat.  The downside to llamas is that they are just as vulnerable to predators if they are attacked by more than one.  Other peoples experience or opinion may vary regarding the use of llamas or donkeys for predator control.

I did a lot of research about livestock guardians prior to deciding what I wanted.  A factor to take into consideration is the threat level of the predators in your area.  Are they very aggressive, have they killed your livestock or just looked?

Something that I read during my research stated, in relation to coyotes, if you don’t have a strong threat from a pack in your area, don’t try to eliminate the current pack.  If you do, then you may get another pack that is more aggressive to fill the void.

Nature abhors a vacuum is how the saying goes I believe.  I strongly feel this is true.  If your current predators know your livestock is protected and leave them alone, why would you want to take a chance that a more aggressive pack could move in to take advantage of the buffet you have provided for them?

I decided to use livestock guardian dogs (LGDs).  I had several reasons for choosing dogs. I have had dogs for over 30 years, was a veterinary technician for 12 years.  I also trained and showed dogs for 20 years, mostly herding dogs.

I am very familiar with dogs and comfortable with them.  Once I decided on LGDs then I had to decide what breed to get.  Just an FYI here, herding dogs are not livestock guardians.  They are bred to work with humans to guide and work a flock of animals.

They also have too much prey drive which means they will more likely chase the stock.  Livestock guardians are bred to be independent thinkers and protect the flock.  Some people confuse the two, thinking that herding dogs will work as LGDs.

There are several different breeds of LGDs with different traits, temperaments, and abilities.  Before you decide on a breed, DO YOUR RESEARCH!  Especially if you are not familiar with dogs or different breeds.

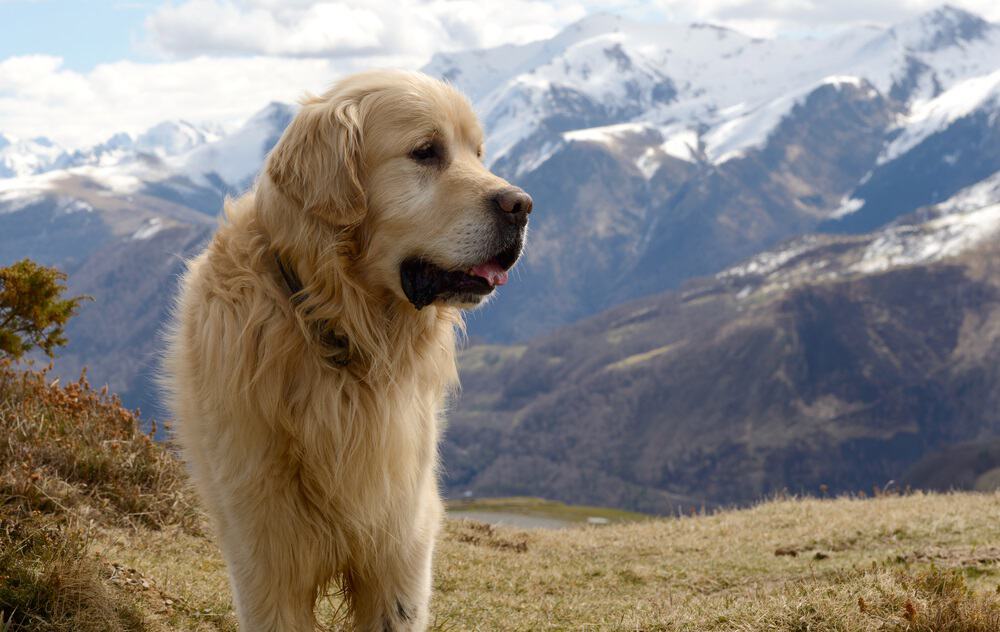
Talk to people, read books, search the web.  There are several good books on LGDs available.  A great website to look at is www.lgd.org.   They have a good library of articles.  I decided to get the Great Pyrenees for their personality traits.

I did not want a breed that was very people aggressive as I have great neighbors that visit often and I wanted to keep my neighbors happy.  I obtained an adult Pyr from Texas Great Pyrenees rescue.  By the way, check out LGD breed rescues.  The people that run these are familiar with their breeds and can answer questions.  My Pyr had lived with goats but had no human socialization.

Great Pyrenees dog

He is a wonderful dog that knows his job and does it well.  I also acquired a puppy at the same time.  Thor (adult rescue) discovered the joy of having human interaction and having a dog buddy.  He taught the pup, Odie, who has, in turn, trained my 2 younger dogs.

Anyway, since I knew what kind of threat level I had, I obtained dogs that are very capable of protecting my goats without being overly assertive.

Don’t underestimate them though, cause if push comes to shove, they will take care of the problem.  There are breeds that are stronger, or more assertive, to predators and/or people.  I have a friend with a large goat herd that has lost a lot of animals to coyotes.  She has a very different threat level than I have.

She obtained llamas but they were not enough.  I encouraged her to get some strong dogs to deal with her predators.  You have to have an idea of what threats you are facing to make a decision on what is right for your situation.

I know this is getting longer than I intended but bear with me, I’m almost done!  Part of my point is also about using LGDs not only to protect your livestock but also to protect your property and your family.  I know about protection dogs such as German Shepherds, etc.

I have had Dobermans, which I love.  However, if you are not sure about having a “protection” dog, I would recommend you consider a livestock guardian dog.  They are not just for livestock.

They have been bred for centuries for their guarding instincts and believe me, watching their instinct kick in is wonderful.  You don’t have to train them to do their job, they already know how.

That doesn’t mean you don’t have to do some training but the basics are already there.  One other thing I should mention is LGDs are independent thinkers.  They are bred to analyze the situation/threat and decide what to do about it.

That means that sometimes, ok a lot of times lol, they can/will ignore your request/directions/commands.  If you can’t handle that, don’t get an LGD.  However, I wouldn’t take anything for my LGDs.  They are the sweetest, best dogs I have had.  Challenging at times, but they keep my on my toes.

They love their people, livestock and property.  My crew is Thor, Pyr; Odie my big teddy bear, Pyr; Alesta, Akbash (Turkish)/Maremma (Italian) LGD and her full sister Ellie, my sweet girls.  They keep my goats safe and they keep me entertained.

Please keep in mind all this is my opinion and your mileage may vary.  I hope this article has given you something to consider in choosing protection options for your livestock and family.

Filed Under: Homesteading

How to Raise Chickens at Home for Eggs and Meat

September 15, 2018 M.D. Creekmore

chickens on the homestead property

by Jane W

My interest in chickens began at age three when my grandmother would allow me to gather eggs from the nests in the chicken house at their farm. I learned from her to be observant and gentle with animals. When my own child reached that age, I wanted to share some of that magic with him and began considering raising chickens.

As an avid reader of Mother Earth News, Organic Gardening magazine and other Rodale Press publications, I felt I had enough information to begin.

I knew I had to protect the chickens from the weather and predators so I purchased a large roll of one inch chicken wire and 1 X 4 X 8 boards to fence a small area outside an old building that had previously been used as a chicken house on our “postage stamp sized” farm in the mountains of Virginia.

When the outdoor ” cage” (it was covered with wire also, so hawks could not fly in and so the chickens could not fly out) was finished, I built nest boxes out of scrap 2 X 4s and plywood and filled them with hay, and built a small ramp for the chickens to use to enter and exit the building through a 8 X 8 inch hole in the outside wall.

A heat lamp was hung from the existing light socket, automatic feeder, and waterer, and the four chickens I purchased from the local flea market were added.

I realized after a few days that chickens do not pick a nest as their own and use that one for themselves. They pick a “community” nest or two. It is not necessary to have a nest for each chicken which can save a lot of work and money if you have a large flock of chickens.

It pays to spend some time in the chicken house in the mornings when the hens are laying to see how many nests are being used at the same time. Some chickens will wait their turn for a chosen nest if it is busy instead of using another nest.

I would wear a mask ( you can get seriously sick from breathing dust from chicken droppings) and gently rake and sweep up the hay, shavings and droppings on the floor (this was composted along with the horse and cow manure from the barn and later used on the garden as “organic fertilizer”) , wash out and refill the waterer and feeder and observe the chickens.

I got the hens used to me reaching under them to gather the eggs and I never got seriously pecked. Some would gently peck at my hand but I never got injured. One hen would even hop on my lap to be petted if I squatted down.

The chickens settled in pretty well. However, I soon realized, all I needed to know about them wasn’t in the neat little articles I read in magazines.

A few days after settling the chickens into their home, my son left the gate open to the fenced outside area and the chickens all got out. The herding dog we had, thought it was great fun to chase them and the chickens ended up in a tree. Who knew chickens could fly!

I put the dog in the house and used a broom to encourage the chickens to come down out of the tree and back in their yard. This took at least an hour and I began to realize “chicken training” and “dog training” were both in order.

On another day later that week, the dog was taken in the chicken yard on a leash and properly introduced to the chickens and not allowed to chase them or be aggressive toward them.

chickens for self-reliance

Over the next week they became used to each other and the “chasing game” never happened again. My neighbors, all over 80 years of age, had first-hand experience with chickens and suggested clipping the wing feathers on only one wing of the hens.

This created an imbalance so the chickens could not fly easily. The chickens could still run and escape any threat when outside their area, but not get 12 feet up in a tree. To do this you hold the chickens upside down by their feet.

They essentially “go to sleep” and are easy to handle this way. If you run after a chicken, it will outrun you and unless you have a net (which I did have later to catch the roosters). The easiest time to catch them is when they are on a nest after laying.

Just slide your hand under them and grab both feet at the same time, They will flap their wings and try to get away, but holding them by the feet with their heads hanging down will stop this readily and you are ready to work on a calm chicken.

It is best to have a helper to do this. One person holds the chicken and the other cuts the feathers. Take one wing, spread it out and using scissors, carefully cut the feathers a few inches from the wing itself. Chickens do get mites and this is a good time to dust them with organic insecticide to prevent them. This process has to be repeated every few months, as the feathers do grow back.

I also began scattering feed in the chicken yard while clucking and calling to the chickens instead of just using the auto feeder and waterer. This both encouraged the chickens to scratch and eat natural feed, such as bugs and worms and weeds, but to also eat small grains of sand and dirt which they need to process their food.

Chickens that are only feed chicken feed have to be provided something like oyster shell which not only helps with their digestion but also provides calcium which helps them form hard egg shells. Chickens that naturally forage for food, better meet their nutritional needs without supplements.

Being able to call the chickens to me instead of having to chase and herd the chickens back into the chicken yard saves a lot of time and work.

Eventually, at the urging and help of my neighbors, I was able to allow the chickens to free range in the garden and barnyard during the day and call and gently herd them into the chicken yard before dusk… chickens really do go to bed just as the sun is setting and it is best to get them into their area before then.

They will roost (sleep) wherever, but once they are allowed to sleep outside of their nesting area, they will lay eggs elsewhere also. Finding an egg in the barn in the haystack, possibly weeks after it was layed, is not a good thing.

I was careful to not let the chickens out until all eggs were laid for that day, so early afternoon until about an hour before dusk was long enough. Also, eggs need to be gathered each day and not left in the nests for long periods of time as some chickens will peck at the eggs and once a chicken cracks and eats some of it, it is almost impossible to stop this.

Many animals will eat eggs and eggs can draw animals such as fox, raccoon, snakes, opossum, and hawks to your area and potentially put your flock at risk.

Chickens in the garden need to be supervised to be sure they are not eating the vegetables and fruits themselves. I was usually hoeing weeds, loosening and bringing fresh soil up around plants, or picking vegetables while the chickens were enjoying their time in the garden.

If I saw a chicken eating something it shouldn’t I would simply correct that behavior and encourage the chicken to move away from that area. I found the chickens would follow me and “work” where I was working. If I was in the barn cleaning out a stall, the chickens were there, because I was uncovering bugs and worms for them!

I had read that modern chickens did not have a nesting instinct anymore because they had been caged and not allow to raise chicks for generations. By this I mean, they did not lay a number of eggs and sit on them and keep them warm until they hatched into chicks. Grandma called this “being broody”.

I did not have a rooster, so the eggs my hens were laying were not fertilized. I could not add to my flock by this method, so I decided to buy an incubator with an automatic egg turner and buy fertilized eggs from the flea market to incubate.

This was a fun experience and was not too labor intensive. If I had not had the automatic egg turner I would have had to manually turn the eggs once or twice a day which was more time consuming than anything. Keeping the temperature and moisture levels correct was relatively easy; waiting the 20 some days till the eggs started hatching was the hard part!

Once the chicks starting hatching young and old would spend hours watching and listening to a chick peep while still in the eggs and peck a hole in the eggs shell large enough to get out. It was tempting to try and help a chick get out of the shell, but it is better to leave it up to nature in this case.

Don’t expect all of the eggs to successfully hatch. That is not natures way, hard as it is to see an animal perish before it actually lives. Once the viable chicks have hatched, keeping them fed and watered in a cardboard box with a heat lamp (or old-fashioned light bulb that gives off heat) until they started sprouting their big chick feathers.

At this time they could be put in a small bottomless cage on the ground during the day for several hours at a time.

They need to be back in the box and under the heat at night even in summer… Some people advocate clipping the beak of young chicks so they will not peck and injure each other. This can be done with fingernail clippers but I never had to do it to my chicks.

I think overcrowding and not handling the chicks could possibly be contributing factors. I handled all the chick by picking them up and cupping them in my hands and never had any aggressive chicks to deal with.

One thing I did not know is that day-old chicks get very tired very easy and will fall asleep and spread out like they are dead. I had a couple fall asleep with their head in the water tray and felt like I saved a few from drowning by picking them up out of the water.

They do stop this after a couple of days after hatching, but it pays to keep a close eye on them or remove the water when you cannot watch them the first couple of days after hatching.

The box itself should be large enough so the heat lamp or light you have over the cardboard box will not heat the entire box. The chicks will move toward and away from the heat as they need it so be aware of whether or not your chicks are getting too hot or cold.

Once the chicks are losing their “baby feathers” and growing their larger feathers I introduce them to the other chickens by putting them in a wire box in the chicken yard. Chickens have a pecking order and you don’t want to risk a small chick being injured by a big chicken by just turning them loose to defend themselves.

After a few days of their being in the chicken yard for a few hours protected by their wire box, I release them in the chicken yard with the other chickens. By this time they have long legs and heads nearly as large as adult chickens. I have never had a problem with a chick being caught and injured by a larger chicken.

I did find that after a year of being “free range” chickens that natural instinct kicked in with one of my hens. She was sitting on about four eggs one morning and was a little more bothered than usual when I went to get the eggs.

I had kept one rooster from the chicks I had hatched and wondered if he was doing his job. He was certainly a good alarm clock, crowing and flapping his wings while on the highest spot he could find in the chicken yard every morning.

I left those eggs for the “broody” hen and she successfully hatched 8 chicks. I was very happy to see that natural instinct would take over if given the chance.

I failed to mention the wonderful eggs we got from our chickens. I learned to make many things I would not have learned to make without them. Everything from mayonnaise to angel food cake to quiche became things enjoyed by my family as well as by the helpful neighbors.

I was able to barter eggs for butter with one neighbor that had a milk cow. I no longer have the chickens, that farm or the neighbors but still, have the incubator. I thoroughly enjoyed learning about chickens and maybe someday soon I will start another flock.

In the meanwhile, I hope my experiences will be helpful to any of you with chickens or thinking about getting started with chickens.

Filed Under: Homesteading

Bug Out Vehicle Tips And Gear Checklist

September 15, 2018 M.D. Creekmore

bug out vehicle setupBy Brian D.

The world we live in today is unstable.  We face the possibility of terrorist attacks, natural disasters, viral outbreaks, power outages, water shortages, the list goes on and on.  Hurricane Katrina showed proved that the government cannot protect everyone in the aftermath of a large-scale disaster.

This was a wake-up call for many that in order to survive you must take your fate into your own hands.  Regardless of personal feelings about what may be coming or ending, it is growing more and more important to maintain a basic level of readiness for whatever may disrupt life and interrupt the ability to acquire a supply of water, food, and shelter.

Whether you are a hard-core, end of the world “prepper” or just take the Boy Scout motto seriously, there is no shortage of good information on prepping for disaster.

If you plan to “bug out” or “bug in” or just learn what items are best to carry every day, you can find numerous resources and opinions on what gear to buy and what skills are necessary, but one area that often fails to get enough attention in preparedness discussions is preparing and maintaining your vehicle for emergencies.

When disaster strikes, whatever the disaster may be, you might be lucky enough to already be in your safe zone, your “bug-in” site.  But what if you’re not?

What if you’re caught out and need to get home?  Many people focus on what makes up a good EDC or a bug out bag, but your vehicle is capable of handling so much more!

By all means, maintain a solid bug out bag and keep your EDC updated so you have the best tools for whatever you encounter every day, but take a good look at the vehicle that may be your best hope of getting where you need to be to survive.

Some of what is suggested here may be redundant with what you already have in your bag or on your person, but redundancy is a good thing in a survival situation.  You can recreate most of what you’d normally have in a bug out bag or a “get home bag” in your vehicle.

Every vehicle should have some basic safety/maintenance items on board.

These include, but are not limited to:

  • Spare Tire/lug wrench/bottle jack
  • Toolkit
  • Can of Fix-a-Flat
  • Tire pressure gauge
  • Jumper cables
  • Flashlight w/ extra batteries

Now we take this list a step further and add items that will aid in various situations.  For example, inclement/winter weather, treating an injury, or just stuck for an extended period of time.  A few basic items can increase survivability and comfort in most situations.

Here are some suggested items to store in your vehicle:

  • Umbrella
  • First Aid kit
  • Tarp
  • Knife
  • Length of paracord/rope
  • Hat (ball cap and wool watch cap/beanie)
  • Glow sticks
  • Duct tape
  • Cell phone charger
  • Hand warmers
  • Ice scraper
  • Gloves (winter, work &surgical)
  • Leatherman type multi-tool
  • Bottled water
  • Lighter/fire starter
  • Granola bars/snacks
  • MRE/dehydrated meals
  • Blanket/Mylar emergency blankets
  • Rain poncho
  • Heavy duty trash bags
  • Sunscreen
  • Hand sanitizer
  • Fishing rod & small fishing kit
  • Firearm and ammo
  • Extra jacket
  • Daypack/small backpack
  • Maps of the area

This is by no means an exhaustive list, but rather some basics to work from.  You will want to tailor your list not just to your environment/climate, but to any specific needs you may have.  Most of these items you probably already have laying around in duplicate or can pick up fairly cheap.

Several of these items are seasonal in their usefulness and can be rotated in/out according to the weather, but it’s easier to keep them all in the vehicle so you don’t forget to add them back as needed.  A few of these items are worth paying a bit more attention to.

I won’t go into great detail on many of these because there are plenty of reviews and resources out there already. Instead, I’ll touch briefly on items worth a little more thought than just something to toss into your glove box.

Your first aid kit should be stocked according to your level of first aid training and knowledge.  For example, don’t invest in a field surgery kit if you have no idea how to perform any of the functions the kit was designed for.  Rather stick to what you know how to use.

You can start with a store-bought first aid kit, but you’re likely to end up with tons of band-aids and little of the other items you may need.  Stock useful items like ibuprofen, anti-diarrhea meds, allergy meds, anti-bacterial ointment, and cold/flu meds.

Be sure to have a selection of band-aids, gauze, tape, with scissors and tweezers.  Add a small mirror and a magnifying glass for those hard to get splinters. The magnifying glass can even double as an emergency fire starter. Some instant cold paks are a good idea, as well as Quick Clot for larger wounds.

Include a snake bite kit as well. Sawyer makes a good venom extractor kit for around $15.  Obviously, it’s always a good idea to expand your knowledge, so sign up for a first responder class or a rescue first aid class with your local Red Cross and add items to your kit accordingly.

When it comes to firearms obviously you’re going to spend some cash and quality items will set you back some, but this is not the kind of thing you can afford to have fail if you really need it, so select carefully.  This weapon should be in addition to your normal conceal carry weapon, so you aren’t as limited by size.

This is totally a personal choice and you can find endless discussions and arguments over what’s the best weapon to have in any given situation.  The important thing is to choose a weapon you are familiar with, practice with, and can rely on.  Of course, when it comes to carrying any weapon, be sure to check your state’s laws and act accordingly.

In addition to the basics, some other items worth investing in are a portable jump starter and a portable air compressor.  You can buy units that have both in one, like the Stanley J5C09 that is a best seller on Amazon. It has 500 Amp/1000 Peak Amp capability, a 120 psi compressor, and the ability to charge USB devices.

The unit is heavy, weighing in at around 18 pounds, but should be enough to jump-start even a V8.

Another good option is the Clore Automotive Jump-N-Carry JNC660, also an Amazon bestseller.  This unit is a professional grade jump starter and while missing the bells and whistles of the Stanley model, it boasts 1700 peak amps.  It also weighs in around 18 pounds.

This is a no-frills model, but might be your best bet if you’re in an area with long-term freezing temps that typically wreak havoc on vehicle batteries.  Both of these items come in between $80 and $130.  You can find a cheaper, lower amp model but if you have anything bigger than a 4 cylinder in warm weather, you may find that your unit doesn’t have enough “umph” to get you started.

As for emergency tire inflators, there are several good ones on the market.  Stick with something in the mid-priced range, somewhere between $40 and $60.  Viair, Kensun, and Q Industries are some names to look for.  Just be aware that much like the jump starters, you often get what you pay for.

If you have a big truck with big tires, you may not get much use out of a bargain mini compressor other than pumping up pool toys for the kids.

Now we’ve talked about the items to have in your vehicle, what about maintaining the vehicle itself?  After all, the real goal of the vehicle is to get from point A to point B in as efficient a manner as possible.  If the vehicle won’t go, it’s just an expensive shelter.

You know to get an oil change when the little sticker from the lube place says so, or the “Maintenance Required” light comes on.  You replace tires when someone points out the steel showing, but beyond that put little thought into vehicle maintenance until something goes wrong.  This could prove deadly in a survival situation.

You may not be a mechanic and may know little about the magic happening under the hood that makes your cargo, but here are a few tips for keeping the vehicle on the road and available for use during an emergency.

At least once a month take the time to do a detailed inspection.   Start out by just cleaning up.  Get rid of the fast food wrappers, old drink cups, and bits of paper.  Go through your console and toss out anything you don’t need and reorganize the things you use the most frequently so they’re closer to hand.

In the warmer months items like ice scrapers, wool hats, hand warmers, etc., could be placed in a bag in the trunk and vice versa when the weather gets cold.  Rotate your unused snacks, MRE’s, and bottled water for fresher items.  Check to be sure you have copies of your current insurance card and vehicle registration.

Check your license plate to be sure it hasn’t expired.  These aren’t survival items, but a couple of minutes could save you a traffic stop.

Now check the head, tail, break, and reverse lights.  Check the turn signals.  Take a look at your tires and use a tire gauge to check air pressure.  Air pressure can vary with the temperature, so even if you don’t have a leak you could be a little low.

Remember that you can find the manufacturer’s recommended tire pressure in your owner’s manual or on the tire placard on the vehicle door’s edge.  Check the tread wear of your tires.  A good way to test this is with a penny.

Insert the penny into your tread with Lincoln’s head facing you and upside down.  If you can see all of Lincoln’s head then you are below the recommended tread depth and should prepare to replace the tire as soon as possible.

Look under your car where you normally park.  Are there any signs of leaked fluid?  Pop the hood.  Check your oil, power steering fluid, brake fluid, and antifreeze with the vehicle off and on a flat surface.  Look over your hoses and belts for any thin places, bulges, or other signs of wear that may need to be addressed.

If you’re unsure how to do this, take a few minutes to read through your owner’s manual, check out some YouTube videos, or maybe look into a basic auto repair class at your local community college. You’ll never regret having those basic skills.

If you have your car maintained periodically at a lube place or dealership, odds are they will check these items and more, but verify that with your particular servicer and don’t count on a periodic oil change service as your only problem detection.

Check things out with your own eyes.  In addition, be aware of changes in the way your vehicle handles.  Listen for different sounds.  For example, squealing when you stop is a good indicator that it’s time for new brake pads.

If you aren’t a mechanic yourself, find someone you trust to handle any repairs and remember that typically the earlier you discover and address a problem, the easier (and cheaper) it may be to repair.

Your vehicle may be your lifeline in an emergency situation.  Whether it gets you out of town when the world falls apart, or just gets you home from work, you never know what you might encounter along the way.

It pays to be confident in your ability to safely get to your destination, wherever that may be, so prep your vehicle just like you would your other gear and multiply your odds of survival!

Filed Under: Bugging Out

Best Water Filters For Camping & Prepping

September 15, 2018 M.D. Creekmore

hiking clean drinking water filtersby Kirk S 

Everyone agrees that you should have an emergency supply of water. Most experts advise that you should have a minimum water supply for 72 hours and the CDC recommends that you have 1 gallon of water for each person in your family for each day.

If you have a family of 4 you will need 12 gallons of water for those 72 hours. This is pretty easy to do with bottled water. Bottled water is pre-packaged and has clear expiration dates so you know that the water is still safe to drink.

Acquiring safe drinking water becomes a little more difficult if you need to abandon your home or if the emergency lasts longer than 72 hours. Each case requires an understanding of water safety, contamination, and treatment.

Choose the right water source

Water from flowing streams and rivers is always preferable to the stagnant water in ponds or lakes. Always try to choose water as close to the water source as possible. In many cases, spring water coming out of the ground will be the safest for drinking.

As much as possible, try to avoid water that is down river from towns and industry. Waste and pollutants often find their way into the water systems. Likewise, water near to agricultural land can be a problem. Fertilisers and pesticides soak into the land, and through rainfall and runoff, will get into the streams and rivers.

Avoid water in marshes and swamps or where algae is growing. Trying to find the cleanest water will make your life much easier. With the being said, there are times when you do not have any choice about the water that is available to you.

This is where it is best that you understand the potential contaminants in the water and the technology needed to remove them.

Water Pollutants

To make water completely safe to drink, five types of contaminants need to be eliminated:

  • Turbidity: visible dirt – sand, silt or mud
  • Chemical pollutants: from heavy metals to pesticides – often associated with mining, agriculture, and forestry
  • Viruses: a biological agent that reproduces in the cells that they infect
  • Bacteria: single-cell organisms found everywhere. Some of them cause infectious diseases. These include E. Coli, cholera, typhoid, etc.)
  • Parasites: waterborne parasites are single-cell organisms (such as protozoa, Cryptosporidium and Giardia) or multi-cell organisms (such as worms) that live in or on other living organisms.

How Do We Make Water Safe To Drink?

Depending on the level of contamination that you are dealing with, there are a variety of methods you can choose. Water purification technology has advanced quite a bit over the last few years and there are numerous methods for getting rid of the nastiness in contaminated water.

Unfortunately, getting clean, safe, good tasting drinking water requires more than one filtration medium. Below are different filtration methods and what they remove.

Boiling Water

Boiling water for at least one minute will kill or deactivate all viruses, pathogens, bacteria, and protozoa. This is an easy way to filter water with no special equipment and you can treat a lot of water at one time so it is good for large groups or families. Boiling does not remove chemical pollutants or clarify turbidity in the water. Boiling also requires a fuel source to burn which is sometimes difficult to come by.

Water Filtration

A water filter is generally a device that blocks impurities or particles from passing through it. This works through size exclusion where the holes in the filter are so small that the bacteria cannot fit. Most filtration of this kind is called Hollow Fiber.

Adsorption

Adsorption normally refers to a product like activated carbon. There are a few forms of activated carbon (granular, powder, and fiber). The small pores in the carbon increases the surface area of adsorption. Activated carbon is ideal for removing chemicals, metals, and turbidity of water.

It also improves the taste of your water and has faster flow rates. Activated Carbon Fiber is a fibrous adsorbent that has 10x higher adsorption than traditional activated carbon and gives you faster flow rates.

UV light purifiers

This method uses UV rays to blast microbes and organisms in the water. This neutralizes them and renders them harmless to humans. UV purifiers require a power source (generally batteries) and are potentially fragile, leaving you without filtration.

Water Filtration Products

LifeStraw

One of the most popular filtration straws on the market. Originally designed as an emergency water treatment method, straws are also well suited for time in the backcountry and are cheap to throw in an emergency pack.

The LifeStraw has a hollow fiber membrane filter that cleanses the water as you sip it straight from the source. LifeStraw does not remove viruses and it can only be used directly from the water source.

Hand Pumps

Hand pump filters are common for backpackers and have the ability to filter large amounts of water. Hand pumps are generally reliable and easy to use. Hand pumps have small filter pore sizes so they can remove more particulate, but this reduces the flow rate of water.

Most hand pumps are heavy and have multiple pieces that can get lost. Also, very few hand pumps can remove viruses. There are a few lately that have been released on the market that gives you complete viruses protection.

Gravity Filters

Gravity filters are a three-step process that are great for groups of people at a campsite or have time to set up a semi-permanent installation. Most gravity filters have a large water reservoir that is filled with dirty water.

It will have a tube that is connected to the filter medium and another tube attached to the clean water receptacle. Most gravity filters are made of hollow-fiber which allows for fast flow rates. Gravity filters are hassle-free, light-weight and can collapse down to save space.

These systems do not protect against viruses and you need quite a bit of water to make the system work.

In-Line Filters

Another very common filter is an in-line filter and most people are aware of the Sawyer Mini. It is one of the lightest filters on the market. It is economical to use and can be used with a water reservoir, a collapsible canteen, as a straw and can be threaded onto a water bottle.

This type of filter will filter up to 100,000 gallons if you continue to backflush it and take care of the filter. The filter is great for a single user, but not very good for larger groups. This type of filter also does not remove viruses and does nothing to remove chemicals and metals.

Chemical Treatment

Chemical water treatment methods, most commonly contain iodine or chlorine dioxide. This is a lightweight option, is good for treating large amounts of water and kills viruses found in the water. The downside is it takes a few hours to treat the water and leaves a negative taste in the water. This treatment does not remove the turbidity of water.

safe drinking water
This Photo was taken by M.D. Creekmore…

MUV Water Filter

A small company out of Utah recently released an adaptable water filter that they believe fixes many of the problems with single-use water filters. The MUV Adaptable Water Filter is a multi-stage water filter that can be modified and used based on the water contamination that you are dealing with.

Not only does it remove all of the water pollutants covered above, including viruses, but it is also versatile in the way it can be used. You can easily modify the filter to work in a water bottle, as an in-line filter, as a gravity system, as a straw, threaded onto a 28mm soda bottle, and as a pump.

With the different MUV filter modules, you are able to completely control how your water filter works and what it removes. Using the chart above you are able to determine which module is right for you given your current water situation. You can easily combine one or more of the modules to get superior filtration.

MUV can adapt to your lifestyle or your needs. With a few simple adapters, you can go from using MUV in a water bottle to a hydration system to a pump. No longer do you need to buy a variety of separate water filters that are incompatible with each other. Now you can easily buy one system that covers 99.9% of all your water filtration needs.

Check out the MUV Adaptable Water Filter and get in on one of the most innovative products to hit the water filter industry in years.

Filed Under: Bushcraft

Will Pacemakers Survive an EMP?

September 14, 2018 M.D. Creekmore

Pacemaker survive an EMPby Arthur T. Bradley, Ph.D.

A surgeon recently wrote to ask whether a modern pacemaker would survive an EMP. It would have been easy to provide a gut reaction and say, “No way!” After all, an EMP might generate fields on the order of 50 kV/m. But is that answer correct?

The surgeon went so far as to ask the pacemaker manufacturer (Medtronic) if they thought the device would survive. The company didn’t have an answer, but they did provide a set of known conditions that the pacemaker would survive (see Table 1). That information proved crucial to dialing in on what I hope is an educated answer.

Table 1: Medtronic provided max power levels vs distance

Field Strength (watts) Distance Required (feet)
< 3 0.5
3-15 1
15-30 2
30-50 3
50-125 6
250-500 10
500-1,000 20
1,000-2,000 30

From literature (IEC E1 HEMP Signal), we can assume that a 50 kV/m E1 pulse would generate a total energy of about 0.1 Joules per square meter. Converting that to watts requires assuming both a pulse width and an area. For this back of the napkin calculation, let’s assume a pulse width of 5 nanoseconds and that the pacemaker, including wires, measures 0.1 square meters. Neither are exactly right, but they’re close enough for this first-order estimate.

Converting the energy to watts is done by:

Equation emp

The Medtronic table obviously doesn’t go this high, but we can assume that power rolls off based on the inverse square law (i.e., 1/d2). In other words, for every doubling of distance, the power drops by 4. Therefore, if we assume that the pacemaker will survive 2,000 watts at a distance of 30 feet (per the Medtronic table), we can extrapolate safe ranges for higher power levels, as shown in Table 2.

Table 2: Extrapolated max power levels versus distance

Power (watts) Distance (feet)
2000 30
8000 60
32,000 120
128,000 240
512,000 480
2.05×10⁶ 960
8.19 x10⁶ 1,920
32.8 x10⁶ 3,840

This would suggest that Medtronic’s pacemaker could survive (without resetting) an EMP detonation that occurred at a distance greater than 960 feet. For simplicity, let’s round up and say that it would survive if the detonation occurred at >1/4 mile.

Given that a nuclear EMP will be most effective if it is detonated at least 25 miles in the atmosphere (above the Source Region) and will likely be at altitudes 10 times that height for greater coverage, it suggests that Medtronic’s pacemaker would easily remain operational.

The disclaimer, of course, is that all these calculations are back of the napkin. There are numerous sources of possible error, including the frequency content that Medtronic assumed when creating their table, the non-ideal roll off of power versus distance, the energy density of the E1 pulse, etc.

With all that said, the safe distances calculated are so much smaller than the actual detonation height (i.e., 1/4 mile vs 250 miles), I think it’s certainly reasonable to argue that such non-idealities won’t change the final conclusion.

In short, these calculations suggest that modern pacemakers, assuming that they perform similar to Medtronic’s, would have a very high likelihood of surviving a high-altitude nuclear EMP.

If you’re interested in learning more about EMPs and solar storms, kindly check out my book, “Disaster Preparedness for EMP Attacks and Solar Storms.” Exhaustive family preparedness information can also be found in my “Handbook to Practical Disaster Preparedness for the Family.” Finally, if you’re looking for an exciting post-apocalyptic saga, check out “The Survivalist (Frontier Justice)”.

Here are some of my favorite prepping gear

Thank you for investing your time in this article, and I sincerely hope it has provided valuable insights to strengthen your survival preparedness. As a survivalist, I make use of a variety of tools and gear, many of which have proven to be indispensable in my journey. Here, I’ve compiled a list of some of my favorite survival gear, which I believe you will find beneficial as well.

These are affiliate links, meaning if you decide to use any of them, I’ll earn a commission at no additional cost to you. However, I assure you that these recommendations come from personal experience – these are the exact tools I trust, use, and confidently recommend to everyone, including my own family.

  1. Long-Term Food Storage: ‘My Patriot Supply‘ is my top choice for emergency food supplies. Their selection caters to long-term storage needs, ensuring you’re always prepared.
  2. Water Filter: Clean, safe drinking water is a priority in any situation. This water filter has served me well, and I trust it will for you too.
  3. Versatile Cooking Solution: The Zoom Versa Cook Stove is a reliable, versatile cooking solution perfect for outdoor and survival scenarios.

I’ve compiled an extensive, frequently updated list of my top survival gear recommendations for your convenience. Equip yourself with the best and latest gear here.

Remember, true survival isn’t merely about making it through – it’s about effectively navigating and thriving in challenging circumstances. Equip yourself well, stay informed, and always be prepared.

Filed Under: Uncategorized

How To Collect Rainwater For Home Use

September 14, 2018 M.D. Creekmore

water-barrel-system-completedby Chuck H

Water has always been an afterthought for me and my prepping. It’s so easy for me to take it for granted when all I need to do is turn a faucet handle and fresh, clean water is made available. But what if the power goes down for a significant amount of time and eventually the water stations with it?

So I finally decided to store some water for just such an occasion. The most efficient way I could find to do this was by rain collection in rain barrels.  I tell the neighbors it’s for watering the garden and yes we use it for that as well. But if the SHTF I have 220 gallons of water available for my family to use.

That’s right, four 55-gallon, food-grade barrels collect rainwater. This was quite a process. I Googled it, YouTubed it, and overall did a lot of research. I combined what I thought to be the best way to do it for what I had available. The first step was to acquire the 55-gallon plastic barrels which I got from a local, large-scale food distributor.

You’d also be surprised who has these with just a simple Facebook request. You would also be wise beyond your years to purchase a bung wrench to unscrew the caps on these bad boys. It just makes life a lot easier.

fitting for barrel and rainwater catchment system

Anyhow, the barrels contained salted vodka (not any good…I tried). So I definitely needed to clean them out. It was a matter of putting some hot water and soap in them and screwing the cap back on. Then just have the kids roll it around the backyard a bunch of times, rinse, and repeat as necessary.

Once cleaned I chose to spray paint them a color similar to the siding on my house in the hopes it would blend in a little better than the bright blue plastic it was made of. After they were cleaned and painted I moved on to the deck I would build for the barrels.

I read in my research that the higher up the barrels the greater the flow of water due to an amazing scientific discovery called…gravity. So my deck would end up being high enough off the ground for me to fit a watering can or 5-gallon bucket under the spigot (about 4′ off the ground). Using treated lumber I ended up with six 4×4 posts as the legs.

They were cut to the appropriate height. Next, I used treated 2x4s and framed out the legs as you see in the pictures.

I basically framed a wall around the legs like you might frame a wall in your house (header, footer, studs, etc.). Once the frame was fixed to the legs I put the deck on which consisted of a treated piece of plywood cut to the dimensions of the frame. This is what my barrels would sit on. Since my plumbing would be under the deck I also cut a hole for each barrel to be plumbed underneath.

Building a wooden frame for water-barrels

My deck was basically complete for now, so I turned my attention to the plumbing. Now I either got extremely lucky with these four barrels or all barrels are like this, but you’ll notice that one of the bungs is threaded in the middle. A threaded PVC adapter will fit this perfectly.

I planned to store rain in my barrels upside down. Since the hole would be at the bottom of the barrel I was all but assured every last drop of water from the barrels. Water will naturally self-level itself so by plumbing all of the barrels underneath the water would enter the first barrel (from the downspout) go to the bottom of the barrel and into the PVC pipes and then rise up into the other barrels.

That is how I planned to fill all of the barrels without extra holes in the top, just let water and gravity do the work for you. It is VERY important that you dry fit all pipes before permanently affixing them to the barrel and each other. So I set my barrels upside down on the deck and began measuring and cutting the PVC pipes.

I planned for a shutoff valve at each barrel and another at the spigot (5 total) in case anything needed replacing or isolation it would be easier to shut off the water from that barrel. Once everything was dry-fitted I used some clear, silicone caulking and applied it liberally to the two bungs in the bottom of the barrel.

This is where the bung wrench comes in handy to tighten the bungs completely. Next, I applied the same caulking to the PVC adapter that conveniently threaded inside the one bung. I tightened it all the way thus making a leak-proof seal on all my barrels. I waited to permanently affix the plumbing until everything was in place. So now I had to prepare my yard for the deck and barrels.

preparing the ground for rainwater catchment home use

With the help of my wonderful wife, we dug up the sod in the backyard closest to the downspout we wanted to use. We dug a 32” x 115” section of the sod out, about 4” deep, and filled it with crushed rock. Here is where the hardest part of the project comes in.

Using an 8” x 8” tamper I tamped down all of the crushed rock making it about the density of cured concrete. Next, I placed six concrete piers on the crushed rock and, with the help of a friend, set the deck in the piers.
It was time to put the plumbing together permanently. I sanded the rough edges off the cut ends of the PVC pipe and applied the purple primer to the end of the pipe and inside the pipe, I would attach to.

I went a little farther up the pipe with the primer than what I would need so it would be a complete seal. After applying the primer I put PVC cement on the purple primer. Then you push the pipe in the adapter and twist a quarter turn. Hold this in place for 30 seconds and then test your work.

This “twist and hold” method is really important because you’ll notice the pipe wanting to push out of the adapter if not held in place. When done correctly it will be pretty solid. Once I plumbed everything together I used metal, nail-on straps to hold them in place (especially at the spigot). I also angled the spigot down a bit to make sure water wouldn’t sit in one place forever.

Now that the barrels were in place and the plumbing secured I built a small fence around the barrels. If you haven’t noticed by now I did a lot of overkill. The decking, the crushed rock, the concrete piers, etc. I wanted to make sure this much weight would hold (220 gallons of water weighs almost a ton!). So the fence keeps the barrels from blowing off the deck when empty.

At this point, I’m almost finished with the project. I used flexible downspout extenders to route the water from the downspout to the top of the far right barrel. Then another flexible downspout was used as an overflow.

finshing the platform for rainwater system

I put them in place and traced around the end where it met the barrel on one end and the downspout from the house on the other end. I cut the barrel and downspout and installed the flexible downspout to the top of the barrel and the downspout from the house.

Since mosquitos love standing water I placed a cut section of window screen around the opening in the barrel (sealed around the edges with the leak-proof caulking mentioned earlier) and around the end of the flexible downspout (attached with an adjustable ring used for dryer vents) to catch particles that washed off the roof. Now water will enter my barrels!

As I mentioned I did a lot of research before attempting this project. Part of that research mentioned drilling a small hole in the top of the barrels because of pressure that may build up in them would reduce the flow of water. I was skeptical about this but it didn’t hurt to drill a small hole in each and place more window screen over them. I sealed these with the same caulking.

The overflow spout is a necessary part of the project. If the barrels continued to fill past capacity then the plumbing could be damaged and that would be a nightmare. So at the very top of the same barrel the water entered, I measured and cut a hole to install another flexible downspout that would return to the original downspout from the house and flow away from the house.

This part was tricky because I wanted a watertight fit and not to have water spilling out of the hole down the barrel and all over the deck/ground. So I got a large diameter PVC adapter and put it in the hole I had cut. I made it watertight using a metal flange and some all-purpose bondo to seal it to the barrel.

Now the flexible downspout fits perfectly around the PVC adapter and overflows to the original downspout on the house and away from the house.

water catchment system for home use
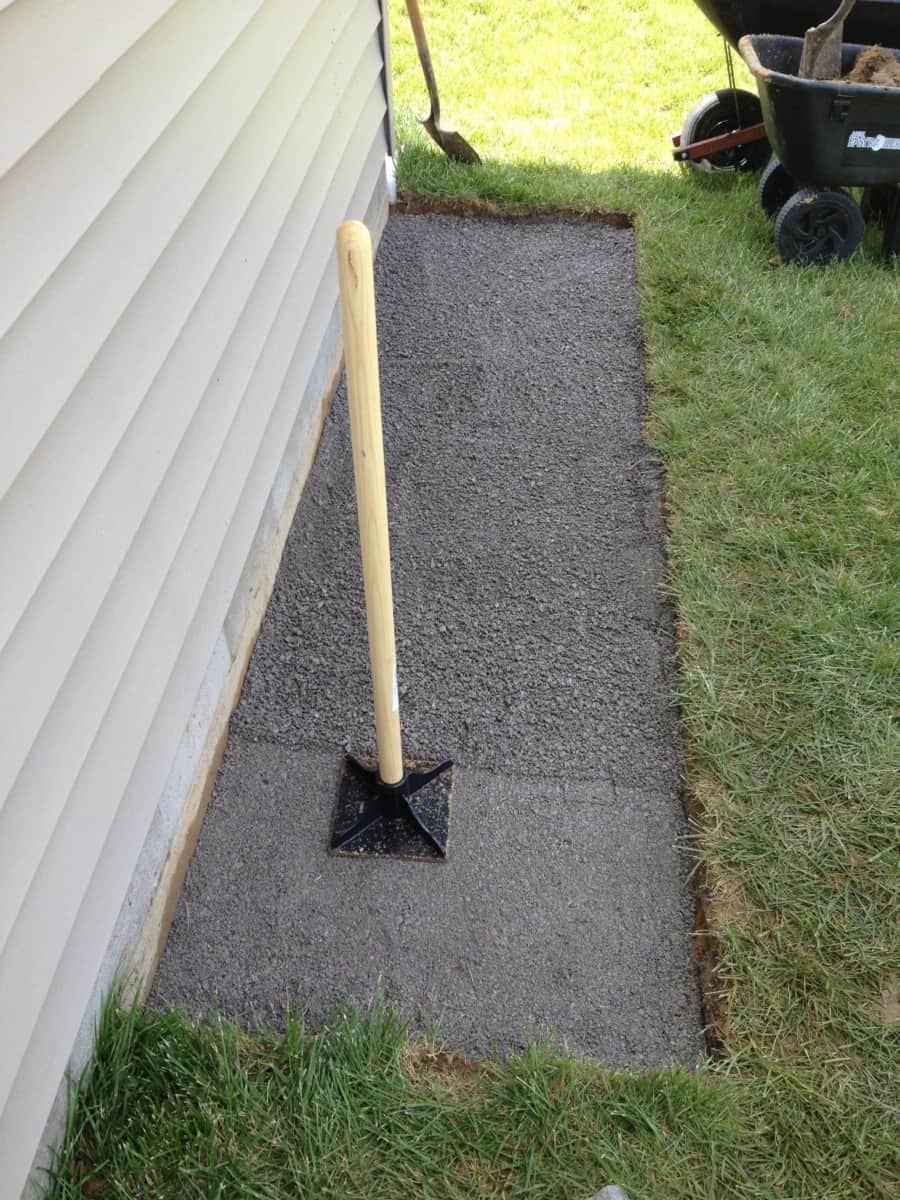
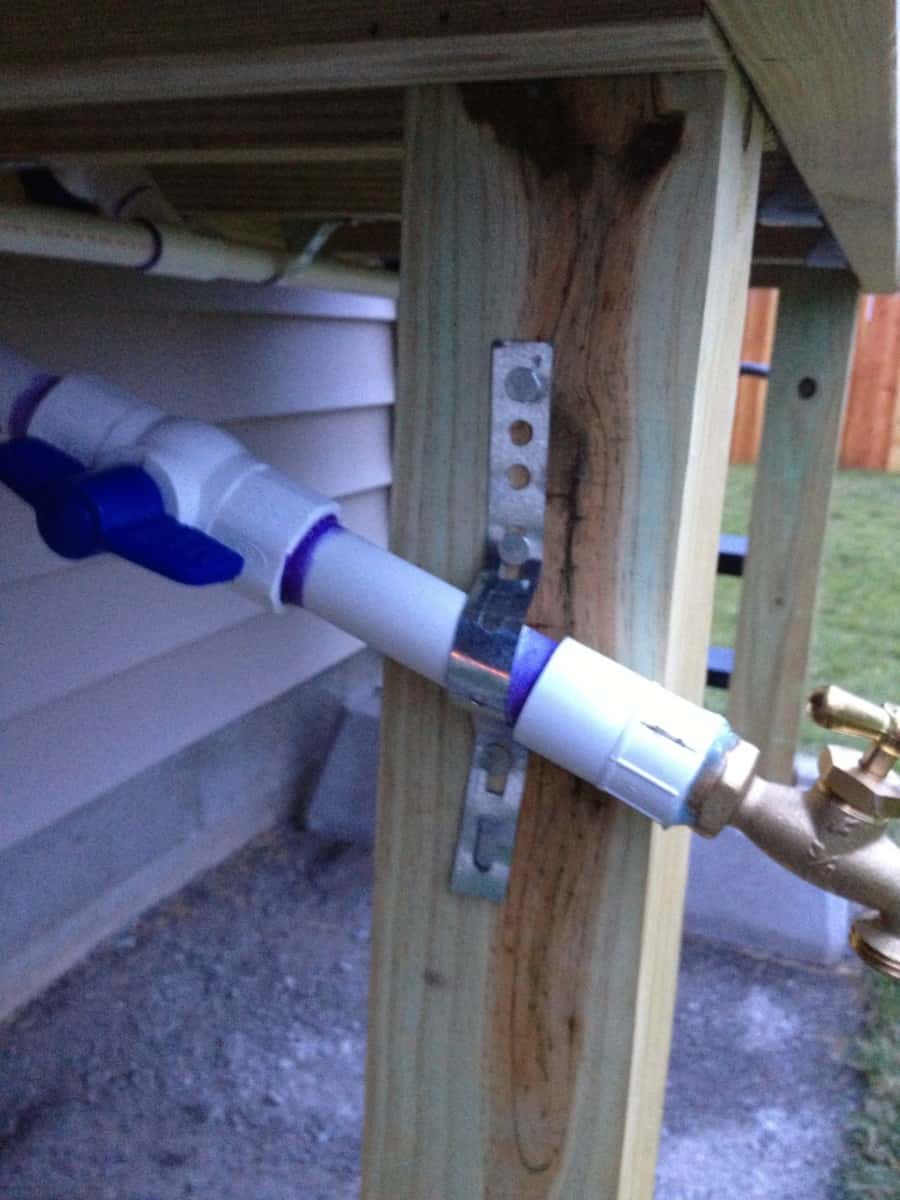
I failed to mention that I also have a small retention basin in my backyard. I drain the barrels before winter so they won’t turn into huge ice chunks. The plan is to use water from the retention basin during the winter if needed. While doing my research I read that rainwater off a roof is not potable.

So if the need arises we will be filtering and boiling any water used from the barrels (and retention basin for that matter). Also during the winter, I take the piece of the downspout from the house that I removed and put a couple adapters on each end, remove the flexible downspouts from the barrels, and place the original downspout back in place. This allows melting snow to flow through the downspout like it’s supposed to.

When spring rolls around I just switch back to my flexible downspouts and I’m refilling the barrels with May showers. It took about 2-3 days to finish the project, a little bit of sweat, and a lot of cuss words, but it was finished. What I like most about the rain barrels is the capability to have 220 gallons of water available to me at almost any time.

A body can survive longer without food than without water so knowing we have this stored away gives me peace of mind. In the meantime, my garden loves the water and occasionally my lawn does too. It’s tucked away behind my house and not many people know it’s there.

You could add some lattice fence-work around the deck frame to hide it even more if privacy is a concern for you.

Hopefully, you’ve learned a little bit about how to make a rain barrel system and its benefits. And that’s really what this blog is all about… learning new things to help us stay prepared.

Filed Under: Homesteading

  • « Go to Previous Page
  • Page 1
  • Interim pages omitted …
  • Page 64
  • Page 65
  • Page 66
  • Page 67
  • Page 68
  • Interim pages omitted …
  • Page 79
  • Go to Next Page »

Primary Sidebar

Subscribe to Blog via Email

Enter your email address to subscribe to this blog and receive notifications of new posts by email.

Join 7,202 other subscribers
  • Amazon
  • Facebook
  • Substack
  • Twitter
  • YouTube

“Do more with less.”

– Minimalist proverb

Recent Posts

  • Just so you know
  • Weather Update for My Corner of Appalachia
  • Why I’m Ordering Ivermectin + Mebendazole Every Year
  • The Website’s Shutting Down (But Here’s the Plan)
  • You Are Hated! Start Training Like It!

Footer

Recent Posts

  • Just so you know
  • Weather Update for My Corner of Appalachia
  • Why I’m Ordering Ivermectin + Mebendazole Every Year
  • The Website’s Shutting Down (But Here’s the Plan)
  • You Are Hated! Start Training Like It!

More about me

Books I’ve written

Books I’ve read

Follow Me on YouTube

Follow Me on Facebook

Gear I Use and Recommend

Newsletter

Search this site

Follow me elsewhere

  • Amazon
  • Facebook
  • Substack
  • Twitter
  • YouTube

© 2008–2025 M.D. Creekmore · As an Amazon Associate, I earn from qualifying purchases.