• Skip to main content
  • Skip to secondary navigation
  • Skip to primary sidebar
  • Skip to footer

M.D. CREEKMORE

  • Blog
  • Books
  • Newsletter
  • Gear I Use
  • About
  • Contact
  • Facebook
  • YouTube
  • Blog
  • Books
  • Newsletter
  • Gear I Use
  • About
  • Contact
  • Privacy Policy

Blog

What Is The Best Home Defense Weapon That Isn’t A Gun?

November 11, 2018 Jesse Mathewson


Open-ended questions like these are often answered using personal experience or second-hand chatter. What is often ignored are the actual studies and verified results coming from these studies. For instance in the United States did you know that while Bear Spray (somewhat more elevated approach to pepper spray) works very well on animal encounters while similar products are less likely to have an immediate stopping effect on humans? (Smith, et al. 2006) (Vesaluoma, et al. 2000) Facts matter when it comes to self-defense of any type.

What I hope to give you with this article is a compilation of data that shows enough for you to make appropriate decisions regarding your defense of self and family. The best defense is avoidance of potential harm through better life decisions and practices.

An indisputable reality is that those who seek war will find it, and those who seek peace will also find it. Lastly, training is inherently necessary with any form of defense and or tool used in said defense. Without training, any tool used in defense is as useful as a brick sitting on the ground. With the preaching out of the way, its time to look at what is the best non-firearm home defense weapon!

Non-firearm defensive implements take many forms. Some of the more popular are as follows, in no particular order.

  • Blades (knives, swords, and farm or working implements with blades)
  • Chemical repellents (oleoresin capsicum otherwise known as OC spray or pepper spray through hairspray and even ammonia in bottles as suggested by some misguided individuals.)
  • Taser-type devices (tasers, stun guns, cattle prods, and spring or air powered electric prong launchers)
  • Bludgeoning tools (bats both cricket and American ball bats, rocks, bricks, anything that can be held in your hand and used to bludgeon an animal or individual who may be attacking you)
  • Walking aids and support material (canes, walking sticks, umbrellas and or walkers etc.,)

When you are in the home what is your plan of defense and approach to safety? Do you have plans in place with alternative meeting locations for all individuals in your house and immediate family group? Do you know what you will do in case of a fire? Have you made plans and practiced them with regards to potential home invasion by armed assailants?

best-self-defense-weapons-that-not-a-gun

It has been established that armed home invasions while relatively small in number compared to other crimes are still a large enough risk that if you practice fire drills than you should also be practicing home invasion drills. It is essential to understand that there is no glory in battling from room to room with individuals regardless of situation when your family is also involved.

In fact, while it may seem a bit cowardly it is the more intelligent thing to avoid this and barricade yourselves into rooms resorting to using of armed defense only when directly threatened.

Obviously, if you live in a rural area and have no backup from emergency responders or neighbors within a reasonable distance and time frame, in this case, it would be important to have studied how to repel individuals intent on harming you and yours. It is still the best approach to barricade yourself and loved ones and defend from a secure position.

Hunting the intruders is pure Hollywood and will only get you or those you love harmed physically or otherwise. I for one would rather my children never have to take a human life or witness its occurrence. Use of less than lethal tools for defense allows for a solution that while not always immediately effective reduces these issues. It should be noted that firearms are not immediately effective either.

Use of bladed tools for defense is hotly contested by many countries and in many states within the United States. Regulations on length and type of bladed tool are important to know for your individual location.

Where I happen to reside blades are relatively unregulated and I am able to own virtually any type of bladed weapon and even use them in defensive situations. However, the same legal implications apply with the use of a bladed tool and a firearm as both are seen as deadly weapons in the eyes of the law regardless of where you live.

Be very careful about the laws and take the time to review recent cases where blades may have been used defensively in your residential area (country, state or social area).

Using a blade takes a substantial amount of training to be effective with, however, due to the alternative uses for blades as utility tools they can be easily carried, procured and kept around. With this one, I definitely suggest training from someone who has a proven background in use of these tools (i.e. Ghurka) or in the Filipino art of Arnis/Escrima/Kali or similar Filipino bladed martial art as these are widely considered the best for self-defense and modern combat approaches. (Wagner, 2014)(Alonso, 2010) There are several extremely solid schools where you can train over the course of a 2 or 4-day seminar and learn enough to practice and have a good footing for future use. As with all things related to personal safety continued training is an essential component.

Chemical repellents have been shown to be somewhat more effective when employed properly. Meaning directly to the eyes and face of the assailant or assailants. It should be noted that in many tests with products and individuals over the years these sprays have had less than stellar results, some uses ending in harm coming to the person using the spray due to it simply not working at the time.

There have also been deaths related to use of OC and other similar sprays. (U.S. Dept of Justice, 2003) There is a relatively high failure rate of the spray canisters themselves to function. These devices are not legal and are outright banned in many locations around the globe. I disagree with the reasoning behind these decisions made by governments, however, they exist so make sure you understand the local laws!


As for overall effectiveness, OC spray ends up being about 85% effective per several studies, when used properly. (Kaminski, Robert et al. 1999) I would suggest training with one and even being sprayed if possible so that you understand exactly how this spray works and can better use it or avoid the use of it when needed.

Lastly, make sure you get a solid version and do not settle for inexpensive knockoffs as this will simply lower the effectiveness with these tools.

These are tools that absolutely require a higher level of quality control from the factory and result in a higher price as well. One last consideration with these devices, OC spray regardless concentration can cause or significantly contribute to difficulty breathing which with already impaired individuals (asthmatics, obese individuals and similar) can and has lead to death as shown above.

SABRE Red is one of the most effective and is used by many police departments across the United States – check current price and availability at Amazon.com…

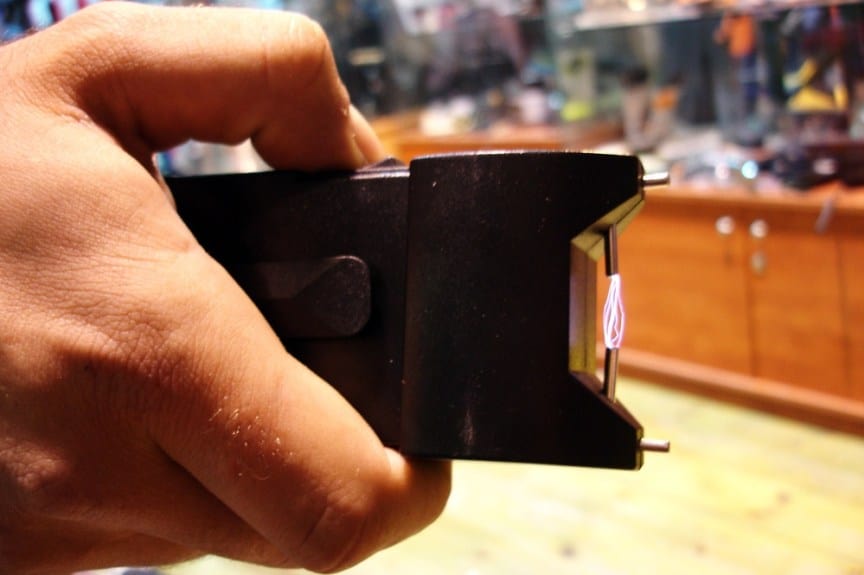
Taser devices work well in some scenarios also and do take somewhat less training to operate, though as with everything I do suggest practicing with your chosen tool. When it comes to taser type devices there are only a few types I can recommend as I have had numerous types used on myself and personally can attest that the vast majority of the low-cost noise makers hawked by unscrupulous individuals at local gun shows and even gun shops rarely function well.

The only versions I have used that functioned well every time contact was made are the Vipertek brand and Taser-brand stun guns. Vipertek is quite a bit less expensive than Taser with the trade-off being that Vipertek products require you to directly contact the assailant with the device while Taser offers this ability, as well as use as a standoff weapon through gas, propelled electrical leads. Both devices work quite well with human assailants when employed properly!

There are other brands out there, Sabre and Ruger both made forays into the stun gun market, my experiences with these are no different than my experience with off-brand versions. They are more gimmick than function in my strict opinion.

Stun guns may also result in unintentional death though the risk is relatively low compared to the overall use of said products. Again as with all other defensive tools, make sure you know the local rules and regulations attached. Good stun guns work well, again make sure you practice use of these and if possible test them on yourself so that you are able to better understand the effect. Practice, train and practice more!

Bludgeoning implements are the last segment we will look at for non-firearm based defensive tools. I will be including canes, walking sticks and umbrellas into this area simply because legally in some locations they are seen in the same light when used as a ‘weapon”.

Again with these make sure you know local laws, for instance in most areas around the world use of police batons and nun-chucks are banned for use as a defensive tool. However, some areas allow the use of expandable batons and other similar tools for defensive purposes. Again, you will want to have some training.

I highly recommend Filipino martial arts in this arena as they are unparalleled in the implementation of beneficial combative approaches utilizing batons and knives.

What is the best self-defense weapon that isn't a gun

There are several approaches to using a cane, walking stick and even your umbrella as a defensive tool as well. It is relatively easy with training to use the extra leverage a cane or stick can offer to gain the upper hand in a situation requiring self-defense.

There have been several news stories over the years of elderly women and men using canes and or purses to bludgeon their attackers forcing a retreat and defending themselves safely. As one of the individuals I worked with over the years stated, everything can be a weapon if you know where to use it best!

There are canes that are specifically made for the dual purpose of being used as a cane plus as a self-defense tool when needed like this BadAss Cane.

So to answer the original question, What is the best home defense weapon that isn’t a gun? There is no definitive best home defense weapon. Any self-defense instructor with personal integrity and ability will tell you something similar to what I will.

Use your head, avoid potentially dangerous situations and get training in solid, functional approach that allows you to best defend yourself. More importantly, remain aware of your surroundings and continually train yourself to recognize threats that may present themselves! If you have anything to add or comment on be sure to do so below in the comments!

Free the mind and the body will follow

Alonso, R. (2010). In the Stick of Things – INQUIRER.net, Philippine News for Filipinos. [online] Web.archive.org. Available at: https://web.archive.org/web/20100615170421/http://showbizandstyle.inquirer.net/sim/sim/view/20100612-275230/In-the-Stick-of-Things [Accessed 29 Jul. 2018].

Kaminski, Robert et al. (1999). Assessing the incapacitative effects of pepper spray during resistive encounters with the police. Policing: An International Journal of Police Strategies & Management. 22. 7-30. 10.1108/13639519910257801.

Smith, T. et al. (2006). Efficacy of Bear Deterrent Spray in Alaska. [online] Wdfw.wa.gov. Available at: https://wdfw.wa.gov/hunting/bear_cougar/bear/files/JWM_BearSprayAlaska.pdf [Accessed 29 Jul. 2018].

U.S. Dept of Justice (2003). The Effectiveness and Safety of Pepper Spray. [online] Ncjrs.gov. Available at: https://www.ncjrs.gov/pdffiles1/nij/195739.pdf [Accessed 29 Jul. 2018].

Vesaluoma, M. et al. (2000). Effects of Oleoresin Capsicum Pepper Spray on Human Corneal Morphology and Sensitivity. [online] Iovs.arvojournals.org. Available at: https://iovs.arvojournals.org/article.aspx?articleid=2123766 [Accessed 29 Jul. 2018].

Wagner, J. (2014). Filipino Kali is Alive and Well in Today’s Police and Military Training – USAdojo.com. [online] USAdojo.com. Available at: https://www.usadojo.com/filipino-kali-is-alive-and-well-in-todays-police-and-military-training/ [Accessed 29 Jul. 2018].

Filed Under: Security

Must Have Items for Your Car Emergency Kit (A Checklist)

November 11, 2018 M.D. Creekmore

Must Have Items for Your Car Emergency Kit (A Checklist)

Most of us spend a lot of time in our cars, and I feel that it’s necessary to have an emergency auto kit aka auto survival kit in every automobile we drive in addition to our every day carry kits (EDC) and concealed carry handguns.

A handgun won’t be of much use when you need to change a tire, get you unstuck, or change a burnt-out fuse for a new one so that you can get your lights or wipers working and get back on the road and to your intended location.

One of the worst on the road breakdowns that I can remember is having a flat tire in winter with the temperature setting right a freezing with a mixture of freezing rain and sleet pouring down as I changed the tire.

By the time I had finished loosening the lugnuts, jacking up the car, finishing taking off the lug nuts, and then removing the flat tire, and putting the inflated spare tire on and snugging the lug nuts, unjacking and then finished tightening the lug nuts. I was soaked through and miserably cold.

It was, an awful (and dangerous with all the ice and uneven footing) experience… mainly because that happened years ago and I wasn’t properly prepared and didn’t have anything but a jack and spare tire.

Granted even now I’d not want to have to change a flat tire again in those weather conditions but even so, it would be a better experience if I do because now I’m more prepared and would at least stay dry because I have a poncho in my auto emergency kit and a change of clothes.

Below are lists of items for two different kits: the deluxe and basic. Choose the one that best fits your needs and budget also feel free to modify the contents list below to match your location and personal driving habits.

Basic Auto Preparedness KIT

❏ Duct tape
❏ EDC kit (your phone, knife, handgun, lighter etc.)
❏ Fire extinguisher
❏ First aid kit
❏ Fix-a-Flat
❏ Folding shovel (I love this one that’s on Amazon.com)
❏ Hand cleaner, waterless (e.g., GoJo)
❏ Jack and lug wrench
❏ Jumper cables
❏ Spare tire
❏ Toilet paper
❏ Water (drinking), 1 gallon

Deluxe Auto Preparedness KIT

❏ Change of clothes, depending on the season
❏ Rain Poncho
❏ Duct tape
❏ EDC kit (your phone, knife, handgun, lighter etc.)
❏ Energy bars or similar food
❏ Fire extinguisher
❏ First aid kit
❏ Fix-a-Flat can
❏ Flashlight and extra batteries
❏ Folding shovel (I love this one that’s on Amazon.com)
❏ Fuses for your vehicle
❏ Hand cleaner, waterless (e.g., GoJo)
❏ Hose clamps
❏ Ice scraper
❏ Jack and lug wrench
❏ Jumper cables
❏ Light sticks, two or three are enough
❏ Matches
❏ Motor oil, windshield washer fluid, engine coolant; 1 gallon each
❏ Road flares
❏ Sleeping bag or wool blanket (weight appropriate for the season)
❏ Socket set
❏ Spare tire
❏ 12-volt portable air compressor
❏ Special needs items: prescription medications, eyeglasses, hearing aid batteries, and items for infants if applicable (e.g., formula, diapers, bottles, pacifiers)
❏ Tire chains for snowy climates
❏ Tire plug kit (this one on Amazon.com is nice)
❏ Toilet paper
❏ Tools: flat-head and Phillip’s head screwdrivers, pliers, vise grips, and adjustable wrench
❏ Tow chain or rope
❏ Water (for drinking), 1 gallon
❏ Whistle
❏ Wire

Finding a place to store all of this gear inside your vehicle yet out-of-the-way can be a bit tricky depending on the type of automobile. My truck is a double cab with several different storage compartments including storage areas under and behind the seats, so it’s just a matter of placing items where they will fit (and remembering where each item is so I can get to it quickly if needed).

If you drive a car with a trunk then it’s easy… just organize everything neatly in a plastic tote (get one with a tight-fitting lid and preferably one that locks down) and secure it in the trunk of your car.

Vehicle Safety Tips (from ready.gov)

  • Keep your gas tank full in case of evacuation or power outages. A full tank will also keep the fuel line from freezing
  • Install good winter tires and ensure they have adequate tread or any jurisdiction-required chains or studs
  • Do not drive through flooded areas. Six inches of water can cause a vehicle to lose control or possibly stall. A foot of water will float many cars.
  • Be aware of areas where floodwaters have receded. Roads may have weakened and could collapse under the weight of a car.
  • If a power line falls on your car you are at risk of electrical shock, stay inside until a trained person removes the wire.
  • If there is an explosion or other factors that make it difficult to control the vehicle, pull over, stop the car and set the parking brake.
  • If the emergency could impact the physical stability of the roadway avoid overpasses, bridges, power lines, signs, and other hazards

Also Read:

  • The Ultimate Bug Out Bag Checklist
  • Best Survival Guns for Preppers: Handguns, Shotguns, and Rifles

Well, folks, that’s it. If you have any questions, comments, and or suggestions then please post those in the comments section below…

Filed Under: Bugging Out

What is The Best Long Term Survival Foods?

November 6, 2018 M.D. Creekmore

Whether you are looking to be better prepared for a general short-term emergency like an extreme weather event or something more long-term such as an economic collapse or civil unrest it’s important to have a sufficient food stockpile so that you can fulfill your nutritional needs until the threat has passed or until you can start producing your own food by gardening and foraging for example.

But what is the best long term survival food? And the answer is foods that will store for well for two or more years and that you normally eat. For example most store bought canned foods have a shelf-life of several years (or even decades), as long as the cans aren’t rusted through or dented and leaking and the contents smell and look fresh then it’s still good to eat. However, if you want to prepare your long term survival foods from basic foods that also have a very long and stable storage life then consider foods such as wheat (or other grains, for those who have trouble digesting gluten), rice, beans, oats, corn, salt, honey, cooking oil and powdered milk.

Storing enough food to survive, unassisted and on your own for three to six months or even a full year or maybe even longer is a daunting prospect and the thought is enough to cause most people to get overwhelmed and some give up altogether.

And while I agree that storing and rotating such a large amount of food on a continuing basis can be a lot of work and takes dedication, it is by no means impossible, and if done right can even be enjoyable – just follow the food storage list below but remembers that this list isn’t set in stone, and neither is anything else in this article. This information is meant to help guide you and to give you some ideas but in the end the best long term food storage needs to be tailored to your personal needs and what you like to eat.

Prepper's Printable Food Storage Checklist
Prepper’s Printable Food Storage Checklist (Click Here For PDF)

Hard Red Winter Wheat

This is the backbone of your survival diet.

Wheat is nature’s longest storing seed, with an indefinite shelf life given proper storage conditions. The wheat (and other grains) can also be sprouted, adding fresh greens to the diet even in winter.

White and Brown Rice

Rice is my favorite storage foods and I actually prefer rice over wheat for storage, but that’s a personal decision, and well I like rice and rice dishes. White rice stores better and has a longer shelf-life than brown rice; however brown rice has more nutritional value.

Despite the trade off in storage duration, I still prefer brown rice for storage because of the added nutritional value.

Pinto Beans

Beans, corn, and rice combined make a complete food, providing just about everything you need to survive. Add some fresh green sprouts or garden produce and extra vitamin C just to be sure you’re getting enough to avoid scurvy, and you’ll be well fed and healthy.

I like to store a combination of pinto beans, black beans, and mung beans. How much you store of each will depend on your personal preferences to taste.

Oats

Don’t go overboard when storing oats, about 20 pounds per adult per year is plenty. Oats have a storage life of approximately four to six years, depending on storage conditions and whether or not they have been opened after being packaged for long-term storage.

Whole Corn

Corn equals cornmeal, cornbread, cornmeal mush, corn cakes, and a huge list of other foods that you can prepare using the seed. I store whole corn because it stores much better and with at least double the shelf-like of cracked corn.

Salt

While not a food but a mineral, salt, is none the less essential to the diet and individual health. Salt is also used in the preservation of food and animal products. Salt, like wheat, has an indefinite shelf life. Store at least 10 pounds of iodized salt per person, per year.

It’s also a good idea to stock up on salt blocks to attract game animals for future harvesting. You can find these in the sporting goods stores and other outlets that sell to hunters. You can also get these through your local farmer’s co-op, where they sell them for domestic livestock supplementation.

Honey or Sugar

As a sweetener honey makes an unequaled contribution to the diet. Honey, like wheat and salt, has an indefinite shelf-life. Store at least 10 pounds per person. If the honey hardens and crystallizes, heat it slowly in a double boiler to reconstitute.

Cooking Oil

There is some controversy as to which is best for storage in the preppers pantry, vegetable oil or olive oil, while both will work fine and you should stock up on the one that you like best. I recommend putting away, 10 quarts, per person, per year.

Powdered Milk

Most people turn their nose at the thought of powdered milk, preferring whole milk from the supermarket shelf. Granted it does have a slightly different taste, but it’s not unpleasant to drink, and after a week or two it seems to “grow” on you. Studies have shown that nonfat powdered milk, when packaged (nitrogen-packed) and stored properly has a storage life of 20 years or more.

Freeze Dried Foods

I prefer to buy those hard-to-store long-term items like powdered milk, dry margarine, butter powder, buttermilk powder, cheese powder, shortening, and powdered eggs pre-packaged for long-term storage in #10 metal cans, from Augason Farms or other reputable survival food vendors.

Supermarket Canned Foods

Canned foods from the supermarket have many advantages when it comes to food storage, they have a decent shelf-life on average of 2-5 years for most products, (note: shelf-life means that the foods retain 100% of their listed original nutritional value up until that point – store bought canned foods remain edible, far past the listed expiration dates in most cases).

As long as the cans aren’t bulging, rusted through or punctured and the foods smell fresh, upon opening then I would not hesitate to eat canned goods that are far past their listed expiration date. But that is a personal choice and one you’ll have to make yourself when the decision is needed.

Store bought canned foods have several advantages over freeze-dried or dehydrated foods, including cost and calories contained per serving. Another advantage is that canned foods already have their own water supply for preparation, so there is no need to use any potable water from your storage.

Despite the advantages of canned foods over freeze-dried and dehydrated foods, canned goods do have some disadvantages in comparison, like, weight, space needed for storage, and shelf-life.

I like to include a combination of the basic foods like wheat, rice, and beans, store-bought canned foods and certain “packaged for long-term storage” foods that are hard to store like powdered milk from one of the reputable survival food vendors…

All canned foods should be dated using a permanent marker and rotated on a FIFO (first-in-first-out) basis. I suggest that you build a rotating canned food shelf that will automatically rotate your canned foods when added and pulled off the shelf.

Always keep a notepad beside the shelf or in your kitchen, and write down every item that you take from the shelf and then take the note with you on your next trip to the supermarket, and then buy and restock the items that you’ve taken from the shelf, that way you always have a fully stocked shelf and a fresh supply.

Please read this article to see how long canned foods can last in storage before going bad…

Don’t Forget the Can Opener

Sure you could use a knife, but a manual can opener is easier and safer – so whatever else you do, don’t forget the can opener. Buy several or the strongest made ones that you can find.

Other Foods to Add to Your Food List

After you get the basic foods listed above in the needed proportions (see below), it is a simple matter to add other foods as you get the extra money.

Canned meats: We all know that SPAM is the preppers go to for a cheap “meat” source that has a longer than average shelf-life, and fat content. Canned hams, tuna, salmon, chicken, and turkey are all welcome additions in my pantry shelf – stock-up on the meats that your family normally eat and date and rotate just as you would any other canned food.

White flour: White flour from the store has a much longer shelf-life than does whole wheat flour because it has been “processed” which removes the oily germ, but unfortunately this “processing also removes the nutrition.

Processed white flour has a shelf-life of over five years if kept dry and safe from pests (like the meal moth). Mill moths get into the flour, lay eggs and those eggs turn into flour weevils, which ruin the flour. Look for tiny dark specks in the flour, as this is the first sign that the flour has been infested.

If it clumps together because of settling, just break it apart and run it through a sifter before use.

Store flour for long-term storage in airtight containers, with oxygen absorbers, added – see details below. You can also freeze flour that has been put into five-gallon buckets. Freezing will also kill any meal moths that happen to have been trapped inside before they can do any damage to your flour.

Most of my “flour” is in the form of whole wheat berries, that I have to mill (grind) before use, but I do have some processed flour in my pantry, for lazy days when I don’t feel like grinding whole wheat into usable flour.

Peanut butter: Peanut butter is a good source of fat and calories and has a decent shelf-life. Peanut butter is also an energy food and one that I always take on hunting and camping trips. Unopened peanut butter will last for years.

Spices: Be sure to include a good selection of spices in your food storage. Spices can make even the most awkward foods palatable, and help to alleviate food boredom. Cinnamon, Turmeric, Paprika, Ginger, Oregano, and Garlic are my favorites and make up the bulk of the spices in my pantry.

Baking powder, baking soda, and yeast: Baking powder, baking soda, and yeast (keep yeast frozen to extend shelf-life) are also essential since you’re storing and baking using unprocessed grains.

Dried pasta: Dried pasta will keep indefinitely if kept dry in bug and rodent proof containers.

Comfort Foods

Storing a sufficient amount of “comfort foods” is very important, to your psychological well-being as well as to alleviate “food-boredom” that is sure to set in after eating only storage foods for several months. Comfort foods are even more important if you have children or need to care for the elderly.

Consider comfort foods such as – Jell-O, instant pudding mix, cake mix, hard candies, chewing gum, Spaghettios, mac and cheese, brownie mix, canned spaghetti and meatballs, mashed potatoes, popcorn, cocoa, tea, coffee, powdered juice mixes, sunflower seeds etc. And remember to date and rotate on a FIFO basis.

We crave variety and having a supply of familiar comfort foods can go a long way toward retaining our sanity and self-worth during a long-term disaster. You can only deny yourself for so long before desperation and depression start to set in. Life will be difficult enough – give yourself a treat. You deserve it.

It is a proven fact that if we are forced to eat foods we don’t want or the same foods for extended periods – just to stay alive – dissociation begins to set in. We begin to float away as an escape – we still eat to stay alive, but suffer a lack of focus and become disoriented in relation to our surroundings.

This is dangerous in a survival setting. Don’t think it can happen? Try eating nothing but beans and rice for three months and you’ll see what I mean. Having a supply of comfort foods can help by providing at least some form of normalcy to your life.

Older folks and children will have the hardest time adjusting to new or unfamiliar foods, with many refusing to eat altogether, especially if the food is unnecessarily bland or unappetizing. Comfort foods will help them cope.

Food Storage Shelf Life (printable chart)

Food Storage Shelf Life (printable chart)

Vitamins and Supplements

To ensure that you’re getting a sufficient amount of needed daily vitamins and minerals for optimum health, you need to stockpile a good multi-vitamin and mineral supplement. Also, consider extra vitamin C and D. Vitamin D is of extra importance if you’re forced to stay inside (bugging in) for a longer than normal period of time and thus are unable to receive the needed vitamin D producing sunlight that is required for optimal health.

Don’t Forget About Your Pets

prepping for pets
She likes to watch the chickens…

Don’t forget to include a sufficient amount of food in your stockpile to feed your pets. A decent dog will increase your chances of survival because they can hunt and alert you to trespassers and other trouble. I prefer smaller dual-purpose breeds, with my choice for a working dog being the Jack Russell terrier.

Three Month Food Storage List for One Adult

  • Wheat 75 Pounds
  • Grains, rice, oats etc. 25 Pounds
  • Canned meats 5 Pounds
  • Canned margarine, powdered eggs etc. 2 Pounds
  • Dried beans, peas, lentils, etc., 6 Pounds
  • Dried fruit juice and concentrates 6 Pounds
  • Dried fruits or canned 25 Pound (if dried, then equal to this fresh weight
  • Comfort foods 3 Pounds
  • Non-fat dried milk 25 pounds
  • Peanut butter or substitute protein/fat source 3 pounds
  • Dried potatoes 12 pounds (equal to this fresh weight)
  • Salt 2 pounds
  • Shortening oils 3 quarts
  • Sugar or honey 12 pounds
  • Canned or dried vegetables 9 pounds (if dried, then equal to this fresh weight)

Please bear in mind that the above list is only a sample to help you get started, the most useful food storage list is the one that you put together yourself. After all who knows better than you, what you and your family, like to eat and in what amounts.

Where to Put All this Food?

After reading the above recommendations, you’re probably asking yourself where in the heck, you’re going to store all of this food. Well, that’s a good question and one that you alone can answer for your situation better than anyone else, but I’ll make a few suggestions that I hope will point you in the right direction.

The absolute best place in an underground bunker, root cellar or basement, unfortunately, most people don’t have any of those and have to make due with other less ideal storage options… Consider a spare bedroom, attached garage, detached storage building on your property, or as a last-resort a nearby storage unit rental.

If at all possible put in an underground storage area of some sort to keep you storage foods safe (and you) safe from weather extremes, as well as the main enemy of your food-storage shelf-life; heat. An excellent option, and inexpensive when compared to other suitable alternatives are the buried shipping container.

Long-Term Storage with Oxygen Absorber and Mylar Bags

I store all my grains, beans and other dry foods (besides sugar, salt or sprouting seeds) inside food-grade five-gallon plastic buckets. There is some controversy over what is and isn’t food grade. Most buckets with #2 inside a small triangle on the bottom are food grade, but not all – the only way to be reasonably certain is to contact the manufacturer and ask.

I buy mine from the local hardware store in the paint department. They also have them at my Wal-Mart, but, I prefer to buy from local business owners if possible. Sometimes they can even be gotten free from bakeries and restaurants, just be sure they only held food products – not paint, chemicals or other things that can make you sick or dead.

Foods packed in oxygen don’t store as well as those in an oxygen-free atmosphere. Oxygen absorbers work by removing the air from the enclosed container, leaving an atmosphere of 99% pure nitrogen in a partial vacuum inside the buckets.

Don’t open the bag of oxygen absorbers until ready to use because they will absorb oxygen from the surrounding air and become useless. Have everything ready to go before you open the package. Any unused oxygen absorbers can be stored in a small canning jar until needed.

Be sure to have everything ready to go before you start. Line the inside of the bucket with an appropriately sized Mylar bag these will help to keep light and moisture out extending the storage life of the foods inside.

The Mylar bag also offers a layer of protection between the food and the plastic bucket, if for some reason the bucket that you’re using isn’t considered food-grade.

Pour the food into the buckets a little at a time, shaking each bucket as it is being filled to settle and distribute the contents. Fill each bucket to about ½ inch from the top and throw in one 2000 cc oxygen absorber in each five-gallon bucket of food.

Now to seal the Mylar bag – first roll the top of the bag closed on one end leaving an opening at the other and press out any air that has been trapped inside, next place a 2×4 across the top of the bucket and pull the Mylar bag over the 2×4 and seal with a clothing iron set at the highest setting in a typical ironing fashion across the board.

Quickly put the lids on each bucket and pound shut by laying the board on the top and striking with a hammer or rubber mallet. After a few hours, the absorbers will create a vacuum that will cause the lids on the buckets to “pop down” indicating a good seal and a proper atmosphere for long-term storage. Be sure to label each with date, content, and weight, written on the front with a permanent marker.

Section Two: Tools For Cooking and Processing Your Long Term Food Storage

Most homes will already have most of what you will need to process and cook the foods from your survival pantry, items such as pots, pans, and other common household kitchen utensils. So we will not get into that. What we will cover are tools that most typical kitchens do not have on hand but that are necessary for the prepper’s kitchen. So let us get started.

Choosing a Grain Mill

You need a grain mill now. Don’t put it off another day. Even one of the least expensive models would be better than not having one at all. I know many of you want the best, and that is great. Get the best if you can afford it. Just do not put it off any longer. Get a mill now. If you cannot afford one of the better models, get a cheaper one; buy two or three of the cheaper models – that way if one breaks and cannot be repaired, you will still have spares to fall back on.

This goes along with my philosophy of the rule of three. Always have at least three independent sources of any survival necessity. Never put all your eggs in one basket. Too many things can happen which will leave you with nothing, which is what we are trying to avoid by prepping in the first place.

While I cannot give recommendations on all the models currently available today (because I have not owned or used them all), I can tell you what I have and my thoughts on these which should, at least, get you started in the right direction.

I currently own four different grain mills, The Wonder Junior Deluxe Grain Mill, a Corona Landers, a Back to Basics, and a Grizzly H7775.

Wonder Junior Deluxe Grain Mill

Wonder Junior Deluxe Grain Mill

If you read my book “Dirt Cheap Survival Retreat”, then you already know that I use the Corona hand grain mill for all of my day-to-day milling. It is a strong and well-built grain mill, and for less than $75 it is hard to beat. The Mill to Table Clamping System is a very strong feature included with the Wonder Mill. However, I have never liked having to run the meal through the Corona several times to produce usable fine-enough flour for baking. That is one reason I made my homemade sifter – to speed up the process. However, it was still always necessary to run the bulk of the flour through the mill two or more times.

Since I mill grain several times per week, I needed a more efficient mill. I considered the Country Living Grain Mill but never could find enough extra change for the purchase. Therefore, I started looking for an alternative. I eventually decided to order the Wonder Mill Deluxe from www.thewondermill.com.

I have used the Wonder Mill for the past three weeks, and so far I have been extremely pleased with my new mill. In fact, I think I’ll retire the Corona and use the Wonder Mill Deluxe exclusively. Yeah, it is that good.

The Wonder Mill comes with both stone and steel grinding heads as shown in the photo above.

I love the one-piece construction of the mill and hopper. There is no separate hopper that can fall off during operation or any pins or clamps that could be lost. This is one thing I never liked about the Corona, as there were several times that the hopper fell off during aggressive cranking of the handle.

Another big improvement over most hand-operated grain mills is the double clamping system used on the Wonder Mill, which is the strongest I have ever seen on any mill. When properly clamped to the table, I had no problems with the mill moving out-of-place or coming off during grinding.

However, since all of my grinding is done in the same place, I will likely remove the clamp altogether and bolt the Wonder Mill directly to the table. This will provide the strongest possible mill to table mounting system.

Another thing I loved about the Wonder Mill is the quick change head system that allows you to easily switch from grinding dry grains, beans, and legumes to oily grains, nuts, and even coffee in just a couple of minutes. The Wonder Mill Deluxe comes with both steel and stone grinding heads, which can be changed out in less than one minute.

Here are the product specifications:

  • Weight: 10 pounds
  • Height: 12 ¾ inches (without the clamp)
  • Hopper capacity: one quart
  • Crank handle: 10 inches

Best of all, the Wonder Mill produces excellent, fine flour (with no sifting or re-grinding required). This saves a lot of time and effort. Moreover, the consistency is easily adjusted using a simple knob to adjust from pastry flour to cracked grains.

In fact, 90% of flour files through the sifter screen after the first pass through the mill. Again, this is a huge improvement over the Corona. In addition, because of the excellent bearing system (that never needs lubricating) cranking the handle is much smoother, but still requires effort.

The flour guide directs the falling flour into the catch pan or onto the screen without any mess around the milling heads or thrown flour on the table and floor. This is always been a problem with the Corona when grinding pieces of grain and flour would be thrown all over the place. One solution was to secure a plastic bag over the grinding head of the Corona to catch the flour and grain particles.

I wish that I had a Country Living Mill to compare against the Wonder Mill. I am sure there would have been some interesting findings with the comparison. The folks at WonderMill.com did perform a speed comparison between the two and according to their website: In a test performed at the Wonder Mill test kitchen, the Wonder Junior was able to grind 1 ¼ cups of flour in a single minute *80 turns* (see our video speed test). This is 65% (about 1/2 cup) more than we were able to produce with the Country Living grain mill with the same flour setting and the same amount of turns *80 turns*, and for half the price.

I know what you are thinking, it sounds great but “can it be motorized?” Yes, it can. There is a motoring pulley available that will allow you to do just that; however doing so will void the warranty. They also make a special adapter which can be used with a power drill to make grinding any grains or beans a quick and easy process.

I only grind a small amount of flour at a time (why grind more than I need?). I will not be adding a motor, but it is an option to keep in mind.

Your next question is probably going to be “what will it grind?” I have used it to grind wheat, corn, and beans. It can also grind spices, herbs, oily grains, nuts, and seeds. See WillItGrind.com for more info on what the Wonder Mill will grind.

Based on my tests, comparisons, price, and use, I give the Wonder Junior Hand Grain Mill my highest recommendation for a grain mill. If you are looking for a hand grain mill this is the one you should get.

Corona Landers Mill

It is strong, robust, well made and my second favorite grain mill. The Corona is a hand-cranked unit that uses rotating steel burrs to crack and grind corn, beans, grains, nuts, and seeds.

It is manufactured using cast-iron parts with an electro-tinned finish to guarantee a rustproof and easy to clean tool. I give it my second highest recommendation following the wonder junior hand grain mill.

Back To Basics Mill

This mill works well and is actually very easy to use. My main complaint is the small hopper that needs to be refilled after a few cranks of the handle. It is lightweight when compared to the Corona and I do not think it would stand up as well to continued usage.

Grizzly H7775 Mill

The Grizzly H7775 mill it is not my first choice but it sure beats having nothing at all. It sits low on the table, low enough that getting a large enough bowl under the head to catch the flour is difficult. I have the same problem when using the Corona. This is the main reason I use a homemade sifter to catch the grindings.

My other complaint is the small hopper, refilling it every few cranks can be an annoyance, at least for me. On the plus side, the grinder is efficient and the grinding plates are easily adjusted to the desired consistency.

While this is a good mill, it is not of the quality of the Corona; but note that it is half the price, so buying two or more is an option.

Country Living Mill

While I do not own this mill, it is given the highest recommendations by those that do. A recent advertisement proclaims: The Country Living Grain Mill is one of the highest quality grain mills ever made.  Living Grain Mill is one of those high-quality items that could be passed on to the next generation.

How to Grind Grains and Beans

When grinding, it is often necessary to regrind the grain several times before reaching the desired consistency. Some of the meal will come out perfectly fine the first time through, while other parts remain coarse and need to be reground several times.

One way to make grinding easier is to use a screen to sift out the finer flour while leaving the larger pieces of grain behind. The sifter is simply a four-sided box with sides but no top, and a bottom made of nylon window screen from the hardware store. Mine is 15″ X 12″ with sides made of a ¾ inch by 3-1/2 wood.

Cut the wood to length, and nail or screw the pieces together. Lay the screen out on a hard surface, sit the box down flat on top of the screen, and cut to fit with a utility knife. Turn the box over and tack the screen to the box with several thumbtacks or small nails to hold the screen in place.

Take all-purpose cement from the plumbing department of the hardware store, and spread generously around the rim of the over the edge of the screen, forming a permanent seal between the wood and the screen.

When grinding, place a section of newspaper under the grinder head and set the box on top. Grind as normal but after each pass through the grinder, shake the finer meal onto the newspaper and transfer into a bowl.

Pour the coarser meal back into the grinder and regrind, repeating until reaching the desired constancy. This saves running the finer meal back through the mill, making grinding easier and quicker.

How to Clean Field Run Wheat

First off, never buy “seed” grain for human consumption. Seed grain is often treated with insecticides and fungicides. Seed grain is to be planted and grown not eaten. Buy untreated whole grain sold as “feed” that is meant to be eaten.

Look for “field run grain.” It is cheaper and because of fewer processing steps, it is less likely to be infected with mold or contaminated. Field run wheat will have dirt and detritus that will need to be removed before use, but cleaning wheat is not a big deal.

First, sort the grain by laying it out on a clean surface and pick out any chunks of dirt, rocks or darker grain. After sorting, you need to wash the grain. Place the grain on a sifter or screen and pour clean water over it until the water coming out the bottom is as clean as that poured in from the top.

After cleaning the grain, you will need to dry it before grinding. Pour the grain into a strainer and set it aside for about ten minutes. After it stops dripping, spread it out on a cookie sheet about ¼ inch deep, heat in oven at 180° degrees occasionally stirring until dry. Drying usually takes about an hour. If it takes longer that’s fine; just make sure it does not burn.

Alternatively, if you prefer you can dry it outside under the sun. This is better and cheaper but is dependent on the weather and time of day and the season. Just spread the grain out in a thin layer on newspaper or other suitable material in direct sunlight. A solar oven could also be used; however, I have never tried this method myself.

Sprout Seeds for Fresh Greens All Year

Fresh sprouts are full of vitamins and minerals that aren’t readily available in the unsprouted seed. Sprouting allows you to have fresh greens even in winter and will expand the bulk of your food storage many times over without any extra expense to you.

To start sprouting, you’ll need at least one wide-mouth quart canning jar (a quart mayonnaise jar will also work) and a 6×6 inch square piece of nylon window screen or cheesecloth. Both the screen and cheesecloth are easy to cut with scissors or a sharp knife.

sprout grains for food

how to sprout grains for food

sprouting seeds and grains for food

Next, put approximately 3 to 4 ounces of wheat, alfalfa, chickpeas, lentils, mung beans, pumpkin seeds, rye, sunflower seeds, or other sprouting seed in each jar and cover the mouth with the nylon window screen. You can use a large rubber band, string, or a canning jar ring to hold the screen in place over the mouth of the jar.

Fill each jar with water to within 2 inches of the top and let stand overnight. When you get up the next morning, pour out the soak water and tilt the bottom of the jar over the sink and leave for an hour or two so the rest of the water can drain off the seeds.

After this initial soaking and draining, you’ll want to flood the jars about every four hours and then drain any excess water by tilting the jar bottom up into a bowl or sink. Repeat two to three times per day.

how to spout seed for food and survivalAt this point, you want to keep the seeds moist but not covered with water. In a few days, the seeds will begin to sprout. When the sprouts reach 1 to 2 inches in length (for most seeds), they are ready to eat. Sprouts can be eaten raw, cooked, or dried. If dried, they can be ground into flour and used for bread or other baked items.

to keep a steady supply of fresh sprouts, simply start a new jar 24 to 48 hours after the last sprout jar has finished sprouting. Repeat cycle. This is a great routine that will keep you in fresh greens year round.

And that is all there is to it. If you want to learn more about sprouting, including in-depth but simple recipes using sprouts, order a copy of The Sprouting Book by Ann Wigmore. This excellent resource is a must-have for any serious survival seed sprouter.

Warning: Even though the risk is low because sprouts can contain bacterial contamination, people with compromised immune systems (e.g., individuals with AIDS, organ transplants, undergoing chemotherapy) are advised to avoid eating them.

Cooking Tools and Related Items

Listed below are some of the best cooking stoves and related tools for preppers. I have all of these and they are all well-made and useful; however, it should be noted that you do not need to go out and buy one of each type of cooking stove. Get what is best for you in your location. For example, if you’re located far north and don’t get all that much sunshine, then you’re probably better off skipping the solar oven and purchasing an EcoZoom rocket stove.

Zoom Versa Stove

The EcoZoom rocket stove is designed to burn wood, dried biomass (plant materials and animal waste used as fuel) or charcoal,  making it a truly versatile means of cooking, especially after the lights go out and other more conventional sources of fuel (like propane) are no longer available or are in short supply

My EcoZoom rocket stove has proven to be very heat efficient. It will bring a pan of water to a rolling boil in less than two minutes and fry an egg like nobody’s business. Having a means of cooking when the power goes out should be self-explanatory. Having a cooking source that uses easy to find, renewable fuel is an extra bonus.

Camping Stove

Having a standard camping type stove on hand for emergencies is one of those common sense things to do, and most folks in the country already have one or two of these for camping purposes.

If you do not have one, go out and buy one now. A top-of-the-line model will put you back around $100 at current prices, but the cost is well worth it. In addition, do not forget to pick up some extra fuel canisters. Put back at least 24 one-pound canisters, or better yet get a hook-up that will allow the use of the larger 20-pound tanks.

Sun Oven

If you are in an area that receives a sufficient amount of sunlight, then a solar oven is must have. With a solar oven there is no need to store or scrounge for fuel, and as long as the sun is hot in the sky you will have an unlimited “fuel” source to prepare food.

The best brand and the one that I recommend is The All American Sun Oven. It is best to get the package with the accessories included in your order to avoid having to buy these later.

Folding Camp Grill

A folding camp grill is another item like the camping stove that most folks in the country already have on hand. But it is still worth mentioning. Every prepared prepper should have one of these. So if for some strange reason you do not have one, go get one as soon as possible. I bought mine at Wal-Mart in the sporting goods department for under twenty-five dollars. They also have them at Amazon.com.

Outdoor Grill / Smoker

This is another one of those items that will make like much easier at least when it comes to preparing food after a disaster or a long-term grid-down situation. I bought mine at Wal-Mart in the lawn and garden department for less than one hundred dollars. They also have them at Amazon.com.

Extra Large Stew Pot

Even if you don’t anticipate having a large group to cook for you should still have at least one large stew pot because you never know who or how many family members or close friends will show up at your door, and most of us don’t want to shoot them, so we will have to feed them. I have a Bayou Classic 7406, 6-Qt. Cast Iron Soup Pot with Cast Iron Lid, but I am afraid that even this will not be sufficient for my needs.

Food Saver Vacuum Sealer

The Food Saver Series vacuum sealer is a great little machine that can greatly increase the shelf life of products. This is a highly recommended item for preppers – check Amazon.com for the current price!

Butchering Kit

Because most preppers are “knife collectors” of sorts, we often overlook the need for a good home butchering kit. Get the very best kit that you can afford. The Outdoor Edge Game Processor PR-1 12-Piece Portable Butcher Kit with the Hard Side Carry Case is a good product – Click here to check availability and the current price on Amazon.com.

Other On-Site Resources:

  • How Much Food Should A Prepper Have?
  • 21 Point Prepper’s Checklist For Stocking Up at Walmart

RECOMMENDED BOOKS THAT DEAL WITH FOOD STORAGE

  • Layton, Peggy. Emergency Food Storage & Survival Handbook: Everything You Need to Know to Keep Your Family Safe in a Crisis. New York: Clarkson Potter/Crown Publishing, 2002.
  • Layton, Peggy, and Vicki Tate. Cookin’ with Home Storage. Self-published, 1991.

Filed Under: Featured Articles, Prepping

Cooking With A Thermos Bottle (Can It Really Be Done?)

October 21, 2018 M.D. Creekmore

cook in a Thermos bottleI first learned of Thermos cooking while reading Kurt Saxon’s The Survivor newsletter back in the late 1980s and have been using this thermal cooking method to save propane ever since. I have no way of knowing for sure, but I would estimate a savings of $40 to $50 per year from my doing this.

In a grid-down situation, using less fuel will be a top priority, and cooking with a Thermos (or other insulated vacuum bottle) will help you get the most from the smallest amount of fuel possible.

  1. All you’ll need is a small-mouth vacuum bottle (I prefer the Stanley vacuum bottle) and a funnel. Let’s take a closer look at how to cook this way.
  2. Start by preheating the vacuum bottle. Simply bring enough water to a boil to fill the bottle, screw on the cap, and set the bottle aside while you do the following steps.
  3. Heat the food in a pot on your stove until it is boiling
  4. Pour out the water used to preheat the vacuum bottle.
  5. Using your funnel so you don’t waste any, pour the boiling food into your preheated bottle, and let the heat inside finish the cooking.

That’s it . . . Simple, isn’t it? Here are several tips to make it even more energy efficient…

  • Lay the bottle on its side so the food will cook more evenly.
  • Wrap the bottle in a blanket to retain more heat.
  • I recommend a small-mouth Stanley (formerly Aladdin Stanley) bottle and not some cheap knockoff. But if you do get another type of bottle, be sure it has stainless steel insulation inside and not glass.
  • A gallon plastic bottle (e.g., milk, bleach, vegetable oil) cut in half makes an excellent free funnel. Just make sure it’s clean.
  • Shake the bottle every few hours so the contents don’t coagulate or stick to the sides.

Cooking time depends on what you are cooking, the type of insulated bottle you use, and the amount of preparation you do before adding the food to the bottle. You’ll learn by doing. But don’t get in any hurry, because your food will not burn or be overcooked.

You’re probably wondering what foods you can cook in a Thermos bottle. I cook whole-wheat breakfast cereal, steel-cut whole oats, rice, beans, lentils, and pasta. One of my favorite dishes is rice with chopped vegetables.

Thermal Cooking Without A Bottle

Thermal cooking can be done without using a vacuum bottle. This method is more convenient when cooking larger amounts of food, such as for beans. Thermal-Cooked Beans You need a large pot with a tight-fitting lid, a wool blanket, and a cooler with lid.

  • Sort and presoak beans overnight…
  • Bring the contents to a rolling boil for about 10 minutes, cover the pot with the lid, and quickly remove the pot from the heat and wrap it tightly in the wool blanket. Cover the pot completely because you don’t want any heat to escape…
  • Carefully set the wrapped pot of beans into the cooler, filling any remaining space between the cooler and blanket with the insulating material (e.g., old newspaper), and place the lid on the cooler.

Pinto beans take approximately three to five hours to cook this way.

If the beans are not done to your liking, simply reheat, rewrap, and let stand for another hour – this is also the case with thermos bottle cooking. 

Thermal cooking can be used to cook anything that you normally slow cook.

The advantages of thermal cooking are numerous: you get three hours of cooking time for only 10 minutes of fuel; food does not stick or burn if left unattended; water use is minimal because it does not boil away or need to be refilled while cooking. In short, thermal cooking is the most cost-effective and least labor-intensive method I know.

Note: Some of you may have heard about “cooler corn,” where you put raw corn on the cob in an insulated picnic-type cooler and then fill the cooler with boiling water. Then a couple of hours or so later (it keeps just right for a long time), you have corn on the cob.

The problem is that “cooler” plastics are made to take cold, not heat, and they may leach bad plasticizing chemicals into the cooking water at high temperatures. Now, if you have one of the old aluminum-lined Coleman coolers, you’re OK to cook this way.

Filed Under: Prepping

How To Make A Homemade Water Filter

October 21, 2018 M.D. Creekmore

homemade water filter girls drinkingWhen asked where they should start their survival preparations, most people answer food storage. Wrong. In fact, food isn’t even in the top three survival priorities.

The most important elements of survival are oxygen, shelter from extreme weather, and water. Depending on health, physical activity, and environment, and with limited activity, most humans can survive:

  •  Five minutes or less without oxygen
  •  10 days or fewer without water at 50°F (and even fewer as temperatures rise)
  •  Four to six weeks without food

Today’s task involves making sure your survival plan includes a reliable source of clean water. Imagine how disappointed you’d be after investing all that time and money to build your stockpile of survival food only to realize that you were about to die of dehydration because you neglected to adequately address your need for water.

Having food storage without a reliable source of clean water is like eating soup with a fork. You’re only getting some of what you need. Before getting started, a few words on terminology are in order. Sometimes the terms filtration, purification, and sterilization are used interchangeably in relation to water.

homemade water filter
This homemade water filter works as well as any commercial model and costs considerably less.

This is incorrect. Filtration removes solid matter (or in some cases emulsified liquids). Purification removes that which is not water (stuff in solution and/or emulsion). Sterilization kills microbes in the water.

The confusion of terms is understandable, as many commercial filter units also remove microbes by filtering them out, and many units include activated charcoal or other elements that both filter out solids and remove a lot of metals in solution by adsorption (as opposed to absorption).

In fact, they now have filters that are so specific and so fine they actually can filter out molecules: a “watermaker” that filters out salt from seawater would be an example. I’m a fan of the Berkey water filters. Having used a Big Berkey filter extensively for more than three years, I can personally attest to its performance.

However, a lot of people can’t or won’t spend $250 or more for a water filter no matter how critical it is to their survival. Fortunately, it isn’t difficult to make your own homemade water filter using only the Black Berkey Purification Elements and a few odds and ends you probably have lying around your house.

The total cost for such a unit at the time of this writing is less than $150, including the Black Berkey Purification Elements. Black Berkey Purification Elements can be ordered online from a number of vendors, including Amazon.com and LPC Survival (www.directive21.com), with current prices ranging from $99 to $110. I’ve found LPC Survival to be very reliable, with superfast shipping and great customer service.

WHAT YOU’LL NEED

  •  Two Black Berkey Purification Elements
  •  Two 5-gallon food-grade buckets with lids
  •  Food-grade spigot (available at most hardware stores or online; the type used for large water coolers works great)
  •  Drill with 1/2- and 3/4-inch bits

First drill two 1/2-inch holes in the bottom of one of the buckets and two 3/4-inch holes through one of the lids. The holes should be approximately 4 to 6 inches apart to facilitate changing the filters as needed. Both sets of holes in the bottom of the bucket and those in the lid should match up perfectly when mated.

preppers make a homemade water filter
Black Berkey Purification Elements secured through the bottom of the top bucket using 1/2-inch holes and supplied wingnuts. Note how the elements protrude through the bottom of the top bucket and align with the holes through the lid of the bottom bucket.

Next, drill a 3/4-inch hole in the side of the other bucket. This hole is for the spigot, so drill about 2 inches up from the bottom of the bucket. This way when it is set on a table or bench, the spigot isn’t touching the surface, where it can be damaged or broken.

homemade berkey water filter
This spigot was taken from a busted water cooler.

Install the Black Berkey Purification Elements securely through the 1/2-inch holes that you drilled in the bottom of the first bucket, using the supplied rubber washers and wingnut fasteners. Be careful not to overtighten the nuts or you could cause a leak or even break the tip of a purification element.

To use this unit, put the lid with the 1/2-inch holes on top of the bucket with the spigot and set the other bucket with the filters installed on top, aligning the holes so the Berkey filter tubes extend through the lid of the lower bucket.

Pour the water to be filtered into the upper bucket and cover with the remaining lid. The water in the top bucket will drip through the filter elements and into the lower bucket, filling it with clean drinking water. As you can see from the photos, it’s very simple. The whole process takes about 20 minutes.

Water Storage Tips

For water storage, I have six 5-gallon containers bought in the sporting goods department at Walmart. Thirty gallons of water isn’t much, but I don’t see water being a major issue at my location.

If you live in a drier region, such as the American southwest, water will likely be a major concern, which may necessitate the storage of hundreds or even thousands of gallons for an extended emergency. Don’t store water in used 5-gallon milk jugs. They’re not strong enough for long-term storage and eventually break down and leak.

The 5-gallon containers sold in the sporting goods section of most department or hardware stores work great, as do the 55-gallon plastic water drums sold by preparedness gear retailers, such as Emergency Essentials at BePrepared.com.

If you must use small containers, empty 2-liter soda bottles work well. They are stronger than milk jugs, have better lids, and are more convenient. Avoid glass containers because they break too easily.

Tap Water Tip

If you’re storing tap water from a municipal water system, there’s no need to add bleach as suggested by some. Water from the municipal tap already contains enough chlorine to thwart any bacterial growth, so it can be stored without any other additives.

Filed Under: Prepping

How To Build A Live Animal Trap (An Easy Illustrated Guide)

October 21, 2018 M.D. Creekmore

homemade box trapNo doubt many of you have read about various improvised and homemade traps in one of the many outdoor survival books and thought, Wow, what a great idea—I could do that. Indeed, many of the ideas and diagrams shown are ingenious, and a few of them actually work to trap game—with practice.

After seeing all these trap designs in these books, you might think you need to learn how to make them all yourself, or that these homemade traps are somehow more proficient than commercially manufactured traps at putting food on the table or keeping pests out of your garden. You don’t, and they’re not.

The main (and possibly only) advantage homemade traps have over most of their store-bought counterparts is that they can be built from scrounged materials. That is a huge advantage and the reason you should learn how to make several different types of do-it-yourself traps.

But don’t go overboard here or discount a factory-made trap as somehow inferior for survival because you did not carve it out of three twigs that are held together by a strand of your own hair. Generally, factory-made traps are superior to most homemade designs, and you should take full advantage of their use.

When you are planning for survival, the last thing you want to do is limit yourself in any way. The best course of action is to blend primitive techniques and tools with modern advancements, therefore increasing your chances of survival.


small game trapping

For best results when trapping small game, I recommend that you invest in a good supply (at least 10 traps, with 20 or more being ideal) of #110 Conibear body traps. They are easy to use for most people and are very effective for filling the stew pot.

Plus, they are quick-kill traps and are therefore more humane. With that said, the best homemade trap for the average survivor is the wooden box or cage trap, as they are commonly called. I am sure most of you have seen or heard about the live traps made by Havahart (www.havahart.com). These traps are lightweight (compared to the homemade version illustrated here) and work great, but they’re expensive, running upwards of $30 for the smallest trap.

Sizes for larger animals, such as raccoon, can cost $100 or more depending on the retailer. I didn’t have the money to purchase several of these traps, and it didn’t make good economic sense to do so anyway since I could make as many as I need for little or nothing. Box traps are cheap and easy to build using plywood or scrap lumber that can easily be found while scavenging through construction site Dumpsters or around abandoned structures or other locations in the country.

These traps are easy on the critters trapped inside, unlike other traps that rely on killing or maiming to secure the animal. An added plus is that game caught in a box trap is kept safe from hungry predators until the trapper returns to check the trap.

When I was growing up in the Appalachian Mountains of Tennessee, just about every boy knew how to build a homemade box trap out of scrap wood. Now kids are more interested in watching TV or playing video games than learning such useful skills.

This is sad because one day this type of skill could make the difference between going to bed hungry or on a full stomach. To construct this trap, begin by putting together a box using outdoor plywood, lumber, or other suitable material.

Each end is left open and should be approximately 6 or 12 inches square, depending on the intended game. The top piece should be 2 or 3 inches shorter on one end— or if you intend to build a trap with double doors, make the top piece 2 or 3 inches shorter at both ends—which will allow room for the sliding door(s).

homemade live animal trap

For larger animals, such as raccoon, opossum, and woodchuck, the box should be at least 36 inches long and have at least a 12-inch doorway. For smaller game, such as squirrels, rabbits, muskrat, and mink, a 24-inch box with a 6-inch opening works well. You have to construct a slideway for the doors to fall through and lock-in.

You can make the trigger system out of branches or other improvised materials. Explaining here in writing how the pieces go together is difficult, but it should all be clear when you look at the photos.

Use the heaviest wood you can find for the doors, as the weight will cause them to close faster and go all the way down and lock into place when the trigger is tripped.

trap trigger

close up of trigger
Close-up view of key trigger points that hold the door in the open position until dislodged by an animal, at which time they collapse, dropping the door and trapping the animal inside.

How To Use

Most traps of this type are set with bait. If you are baiting for raccoon, use peanut butter or fish guts; for opossums, use cut-up apples, peanut butter, or just about anything with a strong odor. Cats like fish guts; squirrels like acorns and corn; pheasants and quail like wheat or crushed dried corn.

When in doubt, use a spoonful of peanut butter, as most animals seem to be attracted to it. Many of us who keep chickens know how frustrating it is to watch our prized hens disappear one at a time to a seemingly invisible predator.

Catching the phantom culprit can be a bewildering problem since in many cases we don’t know exactly what we are trying to catch or when it will make its next foray into the henhouse. I keep two of these traps set and against the outside walls of my henhouse.

I conceal the traps with hay to look like a naturally occurring run or passage and usually catch several would-be chicken thieves (mostly raccoons) each month. They seem to just meander into the traps while searching for a way inside the coop. A dandy rabbit-producing method is to set out boxes in known rabbit country, with brush piled on top of the trap to make it look like a natural hiding place.

Make sure that the brush you use doesn’t interfere with the trigger assembly or keep the door from closing all the way. I like to funnel the rabbits into the trap by placing “wings” made from scrap lumber in a V pattern that lead from the entrance of the traps.

This seems to guide the animals naturally into the traps. These winged traps do not even have to be baited; the rabbits just wander into them while looking for a place to hide. Be patient: don’t expect to catch anything in the first couple of weeks.

The rabbits need to become accustomed to seeing the traps before they will start to come in. If you can find a copy, I suggest you buy Being Kind to Animal Pests: A No-Nonsense Guide to Humane Animal Control with Cage Traps by Steve Meyer (the book is out of print, but

Filed Under: Bushcraft

  • « Go to Previous Page
  • Page 1
  • Interim pages omitted …
  • Page 59
  • Page 60
  • Page 61
  • Page 62
  • Page 63
  • Interim pages omitted …
  • Page 87
  • Go to Next Page »

Primary Sidebar

Subscribe to Blog via Email

Enter your email address to subscribe to this blog and receive notifications of new posts by email.

Join 7,202 other subscribers
  • Amazon
  • Facebook
  • Substack
  • Twitter
  • YouTube

“Do more with less.”

– Minimalist proverb

Recent Posts

  • Just so you know
  • Weather Update for My Corner of Appalachia
  • Why I’m Ordering Ivermectin + Mebendazole Every Year
  • The Website’s Shutting Down (But Here’s the Plan)
  • You Are Hated! Start Training Like It!

Footer

Recent Posts

  • Just so you know
  • Weather Update for My Corner of Appalachia
  • Why I’m Ordering Ivermectin + Mebendazole Every Year
  • The Website’s Shutting Down (But Here’s the Plan)
  • You Are Hated! Start Training Like It!

More about me

Books I’ve written

Books I’ve read

Follow Me on YouTube

Follow Me on Facebook

Gear I Use and Recommend

Newsletter

Search this site

Follow me elsewhere

  • Amazon
  • Facebook
  • Substack
  • Twitter
  • YouTube

© 2008–2025 M.D. Creekmore · As an Amazon Associate, I earn from qualifying purchases.