• Skip to main content
  • Skip to secondary navigation
  • Skip to primary sidebar
  • Skip to footer

M.D. CREEKMORE

  • Blog
  • Books
  • Newsletter
  • Gear I Use
  • About
  • Contact
  • Facebook
  • YouTube
  • Blog
  • Books
  • Newsletter
  • Gear I Use
  • About
  • Contact
  • Privacy Policy

Blog

Is The Lever Action A Good Bug Out Rifle?

September 9, 2018 M.D. Creekmore

Lever action rifle ready to bug out By Jim Ballou

For a lot of potential wilderness survival emergencies, a lever-action carbine of one variation or another chambered for a versatile hunting/defense cartridge seems especially practical in my view. With such a weapon you’d have rifle-like accuracy and power in a comparatively compact, portable platform, and for this reason, I believe the carbine lends itself well as the basis for an emergency survival or bug out kit.

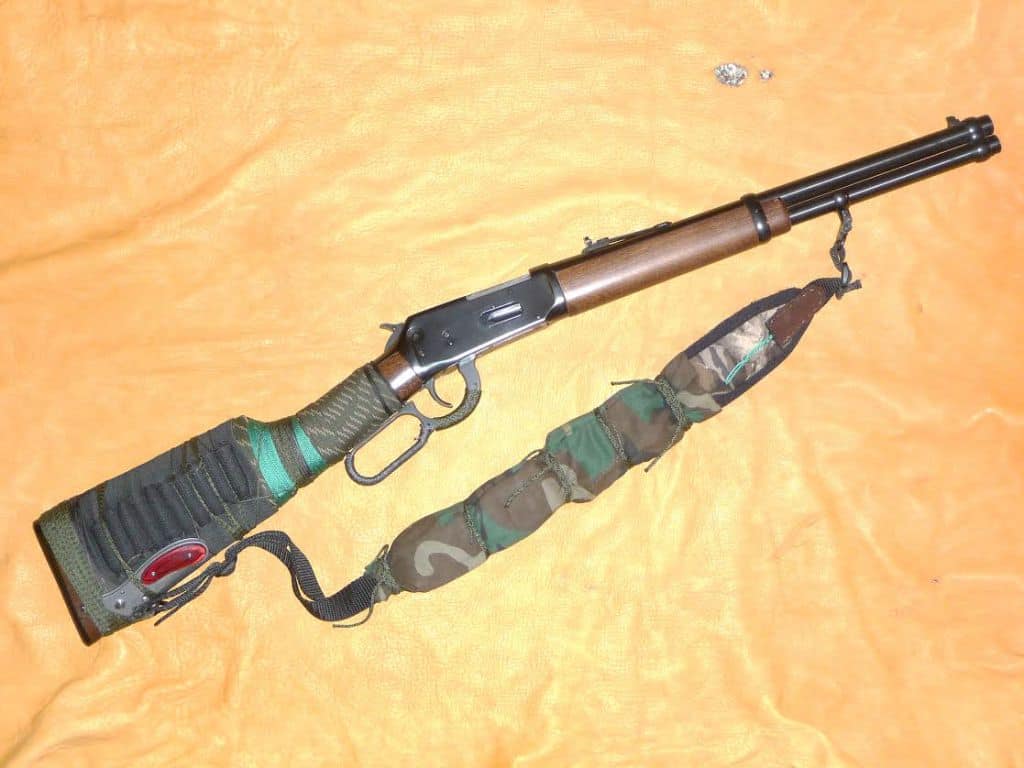
I chose to make my own such survival kit out of a Winchester Model 94 “Trapper” carbine with a legally minimum 16-inch barrel, chambered for 44 Remington Magnum (an earlier glimpse of this same project is featured in my book, Arming for the Apocalypse.

I like this gun for this particular purpose because it’s a fast-handing repeating lever-action of a conveniently short and handy size, and its cartridge is not only interchangeable with my favorite revolver but is also quite versatile.

The 44 Magnum has been used since its introduction in the mid-1950’s to successfully hunt every species of North American big game if my information is correct. My little carbine holds nine loaded rounds in its magazine tube, plus one in the chamber.

For me, this is the perfect sit-around-the-campfire kind of gun. If some beast were to suddenly burst into my camp in the middle of the night and threaten my being or the safety of anyone else in the camp, I believe I would feel fairly secure having nine or ten fast rounds of 44 Magnum at my disposal to answer the threat with.

I am aware that this particular variation of the Model 94 is no longer manufactured by Winchester, but I still frequently see plenty of used ones offered for sale. I purchased mine new in 2002 when they were still in production, and I paid around $300.00 for it at that time.

butt sock survival kit
Plate removed, showing small cavity in butt of stock for housing small survival gear.

The used ones I’ve seen lately have been priced considerably higher. By the way, this same model was also offered in .357 Magnum, and I believe one in that chambering would also be an excellent choice for this purpose. Additionally, there are at least a few other lever-action rifles and carbines chambered for 44 Magnum currently available from other gun makers.

No doubt readers will think of other viable or possibly even more suitable carbine designs for their purposes, but whether we opt for a lever-action, semi-auto, pump-action, single-shot, or bolt-action, I think the general idea of a survival carbine would be basically the same.

I began my project by removing the butt plate and drilling a 5/8” diameter hole into the wooden stock, just deep enough to hold a few wooden matches, a hobby knife blade, some sewing needles with a length of thread, a cotton ball (for emergency fire starting tinder), and some fish hooks.

I avoided the temptation to drill a larger hole that would house more gear, being careful to avoid compromising the stock’s structural integrity. After screwing the plate back on, I decided to sew a tiny pocket to the gun’s sling for stowing a short key-shaped screwdriver with the gun that fits the screws used to hold butt plate to the stock.

sling swivel on lever action rifle
A tiny pocket made from leather scrap was stitched to the sling to house the key-shaped screwdriver for the butt plate.

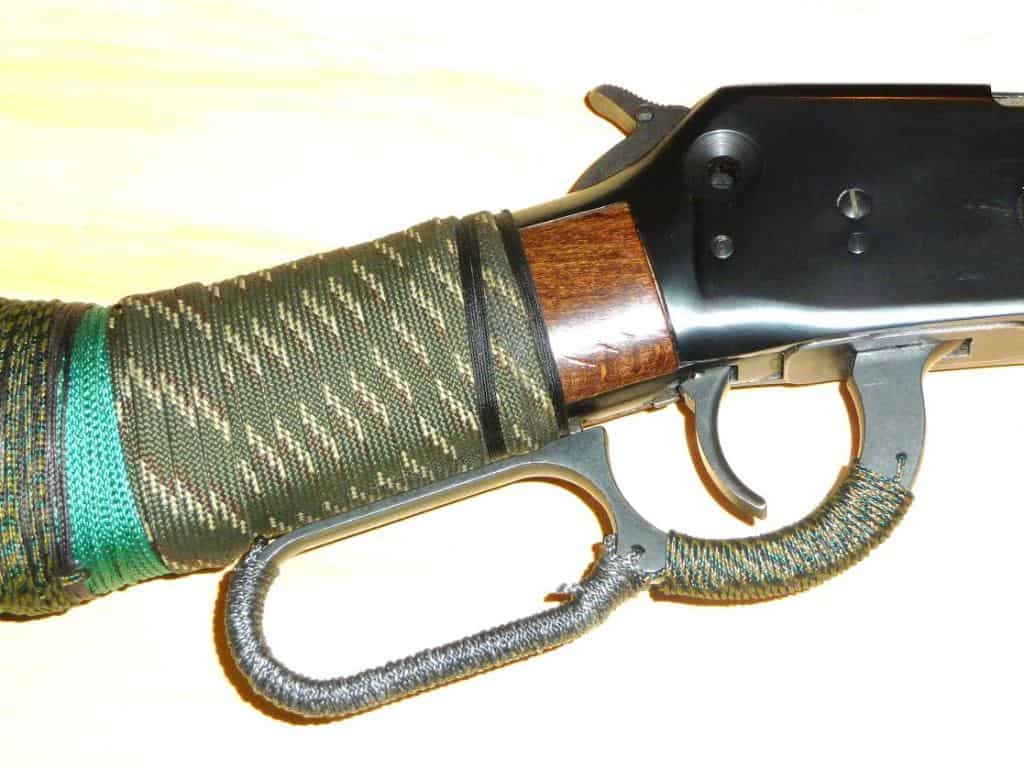
Next, I wrapped the entire buttstock of the carbine with several sizes of utility/survival cord. If there is one type of product more generally utilitarian to a wilderness survivor than cordage, I am not aware of it. When I visit the woods I invariably end up using the cord in shelter building or tent raising, tying down the gear, repairing items, hanging supplies from tree branches, replacing boot laces, etc.

The task of wrapping a rifle stock with cord can be tricky, but I’ve learned a few little tricks that make this process easier and more successful.

First, it is much easier when attempting to tightly wrap any tapered object with cord to start the process from the smaller diameter end of the thing and progress toward the larger portion, because the windings of cord have a tendency to slide apart while wrapping them on a body tapering downward. You will want to keep your wraps even and tight together.

A second trick involves using a wrapping technique commonly employed in whipping the ends of rope with small cord, and this is how you can avoid entirely the use of bulky knots that eventually unravel, while also maintaining a more permanent and tighter wrap.

cordage wrapped around rifle stock
Close up view of the wrist area. Note also that the lever itself has some cord wrapped onto it.

This can be done simply by forming a bight in the standing end of your cord and laying this bight stretched out along the length of the item you want to wrap, and wrap your windings of cord over it together with the (gun stock, in this case) until your windings approach the remaining eye in the end of the bight.

At that point, you feed the running end through the eye and pull on the standing end of your cord to draw the bight and running end under the tight wraps. I sometimes use two pairs of pliers to firmly grip and keep both ends of the cord taut during this finishing stage.

Finally, I discovered that by adding a furniture tack at the comb of the stock I was able to provide a much-needed ledge to hold back the wraps of cord at that point. Without something like this, there is nothing to prevent the windings of cord from merely slipping over the edge of the comb.

Wrapping the wrist area of a Model 94 Winchester requires some care because there is a safety button in the lower tang that must be depressed by the closed lever before the gun will fire. So, any wraps of cord around that area must not be too thick or interfere with that little button, because if they do the weapon won’t work.

lock bladed knife attached to rifle stock
A lock blade knife with a belt clip fits conveniently onto the stock’s shell holder.

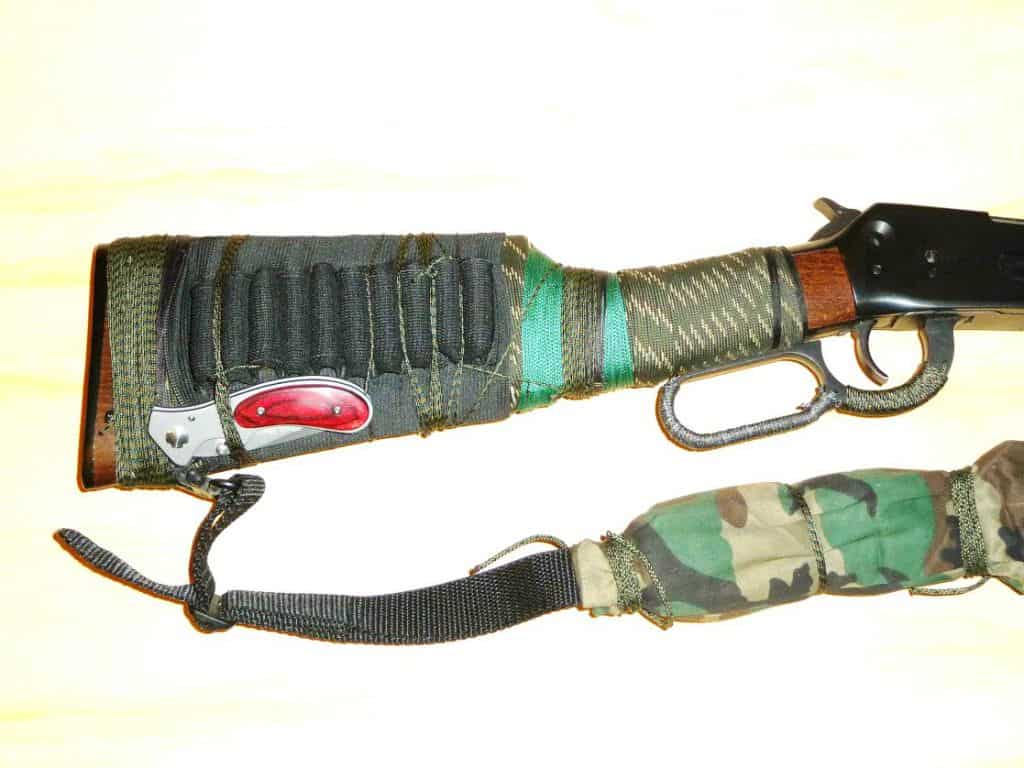
After I had wrapped several layers of small cord on the carbine’s stock, I decided that a cloth shell holder that goes over the buttstock could be a handy thing. After adding that, I found that a lock-blade knife with a belt clip that would firmly slide under the back end of the shell holder could also be very handy to have in the woods. I eventually secured this knife into position more permanently by tying it on using several lengths of small diameter cord.

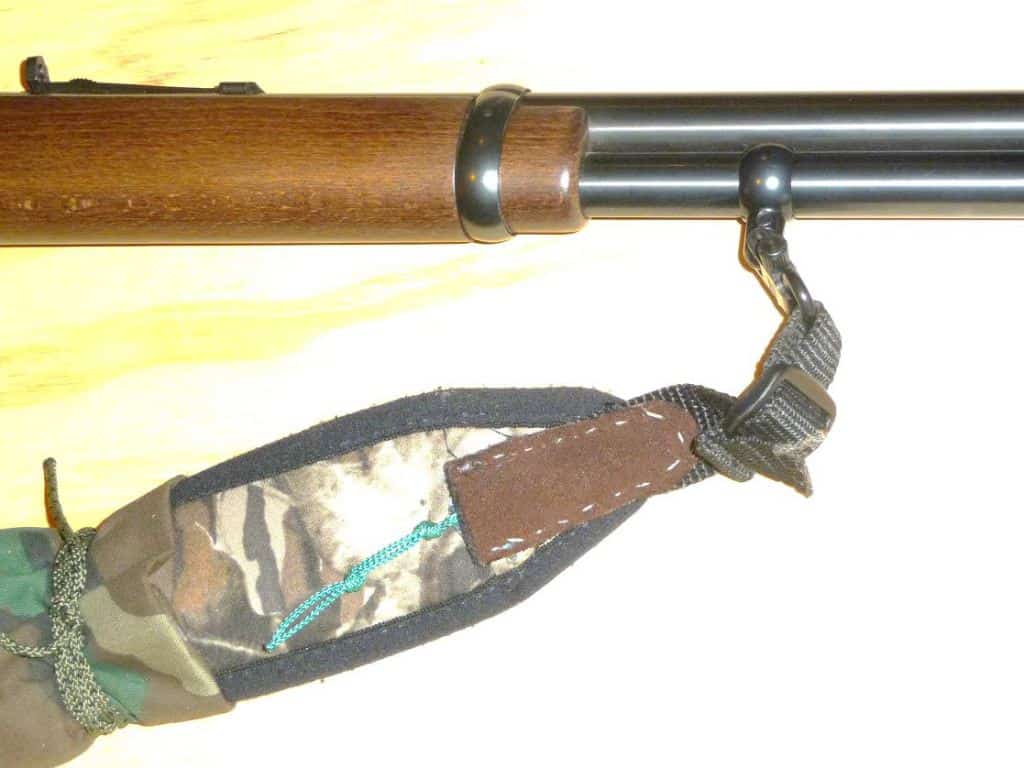
At some point, it occurred to me that the gun’s sling would lend itself quite well as a shell holder as well as a pouch for more small survival gear. The sling I had purchased for the carbine came with a few cartridge loops already, but I wanted a few more.

bug out survival kit
Examples of lightweight survival gear that can be carried on a rifle sling: 1) small knife, 2) sparking tool, 3) wire saw, 4) button compass, 5) #6 barbed fish hooks, 6) needles & thread for emergency repairs, 7) birthday candle, will sustain small flame for 35 minutes, and 8) band-aids and butterfly sutures.

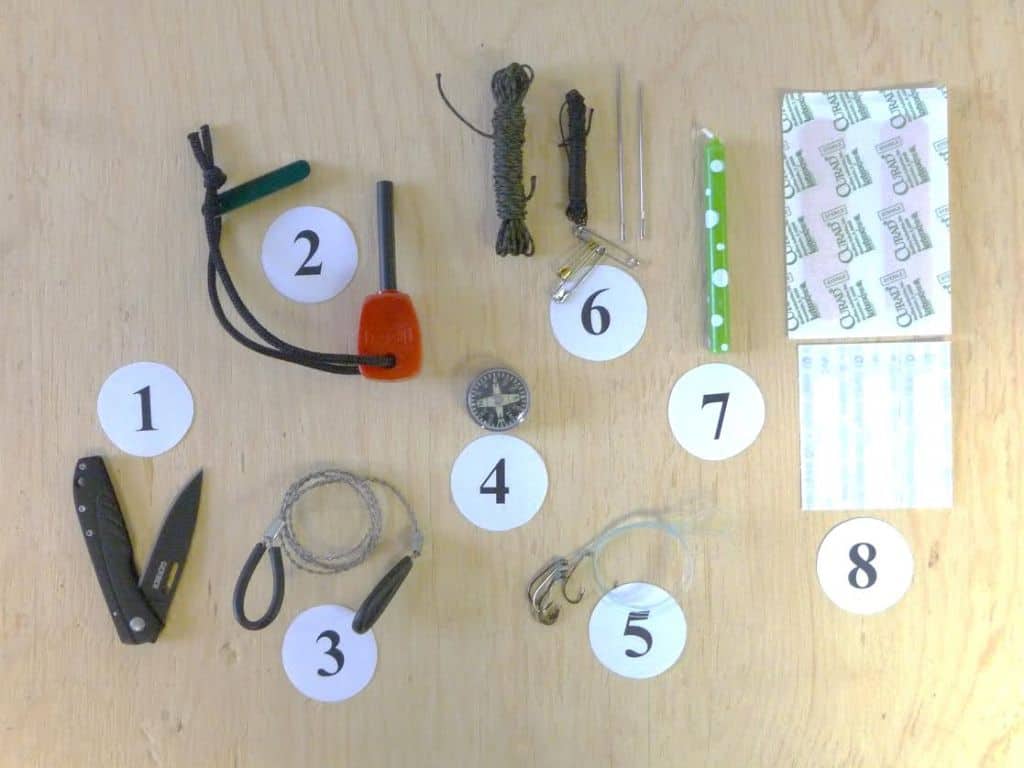
I discovered that a belt slider with six cartridge loops could be positioned in a convenient section of the sling and stitched into place to prevent it from sliding around. I also discovered that this created a sort of convenient pocket between the belt slider and the sling, inside which I managed to fit a small bag of some basic survival items like a ferrocerium sparking tool, a small knife, a wire saw, bandages, more small-diameter cord and fishing tackle, a button compass, etc.

To make all these goodies thus mounted on the sling (including those spare rounds stowed in the cartridge loops) more secure, I ended up wrapping a handkerchief around the whole works and binding it up with a few lengths of small cord. While the sling may now be a tad bulkier and heavy with all of these things on it, it is still nevertheless usable as a carry sling.

Sling on lever action rifle and ready to bug out
A handkerchief tied on helps to protect the ammo in cartridge loops and all the survival gear on the sling.

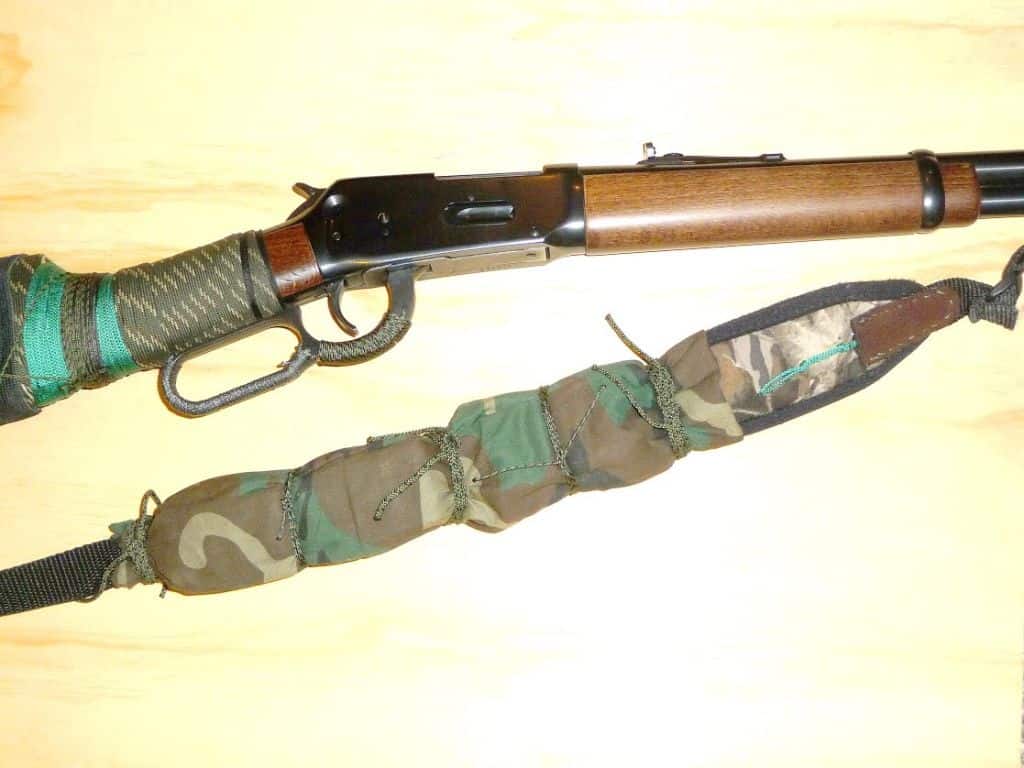
Ultimately I ended up with not only a handy little 44 Magnum carbine to take along camping and scouting around in the woods, with its spare ammunition stowed “on board”, but in fact a survival kit system of its own. So, will this resulting mess of outdoor gear form part of my emergency Bug-Out Bag arsenal? You bet it will. With a set-up like this, a survivor would have plenty of possibilities available to him in an emergency.

Bio:  Jim Ballou has worked as a self-employed, independent insurance agent and a freelance writer for over sixteen years. More than sixty of his magazine articles on a variety of topics ranging from primitive and early American crafts and tools to wilderness survival skills have appeared in five periodicals since 2000, including Backwoods Home Magazine, The Backwoodsman, Wilderness Way Magazine, Primitive Archer Magazine, and Modern Survival Magazine.

Mr. Ballou’s first non-fiction book titled: Long-Term Survival in the Coming Dark Age was published by Paladin Press in 2007, and it quickly became a Paladin best seller. This was followed by four other popular non-fiction titles with Paladin Press, including Makeshift Workshop Skills for Survival and Self-Reliance, MORE Makeshift Workshop Skills,Arming For The Apocalypse, and the most recent title, The Poor Man’s Wilderness Survival Kit.

Ballou’s interests are too varied to list here but include blacksmithing, gun collecting, target shooting, reading and learning about history, writing, camping, hunting, fishing, treasure hunting, exploring, experimenting with tools and creative processes, survival and self-reliance related topics, plus all of the primitive skills, among numerous other interests and hobbies. He lives with his wife and two kids in Idaho.

Filed Under: Bugging Out

What’s The Best Rifle Sling For The AR-15?

September 9, 2018 M.D. Creekmore

photo showing a two-point sling configuration
by Joe Nobody

One extremely important accessory for a shoulder-fired weapon is frequently overlooked by preppers. It is unpretentious, cheap, readily available, and easy to install. It’s the sling.

Suffering from a lack of sex appeal, lost in a plethora of available furniture, and definitely not the cover-girl of gun porn, the lowly sling often suffers from a lack of appreciation – until your body has paid the price.

Through the years, I have conducted numerous training sessions and can now easily identify the guys and gals who have experience in the field… the folks who have carried a long gun for an extended period of time. Their slings are functional and comfortable – like an old pair of well-worn blue jeans or a seasoned pair of boots.

They fit, function, and perform critical tasks without fanfare or ritz. Those who have ignored this critical component suffer – sometimes badly. More on that down-article.

No doubt some of you are wondering, “Why is Joe ranting on and on about something as simple as the humble sling? It’s just a length of material that you use to attach a weapon to your body – right?”

Not really. Not in a practical application:

In the gun-candy store, it’s easy to get distracted by lights, lasers, and fancy optical doodads. At the range, other shooters rarely stroll over and say, “Wow, what a nice sling.” In the gun safe, they tangle and annoy. But if you ever have to keep a shoulder-fired weapon on your person for extended periods of time, there is nothing you’ll appreciate more than a good sling.

photo showing how to use a sling as a plumb lineMany of the folks I work with haven’t spent a lot of time with a weapon in the field. That’s not a criticism or a sin; it’s simply a fact that few occupations or lifestyles demand the need or naturally deliver those experiences. Most of us do not walk into corporate America carrying a long gun.

Even the gents who have served for years in the infantry may not consider that their military experience will likely differ from that of a post-event prepper. Protecting the homestead while accomplishing daily activities, chores and movements is different than the routine of a soldier who is a component of a fighting unit.

I often challenge my friends to perform one simple task without leaning their rifle against a tree – set up camp. Pitch the tent, build a fire, and empty the packs while wearing your blaster. The experience can be a real eye-opener.

Take that exercise one step further; envision a typical post-event day from dawn to dusk with security as part of your plan. This mind-movie will help you realize the need for comfortably accommodating your weapon. Unless you find yourself surviving in a densely populated urban area, you’ll most likely spend a lot more time carrying your rifle than shooting it. This is a critical point. You probably won’t be fighting, sweeping, clearing, or defending all the time. (If your environment requires such diligence, it might be time to consider another location.)

Photo of Joe Nobody climbing a ropeYou will, most likely, be spending countless hours gardening, gathering, harvesting, and performing manual labor. If there is no rule of law, you’ll probably want a firearm close by, or on your person. You may spend considerably more time traveling by foot than you do now. There’s a reasonable chance you’ll be outside and exposed for significant portions of the day.

All of this translates into the lowly sling playing an important role. The wise prepper will evaluate this humble piece of kit now, rather than later when it’s too late. Prove that you can carry that blaster comfortably, securely and in a manner that is “mission configurable.”

Types of Rifle Slings

For years, there were two basic types of slings: Single-point and 2-point. (For a short time, there was a 3-point sling, but it faded from the market quickly.)

A few years back, the single-point sling was all the rage. It debuted as a cool accessory, and droves of shooters wanted to convert their battle rifles to accept this option. For most, this was a huge mistake.

Single-point slings are for SWAT teams, hostage rescue units, and other outfits that are expecting short duration encounters of intense violence. Single-point slings are great for moving a weapon to the weak-side shoulder, close-quarters combat, and other tactics that require a lot of movement of a weapon.

They, however, suck as a way to secure a long gun for extended periods while on the move.

Infantry soldiers, hunters, search and rescue responders, and probably preppers need slings that secure the weapon tightly against the torso. This configuration allows running, jumping, climbing, walking, and picking berries without the rifle banging into knees, thighs, or more personal regions between a male’s legs. A hot barrel can make this capability even more critical.

Consider that you may need to slide the rifle around to your back if you have to use your hands to carry something heavy or to climb. You’ll want to be able to tighten and tuck that fancy AK either in front or across your shoulders and do so in a way that doesn’t rub off significant swaths of flesh.

Recently, a new design has eliminated the need to make a choice. Several vendors now offer what I call “hybrid” slings that easily convert from single-point (when you’re expecting to fight) to a more comfortable two-point arrangement. This nifty invention gives us preppers the best of both worlds.

When shopping for a sling, consider these factors:

  • Be aware of the strap width and thickness. When you have a pack, body armor, load-rig, jacket or other paraphernalia on your shoulders, strap-pollution can be an issue. Wide and thin slings are typically the best option.
  • At least one connection point should swivel. This avoids tangles, twists, and hang-ups.
  • Metal rings, clips, and buckles will hold more weight than their plastic counterparts.
  • Look for quick adjustment straps. These are extremely handy.
  • Quick Detach (QD) connectors are also great innovations. Over the years, I’ve been in numerous situations where I wanted to get the weapon off my body in a hurry. QD mounts work well.
  • The company Magpul probably offers the most configuration/options: http://store.magpul.com/category/slings

But wait. Carrying the weapon is only part of the equation:

photo showing a sling converted into a single point sling

Have you ever read those great articles on a gazillion uses for paracord? Well, a good rifle sling has its own list of secondary applications. Not as many as 550-cord, but more than many people realize.

A sling can be used to provide a brace for several different shooting positions. Used correctly, it can steady a shooter’s aim.

Or how about an angle indicator for non-level shots? If you live in a mountainous or hilly country, you know that making a shot 40 degrees down into a valley requires some adjustment. Often, it’s difficult to judge the correct angle. This handy little accessory can help you with the estimate by creating a plumb line.

Properly selected, a sling can form a tourniquet, elevate an injured arm, tow something, fashion a stretcher or drag bag… the list could go on and on.

Essentially, a sling is a fancy 4-foot section of very strong rope. What could you do with that in an emergency situation?

Consider a scenario where you have three people in your group and need to climb a tree in order to scout. Three of these cords attached end-to-end would yield a 12-foot section of climbing rope.

In my fictional series, Holding Their Own, the protagonist uses his rifle sling and backpack straps to make a safety harness for a dangerous climb.

What I have come to respect most about preppers is a mindset of adaptability and creativity. I’m sure if you put 50 like-minded individuals in a room, they would devise dozens more innovative uses for this little length of material.

All the best! Visit Joe’s website, www.joenobodybooks.com, for more articles, reviews, books, and other resources for those who believe in the self-reliant lifestyle.

Recommended Reading

  • AR-15 Rifle Builder’s Manual: An Illustrated, Step-by-Step Guide to Assembling the AR-15 Rifle
  • AR-15 Skills & Drills: Learn to Run Your AR Like a Pro
  • How To Shoot Your M16/AR-15 In Training And Combat

Filed Under: Uncategorized

How Many Rounds Of Ammo Does A Prepper Need?

September 9, 2018 Jesse Mathewson

Photo showing a prepper shooting an AK-47 how many rounds of ammo does he need?
My suggestion for long-term storage is a bare minimum of 250 rounds of defensive ammunition per defensive firearm in the house with 500 to 1,000 rounds being ideal.

There is an economic concept, the law of diminishing returns, that can be applied to your life. The law of diminishing returns refers to a point at which the benefits are less than the amount of effort invested. This applies directly to ammunition stored for personal use and firearms as well as general prepping supplies.

I should add that I detest the term prepper, as it is defined using modern vernacular and is seen as a negative to many. Rather I am someone who considers that even though I may never need insurance, it is a wise idea to have it.

Ammunition Storage

When it comes to prepping it is possible to have too many things and by default cause issues with both storage and distribution of the items needed. Ammunition if it is not stored properly does age rather poorly even if it is sealed in spam cans. Food regardless posted shelf life must also be stored in a relatively climate controlled environments.

In fact, there is very little that has an extended shelf life if it is not stored in a climate controlled environment. Look at the packaging for any dry frozen or dehydrated food supplies, store between temperatures are listed on the package.

Temperatures are somewhat important for ammunition, however, the real killer for stored ammunition is moisture. I do not suggest leaving ammunition in your car during an Arizona summer, the temperatures reached can negatively affect performance.

However, in personal testing with ammunition stored openly in magazines and original packaging as well as loaded in magazines I have found that overall the temperature variations rarely affect the ammunition by itself, though with un-crimped hand loads I have found it causes greater issues than crimped loads both factory and not.

What has always been the hands down ammunition killer is moisture and the subsequent corrosion that occurs.

Except for personal defensive ammunition I have on me at the moment and in my house for use at a moments notice, my ammunition is stored in watertight cases that are also somewhat airtight. I use desiccants inside the ammunition storage containers as a way to reduce the free oxygen and moisture amount even more.

With my testing and others, I have found that ammunition stored this way can be good for many decades, especially when temperature extremes are prevented. When it comes to defensive ammunition you should be rotating this every 6 months or so. You are not rotating it because it compresses in the magazine and becomes oval or for any reason other than your carry ammunition by default is carried on your person.

This means that it is subjected to temperature extremes and humidity, sweat and general degradation that occurs with carry ammunition.

My Bare Minimum Recommendations

For this purpose, my suggestion for long-term storage is a minimum of 250 rounds of defensive ammunition per defensive firearm in the house. This takes a rotation of 30-45 rounds every 6 months for handgun and between 60 and 240 rounds for the rifle and lastly 12-24 rounds for the shotgun if you have or use one.

Personally, I prefer buying a half a case for handgun and a full case at a time once a year of premium defensive ammunition. This covers needs for the firearms in use as a defensive tool at my house and keeps a decent supply for practice and storage as well.

With very few exceptions I keep all of my magazines loaded, modern Magpul magazines can be kept loaded fully and older NATO/STANAG magazines loaded at 28 for rifle and one round short for magazines not in current defensive rotation for the handguns.

This is not to reduce spring tension, instead, it is specifically because many older magazines do not seat easily or fully in a firearm that has a closed bolt or closed slide.

I am not going to argue the merits of learning how to count your rounds or other similar approaches as these are foolish and outdated approaches that at least will add steps that will only confuse you under stress and at worst get you killed. My suggestion is, use proven modern magazines and firearms.

How many rounds of non-defensive ammunition should you keep on hand? This is where the law of diminishing returns really comes into play. Ammunition weighs allot in quantity, for instance, a 30 round magazine of 5.56 or .223 weighs approximately 1 pound.

ammo in storage how much is enough?


Whereas a loaded 8 round magazine for a 1911 weighs around 9 ounces and a 15 round Smith and Wesson M&P magazine or a loaded 15 round Glock magazine will weigh around 8-9 ounces. Two defensive magazines for your handgun will end up weighing around 16 ounces and a single 2 ¾ inch 00 buckshot shell will weigh a little over one ounce by itself.

Unless you train regularly with your bug-out bag and a full load out of ammunition, I highly doubt you will be humping more than 3 or 4 magazines for any great distance.

Does this mean you shouldn’t keep more than 120 rounds on hand? Absolutely not!

In fact, I recommend at a bare minimum having 500 rounds of quality range ammunition for practice and long-term use. My suggestion is to avoid big box store ammunition, I do not mean specific ammunition retailers and resellers, I mean Walmart, Big Five, and other similar large box stores ammunition.

What is made for them will ALWAYS be a reduced quality than even military and law enforcement training overruns! Big box ammunition is loaded with far less QC being applied than is done with the more expensive yet better overall ammunition that is available.

If you reload, and this is something that takes great patience and dedicated time and effort to do well, store supplies for as much as you may need at current training use for 2-3 years. This can be applied to factory new loads as well. I like having several months at a bare minimum stored away, with my maximums being around 5 years at my current level of use.

If you go to the range and shoot 150 rounds a week, then calculate based on this number. If you carry defensively and do not train with at least 50 rounds a month, please remember a very simple reality, shooting is absolutely a perishable skill.

Certainly, many people get lucky and have used firearms successfully with little or no regular training or any real training. However, you will find a much greater level of success if you at least keep your basic skills sharp with 50-100 solid rounds downrange once a month.

I have taught and worked with law enforcement officers and soldiers who refused to practice regularly, leading them to have to shoot their generous qualifiers multiple times just to maintain employment!

how many rounds of shotgun ammo does a prepper need

Next, it is important to understand that you and your wife will not be taking on an armed group of marauders even with your multiple trips to FrontSight timeshare and firearms training facilities. I know that the Dr. who owns that training facility has told you that because you are a diamond member you are now better than Rambo, the reality is…you will still be best served with not clearing your house and avoiding issues whenever possible!

This is why individual focused training on your own and or with experienced real-world instructors is best. This means that you need to have additional amounts of ammunition available and stored safely and properly. What you will need much of your ammunition for is hunting, getting rid of predator or scavenger animals and potentially defense against two-legged marauders.

All of my ammunition except what is currently in use is stored in a dry, temperature controlled environment. What is currently in use is also kept dry and cleaned and maintained to promote longevity and 99.9% function when it is needed!

So before you have 50,000 rounds delivered, make sure you know why, how and what you are storing it for. Some places have passed laws recently regarding how much you can legally have. Be sure you follow the local laws whenever possible or whenever morally necessary. A few simple guidelines I use as a disabled middle-aged man with a family and some added individuals in potential problem times.

  • What can I carry by myself
  • What can I keep safely secured
  • How much do we use monthly multiplied by each person using monthly and 2-3 years minimum for EACH firearm
  • Use only what works best in each firearm for each required use, (hunting firearms/defensive/ etc.,)
  • What can my group carry
  • What can my family/group keep safely secured

As always use your head, ask yourself why you are doing or considering doing anything and by all means, avoid falling into the age-old trap that is doomsday prepping. Yes, this approach has been around since before the bronze age and is largely due to a time when humans did not have working networks for trade and exchange.

Certainly, being prepared for this is not a terrible idea though it will take more than stockpiling ammunition and can be extremely cost prohibitive to all but the most wealthy of us.

Free the mind and the body will follow…

Filed Under: Prepping

Must Know Bushcraft Survival Skills for Living Off the Land

September 8, 2018 M.D. Creekmore

by Tony Nester

bushcraft skills field-dressing-a-rabit
Field-dressing a jackrabbit during a survival course.

Living off the land is a skill that can pay off in large dividends if you are stranded in the wilds long-term; want to add more variety into your daily diet at home and reduce food bills, or be prepared in the event of a grid-down situation where the grocery shelves empty.

Having taught extended bushcraft courses during the past 26 years, I’ve found the area of procuring food in the wilderness to be the most challenging skill in the field of wilderness living. Once learned and regularly applied, you will gain greater confidence in the back-country and know how to obtain food from a land that has much to offer, to those who know where to look.

The following material intends to convey practical methods that a person, with little experience in the outdoors, can use to get started obtaining food from Nature’s Kitchen. The emphasis of this article is on small game and not big game animals like elk, moose, and deer.

On any given day in the wilds, you are going to come across a greater concentration of rabbits, squirrels, woodchucks, marmots, raccoons, and other smaller critters. For the survivor, these animals will provide sustenance until you can procure the larger game.

Food procurement has a lot of myths and misconceptions surrounding it, however. The idea that one can simply grab their bug-out bag and head into the hills to live off nature’s kitchen for a few months has been perpetuated in the reality shows and can get you into trouble. It took a tribe to feed a tribe and our ancestors relied on sheer numbers to obtain wild food, not on a lone-wolf mentality.

I’ve had the opportunity to eat just about everything that crawls, flies, walks, or slithers- from snakes and coyotes to rats and grasshoppers. Under conditions where hunger is constantly gnawing away at the body (and mind), my food prejudices quickly fade after a few days and you will eat anything that runs in front of you. My success is also greatly increased by having a few key hunting and trapping tools with me at all times. Keep in mind that game laws vary tremendously from state to state so research your region of the country to determine what’s legal.

The Challenge of Living Off the Land

Procuring food in the wilderness can be a challenge because of some or all of the following reasons:

1) Few people subsistence hunt or trap like they did a generation ago and the skills and knowledge base in the community have been reduced or completely disappeared in some regions.

2) When many people hunt today, it is mostly for Big Game trophies which means sport first, and meat second. Plus, the sheer number of hunters taking to the woods each season is staggering. As a result, state game laws are becoming more restrictive and the pressure from often ill-informed animal rights groups have all but eliminated certain practices such as trapping from many states.

3) The geographic region (desert, mountains, etc…) may not support much life to begin with. It is far easier to make it as a hunter-gatherer in the lush, Pacific Northwest than in the desert lowlands of the parched Southwest.

4) It may have been a particularly tough year for your region. Perhaps the drought is severe or wildfires are wreaking havoc, and thus the animals and plants are suffering.

5) Modern game laws are much different than when our ancestors walked the planet and could harvest any species of animal in any season, day or night.

6) Subsistence hunting and gathering is best performed as a group (tribe) and not as a solo pursuit. The more eyes, ears, and hands out on the land the greater the odds of obtaining wild meat, fish, and plants. Many of us today have little choice but to go solo which reduces “caloric efficiency.”

7) Finally, one cannot discount the TBH Effect- “Trained By Hollywood Effect.” There is a constant barrage of romantic notions that we receive from movies and “reality” shows depicting how people are supposed to live in the wilds. If you trek into the wilderness like Jeremiah Johnson, then have realistic expectations of your own skills, what the land can provide, and what is reasonable (and legal) for your region. Even then, don’t expect it to be easy.

Four Areas of Study for the Modern Hunter-Gatherer

In today’s world, if you want to feed yourself reasonably well in the backcountry, you must focus on the following four areas of study:

  1. Proficiency with a .22 caliber rifle or pistol.
  2. Basic fishing methods such as angling.
  3. Knowledge of the ten common edible plants in your region.
  4. How to use traps and snares.

Granted, there are other methods of procuring wild game such as bowhunting, slings, bolas, etc… but the above four represent the core skills to set your sights on as a beginner, in my opinion. If you are a skilled archer then, by all means, work with what you know. The more skills you possess in this realm, the more options you have.

If you are new to firearms and hunting, then seek out an experienced family member or friend who can show you the basics of firearm safety and marksmanship. I highly recommend taking a Hunter Safety class. This will provide the foundation skills of safety and basic gun handling skills as well as covering game laws specific to your state.

Tools of the Trade

Traps-for-living-off-the-land-and-bushcraft-survival
Simple tools of the trade


Provided you are in good habitat, a quality rifle along with the proper training can tip the odds in your favor for procuring wild game. Having been on countless survival treks where we lived solely off the land using primitive skills (no modern gear), I can say that I will gladly take a small caliber firearm any day for filling the stew pot.

There are two approaches to living off the land: Passive and Active. 1) Passive is using traps, snares, deadfalls, trotlines, cast nets, etc…. You are setting out the device and letting it do the work for you while you are back at camp or home. 2) Active is where you are moving across the landscape or still hunting. This is more calorie intensive and not as productive as trapping. I find it is best to employ both methods which increases your food procurement capabilities.

Bushcraft Rifles

I use a Ruger 10-22 with a scope for small game. This is the most ubiquitous .22 on the market with plenty of products if you want to modify the stock, trigger, sights, etc…. CCI Minimag hollow points are my preferred ammo for hunting. I also have a Marlin Papoose collapsible .22 that I use on occasion.

Bushcraft Shotguns

I am a sucker for the old H & R single-shot 20 gauge for hunting small game. You can still find these for under $120 and many a youth has bagged his first squirrel with this simple but efficient shotgun. H & R also makes a hollow, synthetic stock called the Survivor. The stock has enough space to stow basic survival supplies.

Combination Rifles

I think the best of both worlds is getting an over and under rifle. I use either a Savage Model 24 which is a .222 caliber over a .20 gauge or a Savage Model 42 which is a .22LR over a .410 gauge. Both of these are excellent for taking large and small game. I have a penchant for the older rifles with a real wood stock and a nice heft.

Air Rifles

A former student of mine, who was involved in air gun competitions, introduced me to high-powered air-rifles for hunting small game. Until my vision changed recently, I was using a Benjamin 392 with iron sights but have switched to a Hatsan 125 with a scope. This shoots .25 caliber pellets and is excellent for dropping squirrels and rabbits easily within a 30-yard range not to mention that the ammo is cheap. The Pyramyd Air Company has a wide selection of air rifles and is a good place to start your research.

Recurve Bows

During archery season, I use a Bear Kodiak recurve or a handmade cherry bow both of which have a 45# draw weight. I like making my own cedar arrows and use blunt tips for small game and Zwickey Eskimo broadheads for large game. I fletch my own arrows with a Bitzenburger jig.

Slingshot

I like making my own high-powered slingshots using tubular bands and use these each Fall for squirrel hunting. The beauty of practicing with a slingshot is that the muscle-memory carries over to your archery skills. I use .50 caliber black powder balls for ammo.

Conibears

When we teach trapping courses in Utah, we utilize conibears and snares. A #110 conibear is an excellent game-getter that we use for procuring small animals while we use the larger #330 conibears for beaver and raccoon.

These are extremely efficient traps that can easily fracture your fingers or limbs if you are unfamiliar with how to use them. Take a trapper’s education course, obtain a permit, and then spend time with an experienced trapper if you plan on using conibears.

There’s a reason that the archeological record, the world over, indicates that trapping was the prime means of sustenance for indigenous cultures.

Rat traps, obtained from big-box hardware stores, would be another option for procuring small game and don’t have the hazardous kickback that the Conibear possesses.

Fishing

fish-on-open-fire-bushcraft-survival-skills-fishing
Fish filets and trout baking over the coals. These are secured with split, green willow shoots.

Fishing isn’t something I do much in Arizona but when I head up to northern regions I bring a collapsible Shakespeare fishing pole, 6-pound test line, three-dozen assorted fish hooks and assorted artificial baits.

Obviously, if you live in a more productive state then your fishing tackle should be heartier than my kit and you may even want to add in crayfish traps. The latter can be found at Wal-Mart.

Cast & Gill Nets

Both cast and gill nets allow the fisherman to harvest a large quantity of fish while expending little effort. These are the time-tested methods used throughout the world by maritime cultures. If I were venturing into a remote waterway or wilderness region and weight wasn’t an issue, I would definitely pack along a cast or gill net for survival purposes. Cast nets range in size from three to eight feet while the standard survival gill net is 12’ by 4’ and packs down to the size of a softball.

A Menu of Small Game

Small game includes cottontail rabbit, squirrel, marmots, skunk, gopher, woodchuck, jackrabbit, chipmunk, ringtail, raccoon, and porcupine. Not all of these are legal to hunt and you will have to check out your state’s game laws.

One squirrel or rabbit will generally provide a single meal for one person. On the other hand, a fat raccoon or porcupine might last one person for four days. Raccoon tastes like roast-beef, if grilled over an open fire or the barbecue, and is an outstanding meat.

Most of us tend to have a romantic image of the native hunter relying on deer or buffalo as their sole means of sustenance, when in fact, it was the microfauna or small mammals that provided the consistent day to day food source in many parts of the world.

In terms of animal population density, you will be able to sustain yourself with small game far easier than larger animals like deer and elk (and obtaining hunting permits for small game is far easier!).

One wildlife biologist in Nevada found that the number of small mammals per square kilometer was around 4600! Another study in Manitoba, Canada revealed 10 squirrels per acre. The research also suggests that spring and early summer show the highest concentration of mammals.

Summary

If you are reading this article, then you had ancestors who hunted and gathered, fished and foraged. Our body and mind evolved from a much different lifestyle than the one we lead today in our largely urban world. You were born with the senses and abilities to be a hunter. They are already hardwired into your being. Spend some time focusing on one of the four key areas listed here and get started this weekend.

Learn about the top ten edible plants used in your region, acquire proficiency with a .22 rifle or air-rifle; get a small-game hunting permit and take to the field; spend time fishing with your family on the next camping trip. The time to learn how to feed yourself from nature’s kitchen is before a crisis hits and the grocery shelves empty.

Start out with a few of these activities and you will be, not only eating healthier but prepared to supplement your home pantry in the event of an emergency.

Recommended Reading

  • Camp Life & the Tricks of Trapping
  • The Modern Hunter-Gatherer
  • Subsistence: A Guide For The Modern Hunter-Gatherer: Hunting, Trapping, Fishing & Foraging for a Living in Texas
  • The Forager’s Harvest: A Guide to Identifying, Harvesting, and Preparing Edible Wild Plants

About the Author: Tony Nester is the author of numerous books and DVDs on survival. His school is the primary provider of survival training for the Military Special Operations community, and he has served as a consultant for the NTSB, Travel Channel, NY Times, Backpacker Magazine, and the film Into the Wild. Tony also writes post-apocalyptic fiction under the pen name JT Sawyer.

For more information, visit www.apathways.com or www.jtsawyer.com.

Filed Under: Bushcraft

Edible Wild Plants: 25 Wild Plants You Can Eat to Survive in the Wild

September 7, 2018 M.D. Creekmore

wild plants to eat
by Christine W

I once read a very interesting article from a survivor of the Bosnian Collapse in the late 90’s. This was a true end of the world as they knew it event, and it was fascinating and eye-opening to read. One of the things the man talked about in his extensive article was the most useful skills to posses.

Medical knowledge was the highest on his list. Lacking real world medical training, people with the knowledge of the uses of herbs and plants were able to trade and use that knowledge to survive.

Most people in America can’t identify even 1% of the plants that surround them. They don’t know useful from poisonous or nutritious from useless plants. And yet there are dozens of plants that grow even in urban settings that are not only edible but downright lifesaving if you only can identify them.

For 15 years I have been a gardener and outdoorswoman. Much of my knowledge has come from being a curious person interested in the world around me, and also from searching for natural ways to heal common ailments for myself and my children.

I have been amazed at the amount of plants growing near me that can be used for healing, and have compiled a small list of what I consider the important common plants that grow in the USA, things you can find right out your back door. I am sure there are thousands more!

Knowledge is power, so I recommend that you should start now when it comes to identifying wild and not so wild food and medicinal sources. Once you can recognize a plant start noting where you see them, what time of year they flower in your area and when they bear fruit. I go out for drives along country roads and memorize where plants, bushes, berries, and helpful trees are growing.

You can also look around your neighborhood. Rose Bushes will provide you with rose hips that are high in vitamin C and can save you from scurvy in the winter. Echinacea also known as Purple Coneflowers are popular in gardens can boost the immune system and also have a host of other uses.

Look up color photos of plants on the internet to help you identify them, or join a wild crafting group if one is available. Having a print out of each plant with multiple pictures and uses of them, along with how to use them and dosages, is very important in a SHTF event.

There are many books specifying every area of America for finding wild foods and they often have excellent color pictures and identification keys. I keep a few of them in my purse when I go up to the wild and try to identify as many helpful plants as possible. Often these books are inexpensive so picking them up is a good idea.

As a note I say where you can find the below plants. We live in the dry west so most plants only grow near water sources. However, I know that in other areas of the country rain is more plentiful so the growing habitat is much different.

If you are gathering post or during SHTF remember your personal safety and weigh the possible benefits vs. danger of running into other hungry people. Never go alone even now as accidents happen and wild animals many times enjoy wild foods as much as people do.

Meeting a hungry bear while picking berries is a highly unpleasant event! When you head to any wilderness take precautions and let people know where you are going and when you are coming back. Always take a first aid kit, water, a good map, and some food with you.

Caution! As with any wild foraging check and double check your identification before eating anything, do not take another person’s word on the safety of a plant. Some wild foods are debated on their safety as some people will have a reaction where others do not.

Also if you have food allergies be wary and careful when trying new things. Remember that when harvesting wild foods make sure they are not sprayed with poisons or chemicals. I am not a doctor and am not giving medical advice. If you want to try natural remedies do your research and also talk to your doctor.

Even though these plants are natural they can still be very strong medicines and even interact with other medication you are taking!

Alfalfa

Amazingly enough, this plant, a common feed for animals, is one of the most useful in a TEOTWAWKI collapse, or even just in a financial collapse where you suddenly become dirt poor. Alfalfa is highly nutritious and can be used to treat several conditions. The most important in my mind being bleeding, hemorrhaging, hemorrhaging after birth, and heavy menstrual bleeding.

Blood loss is a common problem where medical care is limited and people are exposed to hard physical work or dangerous situations.

Childbirth for women is the most fatal event during life in 3rd world countries, many of the deaths coming from hemorrhaging after birth. Drinking a tea made from alfalfa, or eating alfalfa in the last few weeks of pregnancy can help prevent hemorrhage or excessive bleeding due to several compounds it contains, this includes vitamin K which is essential to blood clotting.

I used this supplement under my midwife’s supervision during my last two pregnancies.

My first two births went off well except that I hemorrhaged after birth. After my second birth, I hemorrhaged so severely that I was only saved by my midwife administering emergency shots of anti-hemorrhaging drugs (which will not be available to most women in a SHTF event).

For two months after I was weaker than normal and under strict instructions to take it easy. My next two births went well and I barely bled at all, even compared to normal bleeding. Both times I was taking alfalfa at the end of my pregnancy. Pregnant women should not take it until the last three weeks of pregnancy due to the fact that as it has hormone properties that could cause labor and miscarriage.

Once a woman is considered full term at 37 weeks that is not such an issue. Taking too much alfalfa for longer than a month can have the opposite effect and cause bleeding to be worse! Newborns need Vitamin K for proper development and usually receive an injection soon after birth, but during or after a SHTF event those shots may not be available and doctors recommend mothers consume foods with high vitamin K so that it will be passed to the nursing child.

Dried or fresh alfalfa can be used in the human diet and also as a compress on wounds to help them stop bleeding. In application to a wound, it is essential to boil the water for 10 minutes to kill bacteria and then boil the alfalfa added for a few minutes thus killing any bacteria on the plant leaves. Alfalfa helps people who are nutritionally deficient.

It helps a great deal with vitamin C deficiency when used fresh, for it contains more vitamin C than some citrus fruits. Scurvy is caused by a vitamin C deficiency and is a common problem for people during famines, or when there is a lack of fresh fruits and vegetables.

It also has very high B vitamin levels and Vitamin D levels which help with problems such as rickets, a common disease especially affecting children who have poor diets or are not exposed to enough sunlight. This is a common problem when living in a war zone or an area where people must stay inside much of the time due to violence as Vitamin D cannot be manufactured by the body and is mainly created by the skin’s exposure to the sun.

Alfalfa is also easy to store when dried and is very cheap. It is a good item to keep on hand. Alfalfa is grown everywhere in the USA and can be found along ditch banks and country roads growing wild, in fields as well as in farmyards. It does not need to be reseeded every year so a field that had it last year will have it this year as well.

Raspberry Leaf

Raspberries (also known as redcaps, bramble berries, dewberry, and thimbleberry) grow wild in the USA and are even considered an invasive species. They come in red, black, purple, and golden fruit all of which is essentially the same plant, but these other fruit colors do not generally grow in the wild like the common red does. Obviously, the fruit is edible but the leaves and even roots can be used for highly effective remedies.

The most well known is for aid to painful menstruation, to regulate and normalize a woman’s cycle, and also to help shorten and lessen the pain of childbirth. I am all for shortening the length of childbirth; having had four children naturally! Caution must be used however, raspberry leaf can cause uterine contractions, so it should only be used once labor has begun or a week before birth is expected.

It can be used by non-pregnant women during and right before menstruation. Another equally important use of raspberry leaf is it’s use as a cure for diarrhea. More on that in the Blackberry Section. These plants are found near water, in boggy areas, besides stream banks, in gullies, on ditch banks, or growing anywhere that gets plentiful rainfall.

Blackberry Fruits, Leaves, and Roots

Diarrhea is one of the most common killers in third world countries due to contaminated water supplies and poor water treatment facilities. As a country collapses the infrastructure of water treatment always breaks down, and waterborne illness explodes. Preparation for such a disease is essential when we plan for a SHTF event.

Diarrhea is especially fatal to children and the elderly and is frightening at how fast it kills. Soldiers in battle frequently suffer from dysentery due to bad water as well. For centuries blackberries (and to a lesser extent any of the brambleberry varieties such a red caps, black caps, Marionberries, dewberries, and raspberries) have been used for treating diarrhea, dysentery, foodborne illness, and even the more deadly waterborne illnesses. This must be remembered to be a treatment, not a cure as diarrhea is a symptom of an infection in the body which must be treated as well.

Blackberry Root Bark is the most effective remedy for diarrhea, but if you can’t get to the roots the leaves are highly effective as well, even dried ones. Last is the fruit which can be eaten or a syrup or juice made from the fruit. A syrup or juice is especially useful when treating small children.

One teaspoon of root or leaves per boiling cup of water, steeped for 20 minutes, then sweetened with honey if possible due to its healing and soothing properties is a good dosage. It is the tannins in the blackberry plant that help with diarrhea.

Blackberries are even more invasive than red raspberries and grow profusely throughout the USA. If in a dry region look for them along streams or down in gullies and canyons. The leaves and root bark are easy to dry, and the leaves can be eaten and are high in nutrition.

Elderberries

I grew up eating wild elderberries, these are a round purple-ish blue fruit that grows in clusters on a bushy tree. The bush flowers in late spring depending on your area and the fruits are ripe in early fall.

They are very common growing wild and like water so they grow either near bodies of water or in areas that get plenty of water. I often see them growing in old farmyards or homesteads because the pioneers and old farmers used them not only for health but as a much-needed fruit.

They also can be found in gullies and draws. The fruit has a dusty powder on it, but care should be taken as the red elderberry, the stems of all elderberries that connect to the fruit, and also the unripe fruit, are poisonous.

The fruit and flowers have been proven in clinical trials to help with many ailments, but especially in respiratory infections such as bronchitis and also to help thin mucus. The fruit are very high in vitamin C and are used to treat the flu and to boost the immune system. Elderberries would be good for an insurance against scurvy. Harvesting is easy and making juice, syrups, or tinctures from them is the best way to use them for healing.

The flowers are used to make a tea or tincture for respiratory ailments and compress for wounds. They also are good in pies, jams, jellies, and to make wine and liquors. There is some evidence that they should be cooked before consuming as uncooked raw fruit can cause stomach upset. Elderberry syrup is safe for children.

Other Berries – Obviously there are many berries growing throughout the United States, many of them not only edible but beneficial as well. Getting a good book on berry identification for your area is an excellent idea.

Rosehips

Wild roses grow all over the USA along roads, up in the mountains, and in forests. They are usually found as just a single flower, meaning they are a single layer of petals in a ring around the central part of the flower, maybe five petals in a ring.

Roses are also grown in many yards and gardens, and there are even rose varieties grown specifically for large rosehips. Rosehips are the main and most helpful part of the plant for use. Wild roses have small hips compared to their cultivated cousins, but size doesn’t matter when it comes to food and medicinal value.

They can be eaten raw in a pinch, but the most common way is to chop the hips roughly and pour 1 cup boiling water over two teaspoons of the chopped hips. Allow them to steep for 20 minutes and sweeten with honey, or, if for a child under two years of age, sugar or syrup. Rose hips are higher in vitamin C than citrus fruit and not only prevent but also treat scurvy.

They are easy to identify and easy to harvest. Rose hips make a tea that is tart and pleasant to drink. They can help treat urinary tract infections and the flu, and rose hips also boost the immune system. When fresh veggies and fruit are unavailable, rosehips can be found even in winter and still be eaten as they do not rot easily and cling to the rosebush.

Rosehips are generally a reddish color, and it is wise to look for ones that are still firm, not black or with mold or rot on them. They can be used to make syrup, jelly, jam, wine, and juice. The flowers of roses are also edible but make sure you don’t eat them if they are been sprayed with pesticide.

Bachelor Buttons

Bachelor Buttons, also known as cornflowers, are a flower that grows wild and cultivated across the USA. They are popular in wildflower or cottage gardens and are also drought tolerant and reseed prolifically in the wild. The common color is a cobalt blue, but especially in gardens, they come in white, light pink, and purple.

The flower is the part used and is most commonly utilized as an eyewash for injured or infected eyes. This is usually done by steeping the flowers in freshly boiled water, cooled, and then applied over the eyes on a moistened rag.

A similar rinse for cuts and sores in the mouth aids healing. In this instance, it is best to spit out after swishing around the mouth. Furthermore, they can also be used in the same form to wash cuts, scrapes, and bruises.

Combine one teaspoon of dried cornflower petals, or five fresh blossoms with one cup of boiling water. Cover and steep for 15-20 minutes; after this you may strain and consume. If taking internally it is best for no longer than two weeks.

Cornflower tea has been used to calm diarrhea, treat urinary tract infections, and for anxiety or nervousness. This flower can be found along roadsides, in fields, and in clearings. They love full sun and they are very easy to grow. Women who are pregnant or breastfeeding should not use this internally. If you have allergies to daisies or ragweed you should not use this at all.

Lambs Quarters/Wild Spinach

Lambs Quarters, also known as wild spinach, goosefoot, pigweed, good king Henry, and fat hen, is considered by most gardeners as a weed, but is, in fact, is a highly nutritious and delicious plant that grows everywhere and is easy to identify. It is nicer than common spinach because it is slow to bolt in the heat of summer, and because while tasting like spinach, it is even more nutritious.

It can be cooked or eaten raw and the stems leaves and seeds are all edible. It can also be frozen, canned or dried for later eating. Lamb’s Quarters is a good survival food and can be found in yards, abandoned lots, fields, gardens, and along roads. You can cut it off almost to the root, yet it comes up and starts leafing out again.

Dandelion

Dandelion is another common yard weed that grows almost everywhere, including in the mountains. I never dig up the dandelions in my yard but use them and also feed them to our rabbits. We do not treat our yard with chemicals. It is highly nutritious, and all parts are edible- including the roots which can be dried and used as a coffee substitute. It has been used as a diuretic and to cleanse the blood of toxins.

The milk that comes when you cut the plant can be used on wounds and is highly effective to use on warts. I have used the milk on three of my children’s warts and all three times it made them disappear naturally without pain or scarring. It must be applied every day for a good month to the warts. A tea made from all parts of the dandelion is absurdly rich in nutrients and would be well utilized by those suffering from malnutrition.

Wild Onions

Wild onions are easy to identify because they smell like onions! They are considered a weed in many parts of the country, and they can be eaten like regular onions while being a healthy addition to the diet and are easy to dry for future use. They can be in yards or near places that have a constant water supply or a good rain.

Pine Trees/Spruce Trees

Pine trees are common all across the USA and several parts of the tree can be used both medicinally and nutritionally. The needles themselves are rich in vitamin C and can be steeped in boiling water to create a tea to fight scurvy (vitamin C deficiency), and they are also high in vitamin A and beta-carotene. Spruce tip tea or pine needle tea is useful to treat a sore throat, cough, colds, and chest congestion.

This is a very important survival food as it is so readily available and easy to find. The best tasting needles are young tender ones, but older needles work just the same nutritionally. Pine nuts that are found in pine cones are rich in calories, healthy fats, vitamins, and minerals and are high in vitamin K which helps stop bleeding. The inner bark of pine trees is even edible but should only be used in an emergency because to get at it you kill the tree.

Pine Sap has many uses and is highly effective for use on wounds when mixed as a salve to prevent and treat an infection. It is also used as the flu and cold treatment when mixed with honey or made into a tincture. It not only fights the infection inside but also soothes sore throats.

Chopped pine needles added to a hot bath can help with skin problems since they contain natural sulfur, they also soothe sore muscles and joints. Pine oil can be used by adding a few drops to boiling water and then breathing in the steam; there is evidence that it helps cure sinus infections, bronchitis, and breaks up mucus. Pine oil kills germs and can be used to clean surfaces during illnesses, although, it must always be diluted and never applied straight to skin.

However, pine oil is a distilled product and must go through special processing and may not be easy to replicate after SHTF (although what a skill to have!) Use roughly chopped pine needles, with boiling water poured over, then cover your head with a towel over the bowl and breath deeply. Pine needles are also a natural flea and bug repellent and can be used to stuff beds and cushions to deter them. The scent of pine is generally very calming. Caution – Pregnant women should not use pine needle tea as there is fear it could cause miscarriage. There are three varieties of toxic pine, and it is highly recommended to learn how to identify and avoid them. They are Norfolk Island Pine, Yew, and Ponderosa Pine.

Crabapples

These are a variety of apple that are often overlooked as an edible fruit because they are unpleasant for fresh eating. They are very good for cooking and if sweetened can be made into pies, jams, jellies, syrup, wine, pickled, and when mixed with other fruits dried in fruit leather. They were mainly used by our forefathers as an addition to cider making as they added depth of flavor and a bit of tartness to the finished product. There are many varieties of crabapple tree and the fruit can be quite large as they are grown for their pretty look. They are grown in many yards and businesses as a decorative tree and the fruit is most often left to rot. Most people I have asked are eager to let me pick off their trees since otherwise they eventually fall and have to be raked up. They also can be found growing wild and in old orchards or farms. Crabapples are high in vitamin C and make a pleasant tea when sweetened. They have been used to treat urinary infections and can also be juiced to make cider vinegar which is one of the most healthy things you can make. For the best flavor harvest after they have been frosted on.

Wild Plums

These are native to the USA and grow in all parts. They are small and are usually a yellowish red color. Wild Plums are a tasty fruit for fresh eating and are useful in making jam, jelly, syrup, pies, and pickles. They are very high in vitamin C and Iron. Dried or fresh they are a good laxative and treat anemia.

Cattails

A well known wild food that grows in marshy or wet areas these are easy to identify. All parts of the plant are edible in different seasons and have good food value. The root can be pounded and applied to cuts and scrapes as a poultice. As these always grown near or in water be careful of pollution.

Rhubarb

This is not necessarily a wild food but it is so common that noting where it grows is a good idea. This plant comes back year after year for practically ever and you see it often in abandoned lots, old farmsteads, abandoned homes, or in peoples gardens.

Most people never use it and are happy to give away to those who will. Harvesting in the spring is best when it is tender. Rhubarb can be made into jam, sauce, syrup, put into pies, cakes, and bread and canned.

Rhubarb is rich in B- complex vitamins such as folates, riboflavin, niacin, vitamin B-6, thiamin, and pantothenic acid and good levels of vitamin K. It has been used to treat stomach problems. The leaves are poisonous, only the stalks should be eaten.

Daylilies

These grow all over the US and in many places, they grow wild or have taken over lots of land and gardens as they are hardy and invasive. They are edible. The shoots when young in spring can be cooked like asparagus or eaten raw, the flowers should be harvested in summer and can be fried like squash flowers, chopped and added to salads, and immature buds cooked like green beans. The tubers can be gathered year round and cooked like corn. They have been used to treat arsenic poisoning.

Nuts

There are so many trees that produce edible nuts that all I can recommend is that you get a good identification book and start looking around you. Nuts are high in nutrition, healthy fats, and calories so they make an excellent survival food.

A couple of varieties that are overlooked by people are acorns and pine nuts found in pine cones. Acorns have good food value but are bitter so most people avoid them, meaning that you will have more opportunity to gather them. Learn how to process them to get out the bitterness.

Wild Strawberries

Also known as Alpine strawberry, Common Strawberry, Mountain Strawberry, Pineapple Strawberry, Wild Strawberries, Wood Strawberry, Woodland strawberry. These grow prolifically all over the USA and although the fruit is very nice to eat (but tiny) the leaves have great food value and have been used to treat diarrhea when made into a tea.

The leaves contain beneficial minerals and vitamins. The root is also used to treat diarrhea. These like shady places but also can grow in sunny clearings and fields..

Wild Violets

The leaves and the flowers are edible and can be found growing in many yards and gardens where they are considered a weed. They are purple-ish blue or white and can be found in the shade of forests or moist clearings. They can be added to salads or cooked. The medicinal uses are many and they make a lovely salve for irritated skin and rashes and also a tea can be made from the leaves and flowers to ease the pain of headaches and arthritis as well as to treat diarrhea. They appear early in spring and grow all summer long in the shade. They are loaded with vitamin A and C which makes them a good remedy for colds and flu. The flowers can be added to jellies during the cooking stage and turn the liquid a lovely violet color.

Ferns

Several fern varieties are edible and are often called fiddleheads, however, care must be taken as there are also several non-edible varieties that can cause mild to severe illness. Invest in a good identification book or print many pictures out of edible varieties off the internet for better identification. These must be harvested in early to late spring. They are fried, steamed sautéed, boiled, and pickled and are rich in vitamin A and C.

Wild Greens

There are so many kinds that it would take a good sized book to describe them all and I highly recommend buying a field guide and searching them out. Some that are common and worth investigating are mustard, watercress, stinging nettle, miners lettuce, sorrel, red clover, and sweet coltsfoot. Most greens are best harvested in the spring and early summer when they are tender and young.

Willow Tree

The willow tree has been used for thousands of years to treat pain. It grows in yards and woods across the United States. The bark of the tree, especially that of the White Willow tree is what as used and has the same actions of aspirin for treating pain and fever Use 1 to 2 teaspoons of willow bark to 8 oz of boiling water and boil for 5 to 10 minutes.

Then turn off heat and allow to steep for 20 to 30 minutes more.

Drinking 3 to 4 cups throughout the day is recommended to be effective. Gathering and drying the bark in spring summer and fall would be a good idea to have a store through winter.

This is a real medication similar in its side effects to aspirin, it interacts with several drugs and can cause the same stomach problems as aspirin so research it well before use. Pregnant and nursing women and children under two should never use willow bark.

Mints

Mints are not a really wild species but are so highly invasive once planted in a garden that they quickly spread and can take over vast tracts of land. There are many varieties and just as many uses both as a food as well as medicinally. Mints are high in vitamin A and spearmint, in particular, is high in minerals. It is often used internally to treat stomach upset, headaches, body aches, reduce fever, for sore throats and cough, anti-flatulence, and diarrhea. Externally mint is an excellent insect repellent and can be used to treat lice, muscle aches, soothe insect bites, hair care, and vaginitis. A simple tea is used internally and is quite pleasant, externally a similar tea can be made and cooled before application.

Mushrooms

Wild mushrooms can be very helpful both medicinally and nutritionally but great care must be taken as so many varieties are deadly. I won’t go into them here but invest in a good full-color photographic field guide, and even then be careful! The only mushroom I feel very safe harvesting is morels because they are so distinctive and only have one similar species to contend with. As my father said they look like a brain!

Tree Saps

There are several trees that produce edible saps that can be boiled down into sweet syrups. Most commonly we think of the maple tree, and all maples produce sap although the sugar maple is the most well known and produces the highest volume per tree. There are however several other trees that produce good sap for human use. Pine trees are one but the sap is more for medicinal use than for pleasurable eating. Birch, Walnut, and Sycamore all produce an edible sap for syrup making. Obviously, these are high in sugar content which equals calories. As a caution only stick to the above or other documented non-poisonous trees for sap. Tree sap syrup has many vitamins and minerals making them a good survival food.

Wild Leeks Or Ramps

These are a leek or onion-like bulb that are common throughout the United States in forested areas and grow often near streams or on hills. The leaves when torn or bruised smell of onion or garlic so they are easy to identify. The plant resembles lily of the valley. These are found and harvested in the spring. When harvesting only take half of what you find so they can continue to propagate.

Supplies For Harvesting – A good pair of boots and weather specific clothing, good identification books or literature, a small hand shovel, a good sturdy bucket/basket with a handle/or canvas bags, a knife for cutting, gardening gloves, a sidearm for meetings with predators of the four-legged to two-legged kind.

M.D. Creekmore recommends you get a copy of The Forager’s Harvest: A Guide to Identifying, Harvesting, and Preparing Edible Wild Plants.


Filed Under: Bushcraft

Small Homesteading Guide and Layout Plan

September 6, 2018 M.D. Creekmore

Face reality, unless you are super rich putting back more than six months to a one-year food supply, isn’t practical, and even if you have the cash to spend, finding room for storage and the constant dating and rotating become the next obstacle, and this can get quickly become unmanageable.

For most preppers the goal should be a one-year food storage reserve, this should see you through most disasters, but you should also plan and work toward becoming as self-reliant as possible where you are. If you can grow and forage for all or most of your own food then you can survive for decades if need be, and eat healthier too.

In this article, I will cover some key points learned from my experience running a small homestead and providing most of my own food for over a decade. This includes gardening, foraging, and raising domestic livestock as well as tips on preserving the bounty of your harvest.

Self-Sufficiency Starts with the Survival Workshop

Self-reliant prepper workshop

The ability to use tools has been a major contributing factor to our survival and growth as a species, but unfortunately, that ability has turned into a specialty skill set in our increasingly dumbed-down, in the call, “the guy” for everything that needs fixing in the world that we now live in. Unfortunately, for some calling “the guy” may not be an option during a long-term disaster. You will be “the guy” and if it breaks you will probably be the one who has to fix it, and aside from the obvious of needing to know what you are doing, you will also need the correct tools to do the job effectively.

Nothing beats hands-on learning and experience, and you can get that by signing up for any courses available in your area. Look into welding, woodworking, auto mechanics etc. learn all you can, because skills will be needed for your own use and well as being an excellent barter item that no one can steal from you.

You can often get free training, by offering your help to local businesses that specialize in the skills that you want to learn. Tell them that you would like to offer your help free in exchange for them helping you learn those skills. As long as they know that, you are not trying to learn, so that you can then set up as competition later, most will welcome the offer.

As for what tools you will need that really depends on your skills in using those tools, once you gain skills you will know also know what tools you need in your toolbox. But not matter what tool you buy always buy the very best quality that you can afford – low-quality tools often break during use and cause all kinds of cursing, disappointment, and unfinished work.

Another thing to keep in mind when selecting and buying tools is that power from the utility might not be available, therefore hand tools that run on muscle power and sweat should be given top priority, in the prepper’s toolbox, and then rechargeable tools that can be charged via solar or generator power. 

The Prepper’s Garden

the prepper garden
Soil tilled and ready for planting corn, pole beans, and squash.

When it comes to gardening everyone seems to have their own ideas as to what is “the best” method, and they all could be right because different methods are required for different situations and locations, but never the less the basics are still the same. You start with a seed, seedling, or cutting, plant it, nurture it, harvest it, and eventually eat it.

Generally, you will need a fertile soil with a pH-balanced level of between 6.5. – 7, well drained, with six or more hours of direct sunlight, and fresh water to grow a healthy, productive garden. If you can provide this type of growing environment, then the plants will do well without much else from you.

With the survival garden, your goal should be to grow as much produce as possible, on the least space as possible, while doing the least amount of work as possible. Remember minimum effort and the maximum reward is the goal because if you burn more calories planting and tending your garden than you get back from the harvest, you then have a negative return for your effort, which goes again the rules of human survival.

I have found a mix of close planting (sometimes called French intensive) and Ruth Stout’s method as detailed in her book gardening without work, works very well for me, producing an abundant harvest with little effort on my part.

With Ruth Stout’s gardening method you simply keep a thick layer of mulch (usually hay, straw or leaves) on the garden at all times, this keeps down weeds and automatically builds the soil and adds nutrients back as it decays. As it decays into the soil, you simply add more mulch, keeping it at a consistent level to keep smoother weed growth.

There is no need to build and turn a compost pile, or plow, sow a cover crop, weed, and seldom have to water, or do anything else besides adding mulch and plants to grow a productive garden.

The only fertilizers that I use are manure tea, cottonseed, or soybean meal, and then only need small amounts these, especially after the first couple of years once the soil has time to become fertile from constantly rotting mulch. To plant you simply pull back the mulch and plant the seeds, cutting or seedlings as you normally would in any garden.

And that’s all there is to it, mulch, plant, let grow, rest, harvest.

Guerrilla Gardening

Guerrilla gardening is a term used by local pot farmers, who have developed unique skills that allow them to raise the “illegal plants” in a secretive manner. However, before you get all excited with visions of easy money and smoke puffing from a freshly rolled marijuana cigarette, let me clear the smoke from the air, this article is not about growing the illegal weed; it is about growing secret food crops after a complete breakdown of the current system and WROL.

Having the traditional garden planted in rolls and in the open could make you the target of looters, scavengers, and thugs. Having your garden hidden and out of site could mean the difference between plenty and starvation after the balloon goes up.

Secret Grow Rooms

Secret grow rooms or greenhouses should be considered, all that is needed in most cases is to remove the roof from a garage or outbuilding and replace it with corrugated fiberglass. The walls can be painted white, or covered with aluminum foil, to help reflect light back onto the plants inside. From the outside, it just looks like any other outbuilding, while inside it hides an abundant garden.

Tables for plants can be made and rigged on pulleys, so the plants can be lifted closer to the roof providing more sunlight and lowered back down again for watering. Using this method, it would be difficult to grow enough to feed an entire family, but it could be done with proper planning and enough space. Most likely, the secret grow-room would be used to supplement other available food resources.

Order a copy of – Secret Greenhouse of Survival: How to Build the Ultimate Homestead & Prepper Greenhouse by Rick Austin for a full plan for setting up a secret greenhouse.

Forest Gardens

Many people have mentioned forest gardens; the idea has been around for a long time and could work well, for the survivor or a person bugging out to the forest. All you do is – find a suitable spot that is hidden, well drained, and open to sunlight. Dig up the soil, work in organic matter, or timed released fertilizers and plant.

If done right, such a garden can be largely self-maintaining requiring little effort by you after planting.

Avoid making trails to the garden area, people follow trails, and these will lead them directly to your garden, remember the harder it is for you to reach the gardens location the more likely no one else will even try.

Remove all signs of activity, like trash or freshly dug soil. Spread any loose dirt over the area covering any open spots with natural ground cover such as leaves. This also helps form mulch reducing the need for watering significantly. Try to make the garden area blend in with the surrounding forest as much as possible.

Step back and look at the possible approach points, and remove anything that catches the eye. Remember to avoid making trails to and from the site by never going in or out the same way and using alternating entry points. Try to walk on hard surfaces as much as possible to avoid leaving tracks.

Some plants are easier to hide than others are; potatoes, for instance, would be easier to hide than say tomatoes or corn. Most people would pass within three feet of a potato patch and not recognize what they were looking at. Choosing plants that blend in with the surrounding is an important consideration for the secret survival gardener.

The Gardening Nomad

I know a guy who lived in a truck camper for years – he would move from one hide to another every couple of weeks, he had gardens strategically located all over the countryside. I do not know if they were all legal crops (probably not), but know that some of what he grew what he grew were food crops and he seemed to do very well, while living a very simple life, all without a lot of stress and worry.

Three Sisters of the Cherokee

Another growing technique that I recommend is “the three sisters“. This system has been used for thousands of years with great success in both North and South America by many “Indian” tribes and native people.

The three sisters consist of corn, squash, and beans that are planted in a circle, with corn in the center, then pole beans are then planted around the corn and then squash are planted around the outside. The pole beans help to put nitrogen back into the soil, which is great for the corn and squash. The beans climb up the corn, which acts as a natural trellis. The squash with its wide leaves help shade out weeds and reduces the need for watering. It all works together in a sort of mini garden ecosystem.

Perennials

Perennials are my secret weapon against post-collapse hunger pains and starvation – planting perennials will allow you to have a continually replicating food supply, which will provide for you year after year with little effort on your part. Every prepper should establish a good variety of perennial edibles at their retreat.

I have established “gardens” of asparagus, Jerusalem artichokes, horseradish, garlic, perennial onions, and herbs scattered around my homestead. Once these perennials are planted, and established, they continue to grow and expand every year on their own with little or no help from you…

Choosing Seeds

At the beginning of the growing season most gardeners, simply head to their nearest garden center, and pick up whatever seed packets that are being displayed on the shelf that year, or they skip the seeds and their germination altogether by purchasing seedlings and transplanting those directly into their garden.

And why this works well (sometimes) during “good times” when you can still rely on going back and getting new seed for planting a new crop each year, if you’re thinking in terms of long-term survival or saving your own seed from year to year, then you need to consider buying and stockpiling Non-Hybrid (Heirloom) vegetable seeds.

According to the good folks at Heirloom Organics:

Non-Hybrid or Open-Pollinated seeds allow the gardener to collect seeds from a crop for future planting. Hybrid seeds do not. Heirloom Organics Seed Packs are 100% Non-Hybrid and Non-GMO (genetically modified) and specially sealed for long-term storage. Use now AND save for an emergency. All from the same hermetically sealed pack!

And while this is true in most cases, saving seed from year-to-year that grows true, without negative genetic changes is a little more complicated than that. Some plant species, such as corn, okra, and spinach, for example, must “cross-pollinate” each year to remain strong and to be productive.

Constant inbreeding of cross-pollinating plans, even if they are of the non-hybrid variety will result in weak, non-productive plans after the first couple of years. Therefore, even if you start with pure non-hybrid, heirloom seed you cannot save the seed of cross-pollinating species, indefinitely without a negative change in the resulting offspring at some point, due to inbreeding of the plants.

The solution to this problem is to simply, buy enough seed to last several years, and stored in optimal conditions to ensure germination, or buy several different Non-Hybrid, Non-GMO varieties and cross-pollinate each year.

Now the good news, self-pollinating plant species such as bean, pepper, tomato, eggplant, garlic, and pea can be grown and the seeds saved year-after-year with little or no genetic change in growth, health, or overall production, allowing you to continually feed your family, now and during hard times.

Over the years, I have seen many folks express concerns about the germination rate of seeds that have been packaged for long-term storage, such as the Non-Hybrid vegetable seeds that are packaged and sold by Heirloom Organics and other seed vendors.

The main concern seems to be that the process and conditions of storing the seed long-term will somehow cause the seed to not germinate (sprout) when planted. After having tested these seeds and their germination rates over the past several years, and others have done the same with similar results, I can assure you that germination rates remain just as good as or better than seeds stored in a traditional fashion.

Putting back a supply of non-hybrid vegetable seed should be on the to-do list of every, gardener and that applies ten-fold for the “prepper” because we do not know what will happen, the result or how long the duration.

We can only store so much food, and after it is gone, you will have to produce your own or starve….

Fruits, Nuts, and Berries

Fruits, nuts, and berries are one of my favorite hedges against starvation because they can be planted once and then mostly take care of themselves after. However, the biggest benefit is that after planted and established they will come back and provide for years after without you having to do much in the way of care…

Plant it and forget it… well almost.

If you have an empty space on your property, then fill that space by planting a food bearing tree, vine, or shrub. To fill larger areas plant fruit and nut trees, and for smaller areas consider planting strawberries, raspberries, rhubarb, blueberries etc. No space should be left empty especially around a small homestead…

Let us start with fruit trees since these tend to produce the most food for the least amount of work. When choosing fruit trees, look either dwarf or semi-dwarf varieties depending on the space you have available. Never plant a dwarf tree if you have room for a semi-dwarf variety, the semi-dwarf trees grow to a larger size and thus they will produce more fruit under the same growing conditions, they are also more winter hardy, and live longer.

It’s also a good idea to plant a variety of different trees, shrubs and vines that produce different types of fruit, nuts, and berries, i.e. apple, pear, peach, plum, cherry, blackberry, blueberry, raspberry etc. This will not only provide you with more variety at the table, it will also act as insurance against pest and disease that might attack one variety or plant but not another.

Also, when planting apple trees, I suggest that you plant both summer and winter varieties, as you might have assumed summer varieties mature and are ready for harvest before the winter varieties which makes it easier to harvest and preserve the fruit because it’s not all ready for harvest all at once.

As for planting instructions, I am not going to get into that here simply because the details can vary slightly depending on location and type. You will find that the planting instructions for your location will come with the trees, shrubs, and vines when you buy them at the nursery, if not ask.

When choosing varieties for cross-pollination, you can use the free tool at www.orangepippintrees.com/pollinationchecker.aspx to help you make the correct choices. Also, ask at the nursery when you buy your fruit trees for their advice on pollination and their recommendations.

I recommend that before planting your first tree, shrub or vine that you order a copy of The Fruit Gardener’s Bible: A Complete Guide to Growing Fruits and Nuts in the Home Garden by Lewis Hill this is a great book that is dedicated to the subject, and will cover everything that you need to know and then some.

Fruit Tree Pruning Instructions – dormant pruning is done in late fall or winter when the leaves have fallen off.

Practical Domestic Animals and Poultry

When choosing which domestic animals to keep for food, look for those that require the least time and effort to care for. As I explained in the gardening section above, when surviving, you do not want to put in more effort, and thus, burn more calories, then you are going to get back upon consumption.

Look for animals that can generally take care of themselves, like with anything else that you do when trying to survive look for the most reward for the least effort. For example, you do not want to exert 1000 calories, searching for an egg that you are only going to get 78 calories from. If you do this for consistently, then you are ensuring a slow withering death from malnutritions.

Chickens

chickens for self-reliance

No section on raising domestic animals for food would be complete without taking a closer look at raising chickens. Chickens are usually the first thought that pops into a person’s head when they think about farming or homesteading and for good reason.

Really the only downside to raising chickens is the initial startup costs of having to build a coop and feeders and watering containers, after that the cost per bird is extremely low, especially if your let them free-range so that they can forage for most of their own food.

Your main concern will be keeping them safe from predators because everything loves to eat chicken, including but not limited to foxes, raccoons, coyotes, bobcats, mountain lions, owls, hawks, domestic dogs, domestic cats and everything else that likes to eat meat. The best way to keep them safe is to keep

them inside a well-made coop with a securely fenced in outside run, but this means that you’ll have to feed them more because they generally won’t be able to forage for the bulk of their food when confined to such a limited space.

As a compromise, I keep my chickens inside the coop with access to the eight by twenty-five foot run most of the day and let them out to forage of the evenings about two hours before dark. They generally stay within seventy-five yards of the coop, and will go back in to roost before dark. After they are all in I’ll go lock the door to the coop, to keep any predators out and the chickens’ safe inside.

When building your coop seal any openings uptight, even a small hole can give a hungry predator a way in – some will even use a small opening as a starting point that they can enlarge by chewing until they can squeeze inside.

When building your run, you will want to use treated wood for longevity, and to dig a trench six or more inches deep to bury that length of the wire in the ground to prevent predators from digging in under the fencing. I also like to pile rocks all the way around the coop and run – so far, this has worked great and I have never had a predator that has gotten inside the coop or run by digging.

Another thing to keep in mind is that chicken wire by itself is weak, and will not keep a large determined predator out. When I built my first chicken coop and run, I had two stray dogs that managed to rip through the chicken wire and into the coop. Luckily, I was at home and stopped them before they were able to do any more damage.

After that incident, I have always re-enforced the bottom three feet of chicken wire around the run by covering it with welded-wire. This has been very effective at keeping larger predators out and the chickens’ safe inside. My coop is almost finished in the photo above.

Having an outside dog (one that will not kill chickens) is also a great help at keeping your flock safe and for security in general. A good dog will keep watch and run predators off when they wonder into the area before they have a chance to find their way into your coop.

When choosing a type of chicken for survival purposes, look for dual-purpose breeds that are both good egg layers and meat producers. You will also want to choose breeds that go broody and that are good mothers so that you can raise additional birds to replace those that are eaten.

Note: hens will continue to lay eggs, even without a rooster but those eggs will not be fertile and with not hatch producing offspring.

My five most recommended breeds for preppers are the Black Australorp, Rhode Island Red, Dominique, Plymouth Rock, and Wyandotte. These breeds meet all of the criteria listed above and are easy to find or order in most areas and easy to care for.

When you start raising chickens, you will find that it is easy to be carried away with the result being that you end up with more birds than you need. For most preppers, a flock consisting of ten hens and two roosters works out well. The extra rooster acts as a “backup” should something happen to the other, allowing your hens to keep producing offspring.

You can find a wealth of free information detailing everything that you could possibly want to know about raising chickens, breeding, medical issues, coop building etc. However, to be honest, it is not that hard and if it is then you are doing it wrong.

Remember look for a maximum reward for the least effort, once you get your coop built it should only take about ten minutes per day to take care of your flock.

Ducks

I used to keep a few ducks around, and plan to add ten or more back into my flock this coming spring when I can buy day-old ducklings from the local Tractor Supply or Farmers CO-OP, and eventually, I may completely replace my flock of chickens with ducks.

Ducks are smarter than chickens and are better foragers that can find most of their own food, and they are less disease prone and seem to attract fewer predators. Ducks lay just as many eggs as chickens, but the eggs taste better and are larger. They are also better mothers to their young.

Many preppers make the mistake of thinking that they must have a large pond or another body of water on their property to keep ducks, and while the ducks do enjoy that setting, it is not necessary. All that I ever used were several “kiddie pools” that I kept full of water around my property and the ducks thrived.

Since ducks like to poop in the water, you will need to pour it out every week or so and replace it with fresh water. The water from the pools makes an excellent fertilizer that can be poured around your fruit and nut trees.

Rabbits

If the goal is to put meat on the table then you should start building your rabbit hutches now. Rabbits meet or exceed all of the criteria that I previously mentioned about choosing animals that easy to keep and cheap to feed because they do well on nothing more than, fresh dry grass clippings, hay, unused produce from the garden, salt, and fresh water.

I also like to add a hand full of commercial feed pellets for each rabbit every couple of day to round out their diet. This becomes more important during the winter months when fresh grass clippings and hay are not as readily available.

Housing for rabbits is a simple matter; all they need is protection from predators and from harsh weather conditions. Do a web search and you will find a wealth of free hutch building plans, these range from basic but functional to major projects costing several hundred dollars. My preference is to keep it simple and cheap.

You will have to keep the male “buck” separate from the females until you are ready for them to breed. After the female has been breed, remove the male and put him back in his cage. Females are usually ready to breed at around ten months old and will usually bear from eight to fourteen young after a short thirty-day gestation period.

The offspring can be slaughtered after nine weeks and the doe then rebreed again. As you can see if you do the math, one buck and five does can produce a lot of meat quickly. Just don’t make the mistake of eating only rabbit meat – rabbit meat is too lean and humans need some fat to survive and a diet consisting of only rabbit meat by itself does not provide enough fat to keep a human body healthy over the long-term.

Larger Animals

If you have enough land to provide the bulk of food and space for larger domestic animals like hogs and cows, then these can prove a huge benefit and should be considered. These larger animals can provide hundreds of pounds of meat, or as is the case with the cow can also provide milk, cheese, and related products as well as meat when slaughtered.

Goats are a great alternative to the cows and are much easier to care for and will find most of the own food if left free to forage over a large enough area. However, keep in mind that they can kill trees, and native foliage, and will eat your garden, flowerbed or just about anything else that they are allowed to get into.

Since this is not a dedicated book on how to care for and harvest domestic animals, I am going to suggest that you order two books – Barnyard in Your Backyard: A Beginner’s Guide to Raising Chickens, Ducks, Geese, Rabbits, Goats, Sheep, and Cattle by Gail Damerow and Basic Butchering of Livestock & Game by John J. Mettler. These two books will cover everything that you need to know to successfully raise and butcher domestic livestock and poultry.

Bees and Honey

Honeybees have been vanishing at an alarming rate, with losses of upwards of 40% of bee colonies worldwide over the past few years. In addition, while no one seems to agree on the cause, we can all agree that the loss of our honeybees will throw our ecosystem out of balance, making it more difficult or impossible to grow enough food to support the earth’s current population.

Personally, I believe that the predominant cause of this hive die-off is due to the increased planting of GMO crops and especially the use of chemical pesticides that the bees carry back to the hive, causing death and eventual hive collapse.

Having one or two beehives can produce 25 to 50 pounds of honey per year if the hive is healthy and well managed. If you want to keep a hive or two at your homestead, the first thing that you should do is to go talk to a local beekeeper that already has established hives.

These experienced bee keeps can give you some great pointers on keeping bees in your area and the dangers to look out for, and possibly sell you everything that you need to get started.

Foraging For Wild Foods

I love waking up in the morning and seeing this guy in my front yard. He thinks he is a pet it seems but could be dinner if needed.

Foraging for wild foods via hunting, fishing, trapping, and gathering of edible plants and nuts can go a long way toward ensuring your survival after the balloon goes up if you are prepared and have the needed skills to do so.

You need to learn how to hunt, trap, and fish as well as how to recognize and prepare the edible plants and nuts that are abundant in your area.

Granted it’s impossible to teach someone to hunt by writing about it in a book, you need to get out and do it to learn, but you can pick up a few tips and some how-to-do-it knowledge from reading and watching other people hunt on the Outdoor channel.

Generally, trapping is more efficient than hunting especially for those just starting out; traps can be set and work without you having to be there. Set it, leave it, come back, and check it once a day to remove caught game, rebait the trap or both.

You can use the free time to do other needed chores like tending your garden or setting more traps. Harvesting wild game for the stewpot is an excellent long-term survival strategy as long as you do not plan to live off harvested wild game exclusively. Wild game should be considered as only one link, in your food resupply chain, and not as the whole chain.

You must have variable and independent sources of resupply, lined up and ready to go. I have seen too many preppers, who plan to rely 100% on their stored foods. They have no resupply chain, and if the crisis lasts longer than their food stockpile, then they are out of luck.

Plus your stockpile might be looted, burnt, blown away or destroyed a hundred other ways, so please don’t put all of your eggs in one basket, so to speak. Plan on losing your main food supply, and make plans that will allow you to keep on feeding your family, regardless of how empty your storage shelves become.

To start, you will need to learn the basics of setting both store-bought and homemade traps. To help you in both areas, I suggest that you order copies of The New Buckshot’s Complete Survival Trapping Guide by Bruce Hemming, Survival Poaching by Ragnar Benson and The Modern Hunter-Gatherer: A Practical Guide to Living off the Land by Tony Nester.

However you’ll still need to get up and off of your rear-end and actually go outside, and do it. You will need to practice, practice and then practice some more because most animals are smarter than the average human trying to trap them is.

There are other good how-to-do-it trapping books available, but the three are my top recommendations. Just do not think that you are an expert or proficient trapper just because you read a book, you are not.

You have to get outside and DO IT!

As for trap and gear recommendations, I suggest that you lay in a good supply of small game snares, you can make your own snares, but I’ve found that it’s just as cost effective to order them pre-made in bulk than to make your own, especially when you consider your time.

The Dakota line Rabbit Snares are a perfect size and weight for trapping small game like rabbit, squirrel, and pheasant. Larger game can also be taken (easily I might add) with snares, but you will have to make your own, heavyweight snares for this (disclaimer: check and follow game laws… yadda, yadda, yadda), full details on snaring large game are given in the pages of Survival Poaching, that I linked to above.

My next trap recommendation is the 110 Single Spring Body Trap, these are perfect for rabbit, and squirrel sized game, and can be set without a setting tool by most people. When setting these traps, it is a good idea to use a Safety Grip Tool, for your safety.

These traps work by snapping shut with enough force to kill the animal with a blow to the neck, and they have enough power to break your hand if the trap is accidentally tripped while setting it.

Fishing Gear

One of the easiest and often most productive places to forage for food are in lakes and streams. While everyone knows about fishing with a pole, line, and hook, most people never consider methods such as trapping, spearing, gigging, or shooting fish (check your state’s game and fish laws yadda, yadda, yadda) despite the fact that these methods are often far more effective.

First, let us talk about “fishing” after all this is the first thing that most people think of when “catching fish” is mentioned. It is easy to tie a line with hook and bait to a pole and toss the line into the water and wait for something to bite.

Alternatively, to make a “hobo fishing reel” which is really just a soda, soup can or stick with fishing line wrapped around it. While this simple setup will not win any contests for “showiness”, it can be put together in a couple of minutes and is effective enough to put food on the table if the fish are biting.

When riding an ATV or backpacking into the backcountry, I like to fish the abandoned farm ponds, and remote streams, that can be found in my area. I like to take a collapsible fishing rod or the voyager spinning travel kit with me, both work very well and don’t get in the way when riding or hiking in wooded areas like a traditionally fixed fishing rod would.

These types of rods will work great in a bug out kit and for foraging the waters away from your home or retreat after a disaster or TEOTWAWKI. Just be careful not to get so preoccupied with fishing that you become oblivious to your surroundings, and are taken by surprise by someone who may have bad intentions.

In this type of situation, after the stuff has hit the fan it is best not to go out alone if possible. When you’re alone it’s nearly impossible to do a task, such as fishing and stay 100% aware of your surroundings 100% of the time. Having an armed lookout, placed in a concealed location to watch your six is a good idea.

Ditto for other post-disaster, chores as well stay alert and if possible, post a lookout to watch your back.

For mobile fishing tackle, I keep it simple, a few assorted hooks, some split-shot sinkers, a few small artificial lures, and a couple small bobbers. This simple yet basic fishing gear is small and lightweight while still being effective for freshwater fish like bluegill and sunfish.

Another type of “fishing reel” that I have grown fond of using is the Yo-Yo Fishing Reels. Several of these can be set and left alone while you go take care of other chores, like setting up camp or building a fire, and let’s face it having several lines in the water at once can only increase your chances of catching something.

Edible Plants

Every prepper should be able to identify, harvest, and use the edible and medical plants that grow wild in their area. Luckily, there are a number of great books with color photos and detailed information on this subject, but like with most things you’ll still need to go out and actually find, harvest and use these plants because nothing beats getting out in the field and doing it to gain lasting knowledge…

Here are two books, a video, and deck of cards that I recommend:

  • The Forager’s Harvest: A Guide to Identifying, Harvesting, and Preparing Edible Wild Plants by Samuel Thayer
  • Backyard Foraging: 65 Familiar Plants You Didn’t Know You Could Eat by Ellen Zachos
  • Wild Cards: Edible Wild Foods
  • The Forager’s Harvest – Edible Wild Plants 2 DVD Set by Samuel Thayer

Filed Under: Homesteading

  • « Go to Previous Page
  • Page 1
  • Interim pages omitted …
  • Page 71
  • Page 72
  • Page 73
  • Page 74
  • Page 75
  • Interim pages omitted …
  • Page 87
  • Go to Next Page »

Primary Sidebar

Subscribe to Blog via Email

Enter your email address to subscribe to this blog and receive notifications of new posts by email.

Join 7,202 other subscribers
  • Amazon
  • Facebook
  • Substack
  • Twitter
  • YouTube

“Do more with less.”

– Minimalist proverb

Recent Posts

  • Just so you know
  • Weather Update for My Corner of Appalachia
  • Why I’m Ordering Ivermectin + Mebendazole Every Year
  • The Website’s Shutting Down (But Here’s the Plan)
  • You Are Hated! Start Training Like It!

Footer

Recent Posts

  • Just so you know
  • Weather Update for My Corner of Appalachia
  • Why I’m Ordering Ivermectin + Mebendazole Every Year
  • The Website’s Shutting Down (But Here’s the Plan)
  • You Are Hated! Start Training Like It!

More about me

Books I’ve written

Books I’ve read

Follow Me on YouTube

Follow Me on Facebook

Gear I Use and Recommend

Newsletter

Search this site

Follow me elsewhere

  • Amazon
  • Facebook
  • Substack
  • Twitter
  • YouTube

© 2008–2025 M.D. Creekmore · As an Amazon Associate, I earn from qualifying purchases.