• Skip to main content
  • Skip to secondary navigation
  • Skip to primary sidebar
  • Skip to footer

M.D. CREEKMORE

  • Blog
  • Books
  • Newsletter
  • Gear I Use
  • About
  • Contact
  • Facebook
  • YouTube
  • Blog
  • Books
  • Newsletter
  • Gear I Use
  • About
  • Contact
  • Privacy Policy
You are here: Home / Archives for Power Generation

Power Generation

Here you will find information on living off the grid including solar power and detailed information on other alternative and off-the-grid power alternatives.

NEW VIDEO ALERT: WHEN THE LIGHTS GO OUT… CHAOS!

January 20, 2024 M.D. Creekmore

In this video, I explore a critical yet often overlooked topic: why some people neglect emergency preparedness and even react negatively when it’s suggested. Despite the regular occurrences of severe weather and power outages, many remain unprepared for these disruptions. This discussion goes deeper, examining the potential aftermath of a major event like an EMP, CME, cyber-attack, terrorist attack, or war that could lead to a long-term grid failure.

I’ll dissect the psychology behind this lack of preparedness, the consequences of being caught unprepared, and emphasize the importance of readiness for even the most severe scenarios. The video also provides practical advice on preparing for these extreme situations, ensuring you have essential survival skills and knowledge for any unforeseen event.

Whether you’re just starting to think about emergency preparedness or are seeking to deepen your understanding, this video offers insights and tips for everyone. Subscribe for more discussions on survival strategies, preparedness, and adapting to life without everyday conveniences. Stay informed, stay prepared!

Click here to watch the video on YouTube.

Filed Under: Power Generation

Heating and Cooking Off-The-Grid With A Wood Stove

November 11, 2019 M.D. Creekmore

Buying a Used Wood Stove by Dan W

This topic has been frequently discussed around our table as one of the prime problems we needed to resolve. I thought that you all might be interested in our solution.

We live about as far north as you can go and still be in the continental U.S. It is about 60 miles to the Canadian border by road and 35 miles or so as the crow flies. Winter is the dominant season here! If it’s winter we’re coping with it and if it’s warm outside we’re thinking about the next winter.

Even so, we manage to stay quite comfortable though the temps often go below zero and stay there for extended periods ……… That is, as long as the grid is up and the propane tanks are full. Our log home is a rather large 2.5 story that is extremely well insulated. We heat, cook, and heat water with propane.

Our two 500 gallon propane tanks get refilled as long as the roads are passable.

Electrical service is fairly reliable but, without juice from the grid (or firing up our generator), we would have no furnace or hot water. Although we can still use our propane range top to cook, our oven is inoperative without electricity.

We do have a gas fireplace that will work without any electricity (no blower) but it is very hungry and uses a lot of propane. Located on the main floor it will not provide much heat for the lower level.

We have a 12.5 KW gas generator and 175 gallons of gasoline in storage plus a lot of 20# and 1# propane cylinders. We’ve bought several Mr. Buddy propane space heaters and have multiple Coleman stoves plus a camp-style small oven, but these are supplies intended for short-term use.

We’ve done about all we can as far as storing away extra fuels. The long-term answer is not man-made fuels. Even the largest supply of non-biofuels will eventually run out no matter how well you manage to ration their use.

All in all, we feel like we’ve planned well and have put in place those things that will dramatically extend our survival time ……….. but, we were still dependent on electricity, gasoline, and propane.

If we could become better prepared so that our supplies of diesel and gasoline were reserved for things other than heating and cooking (Generator, Tractor, ATV, Truck) we’d be in a much better position for a much longer period of time.

Our 30-acre property is all timber and offers nearly a lifetime supply of wood. The obvious solution is to be able to utilize this firewood supply as a means to eliminate our dependency on non-biofuels. A wood cookstove would satisfy the heating needs for the main floor and loft as well as cooking issues.

Due to the design of our home, we would also need a heat source for the lower level. At one time we had a wood furnace located in the lowest level of our home and its masonry chimney is still functional. So, we decided to take advantage of it.

A small wood stove in the lower level would give us the heat to ensure the pipes didn’t freeze and make it livable during winter. A wood-fired cookstove on the main level would give us the ability to cook and provide heating for the rest of the house. It looked to be a workable plan.

Buying a Used Wood Stove 
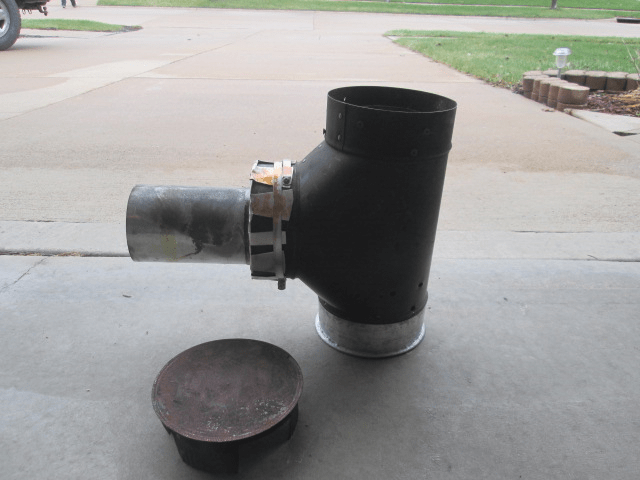
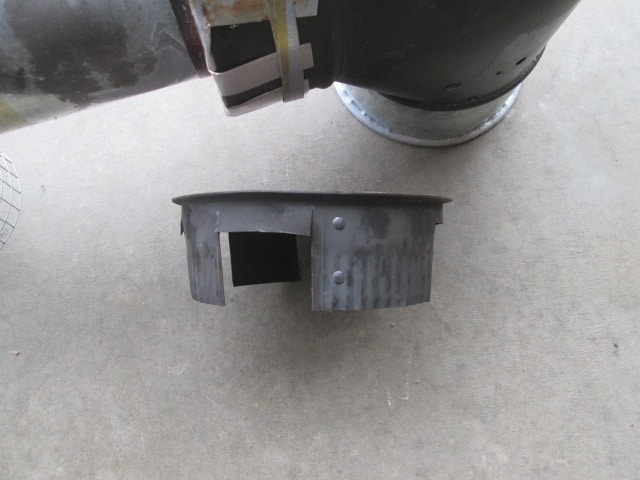
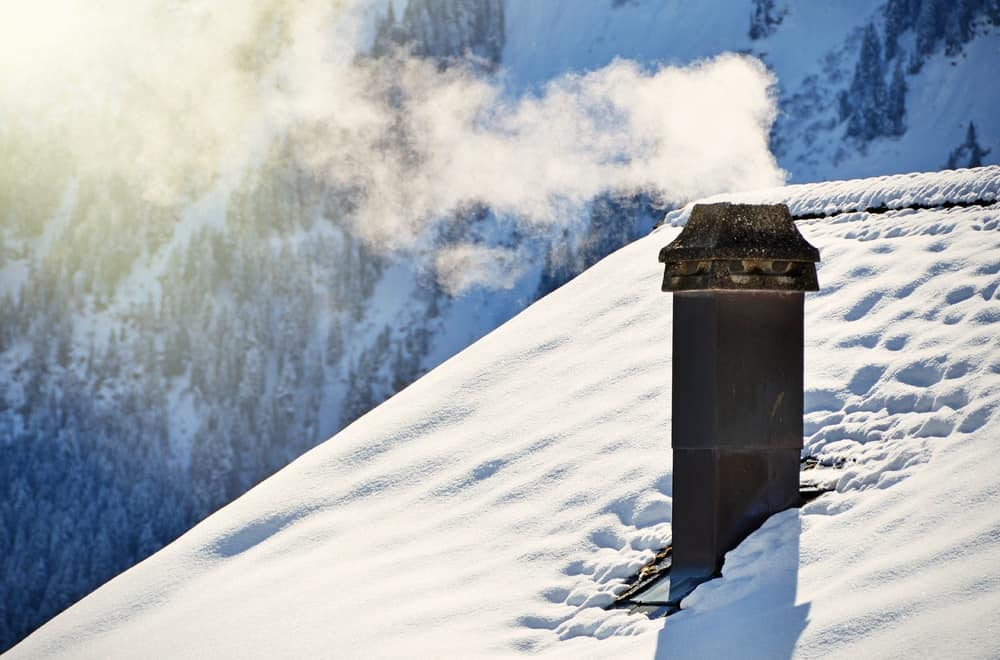
The search was on for a wood-fired cookstove that could be moved into place within the home and be safely put to use if/when the SHTF. I did not want to cut a hole in the roof for chimney pipe to pass through …….. a chimney thimble (just in case) mounted in our T&G roof decking was not acceptable to us. It would also mean that we’d have to get on our steep metal roof to initially install the chimney pipe and remove it when it needed cleaning.

Not good! We did, however, have a large window in a location where we thought a wood stove could be installed. The window slides so that one half is open to a screen fitted in an outside channel. The screen channel could easily be replaced with a custom-made solid piece of tin designed to fit exactly as the screen did.

This would be the exit point for the chimney pipe! I had the tin piece sized to duplicate the dimensions of the screen made at a local shop. I added a 6” insulated thimble to it. It turned out to be a good fit and can be installed without tools.

The stove pipe would exit through the thimble, turn at a 30-degree angle and then head towards the 4’ roof overhang. The pipe would be supported at the edge of the overhang by plumbers tape before it once again made another 30-degree upturn.

A short section of straight pipe was then added and finished off with a spark arrestor cap. Our roof is metal which helps to reduce the potential for a spark causing problems. I know, it’s not the perfect arrangement for a chimney ……….. but since the entire length will be only about 14’, the stove should still draw well.

This entire set up is adequate to safely exhaust the flue gases from a small wood fire like that contained within our cookstove.

The key to all of this working was the right stove. The one I was looking for needed to be relatively light in weight so it could be carried into the house when it was time to set it up. It needed to have an oven, be mostly cast iron, and be efficient. I did not want the typical Amish type wood cook stove as those were too large, too heavy, and way too expensive.

Although I found a few of those type stoves for sale locally, with more on the internet, they didn’t fit my criteria. After much searching, I finally found a stove that fit the bill ………. It’s the SOPKA! Manufactured by the SOPKA Stove Company and imported from Serbia (yeah, that’s right, Serbia), these stoves are an excellent example of a small dual fuel cookstove.

I spoke with the nearest dealer and was pleased to find out that the price was reasonable and delivery to our home was not a problem. I asked if they had sold many and were the buyers satisfied? The dealer’s response was very positive and they said that owners were very happy with the stoves operation, construction and performance.

They also said they were glad they had decided to become a dealer for SOPKA as the company was very good to deal with and stood behind their products. We live about 250 miles from the dealer’s showroom and, as luck would have it, they had the model we wanted in stock.

We purchased a black SOPKA Magnum complete with nickel trim. Check out the stoves at the SOPKA website: www.sopkainc.com .

What I especially liked about this stove is the size; it is actually a bit smaller than 3’ x 3’ x 2’. The smaller firebox uses small pieces of firewood and it is, therefore, easier to manage the cooking temps. As I said earlier, it’s also a dual fuel design that will burn coal as well as wood.

The top cooking surface is more than adequate for our needs while the oven is large enough to bake four loaves of bread at the same time.

Both the firebox and oven have glass windows and there is a temp gauge mounted in the oven glass. There is also a full-width storage drawer below the oven. It’s a small unit that offers virtually everything found on the larger old-styled stoves. The outlet on this stove is 4” but it comes with a 4” to 6” adapter.

I plan to have a water container made for it that will sit on the top surface in front of the stove pipe. When we placed the initial order for the stove we also ordered a large insulated floor pad (5’x5’) to protect our hardwood floors. The SOPKA stove, floor pad, and the stovepipe now reside in our garage waiting for the day when they will be put into service.

Once we had the stove and floor pad in hand, I designed the window insert that would serve as the pass-through for the stovepipe. Made of a medium gauge tin it is designed to fit perfectly into the half section of the window slider where the screen had previously fit.

A standard insulated 6” DW pipe thimble is installed. A 2’ straight piece of double wall 6” diameter pipe is inserted into the thimble.

Black single wall pipe from the stove is connected on the inside and double wall pipe runs up to the roof overhang on the outside. Since the interior walls of our home are cedar I designed a simple 4’ x 8’ wall heat protector using the same gauge tin as the window insert.

This not only protects the wall surface but will reflect heat into the room. It attaches to the wall behind the stove using screws and spacers to create an insulating airspace. I painted the wall heat protector with heat resistant black paint. The drawing will give you an idea of how we plan to set things up.

We’ve verified that we’ve got enough lengths of chimney pipe to connect everything when the time comes. The stove weighs in at 441# but we will remove the doors and inserts to reduce that weight before it gets moved into the house.

My little tractor can lift it and set it down on a furniture dolly on our front porch. From there it’s an easy matter to roll it to its home position in front of the window. By using a 6’ ladder on the outside deck all of the chimney pipe connections can be made without having to climb on the roof.

This is important as the chimney pipe will need to be cleaned a bit more often due to the angles and expected heavy usage (once it’s put into service). I don’t even want to think about getting on the roof during winter!

For heating the lower level I found a nice little Windsor wood stove manufactured by the Majestic Company: http://majesticproducts.com/family/Stoves/Non-Catalytic/Windsor/ This is their smallest non-catalytic model.

Weighing in at only 180 pounds, it’s rated at 23,000 BTU and takes up to 18” logs. Perfect for our application and priced right. The floor where this stove will be installed is concrete so no protective pad is needed.

Believe it or not, I was able to find this stove at a dealership in Iowa (we live in Montana) and have it shipped to us for a considerably cheaper price than I could buy it locally! It pays to shop around and buy off-season when you can.

To help move the heat around we purchased two Caframo Airmax Eco Fans (one for each stove). These fans sit on the stove top and generate their own power using the heat of the stove. Not the cheapest accessory but they do move a surprisingly large amount of air.

If the SHTF during a winter cycle we still have more than enough non-biofuels stockpiled to last until the warmer weather permits us to set up the stoves. All told we’ve invested about $4400 for the SOPKA and the Windsor wood stoves including the stovepipes and fittings.

Yes, it’s a big chunk of change ……….. But, these two stoves are pivotal items in our preps. Since our home is a BOL for several other families the expense has been shared. Now, we no longer fear that we will run out of man-made fuels and not be able to live in a heated environment or cook our food.

Obviously, our solution to the issues of cooking and heating if the grid goes down is not feasible for everyone.

The expense is a big factor (when isn’t it?) as is the availability of firewood (or coal). We figured that if we end up never using this investment our heirs can always sell it!

If, on the other hand, our worst fears do come to fruition ………….. we won’t be forced to cook outside over an open fire and freeze inside when winter arrives!

Filed Under: Power Generation

Can You Use Diesel Fuel In a Kerosene Heater?

November 11, 2019 M.D. Creekmore

Is It Safe to Burn Diesel Fuel in a Kerosene Heater?by Jeff in Ohio 

Can You Use Diesel Fuel In a Kerosene Heater? That’s a good question and one that I will answer below…

It is well-known that diesel engines are capable of using other fuels besides diesel. This includes kerosene (with added lubrication). But how well does diesel work in items designed for kerosene? Theoretically, they should be almost interchangeable.

But are they? I decided to find out for myself. First, I will describe the items used followed by the results of using diesel fuel in them. The fuel used in the testing was off-road diesel that had been dyed red for tax purposes.

So, Can You Use Diesel Fuel In a Kerosene Heater?

Yes, you can burn diesel in a kerosene heater. Diesel burns surprisingly well in MY 23,000 BTU Kerosun brand kerosene heater. I could detect no difference in flame height or heat output and no odors. A friend that works at the local fuel co-op told me that diesel may reduce the life of the wick but so far I can’t tell any difference.

Even if it does occur, wicks are fairly cheap and the difference in fuel price can result in significant savings over the long haul.

Butterfly brand 22 wick 14,000 BTU kerosene stove.

I love this stove because of its simplicity and versatility and I have two of them. It uses rope wicks that are simply moved up and down to adjust heat output. It is made as a cook stove but works quite well as a heater.

Be aware that these stoves do not have an auto-shutoff feature if knocked over. Flame height and heat output were the same. However, I could detect a slight increase in odor and a very small amount of black smoke as well. For temporary use indoors I don’t think this would be a problem. I believe diesel is a viable alternative fuel in this stove.

Dietz Monarch lantern.

This is the”railroad” lantern most people are familiar with. Like the Butterfly brand stove above, these are a model of simplicity. Light output was about the same and I could detect no difference in odor but it was quite smoky.

It didn’t take long to soot up the chimney. This was bad enough that it would have to be cleaned off every day. I would not want to use this in a closed-up house unless I was desperate. Outside use would be fine.

Coleman Exponent multi-fuel stove with kerosene jet installed.

This is a rugged backpacking stove and is quite a little powerhouse. Diesel did not work well in this stove. There was spiking yellow flames among the normal blues flames and it constantly spit and sputtered.

I’m theorizing that the less refined diesel fuel was not vaporizing properly resulting in the mediocre performance. While it would be ok to boil water with, I would not want to cook on this, unless once again I was desperate.

I did not try using diesel in any of my Aladdin lamps after the Dietz experiment above. If the Dietz would smoke as much as it did I had no doubt that the Aladdin would not run on it with the wick and mantle setup. So I passed on that one.

So now that I know the above what good does it do me? Well, a lot. I can store cheaper diesel instead of more expensive kerosene. In my area, off-road diesel is usually at least 1 dollar a gallon cheaper. That is a significant savings if you store fuel in quantity or allows you to store more fuel for the same price.

It seems that in many areas kerosene can be difficult to come by but diesel is readily available. Even when kerosene is available diesel seems to be sold in many more locations.

Also if in an extended TSHTF scenario and my kerosene stock starts to run low I can switch to diesel in the items that run well with it thereby extending my supply of kerosene. Next is what I call “scroungeability”. In short, diesel is almost everywhere.

The tractor sitting in a barn or field. The long-haul truck. That bulldozer sitting at a construction site. Also, many diesel trucks have large fuel tanks in the beds. I am not advocating stealing but this does provide a lot of opportunities for bartering or scrounging in certain circumstances. Also, my own diesel vehicle can be used as a source as well and a large one if the tank is kept at least half full.

While I have not tried home heating oil in the above, I have no doubt that it would work. Home heating oil is virtually identical to diesel. In many areas, the heating oil tanks at houses are more common than propane tanks. Again, another potential source of fuel. A homemade 12v fuel transfer setup would be nice to have here as well.

When trading for or buying fuel of unknown quality it is essential that it be filtered properly for both water and sediment before use. Fuel filters are cheap insurance. I was once stranded along a country road due to clogged fuel filters in my Mercedes diesel.

I had been using scrounged diesel and had not filtered it at all. Both the primary and secondary fuel filters were so clogged that the engine couldn’t run and kept stalling. Not only was I using fuel of questionable quality without filtering it I did not have spare fuel filters with me for the car. Lesson learned.

Many people use kerosene appliances and fuel as their primary backup for emergencies both short and long-term. They are both relatively cheap and readily available. As a bonus, kerosene as a long shelf life if stored properly and more importantly is a safe fuel to store in quantity.

By knowing what alternative fuel can be used in them and their limitations it only increases my options. Fuel interchangeability is a great option to have. Plus be sure to store plenty of extra wicks as needed. Also if used indoors be sure to use more than adequate ventilation and a CO2 detector.

Now for storing that fuel beforehand. Large underground tanks for storage are good to have but may not be practical for several reasons including the cost. Plus, like a lot of people, I live in a small town and large amounts of fuel kept at the house is not practical.

But do you have unused land somewhere or a trusted friend with some property? Then you can make what I call my “mini fuel storage depot”. This is simply a wooden pallet set up on some bricks to keep it off the ground.

On the pallet, there is room for a 55-gallon drum with either diesel or kerosene, five 5 gallon metal jerry cans of gasoline and two 20 lb propane tanks or whatever combination you prefer. On top of this goes a heavy-duty tarp properly secured to keep the weather out and provide some camouflage.

A camo net could go over this for additional concealment if needed. By placing the above in a shaded area it avoids large temperature swings and if the fuel is properly treated this works very well long-term.

By having several of these over a wide area or on different properties you avoid having all your eggs in one basket. If one is compromised or destroyed by fire your entire fuel storage is not lost.

By being above ground you run a slight risk of exposure. However, if sited properly and carefully camouflaged (possibly as a junk pile?) they are not hard to conceal. I hope people find this useful and remember to follow all safety guidelines as outlined by the heater and or appliance manufacturer and keep in mind that these are my results and yours could be different… see the disclaimer policy here.

Filed Under: Homesteading, Power Generation, Prepping

Is It Safe to Use a Propane Stove indoors?

November 8, 2019 M.D. Creekmore

Is It Safe to Use a Propane Stove indoorsby Jacki

Is it Safe to Use a Propane Stove indoors?

Yes, it is safe to use a propane stove indoors… if the proper steps and safety precautions are taken. However, it can prove to be hazardous if you don’t stick to the correct methods of doing so. In fact, propane is deemed to be amongst the most inexpensive as well as safest sources of fuel that will surely fit one’s budget.

Below, we have mentioned several guidelines to help you get started.

1. Verify the cooking device

It will be advisable to check your propane stove prior to starting cooking so as to make sure that it is functioning properly. Make certain that all the essential components, controls, as well as valves are in proper order.

Moreover, do not forget to take the assistance of an experienced technician to perform the maintenance of the stove at least once every year. This will help you to avoid any costly repairs in the future since they will be able to detect and also fix any issue related to the stove.

2. Proper supervision

Never leave the food open while cooking. The same rule applies while you are using the propane stove. There is no need to sit in front of the stove constantly while you are cooking, but try to be within a close distance from the cooking area so that you can attend your cooking as and when required.

This will come of use to you particularly if you are frying some items and performing other activities that involve the usage of cooking oils and grease given that these are inflammable substances which can lead to significant damage in case you don’t give proper attention.

3. Pets and children

You ought to make certain that the kids and pets in your residence are not within the close vicinity of the propane stove while you are cooking. This will prevent them from getting burnt and thus they will remain safe providing you with complete peace of mind. This will also keep you safe given that your attention will not get diverted by the mischief caused by the pets as well as the kids while you are busy cooking.

4. Adequate ventilation

It is essential for your room to be properly ventilated where you will be cooking with the propane stove. The main reason for this happens to be carbon monoxide which is actually a by-product of burning. In fact, propane is known to generate an alarming amount of carbon monoxide as well as smoke thus making it quite hazardous for all those who are staying indoors.

You can take the help of your propane expert who can take care of the installation in the best possible way. They will even install a vent hood above the stove which will help to put the majority of the gas outside.

Also, try to keep a couple of windows open while cooking. Although it is not desirable to do so during the cold months, bear in mind the old saying, “Safety comes first”.

5. Keep the stove clean

The propane stove can produce a lot of smoke in case grease and food items drip down onto the burners. However, by keeping your stove clean, you will be able to avoid this to a great extent.

These above-mentioned paragraphs must have provided you with the proper reply to your query, “Is it Safe to Use a Propane Stove indoors?” Next, we will mention some popular propane stoves on the market intended for cooking.

Recommended Propane Stoves For Cooking:

1. Coleman Portable Propane Gas Classic Camp Stove featuring 2 Burners

Even though it might be a sensible idea to prepare your food over an open fire, it might not be the best way to feed your guests whatsoever. For this, a propane stove will be the best solution to get the job done quickly and efficiently. Here, we will talk about the Coleman Portable Propane Gas Classic Camp Stove which offers a host of innovative features.

First of all, it comes with wind block panels which aid in protecting the burners from wind and also adjusting effectively for different pan sizes. Moreover, it comes with a flawless technology that offers consistent performance irrespective of any type of situation.

You will be able to prepare your food within a short span of time while consuming lesser fuel as well. There are a couple of separately adjustable burners that will provide you with immaculate control for two temperature zones. Lastly, you can easily remove the resilient and chrome-plated grate so that they can be cleaned without any problem at all.

(Click here to check price and availability at Amazon).

2. Camplux Dual Fuel Propane and Butane Portable Camping Gas Stove featuring Single Burner

This amazing product from Camplux is known to offer a consistent performance along with a CSA safety certification. It likewise comes with innovative features such as automated safety switch, piezoelectric ignition, plus a gas leakage protection device. Also, there is a dual fuel single burner which can work with propane as well as butane.

This can be used in different situations and will come of use to you while cooking at home. Another notable feature of the product happens to be the propane converter regulator which will enable you to connect the propane stove to a propane tank.

Last but not least, this portable stove is extremely simple to clean thanks to its enamel surface as well as a dripping tray which contains only a small amount of water for getting the job done.

(Click here to check availability and price at Amazon).

3. Bayou Classic SP10 Cooker with Single Burner

This product from Bayou is ideal for cooking in the open and is portable too. You can use them for RVs, camping, backyard parties, and on other occasions as well. Featuring a single-piece steel frame, this product is amongst the strongest stoves manufactured commercially.

These are known for their strength as well as safety features and come with a cooking surface having a diameter of 14 inches. There is likewise a 4-inch cast-iron burner plus an adjustable regulator too. Other notable features consist of windscreen protection spanning 360 degrees plus an innovative wide-leg layout for providing stability. Above all, this amazing propane cooker is manufactured in the US.

(Click here to check price and availability at Amazon)

4. High Flame Outdoor Propane Gas Burner along with Wind Stand – Automated Ignition together with CSA Approved Regulator and Hose

Next, we will talk about this innovative and breathtaking High Flame Outdoor Propane Gas Burner which features automated ignition together with CSA approved regulator plus hose. The propane stove is 13 inches in height, 17 inches in width, and also features a Wind Guard Tripod Stand.

This amazing stove will offer you everything that is required for managing your cooking experience flawlessly. It has been designed with almost every important feature that will be needed for cooking outdoors. Amongst the notable features, the knob which comes along with flame adjustment facilities plus the robust stainless steel stand deserves special mention.

You can use it for any type of situation including camping, boating, patio or backyard parties, not to mention home cooking as well.

Recommended Propane Stoves For Heating:

It is a fact that a propane heater will be able to keep you warm either outdoors or indoors during the cold winter months. These propane stoves for heating will come of use in case you do not have any electric source available to you. They will provide you with the ideal solution irrespective of whether you require a heater for the patio or would like to warm the outdoor porch. Here, we have mentioned some well-known propane stoves for heating that are high in demand right now.

1. Mr. Buddy Heater for indoor usage

This breathtaking product will be the ideal choice in case you like to heat areas of as much as 45 0 ft.². It comes with innovative customizable features as well as a portable layout which will allow you to enjoy innovative functionality from this product.

It is a fact that propane can be responsible for producing a huge amount of carbon monoxide gas which can prove to be dangerous to human beings. Consequently, the product comes with a safety switch which will allow you to remain safe in case there is any malfunction with the product or it is not able to burn the fuel effectively.

Besides these, there is likewise an innovative tip-over switch which will switch off and on the product automatically.

You have the option of selecting between low, medium, as well as high-temperature settings which will enable you to save energy in case you do not require much heat or you can also increase the heat when the temperature is quite cold.

(Click here to check price and availability at Amazon)

2. PROCOM Propane Wall Heater

This astounding propane heating solution will deliver the goods for you by simply mounting it to any wall within your residence. It doesn’t need any ventilation and also comes with an innovative blue frame that provides a gentle glow that helps to enhance its attractiveness.

Besides this, the propane wall heater likewise comes with a non-adjustable regulator which will help to make sure that there is no over-firing. It will also function as effective thermostatic control. In fact, this thermostatic controller can be used for setting the temperature to the desired level and this will help you to maintain the temperature in your room.

Last but not least, the white finish of the product will allow you to match it to your home’s existing decor.

(Click here to check price and availability at Amazon)

3. Dyna Glo RA18LPDG Propane Heater

Lastly, we will mention this incredible Dyna Glo RA18LPDG which will effectively warm any space during the winter months. Apart from this, it likewise appears great while offering you with optimum safety features plus an innovative design as well.

This product is able to generate heat instantaneously such that you can start enjoying the results as soon as you switch it on. As a matter of fact, it is able to generate sufficient heat within a radius of 600 feet.

This will enable you to use it in bigger areas like the garage, workshop, or even a big hall. In case you would like to heat a smaller area, this heater will also live up to your expectations. It provides as many as three different heat settings thus allowing you to control the production of heat effectively.

Another significant feature that has made this heater so famous happens to be the innovative piezo ignition that will allow you to start the product whenever you require without bothering about how to ignite the flame manually.

(Click here to check price and availability at Amazon)

Tips for Using a Colman Propane Camp Stove:

As we have mentioned before, a Coleman propane camp stove will prove to be extremely effective when it comes to cooking. Apart from being portable, you can easily use it for hiking, camping, as well as other activities too.

Nevertheless, it is essential to bear in mind some essential safety guidelines which will allow you to remains safe while using the product. Below, we have thrown light on some of the essential safety tips on using a Coleman propane camp stove in a risk-free manner.

First of all, make certain that there is enough ventilation in the room where the stove is placed. Refrain from using this type of stove in your tent, garage, or even in a camper. The reason for this is that propane has the ability to produce carbon monoxide which can even cause the demise of an individual.

It will be a smart idea to attach the propane cylinder with the stove and make sure that it does not rust or break in any manner. Moreover, make it a point that the knobs connecting the stove with the cylinder are tightly and securely fit.

The burner is another significant component of the stove that makes use of the flow of gas from the canister which is used for igniting the burner. However, it is important for the burner not to rust or break in any manner since this will prevent it from generating the desired temperature.

Always make it a point to light the stove using the igniter that comes along with it since this will prove to be safe in the long run given that the spark will remain isolated within the stove. Also, keep your arms, fingers, as well as face away from the product while igniting it since this will minimize the risk of getting burnt or becoming seriously injured.

Can I use a Propane Stove in a Tent?

It is a fact that tents are manufactured from non-breathable and flammable materials. Consequently, any kind of flame within the tent can accidentally lead to a huge fire. Moreover, these tents are not properly ventilated on most occasions which can encourage gas fumes to build up in no time at all. This might result in carbon monoxide poisoning as well as an explosion.

A propane stove should never be used within a camper, garage or tent. As mentioned before, propane is known to produce carbon monoxide too much of which might deplete the oxygen level of an individual which might even cause his eventual death.

As a result, the most sensible thing will be to keep the stove outside the tent and you ought to abide by the safety regulations as well. Last but not least, make sure to place it in a properly ventilated area preferably outdoors.

Note: That this article is not meant to be regarded as safety advice. And because you might do it wrong please seek professional advice from a certified propane specialist before following any of the advice contained in the article above.

Filed Under: Power Generation, Prepping

How to Make a Rocket Stove

January 18, 2019 M.D. Creekmore

How to make a rocket stove

by Randy

As a frugal and self, sufficient individual, you may be interested in an alternative to the earthen block, tin can or commercially made, version of a rocket stove.  Here is another effective alternative to those found in articles that are circulating on the internet, YouTube or in “Prepper Blogs” these days.

I have not seen anyone touting or describing how to turn common black stove-pipe fittings into a rocket stove so I will try to explain the process I use to make a rocket stove out of common stove-pipe fittings. This version is possibly one of the best compromise devices for cooking over wood in a grid down or where firewood is of limited supply.

When firing up this little stove, I typically use cut up and split SYP scraps from my home repair business, which I set aside for just this use.  I find that utilizing this design for a rocket stove it only takes about 3 or less, one foot sections of 2×4 split down into ¼ or ½ inch thick kindling to boil water in as little as 5 mins, if you have the wood pre-split and readily available, along with your utensils, pans, and foodstuffs close at hand.

With this very fuel-efficient, design, there is very little smoke exiting from the stove, and little or no ash to contend with.  Other than the usual soot associated with using SYP (southern yellow pine) wood due to the high resin content of the wood there are few drawbacks to this stove.

f using tree limbs gathered from the forest floor, this soot may not be as much a problem in a conifer filled area.  I carry my stove in an old canvas, firewood tote, so as not to get much of the associated soot on my person but this may or may not be suitable for you.

How to make a rocket stove

Some of the advantages of the rocket stove designs out there are the speed and efficiency they offer and this design is not different.  If you are familiar with hand tools, and your local hardware stores you should have little or no problem making one of these little stoves in as little as 4 hours or less not including time to gather your materials.

The tools I recommend for making this small stove are as follows:  Philips head screwdriver/cordless drill, 1/8 dia. And ¼ inch Drill bits, two dozen or so 1-1/2 to 1-1/4 inch long drywall screws, or deck screws, a set of good tin snips (I like the 2 inch long-bladed, RH version).

The drill you use should have at least 2 speeds, high and low.  I believe using the higher speed to drill metal works best. I also recommend leather, work gloves, safety goggles, pencil or sharpie a tape measure and a free afternoon to purchase the materials and assemble the stove.

Below I have listed the materials I recommend as well as some price points of the materials found at my local “ big box” store, for the major items you will need, these prices are only for comparison purposes and may vary as this article ages, your place of purchase will probably be different.  The prices I found are included next to the Item description as of December 2015.

Materials List:

One black pipe cleanout, T fitting, 6-inch dia. (may also use 8-inch dia. T as a substitute just make sure you buy corresponding fittings) $15.00.  This fitting will become the main body of the stove.

Two each cleanout caps/end caps, 6-inch dia. $6.00 each.  One will become the base/clean out at the bottom and the upper cap will become the burner plate/diffuser at the top of the stove.  When orienting the stove one end will be smooth, and one end will be crimped to accept the pressure fit, end caps.   Please note the two different orientations of couplings so when you buy them, you wind need to line them up with the correct configuration.

One 4 inch vent pipe, elbow, 26 gage or heavier, $3.50 ea. (I could not find 4-inch single wall black pipe, elbow fitting so I was forced to use a galvanized pipe).

The next Item you will need to purchase is a 4-inch window thimble made of 24 gage aluminum or if you cannot find a window thimble use surplus sheet metal left over from the 2 ft. section of vent pipe listed below.  I chose to go the route of using a window thimble as I had one on hand from another project.

A blank piece of galvanizing can be used if a thimble is not available.  I do not have the price of the thimble since I had it on hand.

How to make a rocket stove

The next item you will need to assemble your stove is a 2 ft. section of 4-inch dia. stove-pipe or 26 gage, galvanized vent pipe $4.00 each.

Next up for those who want to use a stainless steel “hose clamp” please find a clamp that will accommodate the dia. of the pipe you have assembled using the appropriate size of your legs coming off of the clean-out T, (mine was made of a 6-inch dia. coupling). I Opted out of using a stainless clamp and used some aluminum strapping I had lying around but the clamp would work just as well or better than my arrangement.

It might also be handy to have on hand ½ dozen or so, ¼ x ½ inch sheet metal screws with the slotted hex heads for easy driving.

The last item you will need is hardware mesh or wire.  The wire I used was 18 gage with ½ inch grid but you may find wire with larger or smaller mesh.  The fire-grate will be constructed from this material and the heavier gage, the better, as long as the mesh size remains smaller than 1 inch or so in order to retain the coals better in the small firebox.

The total cost of the materials of the stove should be around $40.00 to $50.00 not counting your labor, which I believe makes this a very affordable and portable addition to your arsenal of grid down appliances.

This completes the list of Items you will need unless you chose to insulate the 4-inch interior, lining of the stove to keep the outside body of the stove from getting too hot.  I chose to forgo the use of vermiculite or insulation since I wanted my stove to cool off quickly and give off radiant heat while it operates.  I could not tell if the stove would use less fuel by being insulated but some swear by it so let your stove be built as you please and publish and findings you have supporting insulation if you like.

A word of caution here, do not operate any open flame stoves such as the one described in this article, inside the home unless this item is vented through an approved fireplace or wood burning stove-pipe properly constructed and designed to prevent smoke/C02 buildup in your home. 

In addition, when using galvanized pipes/materials as a substitute for black stove-pipe realize that burning galvanized pipe will give off harmful fumes until the galvanizing has turned white and started to rust. 

This curing of the galvanized parts must be done prior to cooking or using of the stove to make meals over and should be done in a well-ventilated location such as an open fire pit or wood burning stove.  Once the galvanizing is burned or cured, normal use can be observed).  If you have a source of 4-inch black stove pipe you can eliminate this step, but again I was not able to find 4 inch, black, stove-pipe in my area.   

Now onto the fun part, the assembly of the rocket stove.  This assembly is pretty straight forward and if I leave out any details you should be able to figure out the assembly from the pictures provided.

First I took a pair of tin snips like the one listed above and cut a section of the 26 gage vent pipe/stove pipe about 10 to 12 inches long.  This was then assembled to the normal configuration so the sheet with snap fold becomes a pipe again (easier to cut the sheet when it is uncoupled). The section of short pipe can be set aside for now.

How to make a rocket stove

Next take the 4-inch vent pipe, 26 gage elbow, and configure the fitting so it represents a 90-degree elbow.  This may take some manipulation but the design of the modern vent elbows makes life so much easier for those of us who do home improvement projects, and in fact, it is very hard to find a true 90-degree elbow should you try to find one in the galvanized and aluminum duct or vent pipe.   A word of caution, do not substitute aluminum pipe for steel or galvanized pipe here as the aluminum pipe is very thin gage and will melt through after a few uses, (I found out the hard way).   

Now place the 4 inch elbow inside of the larger (body of the stove), cleanout T fitting, with the top of the elbow fitting in the top of the stove body (will fit down inside 1.5 inches from the top of the stove body) and the elbow portion sticking into the horizontal section of the stove T.   This smaller coupling will sort-of “slop around” in the bigger fitting for now but do not be concerned as we will address that issue shortly.

Now slide the 10 inch or so section of 4-inch pipe in the lower leg of the 4-inch elbow, at the horizontal leg of the stove body.  This will become the combustion chamber, once you get the stove assembled.  This will fit but your 4-inch elbow pipe should be able to be centered in the top leg and side leg with the 4-inch elbow touching the interior of the stove body at the inside corner of the curve.  Things will be secured later but for now just test fit and set aside.

The next step is to cut notches in one of your 6-inch caps (this will be your top burner plate/flame diffuser).  The cap, notches should be equally spaced around run of the pipe, mine are about 1.5 inches long by about 1.5 inches deep, and I made about 4 of them.

These notches do not extend all the way up to the flat part of the cap and are deliberately designed this way but if you choose to or did so by accident do not be alarmed things will work just fine this way also.

These notches will act as air vents and smoke exhaust ports.  You will notice that the 4-inch coupling does not come all the way to the top of the stove body, but this is to allow for the flames to form and breathe

Now get your drill and drill bit and drill 1/8 inch holes in the top of the stove body.  These holes need to be about 1.5 inches down from the top edge of the T-pipe.  I chose to make the top of my stove the smooth edge as my end cap compatibility was so oriented, as opposed to the crimped edge but this is not critical just so long as the lid/cap will fit inside or outside of your main stove body/Cleanout.  Now you can choose to drill a mirror image of these holes for the bottom edge of the T-Pipe but I chose to just push my bottom cap in place with the good pressure fit the smooth/crimped edge of the pipes come supplied with from the factory.  I chose to use a galvanized, 6 inch cap for the bottom as there is little or no heat buildup at the base other than a few coals finding their way to this location, and If I recall, I was not able to find the male crimp end made of black stove pipe when I assembled my stove a few years ago.

Now comes part where you center the smaller pipe and the larger pipe so the stove functions as a rocket stove and the walls will allow for convective air flow if you want to have radiant heat.

I drilled holes on the upper T-leg about 4 inches of the way down from the top at 4 locations symmetrically around the diameter.  Then using 1- ¼ inch drywall screws as set screws to hold the inner elbow in place.  I then repeated the process for the Horizontal firebox section of the 4” pipe and tried to run the screws just as a press fit and tried not to penetrate the exterior of the inter-pipe.

This did leave a small portion of the drywall screws proud of the 6 inch, T’s, outer wall but did a great job of holding the inner pipe and elbow in place using the 8 screws as jamb screws.  The pictures of the interior of the stove should make this pretty clear.

Next, I fabricated the thimble wall of the horizontal leg cover of the stove where the fire-box leg comes out of the larger leg of the 6” clean out pipe/main body of the stove.  In order to do this I held the 4-inch window thimble at the bottom of the stove and made a trace of the diameter onto the window panel.

The 4-inch diameter Thimble hole will be situated at the lower portion of the firebox so it should be positioned as such.  What this will look like properly positioned, will allow for dove tail fingers to be cut in the panel that sticks out past the traced line.

This will become a 6-inch circle, inside the center of an 8-inch circle, with the 4-inch thimble hole located at the lower center of the fabrication.  The 4-inch thimble, hole will be positioned so it rests near the bottom of the 6 inch horizontal opening of the body of the pipe, with the flat surface covering the remainder of the horizontal, 6-inch hole.  This sounds a bit complicated, but please look at the photos accompanying this article for clarification.

Now it is time to cut the 2-inch dovetail fingers into the sheet of aluminum or steel of the remaining metal outside of the 6-inch hole.   Dovetail fingers can be cut at straight or tapered cuts but should be spaced about ¾ to 1-inch intervals.

I found that tapered cuts work better for me but your results may vary.  There is a bit of art to cutting fingers but I came up with about 24 fingers (48 tapered cuts), using tin snips to make them.  I did not remove the alternative fingers but bent every other finger in, in order to fit inside of the 6 inch vertical leg of the stove body.  The remaining 12, alternative fingers fit outside of the body of the stove.

I then used my aluminum straps (or stainless hose clamp) and sheet metal screws to fit and hold the window thimble in place so the hole of the thimble helps hold the firebox of the stove in place.

Alternative methods can be used to make this cover up the horizontal hole, up to and including using a hole in a flattened piece of tin made out of any type of sheet metal as long as it will be large enough to make the cover accommodate the dovetails and hold the firebox in position.

Four to six sheet metal screws can also be used to hold this cover in place or in conjunction with the straps or pipe clamp.

The only thing that remains to be fabricated in order to fire up the stove is a fire grate.  I chose to use the hardware mesh mention in the materials list above.  I cut a section of mesh long enough to fit from the outside edge of the 4 inch, horizontal, firebox to the back of the body of the stove so my mesh was about 14 inches long.

The mesh was cut wide enough to make a role of wire mesh just big enough to just fit snugly inside the 4-inch diameter of the firebox.  The mesh can be a little short but should not fit outside of the 4 x 6-inch firebox section, fitting outside of the main body of the stove.

The pictures I took do not have the hardware mesh fitting in the firebox but what I found works best is to collapse one half of the diameter of the mesh so that it just comes within about ¼ inch of the opposite side of the mesh roll, with the large divert of the mesh on top of the basket or coals catcher (looks like a crescent moon laying on its back when it fits inside the 4 inch firebox).

This arrangement provides maximum, retention of the coals and draft of the air in the combustion chamber.

The next step is the decision to make this an insulated or radiant stove.  I opted to make the stove with the ability to radiate heat so I drilled about a dozen ¼ inch dia. holes 2 inches from the base of the stove body.  These are for convection and do not enhance the stoves oxygen intake as far as I can tell.  These may not even be necessary and if you are a mechanical engineer, you can tell if they are even needed.

On the second version of the stove I made for a friend of mine who fell in love with mine, I made some legs out of the remainder of the 4 inch galvanized pipe that was triangular in shape, made of three folds of metal bent into a one inch wide strap with the bottom of the triangle resting at the base and the back tabs screwed into the wall of the 6 inch body of the stove.

These were made of 12-inch strips cut 3 inches wide with a 6-inch base but if you use small, light, weight pans to cook with these should not be necessary.

I hope you found this article to be informative and give you and your alternatives if the grid should ever go down and your source of wood to burn is scarce.

Filed Under: Power Generation

Homemade Solar Food Dehydrator That Works!

January 11, 2019 M.D. Creekmore

Homemade Solar Food Dehydrator That Works

by Carol B

You will be building three (3) different box-like units, all of which will fit together and work to dry your food in the sun.

The finished dimensions of your solar dryer will be two (2) feet by four (4) feet. You will not be building legs from these directions, but could do that very easily “whenever”. If you are going to build legs, we suggest using PVC pipe and setting them in 5-gallon buckets, with enough sand or concrete to hold them in place but allow for water in the bucket.

The water will keep ants and crawly things from crawling up the legs while your food dries. I do not do this; I simply check it from time-to-time and make sure there are no critters; so far, so good.

You can use virtually any wood you like; we used cheap pine because we’re cheap; but, it’s not well finished, and I have managed a couple of splinters in handling the pine, so, consider that when deciding what wood to use.

Homemade Solar Food Dehydrator That Works

You can spray paint your metal sheet on one side and let it be drying while you build your boxes (see box # 3, below).

Box # 1 (bottom): you will need 2-inch x 4-inch wood (untreated – you do not want chemical toxins in your food supply) and a 2’x4’ sheet of corrugated metal roofing-type material. The first box will be the bottom box which will hold the sheet metal “heater”. Build your two (2) foot by four (4) foot box – we did not center support this box, but, you can if you want.

Attach a sheet of corrugated steel to the top by whatever means you prefer (nails, bolts, screws), so long as it lies flat against the surface of the frame, and covers the entire frame, two feet wide by four feet long.

You will need food-grade polypropylene screen, and you can order it from the folks below. DO NOT try to use aluminum screening or recycled housing screening for a food project. You will also need screening spline and a sharp instrument for cutting.

Homemade Solar Food Dehydrator That Works

We purchased polyethylene screening from www.dryit.com email: orders@dryit.com 1-800-609-2160 MacManiman Inc. 3023 362nd Avenue S.E. Fall City, WA 98024

Box # 2 is not one, but two (2) separate boxes built of 2”x2” boards, each of them two (2) feet x two (2) feet square. Build your frames. Dado the top of them out to create a groove to receive your screening and spine.

Cut your screening to fit across the tops of each of the two boxes, allowing extra to hang beyond frame; place your spline and, using a spline tool, work the splining material into the groove. Trim any excess. Having two separate frames will allow you to dry more than one kind of food at a time, if you wish, without having them “blend”.

For # 3, you’ll need sheet metal (either one 2 ft. by 4 ft. sheet, or qty. two 2 ft. by 2 ft. sheets; black spray paint, and two ft by four ft (2’x4’)’ Lexan or Plexiglass (have it cut at any window glass store) sheet, washers and screws, and waterproof clear acrylic sealant). The Lexan we bought was about $40, so, expect to pay $$$.

Homemade Solar Food Dehydrator That Works

Box # 3 is a single 2’x4’ frame which is braced across the center; cut sheet metal to fit 2’x 4’ (we used qty. two 2’x2’ of sheet metal 1/16 inch thick, because, that’s all we could find). Spray paint both sides of the sheet metal; allow it to dry.

Use screws or nails to attach sheet metal to one side of 2’x4’ frame; this will become the bottom of this piece. Lay a bead of silicone for the Lexan, all around. Now attach the Lexan across the top; you can pre-drill it and attach with screws. Allow to dry.

We have old lawn chairs that we use as “legs”. It is important that the solar dryer be slightly angled for natural air circulation and turned toward the sun (duh!). We get a lot of sun in the Deep South, so solar drying is a natural choice.

Homemade Solar Food Dehydrator That Works

This unit does not utilize any kind of fan, or anything requiring power; you could run a fan under it, and, for some types of foods, it might help them dry faster. Most foods don’t require anything, other than checking from time-to-time until you learn how long that food takes to dry where you live.

Some foods, however, may do better if you turn the foods (move them around) every few hours – although I’ve used mine extensively and rarely turn the food.

Tip: All foods dry better if they are uniform in size; otherwise, smaller pieces will be overly dried while you wait on the larger pieces, or, you’ll have to pick the smaller pieces out in advance of the others, which makes this much more labor intensive – not necessary!

To use, the sheet metal box is the bottom; place food on drying screens (don’t pack it too tight) and place drying screens atop sheet metal heater box. Now place Lexan cover box on top, with black painted metal as the bottom of this box and Lexan facing the sun. Start cooking!

I hope you enjoy your homemade solar dryer; keep it out of the elements when not in use, and you should get years of service from it.

Filed Under: Power Generation

  • Page 1
  • Page 2
  • Page 3
  • Page 4
  • Go to Next Page »

Primary Sidebar

Subscribe to Blog via Email

Enter your email address to subscribe to this blog and receive notifications of new posts by email.

Join 7,197 other subscribers
  • Amazon
  • Facebook
  • Substack
  • Twitter
  • YouTube

“Do more with less.”

– Minimalist proverb

Recent Posts

  • Just so you know
  • Weather Update for My Corner of Appalachia
  • Why I’m Ordering Ivermectin + Mebendazole Every Year
  • The Website’s Shutting Down (But Here’s the Plan)
  • You Are Hated! Start Training Like It!

Footer

Recent Posts

  • Just so you know
  • Weather Update for My Corner of Appalachia
  • Why I’m Ordering Ivermectin + Mebendazole Every Year
  • The Website’s Shutting Down (But Here’s the Plan)
  • You Are Hated! Start Training Like It!

More about me

Books I’ve written

Books I’ve read

Follow Me on YouTube

Follow Me on Facebook

Gear I Use and Recommend

Newsletter

Search this site

Follow me elsewhere

  • Amazon
  • Facebook
  • Substack
  • Twitter
  • YouTube

© 2008–2025 M.D. Creekmore · As an Amazon Associate, I earn from qualifying purchases.