By Michael C
I noticed that many people on this blog want to store milk, vegetables, seeds, and medication in a refrigerated atmosphere but have yet to buy 2 refrigerators. Remember the “two is one and one is none” motto; you need 2 ways (or more) to cool your food.
You could make a Zeer pot like I did but there is too much humidity and the pots aren’t big enough for 2 gallons of milk. I can’t buy another (let alone storing a 19 cubic footer) $700 fridge as a spare. The other problem is – I might not have AC to use in the future, regardless of all the solar panels I have.
So, I needed a small DC powered fridge that will hold at least 2 gallons of milk and some other stuff.
I thought of what MD Creekmore would do – a “Do It Yourself” project. (Mr. Creekmore has a propane fridge (read his book on living in a travel trailer) but, even though he is a great inspiration, I want to limit my power needs to solar since that is the only long-term solution and also because I have solar) Just like the “MDC made” water filter or electric generator – a person can make a refrigerator.
Of course, there will be some technical discussion of the actual properties of said fridge. It will be a bit more involved than the water filter project and, for good reason – you want something a bit more complex.
My most important consideration is that it can be serviceable by me, so, the fridge is not going to use Freon. I am going to use a “Peltier junction” cooling unit – already built for the purpose. These units are less efficient heat pumps than an evaporator/condenser cooler but are solid state, small, low power and can be ganged together for more cooling power. Did I mention cheap? At only $35 per unit – you could buy 2 and have one for a spare.
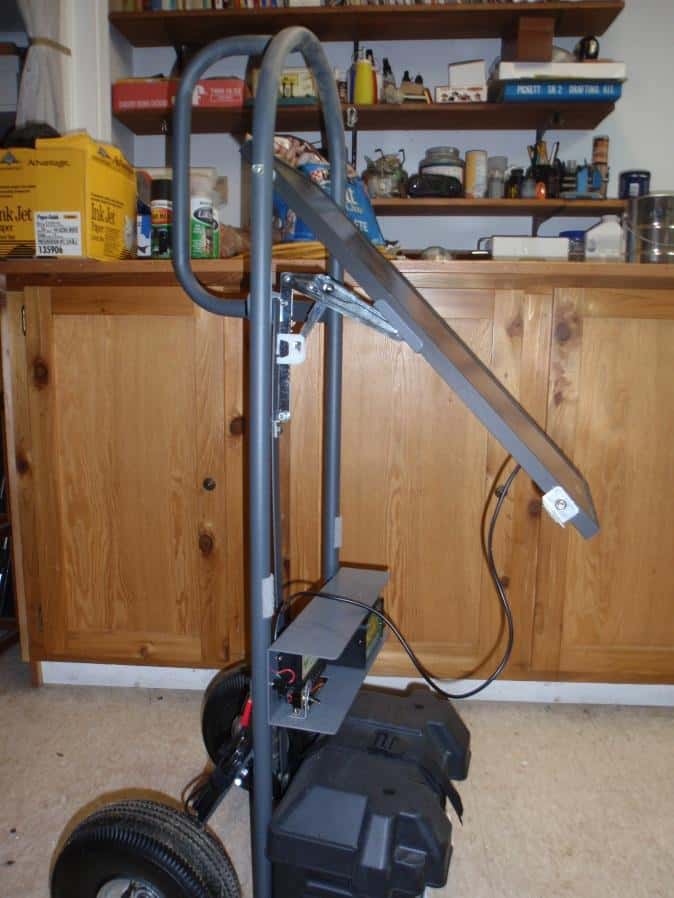
I added fans to the Peltier heat sinks (see photo) and they are the only moving parts. They are blowing air “into” the heat sink – an important point here; there is more exposure to cooling air than trying to suck air “out” of the fins.
You can have lots of spare fans and they are easily replaced. I wedged some round head screws between the tapered fins to mount the fans on each heat sink. The power cord goes to a car cigar plug (negative ground) with a 10A inline fuse.
For anyone who is not familiar with the Peltier device – it is a heat pump that is made like a silicon chip. A DC electric current will get the chip to “pump” heat to one side of the chip leaving the other side cold. Heat sinks (and fans) help to distribute the hot and cold.
The second part is the “containment box” that would consist of the good ol’ beer casket – where they get an icy bath until they meet their drinker. Yes, a cooler, the cooler I selected is 18″ x 10″ x 10″ (1.07 cu. ft. approx.) about 20 quart.
A cooler has all the “fridge” properties like waterproof food grade inner walls, foam wall insulation (except the lid), rugged dent resistant outer walls. The other benefits of the cooler are: lightweight, portable and you probably have them lying around in a corner from all the camping trips. This cooler will actually fit 3 gallons of milk but the 2 side containers will touch the walls.
Now, a cooler can be expected to work as good as a cooler was designed to work – it melts 2 bags of ice keeping 12 beers cold for a couple of hours. I figured that I would improve the efficiency a little bit. I also figured that this could make for a great article so I wanted to gauge any progress I made.
I decided to use a 7 dollar temperature monitor with remote sensor, which eliminates the “open fridge door” variable in checking the temperature inside. The sensor was taped to a plastic box (see photo) to keep it off the “floor” of the fridge so that air temperature only would be measured.
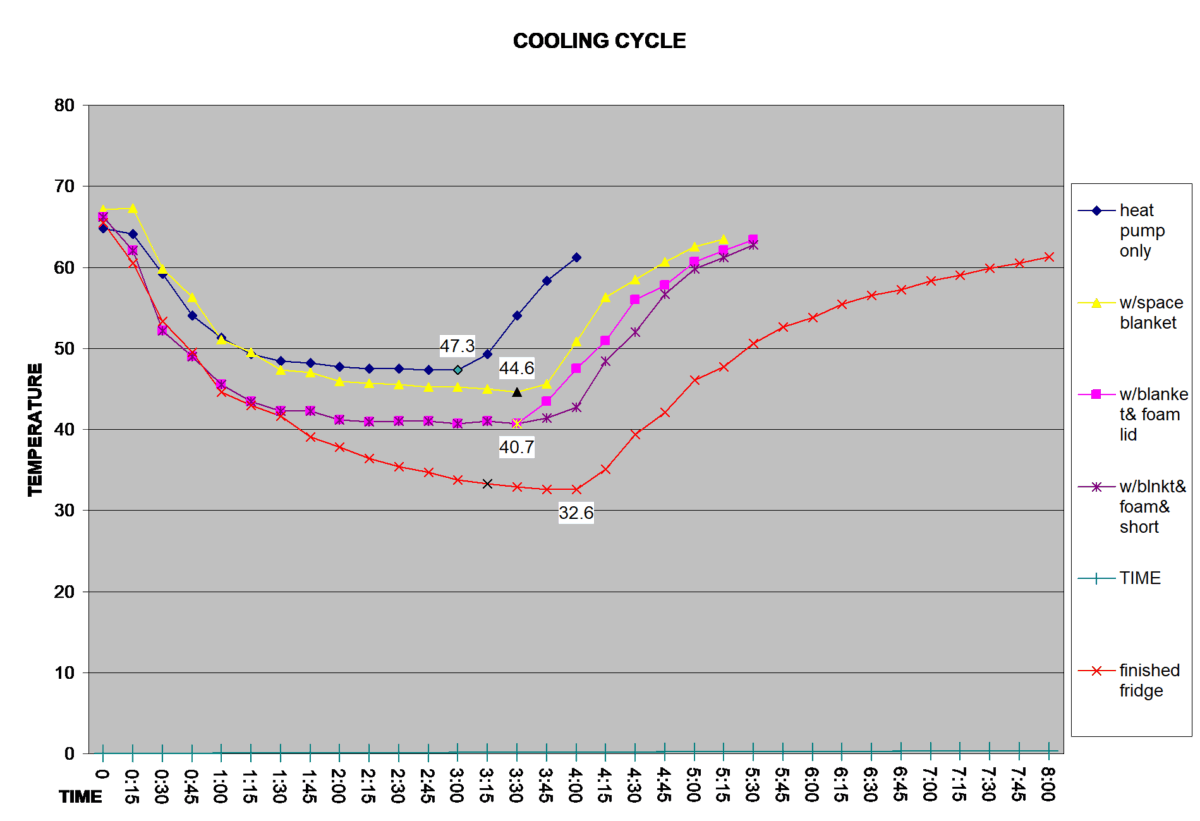
Now, what to check, since I am designing a fridge; the “cooling cycle” is the metric to gage. This just records the temperature as the fridge runs – how fast it cools. The other metrics are – lowest temperature and the “warming cycle” which is keeping track of the temperature after the cooler is shut off.
As I add insulation I will keep track of how the numbers stack up. The lowest temperature is the temperature when loses (heat gain) are equal to cooling effort. The cooling effort is (approximately) 60 Watts – that is what the heat pump and both fans consume. (A person could mount 2 cooling units which would double the total cooling power)
The first task involved adding the Peltier unit to the cooler. The smaller top heat sink has 2 “fins” that slide out from the grooves on the side. I cut the hole (to the size of the smaller, top heat sink) into the plastic (see photo) with a metal Stanley cutter; the cover is really thick in some areas.
I tested the “bare fridge” (see graph) and found that I could only get a 17F degree drop in temperature. The graph shows a fast rise after the heat pump is turned off and the lowest temp (47F) does not really work for keeping milk cold.
The second test involved adding a cheap space blanket (see photo) to the outside of the cooler. I used cellophane tape to attach an old (12 year) Mylar space blanket to the top and bottom of the cooler. The improvement was noticeable; the test ran longer as the heat pump was shaving 0.3F and 0.2F bits for a while. As long as the temperature kept falling – I would run the cooler.

Next I foamed the cover (see photo) and then tested (see graph) a third (and fourth time), the low temp was now down to 40F deg. – good enough for milk. The fourth test was exactly like the third except for shorting the Peltier leads together at shutoff, this extended the cool time about 35 minutes at the low end.
Doing this made the Peltier junction “fight” the temperature change with its own electric generation thru “temperature difference”. (This efficiency improvement would be – adding a switch to shut off/short leads) Adding expanding foam to the cover was the biggest improvement made, so far, and the cost was small – just 4 bucks.
The poly-urethane foam did not stick to the poly-ethylene cover so clean up was easy. The cover is easy to foam after you have cut the hole in for the heat pump. All the later trials do not vary in the first hour of testing – proving that the foam insulation was a big factor for the fridge.
The next step was to replace the old space blanket with a much better insulation solution. The blanket was interesting but, contains no insulation, just pure heat reflection and with only an 80% rate. I first added aluminum foil (used for grilling) to the top and bottom of the cooler.
I wrapped a heavier space blanket around the cooler then doubled the blanket over a fiberglass batt wrapped around the cooler. The space blanket will “seal” the fiberglass in a sandwich and also serve as a double reflective layer.
I used duct tape to hold the foil against the sides and for the blanket seal. The foil gives 100% heat reflection but tears too easily, the blanket and insulation “press” the foil against the cooler wall and protect it.
The testing (see graph) shows that the “NASA cooler” can now drop down to 32 F. It also took almost 4 hours to warm up to 60F. A side benefit of the added insulation is that sound levels are down by half, can’t hear the fan inside.
Things to ponder
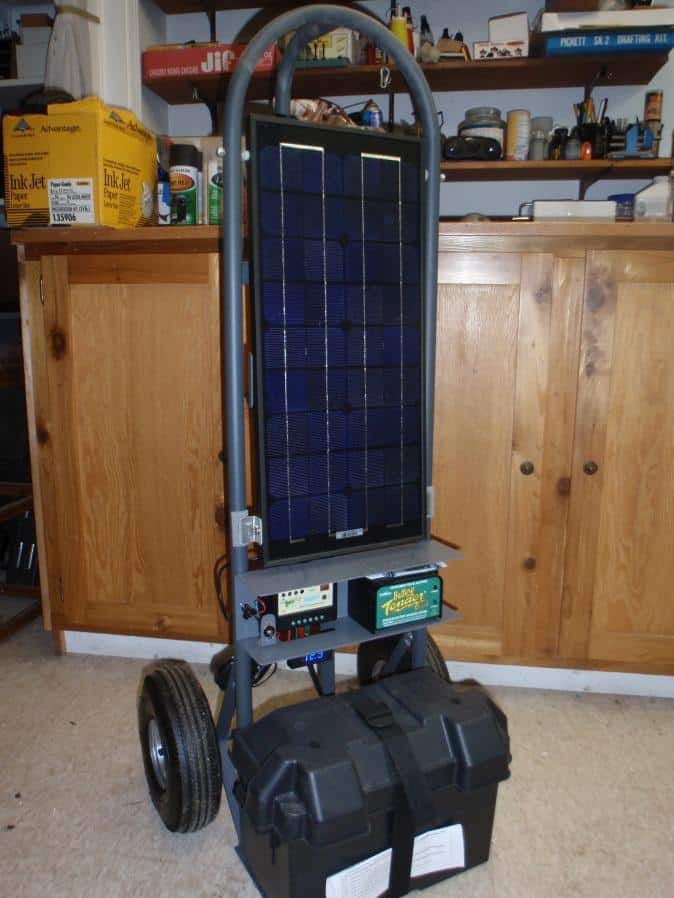
This fridge is meant to be run on solar power (click here to read an article about making a portable solar power station) – just one sixty Watt panel (direct connected) will provide all its power during the day. At night – one can use a battery or plastic “ice blocks” to help keep the cold temperature. A 100 Watt solar panel (this 100-watt solar kit is great – check it out at Amazon.com) would provide enough power for the fridge and a battery.
I do not have temperature regulation – Peltier cooler does not stop at a pre-set temperature. Right now the cooler cannot go below the freezing mark (32F/ 0 C) no matter how much it runs since it does not have enough power but regulation could be added if saving power became paramount. Remember this fridge was homemade and can always be upgraded.
I only measured the air temperature (see chart) inside the fridge; milk (and all other things) will take longer to cool down, maybe 6 hours (per gallon of milk) with this unit. It will also take longer to warm up – a cold gallon of milk will help chill the next gallon of warm milk.
I could reverse the cooling into heating by adding a small “bridge diode” to the fan leads and putting in a reverse-able coupling. The Peltier unit comes with a connector – you would need to find the cord to fit the connector. Of course; I already have a solar cooker.
You could go out and buy a cooler with the Peltier unit inside although I think that it would cost a little more than my unit. It might be a quite a bit less efficient (no space blanket heat reflection) and the parts replacement will be a question.
Parts list
Free cooler (18″x10″x10″ size I used, yours can be different)
$35 PJT-10 – Large thermoelectric device (allelectronics.com)
$6 2X CF-390 – 80mm cooling fan ($3 -allelectronics.com)
$4 can expanding foam (hardware store)
$1 about 8.5 ft. of thin aluminum cooking foil (free)
$13 CW B250 Space (brand) blanket ( EE beprepared.com )
$3 about 8.5 ft. (4 X 16”) fiberglass Insulation (hardware store,
———- I had this laying around too)
$62
I know that this fridge does not look “commercial” and I would not blame you if you bought a nice $1400 “Sun Cooler” DC fridge but if your Sun Cooler gives out – you now have the skill to convert a cooler to a fridge.
Well, what do you think?
 by Repair Mama
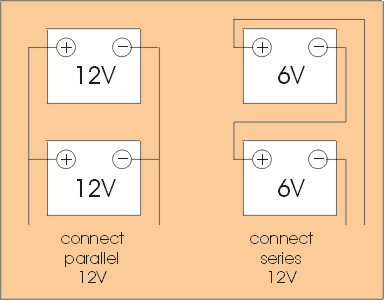 Searching online shows the full range of battery types. The true deep cycle batteries have AH ratings that are high but so is the price tag. Many of the lead-acid and AGM batteries are 6V which means you would need to buy them in pairs. One pair would be hooked up in series to make 12V. That means positive post of one 6V battery to the negative post of the other, and negative post of the first battery to the positive post of the other.
 Most of the time we will need 120V power for the existing appliances. There will be a need for an inverter. It will take the 12V power and produce the 120V that need. Since we have estimated or measured the amount of the appliances will use we can use this to decide how large of an inverter is needed.
 The first mobile inverter I had was a 1000W major brand that came from the solar expert’s store. It proved to be completely inadequate. What I later learned was that the total wattage is split among the outlets. So if the inverter produces a total of 1000 watts and has 2 outlets, each outlet can support a load of 500W.
 By Sandra
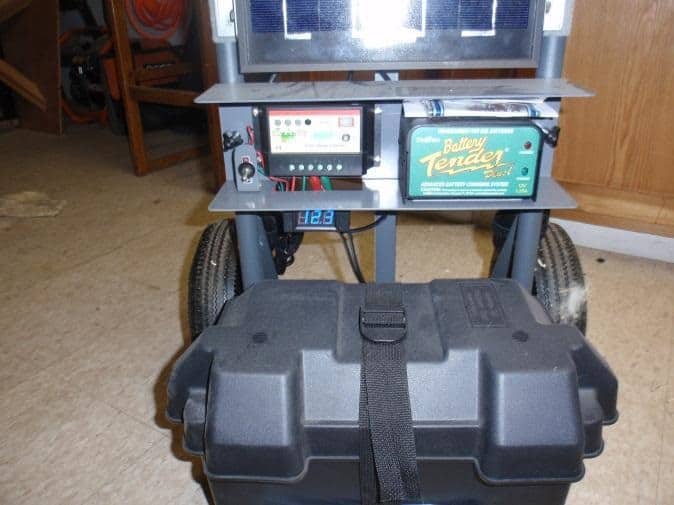 by Dan W
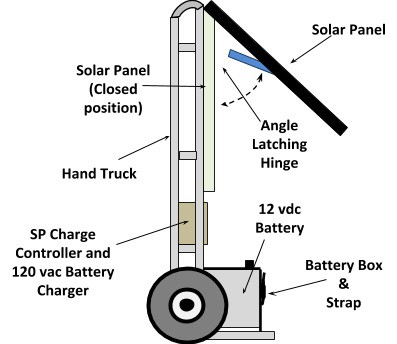
 Setting up and using a shortwave system is more complex than using CB devices. There is a definite need for both types of devices in a complete communications system, but did we want to purchase and set up both types? Would only one type suit our needs?