• Skip to primary navigation
  • Skip to main content
  • Skip to primary sidebar
  • Skip to secondary sidebar
  • Skip to footer

M.D. CREEKMORE

  • Blog
  • My Books
  • Gear I Use
  • About
  • Contact
You are here: Home / Archives for Homesteading

Homesteading

Here you will find articles on small acreage homesteading and farming topics such as homestead setup and how to buy a cheap homestead. You'll also find articles on topics such as gardening, DIY projects, raising livestock etc.

Things are starting to “pop” in the garden!

June 30, 2023 M.D. Creekmore

Tomato plants are huge…
First of the harvest…


Cut these for better production…

And I know you all wanted to see my cucumber lol

Filed Under: Homesteading

Excited About My New Cub Cadet XT2 SLX54 Garden Tractor!

April 11, 2023 M.D. Creekmore

I am thrilled to share with you all my latest purchase – the Cub Cadet XT2 SLX54 Garden Tractor! After doing thorough research and comparing various options, I decided to go for this model, and I couldn’t be happier. You can check out the details of this fantastic machine on Cub Cadet’s website here: Cub Cadet XT2 SLX54

The Cub Cadet XT2 SLX54 is a top-of-the-line garden tractor that offers exceptional performance and durability. With its 54-inch fabricated steel cutting deck and a powerful 24 HP Kohler 7000 Series V-Twin OHV engine, this tractor is ready to tackle any mowing task. The hydrostatic transmission ensures smooth, variable speed control, and the electric PTO allows for quick and easy blade engagement.

In addition to its powerful performance, the XT2 SLX54 offers several comfort features to make my mowing experience more enjoyable. The high-back seat with armrests provides excellent support during long mowing sessions, and the LED headlights ensure visibility in low-light conditions. With its tight turning radius and user-friendly design, I am confident that this garden tractor will serve me well for years to come.

I will be sure to share updates on my experience with the Cub Cadet XT2 SLX54 as I put it to the test in my garden. Stay tuned for more updates and happy mowing!

Filed Under: Homesteading

Best Locations for Preppers in Tennessee

March 30, 2023 M.D. Creekmore

Tennessee is an ideal state for preppers, with its diverse landscape and rich natural resources. In this article, we’ll explore the best locations for preppers in Tennessee, focusing on the unique benefits and challenges of each area.

Cumberland Plateau

Elevated and Secluded

The Cumberland Plateau, located in the eastern part of Tennessee, offers a variety of advantages for preppers. Its elevated terrain provides a natural defense against potential threats and offers a more temperate climate for gardening and farming. The plateau’s secluded nature ensures a level of privacy and security that is difficult to find in more populated areas.

Abundant Water Sources

Water is a critical resource for any prepper, and the Cumberland Plateau boasts numerous water sources, including rivers, streams, and springs. Access to clean, fresh water is essential for long-term survival, making this area particularly attractive for prepping.

Rich Biodiversity

The Cumberland Plateau is home to a diverse range of wildlife and plant species, which can serve as valuable resources for preppers. The abundance of game animals, such as deer, turkey, and squirrels, provides ample opportunities for hunting and sustenance. Additionally, the region’s variety of edible plants, including berries, nuts, and mushrooms, can supplement a prepper’s food supply.

Smoky Mountains

Natural Protection and Seclusion

The Great Smoky Mountains, straddling the border between Tennessee and North Carolina, offer preppers a rugged and remote location with unparalleled natural beauty. The mountains provide a natural barrier, making access difficult for potential threats. This seclusion ensures greater privacy and security for those seeking a safe haven.

Resource-Rich Environment

The Smoky Mountains are home to an abundance of natural resources, including timber, water, and a diverse range of flora and fauna. These resources can be utilized for shelter, food, and fuel, making the region a prime location for preppers.

Fertile Soil and Moderate Climate

The region’s fertile soil and moderate climate make it an excellent choice for gardening and farming. Preppers can grow a wide variety of crops, ensuring a sustainable food supply in the long term.

Land Between the Lakes

Strategic Location and Abundant Resources

Located in western Tennessee and extending into Kentucky, the Land Between the Lakes (LBL) area offers a unique combination of strategic location and abundant natural resources. This region is characterized by its two large reservoirs, Kentucky Lake and Lake Barkley, which provide an ample supply of fresh water for drinking, irrigation, and fishing. The surrounding forests are rich in timber, game animals, and edible plants, making the LBL area a valuable resource for preppers.

Defensive Advantages

The natural boundaries created by the lakes offer a defensive advantage for those seeking a secure location. With limited access points, preppers can more easily monitor and defend their properties from potential threats.

Recreational Opportunities

In addition to its prepping advantages, the Land Between the Lakes area offers a range of recreational activities, such as hiking, boating, and fishing. This makes it an attractive location for those who wish to balance self-sufficiency with a high quality of life.

Sequatchie Valley

Fertile Land and Agricultural Opportunities

The Sequatchie Valley, located in southeastern Tennessee, is a narrow valley known for its fertile soil and agricultural potential. The region’s mild climate and abundant rainfall make it an ideal location for preppers interested in cultivating crops and raising livestock. The valley’s agricultural heritage ensures a wealth of knowledge and resources for those looking to establish a self-sufficient lifestyle.

Access to Water and Natural Resources

The Sequatchie River runs through the valley, providing a reliable water source for irrigation and consumption. Additionally, the surrounding forests offer timber, game animals, and edible plants, further enhancing the area’s appeal for preppers.

Close-Knit Community

The Sequatchie Valley is home to a tight-knit community of residents who value self-sufficiency and cooperation. Preppers seeking a supportive network of like-minded individuals will find this area particularly appealing.

Conclusion

Tennessee boasts a diverse range of landscapes and resources that make it an ideal location for preppers. From the elevated and secluded Cumberland Plateau to the rugged and remote Smoky Mountains, each region offers its own unique set of advantages for those seeking a self-sufficient lifestyle. The strategic location and abundant resources of the Land Between the Lakes provide both defensive benefits and recreational opportunities, while the fertile land and agricultural potential of the Sequatchie Valley offer an ideal setting for cultivating crops and raising livestock.

Ultimately, the best location for preppers in Tennessee will depend on individual preferences and priorities. However, each of these areas offers a strong foundation for establishing a secure and sustainable way of life, making Tennessee a top choice for preppers in the United States.

Filed Under: Homesteading

The raised beds are looking fantastic!

June 14, 2022 M.D. Creekmore

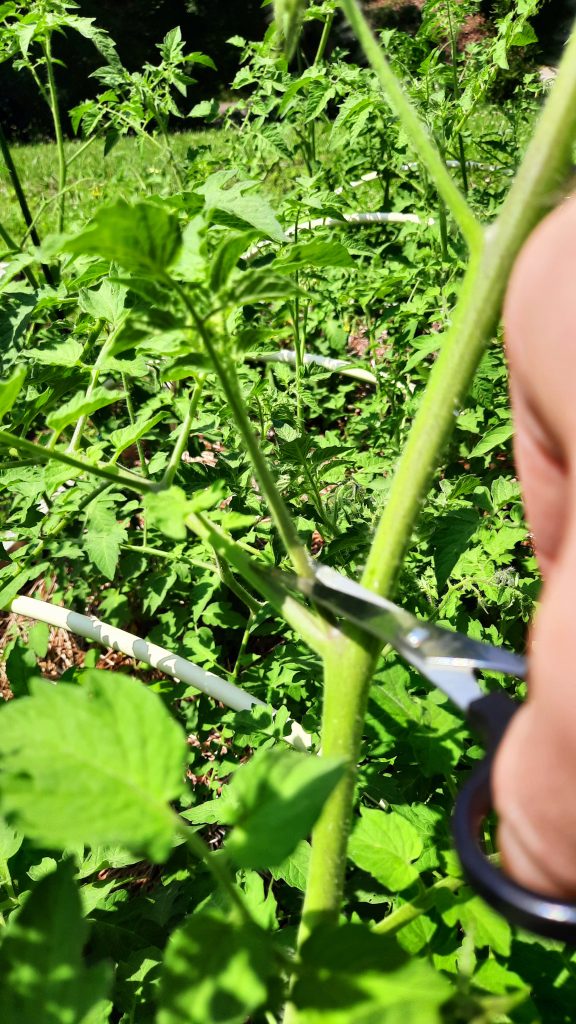
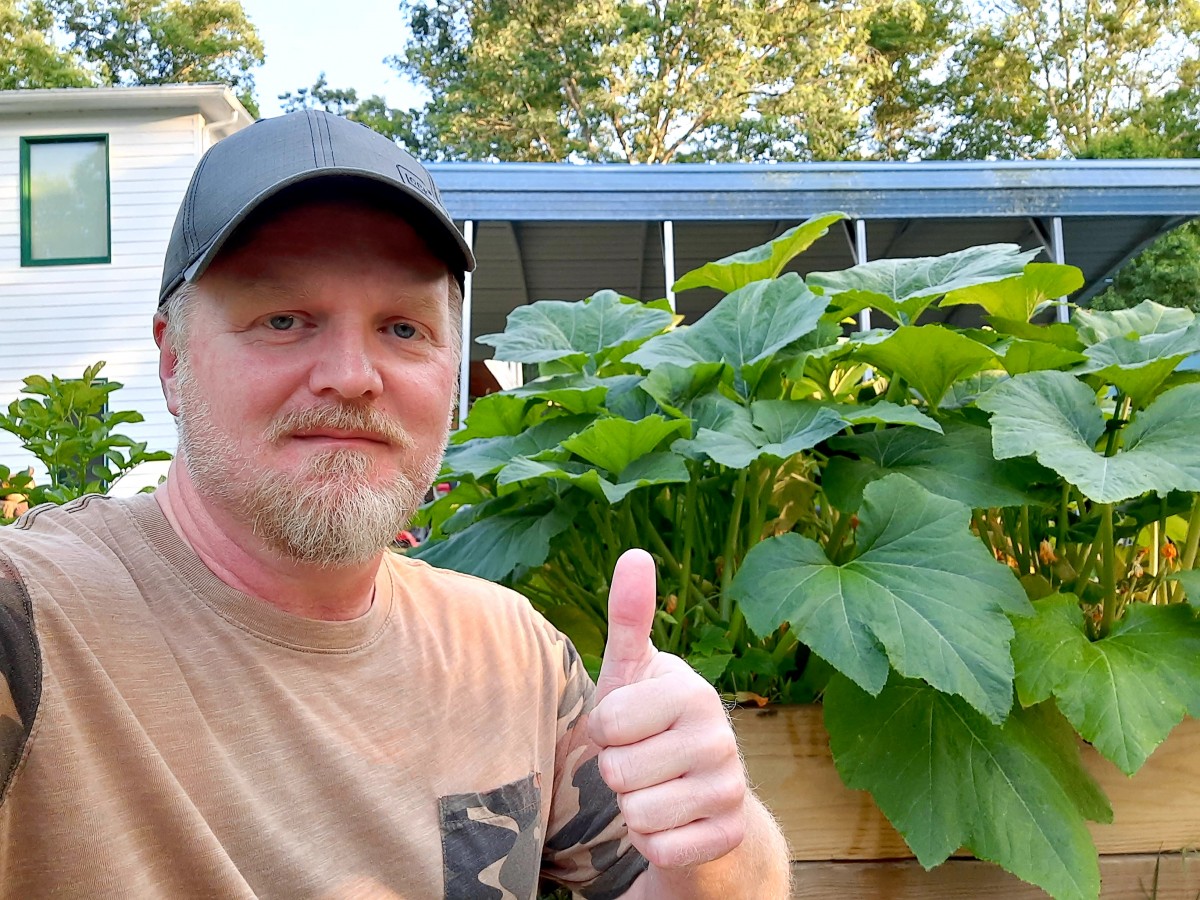
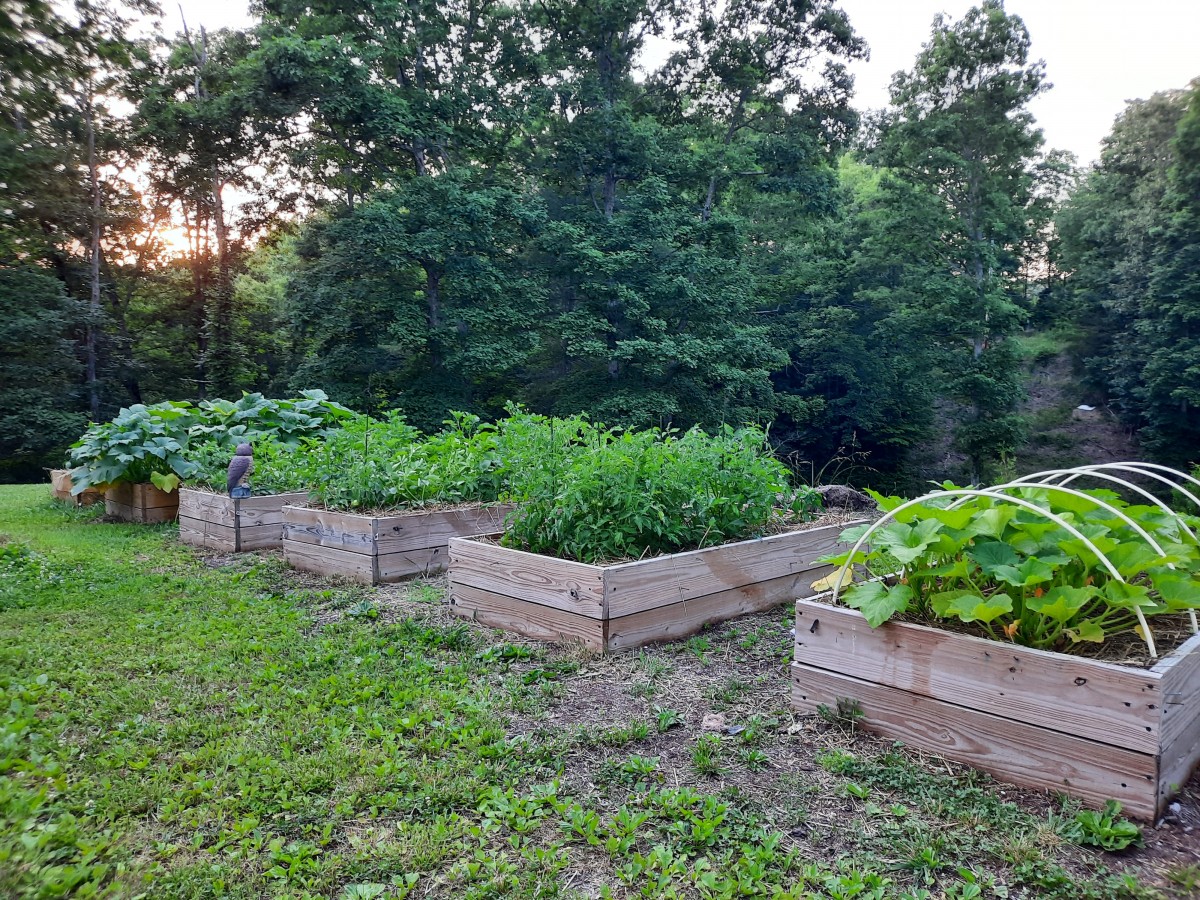
The squash has grown crazy fast in this bed! My other 4×8 raised bed was planted at the same time and not half as large…

[caption id="attachment_17431" align="aligncenter" width="1024"] 
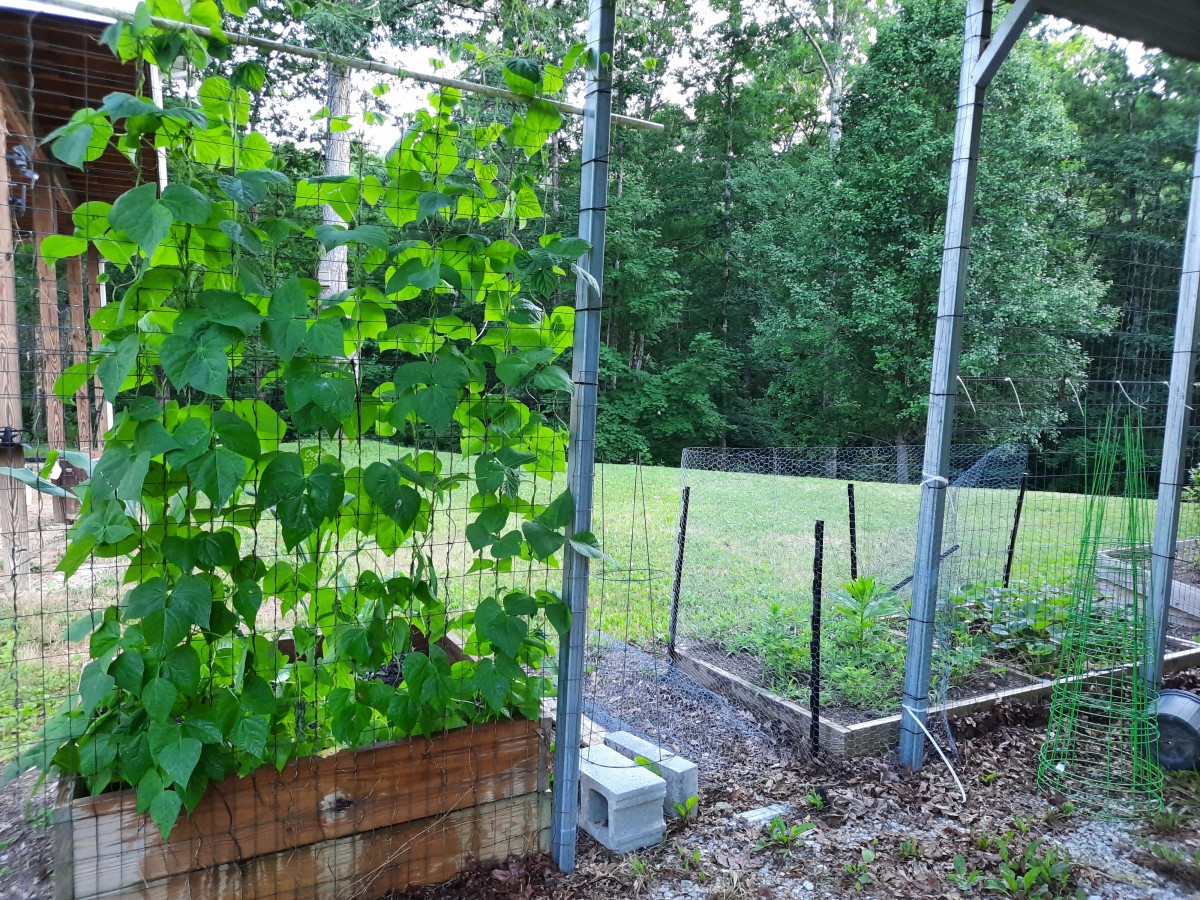
Ky Pole Beans climbing.

Filed Under: Homesteading

Greenhouse Gardening Tips – Growing Vegetables in a Greenhouse Year Round

January 12, 2020 M.D. Creekmore

by Crazy Joe

It is in the greenhouse that seeds are started so a larger seedling/plant can go out in the spring and increasing the chances of an earlier and better crop The larger scale greenhouses with their heating units, air circulation systems, automatic water sprinklers, and temperature controls are on a scale most homeowners could not afford or just not have the room or need for.

I have met so many people over the years who garden and stated how they wished they had a greenhouse. I have shown many folks and helped a few to build one the easy and cheap way out with a cold frame.

The most simple is to get some old storm windows of equal size – 4 for the four sides and 2 for the top. This is good enough to get a few dozen herb plants started or 20 or 30 tomato plants. It only takes a little time to read up on watering requirements for seedlings and the fact that even on a windless cold sunny day in March a small cold frame being 5 feet by 5 feet and 3 feet high can get up to the 60 to 70-degree range.

Getting old storm windows and putting them on a frame or making them with wood lathe and greenhouse plastic and securing them to the south side of any building will give you a much larger cold frame with some standing room.

I have built cold frames as small as 3 foot by 5 foot up to some in the 10 feet to 20 feet long range. On the larger angle cold frames a couple of hinges on a window gives you a window to prop open slightly for those cold sunny days and NO you cannot do this and go to work for 10 hours You will come home to dried out seedlings – as in dead seedlings. The same goes for watering.

Even on cold late spring days a closed cold frame or greenhouse can get up to 90 plus degrees – death for newly sprouting seedlings or very young plants. You want the advantage of a greenhouse or cold frame, therefore some attention is required. Believe me, the attention and advantage is well worth it. I have gotten way ahead on cantaloupe output by getting them started 8 weeks earlier in a small greenhouse.

Building a greenhouse, especially with scrap material (saves money), is not that difficult. It is the same as building a dog house only bigger and it gets covered with glass or plastic instead of plywood. One does not have to have the 3 foot high benches inside as the bigger houses have.

In a smaller greenhouse, with enough headroom to walk down the middle flower pots can sit on the ground or on some lattice or lattice type of structure raised on some bricks works fine At present my greenhouse is in a pile – I dismantled it. The 30 foot long 12 foot wide -at base – by 9-foot high center was all white so boring and it was warping-both deficiencies bothered me equally.

I found a web site with “Victorian Greenhouses” which some include scalloped cedar shake shingles on the bottom part of the greenhouse and some brass or bronze accents. I have about 120 recycled wood frame windows that I have trash picked from homes getting the new and improved vinyl windows. All of these were all white.

I chose an oil-based paint in a shade of forest green (semi-gloss) for the frames and will keep the caulked part of the window panes in an oil base gloss white. Now I have 30 or so painted. In the next 4 months, I hope to get as many done as possible but do not expect to rebuild the greenhouse by next July.

Last but not least is the upkeep and care of a greenhouse that brings me back to the day before Thanksgiving. Greenhouses can provide shelter for small critters seeking warmth on a cold January day. The glass gets dirty or the plastic gets old and brittle.

Weeds may have spouted up and you were busy doing other chores so they kept growing all summer in the empty greenhouse. This is the time to get that empty greenhouse or cold frame in shape. Spring is about 18 weeks or so away.

Here are some web sites for greenhouses, cold frames and their construction, care and what can be started in them. Trust me. Gardening is simple and with a cold frame or greenhouse, you get a major head start over the competition.

  • The Solar Greenhouse That’s Right for You (Text & illustrations for this web page came from the August 1978 issue of Organic Farming & Gardening) Here is a new gardening tool that produces fresh food when the snow flies.
  • Helpful Hints for Using Your Greenhouse <—- ONCE YOU BUILD ONE GO HERE FOR STUFF
  • Amazon.com: greenhouse: Books <—- AND OF COURSE THIS WEB SITE AND THE 8 TRILLION BOOKS TO LEARN FROM
  • Secret Greenhouse of Survival: How to Build the Ultimate Homestead & Prepper Greenhouse (Secret Garden of Survival)
Even if you should just get a cold frame going you will reap the benefits.

Filed Under: Homesteading

Buying Used Canning Equipment (Buyer Beware)

January 6, 2020 M.D. Creekmore

Home canning. Pickled vegetables and jam

by Vickie from Frugal Canning

Although I tout the virtues of shopping at yard sales for canning equipment, it is time to give some words of caution. Know what you are buying! All canning equipment (check out this selection of canning equipment at Amazon.com) was not created equal.

Hot water bath canners are fairly simple to examine. Hot water bath canners are meant to can high acid foods like fruits, jams, jellies, preserves, pickles, relish, and tomatoes. Hold the canner up to the light. Can you see any light peaking through? Is it extremely rusted? Is it dented?

 
Does the lid fit? What size is it? Will it hold a double layer of jars? Are the handles made so that it will be easy to lift when full of water?
Hot water bath canners come in aluminum, enamel, and stainless steel. Since the water does not enter the jars and touch the food, an aluminum canner is safe to use.

Test a used water bath canner by filling it with water to ensure it does not have any leaks. Leave it in the sink for a while. Then put it on the stove and heat the water to boiling. If there aren’t any leaks and if the lid fits so that the steam does not escape and if the handles are sufficient so that you can lift it safely, you may have scored a useful find.

When you are finished canning, always dry out the canner and put it safely away in a dry place.

Pressure canners need careful examination and decision making before buying. Pressure canners are used to can low acid foods like vegetables, meat, poultry, fish, soups, stews. Don’t think because the pressure canner is being sold that it is safe.

 
There are many factors to consider. First how old is the canner? What condition is it in? Is the brand name familiar? Is the instruction booklet with it? Is the weight with it? Are the handles in good condition? Are there signs of staining around the seal?

Let’s be more specific. Does the age matter? Yes. If the cooker was made prior to 1960 it was probably manufactured using a process called die-casting. Molten metal, most likely aluminum, was poured into a mold to create the pot.

 
This was the standard manufacturing process during and after WWII, and such pans are not of the same quality as those made today. Modern manufacturing makes pressure cookers from rolled and stamped metal sheets that form the pot from one single piece of metal.

Cast metal is brittle and it is subject to tiny, microscopic cracks or thin spots that weaken the container. Pots and pans take a lot of abuse, they get banged around and they get dropped and may result in cracks in the metal.

 
All these tiny fracture lines or hairline cracks are microscopic and they can only be picked up through industrial X-rays, they are not visible to the naked eye. While you might be able to use that old cooker safely for a while, eventually such a fault will cause a failure, sometimes with catastrophic results.

The only way to be sure if an old pressure cooker or canner (MD Creekmore adds – this is the one that I use at Amazon.com) is safe is to send it back to the factory for testing. The original manufacturer – although sometimes other manufacturers may be willing or have the special equipment to test other brands.

 
Be prepared to pay a small fee, plus round trip shipping costs to have it tested for unseen faults. Be sure to call the manufacturer first, if they are no longer in service then Presto of Mirro may offer testing on some models.

Also, check with your country or university extension office. Often they will provide this service, although it may only be offered at certain times by appointment as the testing equipment travels from place to place.

Check for the brand name. If it is not a common name then it might be difficult to get parts or be able to send it back to the manufacturer for inspection. Stick with an American brand name like Presto, All American, Wisconsin Aluminum Foundry or Mirro. Foreign brands may be difficult to track down and more difficult to get parts from.

If it is a weighted canner is the original weight with it? It is important to use the same kind of weight designed for that model. I collect old weights and there are subtle differences that could affect being able to calculate the correct pressure.

Are the handles in good condition? Older canners had wooden handles and over the years they become brittle and crack. Check with the manufacturer to see if the handles can be replaced and at what cost. I had the handles break on an older canner once while canning and it was extremely difficult to get the lid off and remove the jars.

 
It was extremely hard to pick it up as well once the handles had broken. That canner became a planter in my garden collection of canning pot planters.

Are there signs of staining around the seal? If so possibly this canner leaked and did not seal tightly. Always get a new gasket for a used pressure canner. No matter what story the seller tells you always be on the safe side. Improperly canned foods can be fatal or at best make you sick as a dog.

 
Make sure you can find the model number so you will be able to order the right gasket. Take pressure canners in to have gauges checked annually by your local County Extension Agent.

Have I frightened you away from buying a used pressure canner? Good, that is what this article was meant to do. Study up or better yet do not buy an old pressure canner. Invest the money in a new model and save yourself time, money and most importantly your safety. New models are technologically safer and will inherently have fewer problems.

Please go to http://missvickie.com to read all about pressure canning. Miss Vickie is the Queen of pressure canning and pressure cooking information. When I grow up I want to be just like her! Thank you, Miss Vickie, from the Frugal Fraulein at Frugal Canning.

Filed Under: Homesteading

Survival Through A Home Business

December 28, 2019 M.D. Creekmore

We survivalists AKA preppers spend a lot of time worrying about a national or worldwide collapse scenario, giving little thought to collapse on an individual level. The fact is many things can happen to send your life into turmoil creating a personal collapse.

You can be laid off from your job or fired. Your employer could move or company close. You could become sick or injured, no longer able to work at your present capacity or industry.

You should consider starting a home business. With a home business, you have a hedge against unemployment and become an asset to your neighbors.

No doubt many of you have thought of starting your own business but lack the willpower to actually get it going.

Every home business started with an idea followed by action. You have to put your ideas to work, if not you’re guaranteed to fail.

Starting a home business need not be expensive or time-consuming. Many can be started part-time with little resources or cash outlay. A good book that has been a great resource for me is Small Time Operator by Bernard B. Kamoroff. 

Ideas to consider:

  • Mail order or Internet Sales
  • Craft Sales (can be combined with above)
  • Freelance Writing (click here to read my article on freelance writing for pay)
  • Gunsmithing
  • Locksmithing
  • Reloading
  • Auto Repair
  • Computer Repair
  • Knife Making
  • Greenhouse / Produce Sales
  • Firewood Sales
  • Odd Jobs / Handyman
  • Welding
  • Childcare
  • Start a blog (click here to read my full article on how to start a blog)

I’m sure you have many other home business ideas and I can’t wait to read about them in the comments below. Just remember ideas should have low start-up costs that the operator can run from home. I have a full-length article covering 31 home business ideas that you can read by clicking on this link. 

Now the bad news. Even a home business can falter. According to statistics on average 50% of home, businesses fail within the first year. This may sound discouraging but one thing is guaranteed –  if you never start you will never be included in the 50% that make it.

Steps To Success

  • Consider your Skills
  • Make a plan
  • Avoid entering a saturated market
  • Don’t go into debt
  • Set a work schedule and stick to it
  • Consider customer needs
  • Look for a “recession-proof” business
  • Prepare to work long hours for little pay
  • Don’t quit your current job (if you have one) until you’re established

Having a home business is just another step toward survival and self-reliance. Think about it; how can you be self-sufficient if you depend on others for your livelihood?

Do you run a home business? What is it? What advice would you give others starting out?

Filed Under: Homesteading

Where I Live as A Survival Retreat Location

December 27, 2019 M.D. Creekmore

Yesterday, a reader dropped an email asking specifics about my retreat location. I’ll admit being caught off guard by such a sensitive question. However; I don’t think the sender has evil intentions only curiosity. Maybe he was looking for an example to compare his situation – I don’t know.

To be honest, I didn’t know what to think at first, but after some thought, I decided it probably wouldn’t hurt to elaborate on my general area (Southern Appalachian Mountain Range) without divulging details that could present a security risk.

No doubt some of you have considered this area yourself.

The Good

The area has a long growing season with plentiful rainfall, sunlight and fertile soil. Raising a garden here is not a problem.

Many areas are covered by thousands of acres of forest, with most of the population being concentrated in a few areas.

Wild game is abundant, with black bear, white-tail deer, wild turkey, rabbit, and squirrel. And the rivers, creeks and other bodies of water are loaded with aquatic life.

During spring and summer, the forests and fields are teeming with eatable plants such as blackberry, cattail, wild rice, butternut, stinging nettle, sheep sorrel and lamb’s quarters.

The Bad

But the area isn’t perfect with a number of negative factors to consider.

It’s nearly impossible to find any type of work. Currently, the county where I live has an official unemployment rate of 5.2%. But it’s really MUCH higher than that because a large part of the population is on the “draw” AKA the disability/welfare check from the federal government. Jobs are few – if you’re an outsider forget about getting a good-paying job.

The decent employment opportunities that do exist are quickly filled by friends and relatives of established workers, management and officials.

Reported unemployment numbers, only include those looking for work.

The real unemployment rate here is much higher. I would estimate the number at 60% to 70% since those living from social security, disability benefits and welfare aren’t included in the official number.

The area has a large welfare-dependent underclass. Nearly everyone is on “the draw” and living from government handouts at the first of the month. They’ve learned to work the system, many being second or third generation, welfare addicts.

I know several dozen “disabled” residents, all in their thirties who’ve been receiving social security disability payments most of their lives, (they claim to have a bad back) yet riding horses, dirt bikes and ATV’s is a common activity and doesn’t seem to bother their condition in the least, while work is another story often leading to severe pain.

How is that possible? Could it be they’re faking so they can stay on the draw?

The Ugly

And let’s not forget the drugs. Both illegal and prescribed. When I was growing up here, all you heard about was marijuana. Now the drugs of choice seemed to be methamphetamine and Oxycontin.

With the amount of drug use in the area, I’m surprised there isn’t more crime. But then for a population of just over 20,000 countywide we do have our share of property crime and the occasional homicide.

Conclusion

I don’t look for much rioting or looting, however, I do expect a huge increase of home invasions and property theft, especially if the government checks stop.

If you’re known to have supplies you could become a target. I expect to spend many sleepless nights guarding what I have.

You’re probably asking yourself why I continue to live here? To answer in one word – family.

How about you

Would you recommend your current location as a retreat area? Why? Why not? Looking forward to your recommendations. Also, if you don’t already own a copy then I suggest that you get a copy of Strategic Relocation: North American Guide to Safe Places then I suggest you get a copy if you’re looking for a safer area to call home.

Filed Under: Homesteading, Prepping

Ten Ways To Keep Warmer This Winter

December 20, 2019 M.D. Creekmore

by The Frugal Fraulein, you can visit her blog at Frugal Canning…
 
Since I opted to turn off the electric heat this winter and use wood I have learned so much! First, it can be done. I not only have lowered my electric bill but I am getting exercise collecting, cutting, splitting and hauling in wood.
 
It is true that there are other things that can be done to keep warm besides changing the source of your heat.
 
1. Wear layers of clothing. Your body creates heat and wearing layers contains this free source of heat. Did you know polyester underwear and long underwear is considered by survivalists to be the superior fabric of choice for undies? The reason is it wicks away moisture.
 
Both cotton and wool hold moisture which can lead to hypothermia. I choose to have many polar fleece articles of clothing. I have hats, gloves, mittens, scarves, vests, jackets, pants, pullovers, socks and a bathrobe all made from polar fleece.
 
My mother (who is 80 years young) now loves her polar fleece pants and loved the fact that she could hem them by simply cutting them off at the bottom. Polar fleece does not unravel or fray! If you are really cold, wear a warm hat as most heat escapes from your head and the brain gets the cold message immediately.
 
2. Throws and lap blankets. I have one on each of my easy chairs. If I feel chilled I pull one on and snuggle with Mister T. I have wool, down, cotton and polar fleece throws and again polar fleece wins the contest for being the warmest. Last Christmas I received a Snuggle which was one of the most popular gifts of the season. It is a great idea and design but the quality of fleece used is not warm enough for my taste so I use it in the warmer months.
 
3. Cover furniture with polar fleece. (Sounds like I am doing a commercial for polar fleece but I am not. If there is a polar fleece company that would like to hire me to do endorsements, of course, I am available.) I covered my sofa with polar fleece at first to keep it clean when I had two dachshunds.
 
What I discovered was it very warm to sit on the couch and I have noticed that the company seems to head straight for the couch and always comments on how comfy it is. I highly recommend a large piece of a good quality polar fleece for your favorite perch to keep you warm.
 
4. Socks and Slippers. I am not a fan of socks and would prefer to be barefoot. There is a huge difference in the warmth of my body when I wear socks so I have come to accept their importance to my well being in the winter months. Coupled with a great pair of warm slippers you will not feel drafts that creep around the floor. Since hot air rises, feet are subject to this cold air.
 
5. Down Comforters. For years I would not even consider a down comforter for my bed. Since most birds fly south for the winter why would down be warm? Silly me. Years ago when I still lived in New England I had the opportunity to go to a sleeping bag factory. At their outlet store I purchased a down sleeping bag before the zipper had been installed. This “blanket” was very toasty and held in my own body heat.
 
It was simple army green and I made a duvet cover for it. I had that blanket for many years and it finally met its demise to mold while being stored. Two summers ago I chanced upon a very good quality down comforter that was being sold by a woman who thought it was too warm.
 
Since I absolutely love a cold bedroom and have my window open at night 365 nights of the year, I was thrilled to steal it for $10. Again I have a duvet cover to keep it clean and I love the warmth I feel when I cuddle with Mister T (for those of you that don’t know, Mister T is my best buddy my mini black and tan dachshund).
 
6. Use Door Draft Stoppers. Door draft stopper or guards are filled tubes that keep cold air from creeping under doors. They can be purchased new or made easily by filling a tube sock or tube of fabric with rice, beans, sand or stuffing. They look a bit like a snake and really do the trick. If you have a dog like mine that likes to pull the innards out of stuffed animals don’t make yours with stuffing!
 
7. Close Doors. Keep the doors closed to rooms that do not need to be heated. Just heat the areas that you sit in during the day.
 
8. Do leave the Bathroom Door Open. Showers and baths create lots of heat but more importantly humidity. In the winter the house dries out and the moisture from the bathroom can help tremendously. Now I understand in some family’s privacy is important. Just leave the door open after showering and don’t use the fan.
 
9. Do Leave the Oven Door Open. Leave the oven door open after cooking and turning off the oven. Let that heat escape to warm the kitchen.
 
10. Do Open the Dishwasher When Washing Cycle is Finished. Once the dishes are washed open the door and let the dishes air dry. This will let the heat escape, allow the moisture to escape to humidify the house and save a bundle on electricity over a period of time.
 
Hopefully one or more of these suggestions will help you stay snuggie warm in the cold months. If all else fails go to the animal shelter and get a Dachshund. Dachshunds love to snuggle under the blankets and curl up and sit in your lap. They are loving, loyal, small and great substitutes for hot water bottles. Your other alternative is to go to bed early with a good book.

Filed Under: Homesteading

How I Made My Tiny Home Out of a Shipping Container

December 16, 2019 M.D. Creekmore

inside-container-home
The inside of my container home.

guest post by KR Prepper 

I like living frugally. There’s a certain power that comes from knowing that you don’t ‘have’ to spend money.

I used to run a recording studio. I saw the writing on the wall, that I wouldn’t be able to sustain my business long term (economy, local music market changes, burnout). I had been living in the office building that housed my recording studio, showering at the local gym.

I had recently read “Dirt Cheap Survival Retreat, by MD Creekmore and Travel Trailer Homesteading under $5000” Brian D. Kelling and begin praying about how to not be homeless (read this article on how to survive being homeless).

After searching for land. I found a place north of my studio right at 4800. It was a half-acre. It was the only place within my price range, so I met the guy. He and his wife were very friendly. Set up a contract for deed at 220 a month for a couple of years.

Then I looked at several options. I’m not a handyman, so I knew a self-build would be out of the question. My next glance was prefab, but I knew that music gigs would keep me away from my place for stretches at a time. So anything that could be burned, or broken into easily couldn’t work.

So I chose an 8′x20′ shipping container and made it home.

Here’s my setup process…

The Cost

My container came insulated, framed, and wired with lights with delivery for 3300 I could’ve done these things myself, but time being of the essence. This was the wisest option If you’re not near the coasts. I found that metal fabricators are the best place to get them, as they will customize them with doors, windows, and other stuff.

Mine has a man door and 4 ventilation ducts and a metal floor. The metal floor is better, as off-gassing of pesticides and other things are less of a problem.

Prep: Before purchasing the container, I purchased everything that I needed inside FIRST. Because I knew I’d have a bill. I wanted to have all of my gear set up before I’d hunker down.

Heating/Cooking

Buddy Heater / 40# Propane tank. I use this to simply heat up the cabin quickly in the morning while the fire is building 1920 Estate Woodstove: I found this piece at a consignment store around the corner from my studio for $100 bucks. Spent a couple of bucks more on the stove pipe and done. 2 of my friends donated barbecue pits to me. One is gas with a burner, and one is charcoal/wood.

Sanitation/Water:

Coleman Camping Toilet. I wasn’t planning on humanure composting, so I filled the flush tank with bleach/water to help kill the odor. Ecotemp Portable On Demand Water Heater. I use this unit to provide running water Shurflo 3gpi RV pump (2) 55-gallon water tanks (4) 5-gallon water bottles this covers my water needs for 2-3 months.

I also have made it a habit to fill up my water cisterns every time I go into town for free. I hope to have a well drilled within the next year, but this saves money for now.

Lighting / Power:

 Sunforce 60w Solar Panel System with upgraded power controller and inverter 2 deep cycle batteries, Coleman CPX lanterns with power supply. The lights recharge via a drill type battery, so I’d be covered as long as the batteries hold up.

Refrigeration: I bought a used propane refrigerator for $50. Honestly. During the winter I put my coolers outside. Minnesota IS the freezer.

Storage: I salvaged a set of Kitchen Cabinets and a countertop for free. Just the cost of Driving to get it.

Cabin Setup: 1 I cleared a 10×25′ rectangle, and put cinder blocks/logs near where I wanted the cabin to be. My lot is narrow, so we had to take down trees to get everything in. Good. Free firewood.

Went to the distributor to pick from the containers that they had. This was in July. So I got to FEEL for myself the difference between the container that was insulated vs the one that was not. Without any fans or AC, the insulated container was bearable. The one that wasn’t felt like an oven.

I also had read up on some of the chemicals they put in them for travel. The ones with wood floors can pose health problems due to off-gassing. So mine was floored with metal. They had already installed a man door, lighting, and a power cable. (upon getting to my property. My system was insufficient to power them, no worries).

After purchasing the container… I set up a date to have it delivered. It arrives on the back of a flatbed trailer. They had to cut more trees to get the truck in and trailer to clear. Great! more firewood. The first night I slept on the metal floor with a packing blanket… It was the best night of sleep in a long time.. It was cold and hard, but MINE.

2: Cutting the hole for the woodstove.. A drill and a Sawzall.
3: Getting a twin mattress from Menards.

There have been several layers of improvements, but I believe this is one of the best ways to get cheap shelter.  Although I no longer live there full time… I miss this place so much. I’ll move back in a while.

Filed Under: Homesteading

Can You Use Diesel Fuel In a Kerosene Heater?

November 11, 2019 M.D. Creekmore

Is It Safe to Burn Diesel Fuel in a Kerosene Heater?by Jeff in Ohio 

Can You Use Diesel Fuel In a Kerosene Heater? That’s a good question and one that I will answer below…

It is well-known that diesel engines are capable of using other fuels besides diesel. This includes kerosene (with added lubrication). But how well does diesel work in items designed for kerosene? Theoretically, they should be almost interchangeable.

But are they? I decided to find out for myself. First, I will describe the items used followed by the results of using diesel fuel in them. The fuel used in the testing was off-road diesel that had been dyed red for tax purposes.

So, Can You Use Diesel Fuel In a Kerosene Heater?

Yes, you can burn diesel in a kerosene heater. Diesel burns surprisingly well in MY 23,000 BTU Kerosun brand kerosene heater. I could detect no difference in flame height or heat output and no odors. A friend that works at the local fuel co-op told me that diesel may reduce the life of the wick but so far I can’t tell any difference.

Even if it does occur, wicks are fairly cheap and the difference in fuel price can result in significant savings over the long haul.

Butterfly brand 22 wick 14,000 BTU kerosene stove.

I love this stove because of its simplicity and versatility and I have two of them. It uses rope wicks that are simply moved up and down to adjust heat output. It is made as a cook stove but works quite well as a heater.

Be aware that these stoves do not have an auto-shutoff feature if knocked over. Flame height and heat output were the same. However, I could detect a slight increase in odor and a very small amount of black smoke as well. For temporary use indoors I don’t think this would be a problem. I believe diesel is a viable alternative fuel in this stove.

Dietz Monarch lantern.

This is the”railroad” lantern most people are familiar with. Like the Butterfly brand stove above, these are a model of simplicity. Light output was about the same and I could detect no difference in odor but it was quite smoky.

It didn’t take long to soot up the chimney. This was bad enough that it would have to be cleaned off every day. I would not want to use this in a closed-up house unless I was desperate. Outside use would be fine.

Coleman Exponent multi-fuel stove with kerosene jet installed.

This is a rugged backpacking stove and is quite a little powerhouse. Diesel did not work well in this stove. There was spiking yellow flames among the normal blues flames and it constantly spit and sputtered.

I’m theorizing that the less refined diesel fuel was not vaporizing properly resulting in the mediocre performance. While it would be ok to boil water with, I would not want to cook on this, unless once again I was desperate.

I did not try using diesel in any of my Aladdin lamps after the Dietz experiment above. If the Dietz would smoke as much as it did I had no doubt that the Aladdin would not run on it with the wick and mantle setup. So I passed on that one.

So now that I know the above what good does it do me? Well, a lot. I can store cheaper diesel instead of more expensive kerosene. In my area, off-road diesel is usually at least 1 dollar a gallon cheaper. That is a significant savings if you store fuel in quantity or allows you to store more fuel for the same price.

It seems that in many areas kerosene can be difficult to come by but diesel is readily available. Even when kerosene is available diesel seems to be sold in many more locations.

Also if in an extended TSHTF scenario and my kerosene stock starts to run low I can switch to diesel in the items that run well with it thereby extending my supply of kerosene. Next is what I call “scroungeability”. In short, diesel is almost everywhere.

The tractor sitting in a barn or field. The long-haul truck. That bulldozer sitting at a construction site. Also, many diesel trucks have large fuel tanks in the beds. I am not advocating stealing but this does provide a lot of opportunities for bartering or scrounging in certain circumstances. Also, my own diesel vehicle can be used as a source as well and a large one if the tank is kept at least half full.

While I have not tried home heating oil in the above, I have no doubt that it would work. Home heating oil is virtually identical to diesel. In many areas, the heating oil tanks at houses are more common than propane tanks. Again, another potential source of fuel. A homemade 12v fuel transfer setup would be nice to have here as well.

When trading for or buying fuel of unknown quality it is essential that it be filtered properly for both water and sediment before use. Fuel filters are cheap insurance. I was once stranded along a country road due to clogged fuel filters in my Mercedes diesel.

I had been using scrounged diesel and had not filtered it at all. Both the primary and secondary fuel filters were so clogged that the engine couldn’t run and kept stalling. Not only was I using fuel of questionable quality without filtering it I did not have spare fuel filters with me for the car. Lesson learned.

Many people use kerosene appliances and fuel as their primary backup for emergencies both short and long-term. They are both relatively cheap and readily available. As a bonus, kerosene as a long shelf life if stored properly and more importantly is a safe fuel to store in quantity.

By knowing what alternative fuel can be used in them and their limitations it only increases my options. Fuel interchangeability is a great option to have. Plus be sure to store plenty of extra wicks as needed. Also if used indoors be sure to use more than adequate ventilation and a CO2 detector.

Now for storing that fuel beforehand. Large underground tanks for storage are good to have but may not be practical for several reasons including the cost. Plus, like a lot of people, I live in a small town and large amounts of fuel kept at the house is not practical.

But do you have unused land somewhere or a trusted friend with some property? Then you can make what I call my “mini fuel storage depot”. This is simply a wooden pallet set up on some bricks to keep it off the ground.

On the pallet, there is room for a 55-gallon drum with either diesel or kerosene, five 5 gallon metal jerry cans of gasoline and two 20 lb propane tanks or whatever combination you prefer. On top of this goes a heavy-duty tarp properly secured to keep the weather out and provide some camouflage.

A camo net could go over this for additional concealment if needed. By placing the above in a shaded area it avoids large temperature swings and if the fuel is properly treated this works very well long-term.

By having several of these over a wide area or on different properties you avoid having all your eggs in one basket. If one is compromised or destroyed by fire your entire fuel storage is not lost.

By being above ground you run a slight risk of exposure. However, if sited properly and carefully camouflaged (possibly as a junk pile?) they are not hard to conceal. I hope people find this useful and remember to follow all safety guidelines as outlined by the heater and or appliance manufacturer and keep in mind that these are my results and yours could be different… see the disclaimer policy here.

Filed Under: Homesteading, Power Generation, Prepping

  • Page 1
  • Page 2
  • Page 3
  • Interim pages omitted …
  • Page 6
  • Go to Next Page »

Primary Sidebar

Find It Here

About the author

I’m M.D. Creekmore, and I’m all about simple living, financial freedom, and life here in Appalachia. I grew up poor in these mountains and built a life around doing more with less. Read more→

  • Amazon
  • Facebook
  • Instagram
  • Twitter
  • YouTube

Never Miss a New Post

Enter your email below and get notified when new posts go live—straight to your inbox.

Join 7,403 other subscribers

“Do more with less.”

– Minimalist proverb

Secondary Sidebar

Read My Books

Paperback and Kindle

Footer

Recent Posts

  • Everyday Carry in Appalachia — My No-Nonsense EDC
  • Best Off-Grid & Emergency Water Filters (2025): What I Use—and What I Don’t
  • Read This Before You Waste Another Dollar
  • Are We All Helpless Now?
  • Simple Living in Appalachia: Resources That Made All the Difference

More about me

  • Books I’ve written
  • Books I’ve read
  • YouTube Channel
  • My Facebook
  • Gear I Use
  • Tea I Drink

SWARCH THIS SITE

Follow Me On

© 2008–2025 M.D. Creekmore · As an Amazon Associate, I earn from qualifying purchases.

  • Blog
  • YouTube
  • Gear I Use
  • Books
  • About
  • Contact
  • Privacy Policy