• Skip to main content
  • Skip to primary sidebar
  • Skip to footer
  • Blog
  • Books
  • Newsletter
  • Gear I Use
  • About
  • Contact
  • Privacy Policy

M.D. CREEKMORE

  • Blog
  • Books
  • Newsletter
  • Gear I Use
  • About
  • Contact
You are here: Home / Archives for Minimalism

Minimalism

May 09 2018

DIY Solar Projects Made Simple – Even Forrest Gump Could Do This

by Michael C

DIY Solar ProjectsMost folks have the “idea” that solar costs lots of big bucks. But the truth of the matter is – solar energy is an investment. Like big power company’s that buy a nuclear power plant. There is a big (one time) upfront investment for the company that will usually pay off later.

You would do the same thing – invest in a pile of components that will become your personal utility. The cost of taking care of your utility is minimal – after the initial purchase. You don’t have any monthly bills – it is YOUR utility. Why is solar worth having? Because it gives you power. The power comes from the sun and goes into your pocket – if you got it. Solar power is nice and quiet – use a night-light to go to the bathroom.

A few people can tell you how to build a solar energy system. But, going into wire sizes, battery sizes, panel sizes and everything else is sure to confuse you to the point of “puttin’ it off”. So, I am going to just describe systems that I made. I am going to describe 3 different sized systems – that you can copy – for your own use. You should copy – but, keep in mind that you can adapt your system to the materials you have. If you have a 100 Watt panel lying around – use it – instead of the 80W panel I used in my medium system.

Small system

A small system for me is just some thin-film panels, taped to a piece of stretch proof plastic sheet (from the post office plastic mailer) with wires soldered on. Most productive for recharging batteries or powering a small device. A common connector is style “M” which can be found at Radio Shack.

solar projects diy

I added diodes (…N1001) to each solar panel (since they are all in parallel) to block all reverse current – I did not want any panel to “leak” power backward. At this size of alternate energy system – most of your connections would be soldered. The cost for each thin-film sheet was about $17 (USD) and the wire was cheap speaker wire (24 gage).

The solar panels can be soldered together in parallel, series or both for the voltage/amperage needed. (The thin-film panels can be bought in various sizes too.) At about 12 volts you might consider a 12V solar panel to avoid all the soldering. Thin film panels work great in this case because they are very lightweight and portable. You could have these in your BOB, GHB or with your GPS.

Medium System

This alternate energy system is larger, uses regular components like a framed solar panel. This system is still portable – if you have an electric chainsaw, you can roll into the woods and use it. I use a $30 (USD) hand truck from Harbor Freight to “mount” the parts.

The parts consist of an 80W solar panel, Xantrex C30 charge controller, 2 – 6 Volt 225 Amp hour batteries, 2 – inverters (400 & 1200 Watt), desulphator and a 12V car outlet. The batteries are inside the wood box, the inverters, desulphator, and outlet are on top.

solar projects diy

The components of this system can be separated – the battery box is strapped to the hand truck and the solar panel is mounted on the handle with 2 U-clamps. Mounting the panel this way allows me to “swing” the panel up into the sun, I use a stick to keep it there. I used a short extension cord (cut in two) to connect the panel to the battery so I can “unplug” the panel.

Connections from the battery to charge controller (and from the solar panel to charge controller) are fused using common automotive blade style fuses. The inverters and power outlet have their own (blade style) fusing. The battery and solar panel are the biggest cost in this system. The cost for the panel was $400 (at the time) and the batteries were $150 each.

This system does have 120V AC output but, if you’ll notice – you’re not going to touch it, at all. All components that you handle are only 12 volts, the inverter will be connected to the battery with the cables that they give you.

This system has an 80 Watt solar panel so the output is 80 Watts per hour or 80 Whrs. In a 10 hour sunny day, you would get 800 Whrs – enough for 5 – 24W CFL’s for over 6 hours. (This system is bigger then MD’ Creekmore’s system that’s in his book Dirt Cheap Survival Retreat.)

Large System

The large solar power setup is just like you see in magazines with solar panels on the roof, a wall full of components and kids playing in the yard. I have 3 – 90W and 6 – 80W (total 750W) solar panels on top and a Solar Boost 50 (charge control), Prosine 2 (2 kW inverter), Xantrex breaker box, Link 10 battery meter (fuel gauge), 8 – Trojan L16 batteries (20 kW storage). All components except batteries and panels are mounted on 3/4″ plywood. This means that I have 3 major connections: solar panels, batteries and AC output from the board.

solar projects diy

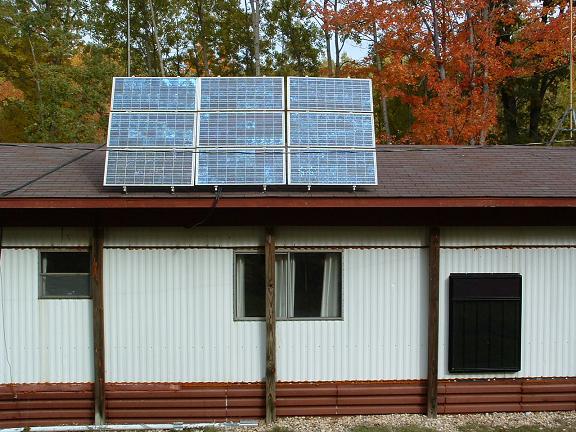
This type of system is best bought as a kit – I bought the first 3 panels with an inverter and added the other solar panels and charge controller later. You get almost all the pieces – including roof mounting hardware for the solar panels and the right size wires.

The trick with building this system is to put most of the stuff on a plywood board. I set the parts on plywood and arranged it to my liking. The breaker box should be located close to all the other stuff to minimize wire length. I had my panels mounted on the ground for good snow removal but, after thinking about theft (nice shiny blue panels) I mounted them on the roof. I use a snow rake and angle the panels steep (70 degrees).

The best feature of this kit was the inverter. The inverter has an automatic transfer switch (the thing that goes click in a UPS when the power goes out) and 3 stage battery charger built-in. It is true sine wave (yes, had it hooked up to my scope meter). I added the breaker box because you just can’t get 300 amp DC rated fuses from the electric store.

solar projects diy

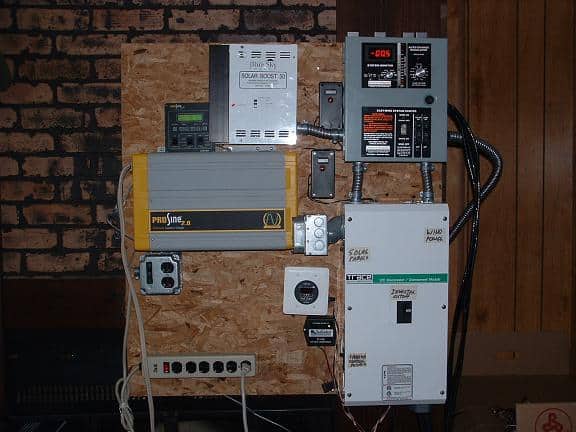
I normally use cheap grid power for running everything but, when the power goes out – its solar time. If you have heard neighbors say something like “I have 100 amp service” then this inverter gives you 15 amp service. You can run up to 15 amps at 100% duty, it will surge to 30 amps (4 kW). This inverter is not grid tie but, UPS (Uninterruptable Power Supply) tied. I have my fridge on this inverter in case of power outage.

Here is my little lead in on efficiency. My fridge (19 cf. Kenmore side by side) uses 1.12 kW a day, in 2 hours of sun – my panels will generate 1.5 kW – enough to cover my fridge power (and inverter overhead) use for a day. This fridge is 20% more efficient than every other fridge in its class (19-21 cubic foot). It cost $700 (USD) when I bought it. In the years that I have had it (about 8) it paid for itself in lower electric costs. It will always “pay you” to buy a new fridge.

Final Notes

Try to place the panels where they get sunlight, I should say “where they get the most sunlight”. If you have a tree that shades your panels at 2 pm – move the panels so that the tree shades them at 6 pm. I know that my roof space is limited but, I plan on getting the “best” light (10 am-3 pm) that I can. Losing energy in the winter because the tree shades at 2 pm is very costly (especially after all the money you paid for solar!)

SAFETY for the small system consists of not burning yourself with the soldering iron. The medium system has batteries that could weld your tools to the posts, wrap electrical tape around “good” tools used near the battery, have a tap for the post threads.

The batteries in my medium and large systems are flooded lead acid which means that I have to fill them with pure (distilled) water, I wear rubber gloves for this task and goggles. I also keep the family sized baking soda bucket nearby in case a mouse chews the corner (for water) – a lot of solution (more than a gallon) in a 120-pound battery. Lead acid batteries generate hydrogen gas which is explosive, a vented battery box is recommended.

The medium system uses a (cheaper, easier to find) flooded lead-acid battery, not the best type (AGM Absorbed Glass Mat or Gel Cell) for this application. Since it could tilt past 40 degrees (max fluid to cap angle) the solution can leak. I installed plastic inside the box to contain any fluid and am aware of this limitation in my system. The box is strapped to the hand truck for quick release to move into a truck bed.

The lead acid batteries that I used were bought before I found out about Edison batteries. Admittedly, the lead-acid battery has more power per pound than the Edison (Alkaline based Nickel-Iron) battery but, have become the “throw away” part of every solar power system. Edison batteries will (have) last for a hundred years, don’t sulfate, don’t break down (lead plate flaking) and if they run dry – simply refill. In fact, replacing the alkaline solution would only take Berky water and wood ash (lye is alkaline) solution. Last but not least – no chance for an explosion, does not generate hydrogen.

If you have read “31 Days to Survival” then you know that there is a chapter on alternate energy. I think that any of these systems will count for that day. Please share your comments and thoughts in the comments below.

You might also like:

K-Tor hand crank generator (pocket socket 1 amp usb) : Weekly Product Review

Written by M.D. Creekmore · Categorized: Power Generation · Tagged: Communications, Minimalism, Security

Apr 25 2018

Using Coupons To Save Money When Stockpiling Your Homestead Pantry

Extreme Couponing: Learn How to Be a Savvy Shopper and Save Money

Using coupons offers an opportunity for huge saving on food that you should take advantage of.

According to Wikipedia.com, a coupon is “A ticket or document that can be exchanged for a financial discount or rebate when purchasing a product. Coupons first saw widespread use in the United States in 1909 when Post conceived the idea to help sell their breakfast cereals”. So the concept is nothing new.

When I was in my early teens, I remember my mother clipping coupons from the Sunday paper; she would organize them in a small purse that she kept just for the purpose. She would wait for double or triple coupon deals to be advertised, and then she would go shopping.

I remember one time she managed to get over $260 worth of stuff for less than $10 – I was impressed.

I’ve used coupons to save money and stock up on survival supplies and food for several years and the saving can really add up fast. I’ve used coupons to save when buying everything from canned foods, tissue paper and toothpaste to dog food.

Now with the age of the internet, there is no need to clip coupons from the Sunday paper (but you still can). Now you can easily find discounts for virtually any product by simply going online and printing them off with your home printer – two of my favorite places for this is Coupons.com and MyPoints.com.

No, using coupons doesn’t emit the typical perceived image of a survivalist, but it sure makes a lot of sense from a financial stand point.

I think the main reason a lot of people avoid using coupons is that they are afraid of looking poor (even if they are). This is nonsense, and really, who gives a rat’s behind what the person waiting in line behind you thinks. I don’t. If they don’t like it they’re free to move over to the next checkout lane.

Stop worrying about what other people think – trust me your life will be better when you do.

Before you can start using coupons to save on your survival supplies, you’ll obviously need coupons. Coupons are all over the place you just have to know where to look.

The bulk of mine are printed off from the web or clipped from the Sunday newspaper. I’ve worked out a deal with a local store owner, where I get the papers they don’t sell for free. I often get ten or more all loaded with coupon inserts.

The vendor only has to send the header of the papers that didn’t sell to the publisher to get credit for unsold papers because the newspaper doesn’t want the old papers back and could not care less what the vendor does with them.

If you don’t want to buy the paper and getting a local vendor to give you the leftover papers isn’t an option, you can often get the paper and the coupons for free by asking friends, neighbors and relatives who buy the paper to pass it on to you when they are done reading it.

It’s common knowledge among couponers that some of the best coupons are found in print magazines, coupon mailers, food packaging inserts, and grocery store receipts.

Once start clipping and using coupons you’ll need to a way to stay organized. You’ll need to be able to find what you’re looking, when you need it, and to know what you have so you can avoid letting your coupons expire without using them.


I use a recipe box with dividers and sort by date and coupon type. For example; canned foods, deserts, over the counter meds, staples such as beans, rice, and oats, dog food, kitchen supplies such as dish soap, bath supplies, such as soap and toothpaste etc.

Working out a system to stay organized isn’t difficult, but it will go a long way toward maximizing savings and lessening your frustration. You can buy ready-made coupon organizers but I prefer my box because it was free. I go through my coupons once a month and weed out coupons that have expired or that I no longer want to use.

When using coupons you’ll be tempted to buy stuff that you really don’t need or never intended to buy, just because you have a coupon for it. Don’t do it. Unless of course, you can get it free. If you start buying stuff you don’t need just because you have a coupon for it, you’ll end up losing money.

Be sure to check prices before you buy – keep in mind that even with coupons, some brand named products can cost more than generics with coupons. Never buy a more expensive product because it has a brand name on it, many of these are from the same companies as their generic counterparts.

Watch for sells and stock up on items that you use that are on sale, especially when you have coupons for those items. Remember; some stores offer “Double Coupon Sales” or even “Triple Coupon Sales” that actually doubles the value of the coupons you have, such offers can lead to huge savings on the items you need.

And don’t overlook rebates and refund opportunities that are sometimes offered by-product manufactures – most manufacturers require you buy the product then mail in the cash register receipt along with the UPC barcode from the product. Keep these organized and send for the rebate or refund asap so you don’t forget and possibly let the offer expiration date pass.

Written by M.D. Creekmore · Categorized: Self-Employment · Tagged: Budget tips, Food storage, Minimalism

Apr 20 2018

You Don’t Need To Be Wealthy to Homestead

LOG HOME HOMESTEADSo you want to homestead but don’t think you can afford it? You see sprawling ranches on television with seven-figure price tags and think that is what homesteading is all about.

I’m here to tell you that’s not true. You don’t need to be wealthy to start a homestead. You don’t need a trust fund or a rich relative. For most people, this isn’t a hobby or a vacation house, it’s a way of life.

A life of self-sufficiency. A life that includes hard work and discipline, but also one where you will feel rewarded when you lay your head down each night.

If that sounds like the kind of life you want, you can follow these steps and begin your dreams of homesteading sooner than you might expect.

  1. Where you choose to live is important

We all know location is everything is real estate, and that is certainly true when looking to purchase a homestead. Generally, the further you are from town, the cheaper- and more available- land becomes. In some cases, that might mean moving to another part of the state or out of the state altogether to follow your dreams.

Whether you move across town or across the country, keep a couple things in mind. What is more important to you? More land or being closer to town? And if you have kids, school could be a consideration. Would you be happy moving to another state and potentially leaving your family?

There is no right or wrong answer. But these are things you will need to think about as you begin your life on the homestead.

  1. Buy what you can afford

You don’t need to start out big. You can begin homesteading on a couple acres and build it up over time. That’s usually a great place to start so you don’t get over your head and potentially discouraged by the amount of work a large homestead entails.

And one of the great parts about living in the country is that you can usually buy more land around you as you have the money and the need.

But it will be no fun if your property is larger than you can work or more expensive than you can afford.

  1. Go into homesteading debt free

As you prepare to begin homesteading, becoming debt free should be in your plans. Pay off your student loans, credit cards, medical bills or any other type of consumer debt before moving forward. You might think most everyone has debt, and that’s just normal. You’d be right, but you need to be different. Why?

Because your debt will just be a stranglehold on you and your homestead. You will constantly be paying back debts, and interest to the bank, rather than being able to save for the future. This will take commitment and might mean you put off your dreams for a few years, but it will be worth it.

If you don’t think getting out of debt is possible, I am here to tell you it is. To get started, I recommend you read Dave Ramsey’s The Total Money Makeover. It will bring you financial peace and change your life forever.

  1. Buy used

That new shiny tractor at the dealership looks mighty nice. And it sure would look really nice on your property. But I’m not interested in the fancy price tag that goes along with it. Like anything with a motor, it is going down in value. So buy used. Whether it’s a tractor, trailer or your truck.

This is part of debt-free living and living within your means. If money is not an issue, buy whatever you’d like. But if you are wondering how you can make it on a budget, buy used and save.

  1. Do work yourself

Learning how to fix things yourself– whether it’s a plumbing issue in the house or something on the tractor- will save you mightily. You’ll save money, but you’ll also save time from not having to wait for someone to come to your property when they can.

But if you’re not a DIY pro right now, it’s okay. You will learn a lot along the way, whether it has to do with your house, your property, your animals or something else. Just be ready.

  1. Monetize your homestead

There are multiple ways that you can make money on your homestead.

First, and most obvious, is selling what you harvest. Fruit, vegetables, eggs, milk, even meat. There are still plenty of people who sell what they harvest out of the back of their truck on the side of a highway. You can do that, but in the interest of being more efficient, you can sell at farmers markets, online or through personal networks.

In this same category, you can also barter. If you need some work done that you can not do, instead of paying cash, see if you negotiate a fair trade.

You can also share your experience on the homestead through blogging. Blogging is how I was able to quit my day job and earn a full-time living without having a regular job and a boss. If you are interested in getting started, I’ve put together a comprehensive step-by-step guide to starting a profitable blog. Be sure to check it out.

  1. Live off the land as much as possible

Maybe one day you dream of being 100 percent off-the-grid eating only food you harvest on your homestead. Even if you’re not there, as most homesteaders are not, you can still save by living off the land.

A good way to start this journey is to set goals. These goals will be different for everyone depending on experience and size of your homestead. But outline what percentage of food you want to harvest by season. See if you are hitting those goals and increase them each year.

If you follow these steps and make some sacrifices along the way, you will be homesteading very soon.

Written by M.D. Creekmore · Categorized: Self-Employment · Tagged: Minimalism, Pay off debt

Apr 18 2018

Straw Bale, Rammed Earth, and Earthbag: Three Unique Building Methods for Your Homestead

by Adam Leviness

If you’re reading this site it’s probably because you either are or dream of becoming, a homesteader. Living off your own piece of land, becoming more self-sufficient, and living a more simple lifestyle.

Maybe you have even started looking at pieces of land in the country that will be able to provide everything you and your family need. If you’re really lucky you already own that piece of land and are just waiting for the right time to move there and start your new life as a homesteader.

If that’s where you’re at then you are probably chomping at the bit to break ground on your plot of land and build your very own house. Maybe you’ve seen other homesteaders who have rolled up their sleeves and built beautiful homes from the ground up or hitched a tiny home they made to a trailer.

The problem with these homes is they are all basically made using the same materials and building techniques that almost every home in the country is made with. In the Western World, we have been making our homes from wood, screws, and maybe some bricks for hundreds of years. And, while that’s all well and good for the average person, these materials don’t really mesh well our homesteader mindset.

Unless you have a large timber field on your property or your own personal quarry in your backyard, you will have to ship in the necessary materials from somewhere else. And, the process of making these materials plays a part in the continued destruction of our planet. Forests are cleared for the wood and strip mining gets us our stones to make traditional homes.

This doesn’t exactly line up with how homesteaders tend to appreciate the land and everything it provides for us. Luckily there are ways to build a home that fall more in line with the homesteader lifestyle.

If we look around the world other cultures have been using building materials and techniques to make their homes without being as wasteful, with little carpentry know-how, and for much cheaper than what the average home in the West cost to build.

Homesteaders are starting to find that things like earthbag, rammed earth, or straw bale houses not only make it easy for anyone to design and build their own home but to build them using mainly what their piece of land provides.

These types of homes are great for homesteaders and people looking to go off-grid alike. If your property is far out in the country, away from towns or possibly even paved roads, then shipping in the materials to build a traditional style home will not only be difficult but it could be rather expensive as well.

That’s why I suggest you consider building your house using one of these techniques instead. They can be built with all the modern amenities you would find in any other home, so while you’re living off-grid, you don’t have to live in the stone age.

Each one has its own benefits as well as downsides, so it will be up to you which one serves your needs best. Whichever one you decide to build with, however, you can be happy with the fact that no matter your skill you can get your hands a little dirty and feel the pride that comes with building a house with your bare hands that your family will enjoy for years to come.

So, let’s get right to it so you can figure out which one is best for you.

Straw Bale House

I’m starting with the straw bale house because of the three it is closest to the traditional home design we are all so familiar with. If you don’t want to stray too far off the beaten path then this is probably the best option for you.

Straw bale houses look a lot like a traditional home, but as the name implies the walls are made of bales of hay or straw and then generally covered with plaster. The frame, roof, and foundation are all made using traditional techniques.

Now, I know what you’re probably thinking; wouldn’t a straw bale home be a huge fire risk? As it turns out these types of homes are actually less vulnerable to fire than a house made out of wood. Because the bales are so compact a flame has a hard time catching and is more likely to fizzle out resulting in nothing more than a few embers.

In fact, what you need to worry about with a straw bale house is moisture. Water damage to a straw bales house can do more harm than it would to a normal wooden house. But, if you are planning on building a house in a dry, arid region then it could be the perfect option for your new home.

And, while the water damage is a potential problem there are far more benefits to using straw to build your house. For one straw is amazing at insulating a home, which means your heating and cooling bills will be much cheaper. If you are going off-grid and planning on getting energy from solar panels or wind turbines than straw bale walls can go a long way in cutting down your energy use.

They are also pretty simple to build. A basic knowledge of building techniques and a little help from a skilled carpenter to guide you through the harder parts of the job is all it takes to build your very own straw bale house. But, in all fairness, they do take more skill than the other homes listed here.

With proper upkeep and maintenance, a straw bale house can stand for over a hundred years. But, if and when you are done using your home the materials are biodegradable and will be taken right back by the earth it came from.


Rammed Earth Homes

Rammed earth construction has been used for building for thousands of years. It is one of the oldest building techniques known to man, and it was in fact used to build part of the Great Wall of China.

Planks, which can just be a couple pieces of plywood, are set up to serve as a guide of sorts for your wall. Then a small layer of a dirt, clay, and gravel mixture is then poured in between the planks, and using simple tools or machinery the mixture is pressed and compressed as tight as you can get it. You simply repeat this process until you have finished your wall.

While it can be a laborious task without modern machinery, with time and patience anyone can make their own house using this method with almost no carpentry skill whatsoever.

Rammed earth houses also have the benefit of looking a lot like a traditional home. While the walls are made of dirt and sand you still have the type of square rooms we’re so familiar with but with a more aesthetically pleasing look of wavy sand layers.

The list of benefits doesn’t end there, however. Rammed earth homes have noise reducing properties, they are fireproof, pest proof, durable, keep your house at a tolerable temperature year round, and are environmentally friendly.

The one big downside to rammed earth is that it is somewhat susceptible to water damage. This doesn’t mean that after one rainfall your new home will turn into a sloppy, muddy mess. But, it does mean they are best used in drier climates. However, with a little upkeep, they can be built in any place that doesn’t get an unusual amount of rainfall each year. In fact, for being made of basically dirt it holds up well enough to rain that buildings have been made using rammed earth in places like Australia, France, and even South Carolina. Taking some simple waterproofing measures with your walls can ease your concerns about water damage.

Earthbag Homes

Earthbag homes are very similar to rammed earth and have many of the same benefits. And, they might be even easier to make for a first time home builder.

While the dirt in a rammed earth home is exposed, in an earthbag home that dirt is kept inside of sandbags before being used to build the walls of your home.

The first step to building an earthbag home is to level and ram down a large, circular layer of land that will be used as your foundation, no concrete needed. The filled sandbags are then laid in a circle end to end overlapping at the openings. Once you have your first layer of sandbags laid in a circle you then place a length of barbed wire on top of them that will be used to help hold all of your bags in place. Then continue the process until you have a dome-shaped room to your desired size. Finally, plaster is used to coat the entire structure inside and out.

This method of building is easy enough that one person could build their entire home even without any knowledge of carpentry.

While it is possible to make just about any shape house using earthbag, most people that design them have found that a domed shaped earthbag house is the best way to go. That’s because a dome shape will make your house earthquake proof on top of all the other benefits.

Those benefits include being soundproof, fireproof, bulletproof, and flood proof, and environmentally friendly. But, the best advantage to having an earthbag home is that they can cost as little as $5 per square foot to build.

As homesteaders and people willing to live off-grid we do things a little differently than everybody else, so why would you want to live in a house that’s the same as everybody else?

These unconventional building techniques let anybody build their own dream homes mostly using materials the land provides, in an extremely affordable manner.

Your home is where you build your life from, using these methods for building yours you can make it as comfortable and as personal as you like. And, since all three are extremely energy-efficient they will get you one step closer to living the type of self-sustaining life every homesteader dreams of..

Written by M.D. Creekmore · Categorized: Homesteading · Tagged: DIY, Minimalism

Primary Sidebar

About Me

Subscribe to Blog via Email

Enter your email address to subscribe to this blog and receive notifications of new posts by email.

Join 7,184 other subscribers
  • Amazon
  • Facebook
  • Substack
  • Twitter
  • YouTube

A prudent man foresees danger and takes precautions. The simpleton goes blindly on and suffers the consequences.
Proverbs 27:12

Footer

DISCLAIMER

This website is for informational and educational purposes only.
I’m not a financial advisor, medical professional, or legal expert.

Everything shared here is based on personal experience, research, and opinion.
Use your own judgment and do your own research before making decisions.

  • Blog
  • Books
  • Newsletter
  • Gear I Use
  • About
  • Contact
  • Privacy Policy

© 2008–2025 M.D. Creekmore · As an Amazon Associate, I earn from qualifying purchases.