• Skip to main content
  • Skip to secondary navigation
  • Skip to primary sidebar
  • Skip to footer

M.D. CREEKMORE

  • Blog
  • Books
  • Newsletter
  • Gear I Use
  • About
  • Contact
  • Facebook
  • YouTube
  • Blog
  • Books
  • Newsletter
  • Gear I Use
  • About
  • Contact
  • Privacy Policy
You are here: Home / 2018 / Archives for September 2018

Archives for September 2018

Installing a Tankless Propane Water Heater for Home or Off Grid Cabin

September 21, 2018 M.D. Creekmore

tankless-water-heater for off the grid showerby Patientmomma

When I purchased my country property several years back it was in dire need of updating.  Over the last few years, I have gradually replaced many items which were hanging on at their end of life!  The conventional, tank water heater was approximately 15 years old and while it worked, it took between 5 to 7 minutes to get hot water to the master bathroom, depending on outside temperature.

I knew it needed to be replaced so I began researching tankless water heaters.  I have no connection to any brand mentioned other than being a happy customer.  I had already decided to use propane gas as a fuel source as I did not want electric and I don’t have access to natural gas.

This article describes my research and choice of a water heater.

I lived in Europe for five years and most of the housing had tankless water heaters so I gained some valuable experience with on-demand water heaters; both good and bad.  Fast forward a bunch of years and the on-demand heaters were becoming the rage in the USA because of the high utility costs of conventional tank water heaters.  But I stayed with my 50-gallon tank and paid the price of heating water 24/7/365.

About 8 years ago I was faced with replacing water heaters in a large house. I had a choice to replace three 50 gallon tank heaters with newer models or go tankless.  About that time a friend of mine had her 50-gallon tank water heater, located in her attic, fail and the water damage was significant.

She had to move out of her house for six weeks while ceilings, floors, carpet, drywall, etc., were replaced.  Her experience was a motivator for me!  I did my due diligence and researched all types of water heaters; both tank and tankless.

The tank type was much cheaper to purchase and install but the utility bill is what made the difference.  The tankless heaters had higher upfront costs but saved on the utility bill the rest of its useful life.

After going back and forth for months, I made the decision to go tankless.  While the research you must do is the same for any type of tankless water heater, your family lifestyle, location, how long you think you will stay in the house, the availability of desired fuel, and maybe Home Owner Association (HOA) rules will influence your decisions.

I also considered the improved resale value of the home by having energy efficient tankless water heaters.

So what’s the difference?  Basically, the tank heaters hold the water at a constant temperature 24/7/365.  When you turn on your hot water faucet the hot water in the tank mixes with cold water from the house water system and gives you warm water.

You pay your utility provider a fee to keep that water hot all the time.   In a tankless system, the water heats only at your demand.  When you turn the hot faucet on, the heat exchanger in the tankless unit turns on and provides you hot water, then stops heating water when you turn the faucet off.  Below is a diagram I copied from the Navien website on the components of a tankless water heater.

Choice of Fuel Type:

One of the first decisions you have to make is the type of fuel for the water heater; the choices are electric, natural gas (NG) and propane gas (PG).  If your house is all electric that may influence a decision to install an electric heater, but there is always the possibility of running NG to your house if you are close to an existing line.

Some city/communities/HOA will not allow a propane tank in the yard, but you must ask the HOA and city ordinance folks.  They might allow a buried underground tank, but not an above ground tank. Do a cost comparison of fuel types (if all are available to you); the cost of electric, NG or PG.

How big a tank do I need?

Another research and decision to make is sizing; how large of a water heater do you need?  Basically, the larger the heater, the more expensive the heater, no matter what brand it is.  The following general information comes right off the internet and you can query “tankless water heaters” and find a lot of data. Now down to the details you need to know…

Maximum Flow Rate:

This is the measure of how much water passes through the water heater at a time, in gallons per minute (GPM). For NG/PG tankless water heaters, it averages between about 6 GPM and 10 GPM but some go higher.  I was told an average shower or faucet has about 2 GPM flow rate; so you can get an idea of how much water flow you use.

If you have two adults, two teenagers and 2 younger children, think about the number of water fixtures that will be used simultaneously and how long the water will run if you have teenagers in the bathroom. Will you have people in the shower at the same time you are running the washing machine and your dishwasher?

If your family is two adults and some fur babies, your demand will be different.

The important point is not to confuse the flow rate value with the water heater’s heating capacity. Water flow capacity is NOT how hot the water will be if it’s flowing at 10 GPM. For example, a tankless water heater listed as providing 10 GPM will give you water at that rate, BUT how hot that water can rise to depends on the energy input of the unit.

That is why when choosing a NG or PG tankless water heater you need to pay attention to its energy input per hour, or BTUs per hour.  Now here’s where the info gets more complicated.

Heating Power:

There is a whole complex discussion of British Thermal Unit (BTU), joules and temperature explained on many different websites on the internet.  I am not an expert on this so I just used the common knowledge I read on several internet sites.

Basically, about 500 BTU/hr is enough to heat water flowing at 1 GPM by 1 °F. If you know what the incoming water temperature is, it is possible to estimate how many BTUs per hour you need from a tankless water heater. You can ask your plumber to figure this out for you.

Water temperatures can vary by season and by location; e.g., New York is colder than Mississippi in the winter so the groundwater temperatures will be different.

From my experience,120 °F is the maximum temperature I wanted, because higher temperatures create a scalding risk. You should also know that the BTU number in the product specification sheet is not the actual heating capacity. T

o calculate how many BTUs are actually used to heat the water, you need to use the energy factor.

Energy Factor:

The energy factor for water heaters means the part of the heat energy actually applied to the water and to the total energy input which is delivered to the heater. I wanted an energy factor of at least .9.5.  If you have a four-person family, you will need at least 160,000 BTU, higher would be better.

The energy factor needs to be about .9.   For natural gas and propane tankless water heaters, the energy factor varies between 0.8 and 0.95, depending on whether it is a condensing unit or not.  So what is the difference between condensing or non-condensing water heaters?

Condensing Water Heaters:

Simply put, a condensing water heater uses the heat of the expanded gas, which would normally be expelled through a vent, as an additional heat source. The waste gas released from the exhaust vent of a condensing water heater is cooler and in the cooling process, the water vapor often condenses back to the liquid state, which is why it is called a condensing water heater.

Non-condensing tankless gas water heaters have an average energy factor of 0.82; condensing water heaters have an energy factor of up to 0.95. Guess what? Condensing units cost more money, but I think they are worth it.

Activation Flow Rate:

One of the things you need to realize is tankless water heaters only start heating when their sensors confirm a certain amount of water is flowing through the system. If the water use does not reach that minimum flow rate, the unit will not be activated and you get cold water.

This means if you don’t turn the faucet on full open, the water heater may not turn its heating element on.  Look for a water heater that has a .4 to .6 flow rate.  You do NOT want a 1 GPM flow rate.  Do your homework and check out the product specification sheets and make sure you get a unit with a LOW number minimum activation rate.

Brand and Build Quality:

I am very opinionated on this topic so bear with me.  I like hot water; that is why I purchased tankless hot water heaters.  In a former house, I had a whirlpool tub that I could not use because the tank water heaters could not provide enough hot water.

After I installed the tankless water heater, I was able to fill the big whirlpool tub and enjoy the experience with HOT WATER.  Sorry, I digressed.

The old saying “you get what you pay for” is true and especially with tankless water heaters. I won’t demean various brands, but I say, do your homework.  If you are on city water your brand choices are wide. Talk to people and quiz your plumber and friends on their opinions of different brands.

Check out websites which compare brands and prices but examine the specification sheets in detail.  Look at:

  • Energy factor: Over 160,000 BTU; Desired 180,000 to 199,000
  • Minimum flow rate: Desired: over 0.26 GPM
  • Minimum activation flow rate: Desired: 0.4 GPM
  • Maximum flow rate: 7.5 to 11.5 GPM/min — this depends on the model and your need

Other Things to Know:

  • Tankless water heaters can be indoor or outdoor, vented or non-vented; depends on what you want/need.
  • Outdoor units should have ALL pipes insulated; some indoor units should also be insulated, depends where you have it installed. I have had both indoor and outdoor units insulted, even though I live in the South. Northern folks MUST have insulation!
  • Tankless water heaters require a minimum of ¾” pipes while conventional tank water heaters only have ½” pipes; this should be included in your install price; everything is negotiable.
  • Water heaters need some annual maintenance so put them where you can get to them.

Oh By the Ways:

  • It will take a minute for the hot water to get to your faucet, depending on where you place your water heater. I had to wait 6-7 minutes for my conventional tank electric water heater to get hot water to my master bath shower.  Now with the new tankless one, it takes 1-2 minutes to get to my shower.
  • Before you turn on your dishwasher, turn your kitchen faucet hot water full open and let it get hot; then start your dishwasher.
  • It will take a few seconds for the tankless water heater to adjust temperatures from hot to warm or warm to hot. Depending on the type of faucet you have, once you get used to the tankless water heater, you’ll know where to turn the faucet the first time to get the temperature you want.

If you live in the country and are on well water your choices are more limited.  Unless filtered at the entry point, most well water contains a lot of minerals and will corrode any water heater.  Navien brand water heaters have stainless steel innards and will hold up better when connected to well water.

Other brand heaters are less expensive; but they usually have cooper innards, which corrode more quickly.

At my place, the well pumps water to an underground holding tank. Occasionally, there is low water pressure between when the well pump kicks on and the pressure pushes the water to the faucets.

This causes a lower flow rate to my faucets, which delays the water heater kicking on.  To me, this is just part of having well water so it does not cause me any concern; I just patiently wait until the well pump does its thing. But it is something you should be aware of if you are on well water.

My Choice:

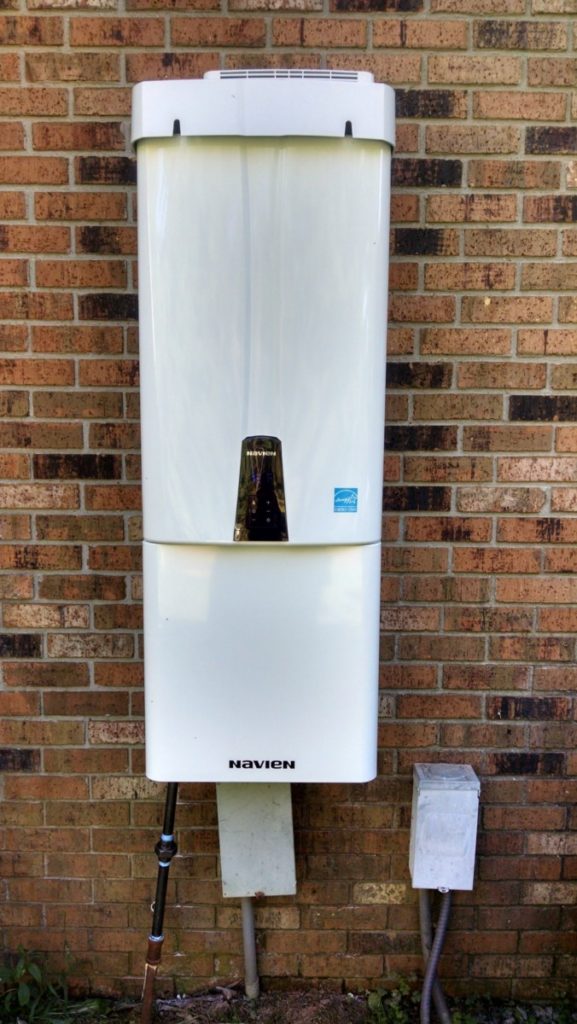
Because I live in the country, have a set income and I really like hot water, I decided to purchase and install a propane tankless water heater.  It is an outdoor condensing unit.  I choose Navien (click here to check price and availability on Amazon.com) because I use well water and Navien is the only brand (that I researched) which has stainless steel innards.

The picture below is of the installed tankless water heater on the exterior of my house. This is the largest residential unit Navien makes and the insulation is protected by the unit cover. Other brands will work but they will corrode faster from well water.

With Navien’s 15-year heat exchanger warranty, the water heater may outlast me. I am not affiliated with Navian, I am just a happy customer.

I have purchased three Navien tankless hot water heaters for various houses and I have had no problems with them providing hot water when I wanted it.

That said, Navien requires a licensed plumber to install the unit to receive their 15-year warranty.  A good DIYer could probably install the unit, but again, Navien will not warrant it unless installed by a licensed plumber.

The only thing I am unhappy about is I cannot independently light the water heater because it has a closed, self-contained ignition.  That means I cannot take a match to a pilot flame like we could in the old days.

But, I have a propane generator so unless manufacturers stop making propane, I’m good!

tankless-water-heater

The Cost:

Tankless water heaters will cost you more up front; there is no getting around that. But…your utility bill will go down.  In my former city house, the three conventional tank water heaters were NG.  After the Navien tankless NG heater was installed my gas bill reduced by 45% the first full month and after a year the bill was down by 52%.

Currently, my conventional electric 50-gallon water heater cost about $700/year to operate.  Since I have only had this tankless water heater a short while I don’t have statistics to give you; but I anticipate about 4.5-year return on investment (ROI) for the tankless water heater.

The cost will vary around the nation; your location makes a big difference in the price. Your cost reduction and ROI will be different depending on the brand, size of tankless water heater you choose and your family size and use.  You can see most of the retail prices on the internet but remember, your plumber can get a discount.

Installation charges could vary from $800 to $2000, depending on your location, codes and ordinances, how much ¾” piping is used and your plumber’s profit margin. One last plus for tankless water heaters: In 2016 the IRS is allowing a $300 tax credit for installation of energy efficient tankless water heaters.

I’m sure there are some really knowledgeable readers that can talk technical specs better than I can, so please pitch in and clarify if you can.

My need was to have hot water and my desire was to save money so I decided to switch to a propane tankless water heater.  I cannot put a price on my peace of mind.  I hope this information is helpful.

Filed Under: Power Generation

Long-Term Fuel Storage: Where and How To Store Fuel for Emergencies?

September 18, 2018 M.D. Creekmore

By R. V. Zeigler

In any survival situation, some type of fuel is necessary be it liquid, vapor, or solid. Fuel will be used for heat, light, transportation, and cooking. Each fuel has its good and bad points. You do not know when you will need this fuel so the effects of long-term storage are a primary consideration.

Solid Fuel:

The most common solid fuel is firewood. Different woods give different amounts of heat for the same amount of space. I have used softwoods like cottonwood, which give off little heat, burn fast, and leave a lot of ash. They also have a pungent smoke that could travel a good distance and alert others to your presence.

I have also used hedge (Osage Orange) which is an extremely hard wood, burns slowly and leaves little ash. Its smoke has fewer odors as well. The tradeoff? Dry, standing cottonwood is plentiful and easy to find. A dry hedge is more difficult to find in many parts of the country, and is extremely difficult to cut, especially with hand tools.

Sparks will come off of this wood when cutting with a chainsaw.

Cottonwood will deteriorate faster than hedge too. No matter what wood you have in your part of the “woods”, cut it to length, split it to a usable size, make sure it is tightly stacked, and cover it for a year before use. If not, you will create much more smoke than necessary, it will not give you the maximum amount of heat, and if it is used in a stove or fireplace, it will cause creosote buildup that can lead to a chimney fire.

Chimney fires are not something you want to have to deal with, ever. There are many other kinds of woods between cottonwood and hedge. Find out what is available in your area, and talk to some of the “old-timers” that have used them. Find out which have the most heat for the least work. In a survival situation, the most bang for your labor buck is what you are after.

There are other solid fuels such as charcoal, and “faux” fireplace logs, and some chemical fuels. Use each in accordance with the instructions provided by the manufacturer. I am personally a bit skittish about cooking directly over the flame of some commercially-produced products such as the fireplace logs.

I am not really sure of what chemicals were used in the manufacturing process and would rather be safe than sorry. As with all fire, be careful of heat impinging on other surfaces in the area, and be careful that you are not using fire in an enclosed space.

It can lower the oxygen content to a fatal level, such as leaving a fire going while you sleep. NEVER leave a fire unattended under any circumstances.

Liquid Fuels:

Liquid fuels are for the most part hydrocarbon-based such as gasoline, kerosene and diesel fuel. There are also alcohol and Sterno type of chemical fuels.

Alcohol can be stored for a considerable time as long as it remains sealed. Once alcohol is unsealed it absorbs a small amount of water from the air. The more water the less effective the fuel becomes.

Alcohol is a good liquid fuel for small, fast cooking fires, but be warned, you cannot see the flames of an alcohol fire. They are there, but a sleeve or part of your body could be exposed with no warning. Keep alcohol fires small and well supervised.

Sterno type fuels are used for small cooking fires like alcohol. There are accessories for them that make them more useful and they are easily transportable. Do not use them in tightly enclosed spaces and follow all directions.

Gasoline, as used for internal combustion engines, is not the best choice for long-term storage. It has a short shelf life (less than a year) and can harm an engine once it becomes old. Gasoline is also very volatile and has explosive vapors.

Follow all gasoline handling safety instructions to the letter. An uncomfortable burn in normal times can become a fatal burn in a survival situation. Storage of gasoline is also something to be very cautious about. Venting vapors can build up in enclosed spaces, so well ventilated areas, and approved containers, are the only place to store gasoline.

Kerosene is a bit more stable than gasoline and only has flammable vapors. It can be stored a bit longer and is much more “user-friendly”. It is generally used for heat and light which makes it more likely to be used in living spaces. It does produce carbon monoxide when burned and should be used in spaces where there is ventilation.

Nothing with an open flame should be used in an enclosed area at any time. Why take the time and trouble to prepare and then die because you slept with an increasing carbon monoxide level? Doesn’t make a lot of sense does it? When our ancestors used “coal oil lamps” they lived in very drafty houses. For the most part, we don’t. What worked for them might very well kill us. Be safe!

Diesel fuel, or as is most likely encountered today Ultra Low Sulfur Diesel Fuel (ULSD), is not our granddads’ diesel fuel. The “old days” diesel fuel was good for a number of years and was quite easily stored. Not so much today. ULSD is an extremely fragile fuel that is only good for about 6 months without additives or extreme measures of storage.

If you have a supply of diesel fuel for a generator (the most common reason for long-term storage) either have it tested or have it “recycled” by your vendor, if possible.

There are additives available that will extend the life and there is a technique called “nitrogen blanketing” which, in theory, can extend the life of the fuel indefinitely. Blanketing requires the injection of external nitrogen gas into the storage tank as the fuel in the tank increases and decreases by either use or temperature change. The idea is to replace any empty space in the tank with nitrogen instead of atmospheric air which has water and oxygen.

Oxygen and water are the two most detrimental elements to ULSD. These are what cause fungus to grow in the tank and clog filters and injectors in the diesel engine. Diesel fuel is made to be used and used quickly. Long-term storage is a small percentage of fuel use, and not really taken into consideration by the industry.

It is up to you, the end-user, to do whatever you can to preserve your fuel supply. Bio-Diesel, which is a mixture of hydrocarbon diesel fuel and organic oil, is meant to be used almost immediately as the organics and hydrocarbons will separate over time. They cannot be re-combined by the end-user. Unless you are going to use it soon, do not get Bio-Diesel for long-term storage.

Vapor Fuels:

This is somewhat of a misnomer as most of these are derived from a liquid such as propane and butane. I am not going to delve into natural gas as storage of this fuel by the average citizen is not easily accomplished nor is it readily available in a portable and storable form in most areas.

Propane is possibly the best long-term storage fuel for the average person. It does not deteriorate over time and is relatively safe. There are also many appliances that will work on it such as stoves, refrigerators, water heaters, and lights.

Propane can be stored in large and small quantities (as allowed by law) and can be transported easily in small to medium-sized quantities. Extreme amounts can be stored in certain locations, but these large tanks are rather hard to hide and virtually impossible to move once installed. Propane can lose its vapor characteristic when exposed to extremely cold temperatures. Be cognizant of this in colder climates.

Check with your propane supplier as to the size, and number, of tanks you can personally store in your area. Propane is a very clean fuel for generators and vehicles. While it does not have the energy output of diesel fuel, it has few of the drawbacks.

A propane-fired engine is just like a gasoline-fired engine as far as the way it works, not so with diesel. Most people can, with study, or mentoring, do minor repair and maintenance on a propane or gasoline engine. Diesel engines take specialized training and tools the general handyman is unlikely to have. Like any fuel, it can be dangerous so follow all safety precautions to the letter.

Safety First and foremost FOLLOW THE INSTRUCTIONS TO THE LETTER. The safety instructions on fuel-fired appliances are from years of experience and not always from the legal departments of the manufacturers.

Even if you have experience with any of the above-mentioned items not everyone in your party may have the same familiarity. If you set a good example, they will follow.

Remember, a survival situation many times becomes one long learning, and teaching, event. There will be enough things to worry about along the way, pulling a stupid stunt with a flammable item should not be one of them.

Preparing means getting ready BEFORE an event, otherwise, we would call it Postparing!

Practice, practice, practice. Cutting and splitting wood before the balloon goes up will be good exercise, and teach you some of the little things that can save you time, or body parts, now.

It will also introduce you to the labor/benefit ratio in a way that you will remember. Spending a lot of time getting wood that is going to burn as fast as you cut it is counter-productive. Burning wood is a science and art all by itself.

Read what you can, and buy a book or two on the subject. Try some of the different fuels for cooking to see what works best in your climate and what does not. Better to find out now that the chemical fuel cans you bought will not boil water, except for small amounts, in your area.

It is also better to find out now that your appliances and engines will work for extended times. Learn what you need to regarding maintenance on everything you expect to use.

Practice this maintenance and stock up on the items you will need for maintenance. Filters, oil, hoses, belts, and fuses will be difficult or impossible to get should things go all the way south. Know how to sharpen an axe, hatchet, saw, and knife and have the items needed to do this.

A dull axe will tilt your labor/benefit ratio too far towards the labor side. I expect to use these items a whole lot more than my firearms should that day come.

Filed Under: Power Generation

Survival Essentials List: A 16-Point Checklist For Preppers

September 18, 2018 M.D. Creekmore

It seems everyone likes lists.

Lists are a quick reference point and a guide when stockpiling survival gear. Keep in mind that this is only a guide and not a list formed in stone. The tools and gear that you include should be individualized for you and your needs.

After all, who knows your skills, location, and resources better than you do? However, with that being said, I feel this list is a good starting point and a thrust in the right direction. It represents the bare minimum amount of gear.

I have purposely left out such items as cookware, clothing, and other everyday household items.

Every home should already have a plentiful supply of these everyday staples. I have also not included food, barter goods or firearms since these have already been covered, or will be, covered in more detail in other articles.

I have tried to keep this list as short and as to the point as possible. I have included only items that I feel are essential.

Sure, you could survive with less, but with some basic gear, things become less of a challenge. If nothing else, it should generate discourse. Let us get started.

1. Water filter

Even though we talked about water and the Berkey filters earlier, it is such an important and vital piece of survival gear that it bears repeating. Get a good water filter. The one that I recommend is the Big Berkey filter system (check current price on Amazon).

You should also have a smaller portable filter for when you are on the move.

2. Chainsaw

A chainsaw is essential if you are planning to heat with wood. Even if you are not, I still recommend that you get one. A chainsaw can be used for a lot more than just cutting firewood. It can be used when building wooden structures, and cutting felled trees that are blocking the roads leading to your location.

This is a great chainsaw for the homestead or farm.

3. Chainsaw accessories

Now that you have a chainsaw, you will need a few things to keep it running. To start, you will need mixing oil, bar/chain oil, and files. A spare saw is also nice to have and the quickest “repair” when a chainsaw breaks.

4. Basic tool-kit

Tools are essential prepper items and should not be overlooked. Instead of buying your tools one-at-a-time, it is quicker and in most cases cheaper to purchase a ready-made kit. After you have a basic kit, you can add tools as funds permit. Consider hand saws, drills, and other tools that do not require a source power to operate. See this article for a complete list.

5. Electrical generator

Current prices for electrical generators can range from just over one-hundred dollars to one-thousand dollars or even more, depending on what you get. I suggest that you get the best that you can afford.

Consider purchasing a diesel-powered model over gasoline if you can find an affordable one.

6. Work clothes and safety gear

Do not forget your safety when working with tools and saws. The last thing you need is to get hurt during a grid-down situation. Start by storing at least 12 pairs of good quality work gloves and several pairs of steel-toed boots, as well as eye protection, protective chaps, hearing protection, etc.

Always remember to work extra safe and to take every precaution to reduce the likelihood of getting hurt.

7. Five-gallon plastic buckets

It’s a good idea to have several of these around because they have multiple uses, for example carrying water, animal feed, garden produce, tools, etc.

8. Hunting Deer Cart & Game Hauler Cart

These carts work great for moving downed deer out of the woods and moving heavy but awkward loads around the homestead. They also work great on foraging trips after a crash where you need a way to haul scrounged supplies back to your survival retreat. This is the one that I have – click here to see it on Amazon.com.

9. Plastic sheeting

Six-mill plastic sheeting has multiple uses, including temporarily stopping a leaky roof, sealing windows, and as improvised body bags. You should include at least one large roll in your preps.

10. Tools of your post-collapse trade

The best barter item is you and your skills, and you will need the necessary tools to apply your trade on hand and in good working order. I suggest that you include at least two of each of those tools because it will be impossible to perform your trade with them.

11. Gardening tools

Get the best tools that you can afford. Most of the “tools” sold at Wal-Mart® are nothing but low-quality Made-in-China junk that will fail under hard use, especially when you need them the most.

12. Reloading gear

If you are not reloading your own ammo now, you need to start. I suggest that you buy a complete reloading kit to start with instead of trying to put it all together one piece at a time. Check out this article on TN Concealed Carry for the best reloading kit for under $40.

13. Animal Traps

I prefer live traps and snares for survival food procurement purposes to leg-hold type traps. Leg-hold traps are designed for catching fur-bearing animals and are not as effective when it comes to catching meat for the stewpot.

14. Camp toilet

We all have to go and we need a place to go, so I suggest that you have a camp toilet or a bucket with a screw-on lid to hold human waste until you have time each day to dispose of it properly. In the country, build an outhouse.

Be sure to put back some hydrated lime – poop, and then cover with a scoop of hydrated lime.

15. Personal items

Get a quality sleeping bag and enough toilet paper, toothpaste, brushes, soap, tampons, eyeglasses, sunscreen, medications, birth control, etc. for each person in your group to last approximately one full year. Note that this may be impossible with certain medications.

16. Antibiotics

Having a supply of antibiotics can mean the difference between life and death. For the survivor, unfortunately, maintaining a good supply can be nearly impossible when going about it the traditional way. Fortunately, companies like Camping Survival are selling “fish antibiotics” that pharmacologically indistinguishable from those prescribed by your doctor.

Disclaimer: Always seek medical advice from a licensed professional for diagnoses and treatment options.

Filed Under: Prepping

Survival Tools List – What You Need in Case of Disaster

September 18, 2018 M.D. Creekmore

survival tools listby Chad H

During the most recent years of my adult life, my finances have changed significantly, which forced me to seek additional ways to support my family. In my chosen career (firefighter) I have gone back to school in order to obtain additional training to become a Paramedic. The additional skills I am learning will allow me to provide better care for people in need, and give me more useful skills for a post SHTF scenario.

I have also taken on a second career as a handyman, doing odd repairs and to-do lists in my off days. Both of my current careers as a firefighter and as a handyman have much to offer in the area of survival and prepping. With this, I have been able to learn about many tools, their practical uses, and applications which would provide a positive benefit in a SHTF environment. The following descriptions are some suggestions that may be helpful to you.

Oxygen/Acetylene Torch: This type of torch is very versatile and reaches extremely high temperatures. An oxy/acetylene torch is capable of cutting many types of steel including chains, bolts, sheet metal, tubing, and locks. An oxy/acetylene torch also has the ability to weld steel, loosen corroded nuts/bolts, brazing, bending and forming all types of steel.

With all these options available, one could easily salvage parts from cars, repair fences, strengthen structures, or any other type of steel-related project. Oxy/acetylene torches do not require electricity making it very mobile and useful in a grid down environment. Additionally, an oxy/acetylene torch reaches temperatures of approximately 6330 F, thus giving it the ability to easily melt the following examples of metals: iron at approximately 2750 F, steel at approximately 2500 F, gold at approximately 1950 F, and silver at approximately 1765 F.

Propane Torch: This torch does not reach as high of temperatures as an oxy/acetylene torch, but it is inexpensive, very common, and easy to use. The propane torch is great for soldering copper pipe together (sweating pipe). Many propane torches come with convenient electric igniter which would make it a great fire starter in situations that demand more BTU’s than a regular cigarette lighter or matches can offer.

Another way of increasing your operating temperatures but having the convenience of one tank is using MAPP gas. It operates the same way as propane, but it burns at higher temperatures enabling you to melt some metals like lead or silver with it. Some systems use separate oxygen and propane/MAPP cylinders to increase the temperatures to almost oxy/acetylene levels. Additionally, some propane torches use very common “Coleman” style 1 lb. cylinders making use and storage of these tanks dual purpose.

Generator with 3-way Carburetor Conversion Kit: Having a generator on hand speaks for itself. With it you can run any number of electrical tools, operate lights, keep refrigerators cold, and be able to charge batteries. The unfortunate side is most residential use generators operate solely on gasoline. Gasoline is great if you can get it, but when it runs out you do not want to burn up your last fuel source for your vehicle.

If you are able to store gasoline, it is possible for it to go bad within a year even with fuel stabilizer. There is a kit you can buy for most gasoline generators that allow you to convert your standard carburetor to run on three fuels: gasoline, natural gas, and propane. You will always have some gasoline on hand, but why waste it if you can use natural gas that is being piped into your home?

If the grid goes down that flow of natural gas may stop, so then switch over to propane. Propane is great because you can store large capacity tanks without anyone showing concern, and it can be stored for many years as it virtually never goes bad. To make the generator more portable, you can operate it off 25lb. grill style tanks. Additionally, the propane you are storing can be used for other applications like heating water and cooking. Google search “propane carburetor conversion kit”.

Halligan Tool: In combination with a sledge-hammer, this is one of the most versatile hand tools available for breaching a means of egress. It is in use on nearly every fire company in America due to its’ versatility and effectiveness. The tool consists of a claw or fork end used for prying into doors or latches, the other end consists of a tapered pick used for breaching locked doors or punching holes and the wedge or adze which is another option for prying. Usual lengths are 24” to 42”, constructed of forged steel, and weighs 8 to 12 lbs. Google search “Halligan tool”.

18 Volt Cordless Drill Combo Kit: Currently the drill kit I use is an 18 Volt Ridgid, but there are many other brands that are just as serviceable. My kit included an 18-volt drill with work light, reciprocating saw, AM/FM Radio, and a flashlight. The kit included (2) batteries, and I have (2) additional batteries from a previous drill purchase which are all interchangeable.

The Ridgid brand is durable, and the batteries have a lifetime warranty. As long as I am able to charge the batteries, I will have a dependable flashlight, radio, saw, and drill without wasting disposable batteries or fuel to constantly run a generator. This will enable me to do work around my structure or listen to the radio for updates very easily and efficiently.

I also upgraded the light bulb on the flashlight from a standard incandescent bulb to an LED which will last longer and not use as much battery power. The bulb was easy to find at Superbrightleds.com for only about $10.00. There are additional accessories made by Ridgid like a shop light that uses the same battery, which can be purchased as well.

Pressurized Water Can: A great tool that most fire companies carry is called a PW can. It is a stainless steel can about the size of a large fire extinguisher that carries about 2 ½ gallons of water. On the top is an air valve that allows you to pressurize the can. It operates the same way as any fire extinguisher: PASS- Pull, Aim, Squeeze, Sweep.

These small cans actually put out a lot of fire do to the pressurized stream exiting the nozzle. They are however only recommended for use on Class A combustibles like wood and paper. In a grid down environment, the need for fire extinguishers will be high and there may be a lack of pressurized water available. With the PW can, it can be emptied and refilled as often as needed as long as water and pressurized air are available. Google search “pressurized water fire extinguisher”.

WD-40: Well, I like this stuff. It is very simple, but you can do a million things with it. For years I have used it in all situations around the house, as I am sure most people have. In a SHTF environment, the tools you have with you will be all the tools you have. They have to work and they must be taken care of. WD-40 is a great lubricant and a great preventative for rust and corrosion.

prepper tools checklist

I recently began cleaning and protecting my firearms with it and have had great results. You can also repair many varieties of sticky mechanisms with it. This stuff is cheap and does not go bad. To me, it is the duct tape of the lubrication world.

The following is a list of tools that I recommend every home should have. These will be important for any situation you find yourself in as they have many practical uses. In a SHTF situation, these tools could save your life.

  • Leatherman Multi-Tool-At least two
  • Bolt Cutters- Cut locks, fences, metal
  • Come Along- Lifting objects, pull-out stuck vehicles, securing vehicle loads
  • Farm Jack- Lifting objects, pull-out stuck vehicles
  • Chainsaw-Extra chains, oil, spark plugs, oil mix
  • Shovels- At least two
  • Axes/Hatchet- At least two
  • Machete- Making trails, trimming bushes, also a scary weapon
  • Pruning Saw- Great for small firewood
  • Hand Saws
  • Pick
  • Air Compressor
  • Pneumatic Tools
  • Full Wrench/Socket Sets
  • Full Screw Driver Sets
  • Full Allen Wrench Sets
  • Worm Drive Construction Saw
  • Side Grinder-Steel Blades/Masonry Blades
  • Flat Black Spray Paint (Lots)
  • Bullet Puller- Gunsmithing
  • Brass Extractor- Gunsmithing
  • Rubber Mallet- Gunsmithing
  • Plastic Mallet- Gunsmithing
  • Pin/Nail Punch- Gunsmithing
  • Files- To sharpen all edged tools
  • Soldering Iron- Repairing electronics, wiring applications
  • Full Sets of Pliers/Cutters
  • Chisels- Woodworking
  • Vise
  • 12 Volt Water Pump
  • Hacksaw- Extra blades
  • Duct Tape-Lots
  • Electrical Tape
  • Manual Flammable Liquid Pump- To siphon gas
  • Drill Bits
  • Hammer-Sledge, construction, Estwing’s are good due to metal handle construction

The above list is a good starting point, as there are many tools that could be added to this list, and your personal needs will determine what tools you should have. Please do consider some of the above tools for your home or getaway as they may save your life. Be aware of your surroundings, practice like its real, and may God be with all of you during the tough times ahead.

Further Reading

  • +Tools for Survival: What You Need to Survive When You’re on Your Own
  • +The Complete Do-it-Yourself Manual Newly Updated

Filed Under: Prepping

Best Camping and Survival Knives for Under $100

September 17, 2018 Jesse Mathewson

the best survival knife in the world

Best, this word always brings to mind the 80’s ninjitsu and various karate/TKD/dance kick-boxing martial arts superstars. Best is at subjective and a useless measurement of anything. This said, I and many others, have done enough recorded testing to be able to give you a short list of good survival knives.

In fact, I believe quite strongly that as long as you do not want a knife that can be an axe, pry bar, fighting knife, butcher knife and a camp knife all in one the following short list will include knives that do exactly what you need!

There is a simple reality within our modern society, nothing is made in the United States or any single nation without raw materials or parts being made in other countries. This is a reality of a highly industrialized global commercial marketplace.

I am a huge fan of Palmetto State Armory products, and while they are almost entirely alone in their approach to making everything themselves and in the United States the raw materials used are sourced from outside the United States.

Likewise, I enjoy and promote Benchmade knives as well as Spyderco, both of these are quality well known American brand names. Both use steel formulated in other countries and other raw materials can be put in that bucket as well.

This is why when it comes to my families well being and safety, I shop for the best overall product and not what has “made in the USA” stamped on it alone. Facts matter, I enjoy shopping locally, except when the only local store is Walmart or another big box retailer.

I met Sam Walton (he gave me a few bucks and said I should get some ice cream – I was 10?) and worked for Walmart back in the 90s, these days Walmart is nothing like what it was meant to be.

Here is the knife/knife line I firmly believe is best currently for pure survival needs. While I am certain many will talk about their combat blades, those are not necessarily good for bushcraft work. Survival is more than the extremely romanticized fight for your life against hordes of humans who are all far less prepared than you.

Survival is not bugging out or bugging in. Survival is not endless ammunition and guns that never break to shoot that endless ammunition. Survival is quite simply the ability to adapt to any situation and live through it.

My choices of “best survival knife” is based entirely on the reality that is true survival. It should be noted I use my real name, my real picture and have not intentionally sold anyone a lie. Rather, I write these articles because I believe in the need to remain prepared and aware of everything.

The knife I have chosen is the Morakniv Bushcraft Black. It is a very well made, high carbon steel blade that has been designed using the Mora pattern blade with modern steel. This combination allows it to be both lightweight and extremely durable.

The blade is 3.2mm (1/8th inch approximately) and 232mm or 9.25 inches long overall. The blade is 109mm or 4.25 inches long, my conversions may be off a bit, for the record an inch is equal to 25.4mm. It has a true 90-degree spine already for easy fire steel or flint use and a very grippy rubber/plastic composite handle.

Combine the well-designed sheath and you have a very serious package for well under $100 US. During my testing with this blade, I used it to chop, carve, feather stick and even batoned with it. Now, batoning is really a silly use for a knife.

You can carve wooden pegs and use those to split larger pieces of wood. Why risk your blade or sacrifice all else to get a heavy chopping blade when a knife was never really meant to chop wood? Do what I do, get a hatchet, axe or tomahawk and even a Khukri will suffice in many cases.

the best survival knife in the world

Next, we have the Morakniv Craftline Robust or the Companion HD in stainless or high carbon steel. If you prefer a guard on your fixed blade knives, get the Craftline Robust. This approach incorporates a small guard into the injection molded grip.

Like every Morakniv blade, I have owned or currently own these grips are honestly one of the best features and I really like their steel as well! I have used these blades for skinning large game/animals and many camp tasks in heavy rain and have never had my grip slip on one.

Edge retention of the carbon steel version of Morakniv knives is quite good, with a small stropping you can skin large game rather easily. The stainless version will require a bit more edge work as you go, however, it does have more corrosion resistance.

My personal approach is to force a patina using 120-140 degree apple cider vinegar, cold water, and isopropyl alcohol to clean the blade and a good bath of Ballistol after I am done forcing the patina. There are a few ways to do this, the easiest is to simply soak the well-cleaned blade until it reaches a level of patina you prefer.

This may take a few times and you need to rinse and clean the blade each time!

Now for some people who enjoy the over-engineered more robust modern “full-tang” approach, the modified rat tail tang can seem disappointing. It should be noted that with very few exceptions full-length swords, machetes, kukhris, and many other incredibly strong blades have utilized rat tail tangs.

I am one of the old breed of knife enthusiast who understands that it is not as simple as full versus rat tail, it really is all about the strength of the steel and what you plan on doing with your blades.

Morakniv Bushcraft Black can be found for $40 on Amazon, it is easily worth twice to three times that price in my opinion.

I have only had one rat tail knife break on me, I have had several “full tang” knives break on me. What it comes down too is steel type and temper (regardless approach taken with tempering a blade if it is not done properly it will fail!) Morakniv has proven to be a very well made brand, I do suggest getting the HD versions when possible, however, the standard work very well also!

You can easily buy 2 or more of these amazing blades for under $100 and have twice the support should you need it. I personally own several dozen Mora blades. I have custom mora type blades and I have original Frost Mora blades, I also have and use Kephart style and more.

I can honestly say that between the Kephart style and Mora style you are well taken care of regardless which you choose to purchase. Morakniv blades are made exceedingly well, I have personally only broken one of them in the many years I have owned and used them.

Skinning animals, filleting fish, prep work in a kitchen, camp work and building fires these blades have always performed above and beyond what I needed. Certainly, I can say that there are many blades designed for specific chores that work better alone.

However, if you are looking for a lightweight, strong, durable and exceedingly sharp blade look npo further than the Morakniv line of knives. All things break, this is a simple fact of life. Some things are made better than others, and these blades, fit that bill well!

Local laws and rules for blades always apply and this is another area where these blades shine well. I am unaware of any specific location outside of some major cities where you cannot legally carry a Morakniv knife.

They are working blades, they are not designed for fighting though with practice you could easily use them in this way. Because they are designed for working with, most places that may be strict on knives will allow these blades. If you live where you cannot have a working knife on you, move.

Seriously, if you are okay with not having any way to defend yourself or even just work on projects, you are at best indentured at worse a slave to a system that doesn’t care about you. And no, I will never agree that laws against natural rights should exist, using facts alone we see that any time this is allowed or promoted, lots of people die.

If you enjoyed this article let me know in the comments, I try to get back to most people and will do my best to respond to all queries and comments. Thank you for reading and feel free to drop me a line via email or in the comment box.

Please understand that I can not ever test every single item ever made by any company. I can and have tested dozens of Morakniv blades and am very much a fan of their products!

Free the mind and the body will follow…

Filed Under: Knives and Blades

Identifying and Harvesting Wild Berries for the Homestead

September 16, 2018 M.D. Creekmore

Mulberries (early June)

by Bobcat-Prepper

“Warning – Positively identify any food in the wild as safe before collecting. Some berries that are dark purple (like pokeberry) or black (like nightshade) are TOXIC.”

I have been hiking and running around an abandoned 16 acre field near my home for the last year for exercise, and this spring I started paying attention to some familiar spouts popping up – raspberry and blackberry canes.

That got me thinking about how much my family likes fresh berries, and the high cost of them at the store, so I decided to go berry picking this year.

Wild Berries are great for preppers, homesteaders, bushcrafters, and fans of self-sufficiency because they are low/no maintenance plants that propagate themselves.  In addition, these berries are full of vitamin C, and can be stored in several ways for use in normal times, or for when SHTF.

Blackberry leaves were chewed by Roman soldiers in ancient times for their vitamin C and tannin content, and today blackberry leaf tea is helpful in reducing the symptoms of diarrhea, a dangerous condition when medical help may not be available.

I have also found a mulberry tree and elderberry bushes in public parks in my area, so I have been collecting their harvest as well.

Mulberry trees are easy to identify, and a large one can provide tens of gallons of dark purple ½” to 1” berries.  Here to how I have figured out the best way to harvest them:

  1. If the tree is in a public park, pick a time when few people are around. It’s probably legal to collect berries from it, but why take a chance, and why alert other people to free food?
  2. Dress in an old t-shirt and shorts, preferably dark or red-purple. Mulberries stain like crazy, so don’t go picking dressed in anything nice – boots included.
  3. Bring a 5-gallon pail, a 10’x10’ tarp or plastic sheeting, and a stick or scrap wood about 10’ long.
  4. Lay out the tarp or sheeting under the first large branch, and tap or strike the branch to make the berries fall.
  5. Have a friend help collect the tarp corners, and pour the berries into the pail.
  6. Move to the next branch, and repeat.
  7. When the tree has been thoroughly harvested of ripe berries, come back in a couple of days, and get a whole new harvest. They ripen over about 2 weeks, so you will be very busy if you want them all.
  8. Note: do not pick up berries off the ground, as deer love mulberries and will poop on them as they graze. Watch your step!
  9. When you get home, carefully wash and clean the berries, and keep cool until processed.

Raspberries in my area near the woods, so I dress in an old t-shirt, jeans, boots, and a wide-brim hat.  I apply bug spray to my pant cuffs, arms and neck to keep the ticks and chiggers off. Wash your hands after applying the spray, so the odor doesn’t get on the berries.

Raspberries (early-late June)

Keep your eyes peeled for these black beauties on thin green canes– black raspberries are smaller than blackberries and may be hidden by the leaves.  If raspberry canes have thorns, they are usually small enough I don’t worry about them.  Collect in a modified 1-gallon milk jug or two, strapped through your belt.  This method allows you to collect with two hands.

You probably won’t collect many, due to their small size and lesser frequency, but they are worth it, as they are sweeter, and the smaller seeds are much easier on the teeth than blackberries.

Jug for collecting wild berries

Blackberry canes are thicker, taller, and have sturdy thorns that tear the !@#$ out of your clothes and skin.  Prepare yourself the same as for raspberries, but if you can stand the heat, you may want to wear long sleeves to protect your forearms.  I just grin and bear it in a t-shirt, and stay cooler.

Blackberries [early-late July]
Try to pick strategically, standing in one spot, picking every black berry in reach 360-degree blackberry move to the next unpicked area. Yes, the thorns hurt, but you’ll get over that and I have yet to get an infection for a thorn scratch.

With luck and enough canes, you should be able to pick about three quarts an hour during the peak picking days.  I go back to the patch every two days to get the newly ripened berries.

Elderberries [early-mid August]Elderberry bushes don’t have thorns, and for that I am grateful.  The berries are cleaner to collect, as they tend not to burst when picked, which is another big benefit.   The downside – unripe elderberries contain the mildly toxic sambunigrine, so only eat the really ripe ones.

Elderberry flower tea is said to boost your immune system, and a daily tablespoon or two of elderberry syrup can shorten your flu or cold.  Dried elderberry leaves can be used to keep mosquitoes away too.

  1. Select only elderberries that are dark purple/black.
  2. Place the head into a plastic bag for collection, then cut the stem that holds it to the bush.
  3. When done collecting the heads, take home and wash.
  4. Use a fork to pull the berries off the head.

Now, What Do I Do?

Now that you have your berries, you need to decide what to do with them.  I like to diversify my berries, so that I can enjoy them in a variety of ways and times: either fresh, frozen, baked, canned, or dried.

Fresh – Fresh raspberries and real whipped cream are the best, while fresh blackberries tend to be too tart to enjoy.  The mulberry flavor is OK, but its biggest benefits are volume and sweetness (now that I think about it, mulberries used for wine would be a pretty good use, but that’s for another post). Elderberries should be heat-processed in some way, for safety’s sake.

Frozen – If you enjoy them fresh, but have too many, why not freeze them?  I just place clean dry berries in a quart Tupperware container, and when thawed they are passable as fresh, but better is then baked or otherwise heat-processed.

Baked – All of these berries are delicious in tarts, pies, and cobblers.  I used a blackberry pie recipe last night, but make it into tarts.  It’s cleaner to eat, and the kids loved it.

Canned – The canning method is probably the favorite of preppers and homesteaders alike for the durability of the resulting food.  It keeps for years, and the jelly/jam/preserves are full of sugar for preservation and calories when they are needed.

Berries tend not to jell without pectin, but pectin is pretty expensive – about 75 cents/canned pint.  For that reason, I’ve been experimenting with ways to have it jell without store-bought pectin.  Here is my recipe:

Raspberry Jam

  • 8 cups clean berries
  • 5 cups sugar
  • 10 small green (unripe) apples – I have a couple apple trees on my property, so it worked out well
  • ¼ cup lemon or lime juice (the acidity raises the ability to jell – if I didn’t have those in SHTF, I’d try vinegar)
  • 1) Mash the berries in a large saucepan. Add sugar and juice, place on medium heat.
  • 2) Core apples, slice thinly.  Tie up in a cheesecloth bag (or don’t – this adds more pectin), and place in same pan.
  • 3) Bring to a boil, watching carefully so it doesn’t boil over (happens easily).
  • 4) Cook for 15 minutes on low, then let cool while prepping and heating canning pot.
  • 5) If you bagged the apples, remove the bag from the pot.  If you didn’t, scoop the apple slices into a ricer, and rice the apple/raspberry glop back into the pot.  Dispose of the solids caught in the ricer.
  • 6) Fill the 6 to 8-pint jars with ½” headspace, close, and process for 15 minutes.

Your jam will not jell at first, but within 2 or 3 days the pectin will do its thing, and it should be firm enough for toast, sandwiches, or whatever.

Elderberry Syrup

Good for immune system reduces sick time.

  • 8 cups clean berries
  • ¼ cup water
  • 5 cups sugar
  • 1) Place the berries and water in a saucepan, bring to a boil, cook for 15 minutes.
  • 2) Rice the berries with the “fine” plate to remove the numerous seeds, into another saucepan. Dispose of the seeds in the ricer.
  • 3) Bring the elderberry juice back up to a boil, and add the sugar. Reduce to low heat. Prepare the canning pot.
  • 4) When the syrup starts to thicken, turn off and fill the pint jars with 1/2 “ headspace, close, and process for 15 minutes.

Dried

berries drying at the homestead
Berries drying at the homestead…

I have a second batch of blackberries in the dehydrator right now, as I write this. The first batch of 2 quarts fit onto 4 trays and took about 18 hours to dry.  Now they are about 2/3 of a quart of crunchy tart nuggets, ready for snacking, pemmican, or rehydration with boiling water at some later date.

You could also dry them by placing those 2 quarts on a lipped baking tray, and put it under a screen in the hot sun for a few days.    You could also plant them, I guess, if you were starting a post-SHTF garden, or trade them with someone else who wanted to start a garden.

Blackberries turn red as you dry them, so don’t be surprised.

Berries are a perennial source of fruit that keeps giving all summer, so keep your eyes open when you walking around empty lots and parks in your neighborhood, and get picking!


Filed Under: Bushcraft, Homesteading

  • « Go to Previous Page
  • Page 1
  • Page 2
  • Page 3
  • Page 4
  • Page 5
  • Interim pages omitted …
  • Page 8
  • Go to Next Page »

Primary Sidebar

Subscribe to Blog via Email

Enter your email address to subscribe to this blog and receive notifications of new posts by email.

Join 7,202 other subscribers
  • Amazon
  • Facebook
  • Substack
  • Twitter
  • YouTube

“Do more with less.”

– Minimalist proverb

Recent Posts

  • Just so you know
  • Weather Update for My Corner of Appalachia
  • Why I’m Ordering Ivermectin + Mebendazole Every Year
  • The Website’s Shutting Down (But Here’s the Plan)
  • You Are Hated! Start Training Like It!

Footer

Recent Posts

  • Just so you know
  • Weather Update for My Corner of Appalachia
  • Why I’m Ordering Ivermectin + Mebendazole Every Year
  • The Website’s Shutting Down (But Here’s the Plan)
  • You Are Hated! Start Training Like It!

More about me

Books I’ve written

Books I’ve read

Follow Me on YouTube

Follow Me on Facebook

Gear I Use and Recommend

Newsletter

Search this site

Follow me elsewhere

  • Amazon
  • Facebook
  • Substack
  • Twitter
  • YouTube

© 2008–2025 M.D. Creekmore · As an Amazon Associate, I earn from qualifying purchases.