• Skip to main content
  • Skip to secondary navigation
  • Skip to primary sidebar
  • Skip to footer

M.D. CREEKMORE

  • Blog
  • Books
  • Newsletter
  • Gear I Use
  • About
  • Contact
  • Facebook
  • YouTube
  • Blog
  • Books
  • Newsletter
  • Gear I Use
  • About
  • Contact
  • Privacy Policy
You are here: Home / 2018 / Archives for November 2018

Archives for November 2018

How to Raise Catfish in a Barrel

November 12, 2018 M.D. Creekmore

The text and illustrations of this article are from Organic Gardening and Farming; October 1973.

By Philip and Joyce Mahan

catfish in a barrel
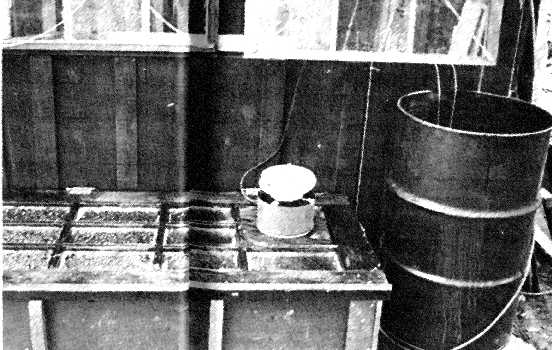
After some study and experimentation, we have set up a productive food chain– table scraps to earthworms to catfish–in our backyard. The project is satisfactory in many respects, utilizing waste materials to produce fresh fish for food and at the same time yielding ample compost for a small garden. The material cost is minimal. The whole operation can be set up for less that $15.00. The equipment occupies only about 12 square feet of space, and the entire assembly can be easily moved if necessary.

The materials can be very simple: Two 55-gallon steel drums, three panes of glass 24 inches square, and a medium-sized aquarium air pump. One of the drums will serve as a tank for the fish, oxygen being supplied by the air pump, and the second drum should be cut in half to provide two bins for the worms. The panes of glass are used as covers for the worm bins and fish tank, and for ease and safety in handling can be framed with scrap lumber.

We chose catfish because they are readily available in our part of Alabama, and reach eating size in a summer. Various small members of the sunfish family, such as bluegill or bream, would also be suitable.

While we readily admit that our plan has no commercial possibilities, we know that we can produce, for our own table, tasty fresh fish that is uncontaminated and costs practically nothing, both considerations being highly relevant at this time.

Fish are usually efficient food producers; a one-pound fish yields approximately 10 ounces of food. Further efficiency is indicated by the fact that fish fed on commercial fish ration convert about 85 percent of their food to meat. While we are not prepared to compute the technical data about food conversion in fish on an earthworm diet, we can readily state that the fish relish earthworms, and do grow well on this food.

Spraying the water back into the tank aerates the water and at the same tie releases the ammonia produced by excretory matter in the water. Because the oxygen requirements of fish are quite high, the faster the circulation of the water, the faster the growth of the fish.

We decided to keep our equipment as simple and inexpensive as possible at the beginning, but to use the maximum stocking density advised, keeping 40 fish in a 55-gallon drum. Although inexpensive circulation pumps are available, we chose to use a METAFRAME HUSH II aquarium bubbler for oxygenation and a garden hose to siphon off water from the bottom of the barrel.

We take off 15 gallons of water per day, but as we run the wastewater onto the worm beds and adjacent garden, the cost is negligible. Although we have creek water close at hand, we were advised to use city water to avoid the introduction of undesirable algae and fungi that might be harmful to the fish. Because city water is usually quite highly chlorinated, it is necessary to draw the water in 5-gallon buckets and let it stand for a day in the sun before emptying it into the drum to replace the water siphoned off. We have seen no evidence of oxygen starvation in the fish with this method of water circulation.

The most important variable we have found is water temperature. Catfish will feed at temperatures as low as 40 or 45 degrees, but their greatest growth is achieved at 84 degrees. We noticed a decided increase in feeding activity when we painted the barrel black and moved it into full sun. Leaving the buckets of water in the sun not only speeds chlorine dissipation but warms the water as well. In areas where city water temperatures are close to the growth optimum, the chlorine can be removed by setting the hose nozzle at fine spray, and the barrel can then be filled directly from the water supply. Although summer growth is greatest, the project continues throughout the year. By judicious use of sun when possible, plus auxiliary heat when necessary, winter growth can be kept at a fairly high level.

When water temperatures are right, the fish will feed so enthusiastically that they may leap completely out of the barrel. For this reason, the top of the barrel should be covered completely with a pane of glass which will also help in keeping the water warm. Because fish feed most eagerly in late evening and early morning, we feed them at these times of the day. As with earthworms, care must be taken not to overfeed. In warm water and bright sunlight, any uneaten worms will die and decompose rapidly, giving off gases which are poisonous to the fish.

Transferring any grown animal to a confining environment produces the equivalent of cultural shock, and is followed by a period when feeding is light and growth is slow. At this time special care must be taken not to overfeed. Unless fish can be found that have been hatched and grown in a tank, small fish should be selected to stock the barrel, as their adaptation time is proportionally shorter that that of larger fish. To eliminate as much transplanting shock as possible, we use a large wooden box, lined with two layers of polyethylene sheeting and covered with an old door, to stock with fry. By the time the fry reach fingerling size, they can be transferred to the barrel as replacements are needed, and very little shock is evident. An insect lamp over an opening in the cover of the fry tank permits the small fish to eat at night while ridding the garden of night-flying pests.

Earthworms, as any angler knows, are food for fish in their natural habitat; and most fish in captivity prefer live food to the dehydrated type. Kitchen scraps make excellent food for earthworms, and even the most careful organizer will have enough refuse to feed, quite handsomely, 5,000 to 10,000 worms.

We found that growing earthworms at home is not difficult. The basic materials are easily arranged, and the earthworms’ demands are simple. All they require are a protective container, reasonable temperature control, adequate moisture, not too much food, and a light loose bedding which is never allowed to become acid.

The steel half drums are ideal worm bins as they are effective protection against the earthworms’ predators in addition to being quite inexpensive. They have the added advantage of being movable so that as cold weather approaches, the worms can be carried to an enclosed porch or basement to continue composting activity and fish food production throughout the winter.

Each half-drum will house between 4,000 and 6,000 worms. The two half-drums are utilized most effectively if they are alternated so that the worm population is allowed to build up in one, while the second supplies the fish food. The eggs that remain after the worms are removed will serve to start a new supply when the first drum is converted to feeding.

catfish in a barrel

Worms will start breeding when they are about 90 days old. Each worm, possessing reproductive organs of both sexes, will produce an egg capsule per week, containing from three to 25 eggs apiece. The most economical way to establish worm bins for a home food-chain and composting operation is, to begin with capsules. Although a little more time is required initially, there will ultimately be more worms available to work with. Under the protected conditions of a worm bin, the survival rate of young worms is very high.

The type of worm selected is not important. There are two compost-bait types raised commercially — usually known as “brown-nosed worms” and “red wrigglers.” Either type may be purchased from most dealers.

The bedding for the worm bins may be any organic material that is water-absorbent and does not pack so as to exclude oxygen and impede the worms’ movement. Leaves and old straw are good, as is aged sawdust soaked in several waters for a week or so. Ground peat moss, being odorless, is ideal if the worms are to be kept inside. Soil should never be used as it contains no nutriment and is likely to pack.

It is safe to assume that earthworms can eat any kitchen scraps except citrus rings, vinegar dressings, and bones. Though they eat almost anything given them, their intake of food, and likewise the production of compost, can be increased by frequently feeding foods that are especially tasty to them. The prime consideration is to avoid overfeeding. Although worms thrive on decaying food, they should never be given more than they can consume in 24 hours.

The dangers of acidity cannot be overemphasized. It is the only real hazard in worm raising. Acid bedding frequently destroys an entire worm farm in a few weeks. To maintain accurate control over the acidity, one should use a soil test kit or a pH test strip of the type used by industrial and medical laboratories.

Tests should be made at least once a week, and the pH factor (degree of acidity) should remain between 5.5 and 6.5 on the scale. A reading of 5.0 or below means danger, and immediate steps must be taken to neutralize the bedding with an application of pure ground agricultural limestone. It is important to read the label carefully to verify that the limestone does not contain any added phosphates which also bring disaster to a worm bed. 

The drums should be located in an area protected from temperature extremes. Optimum temperatures for feeding and growth are between 60 and 70 degrees, but worms will thrive in most summer climates if the beds are well shaded and the bedding is kept loose. During the summer months, the bedding must be sprinkled daily, but it should never grow soggy. The glass tops on the half drums serve to conserve moisture, but they will not prevent crawling. Worms have a tendency to roam at night during damp or rainy weather unless preventive measures are taken. A small light over the bed is an effective deterrent to their wanderings, while an equally effective measure is to cut a remnant of carpet to fit the drum exactly and lay this on top of the bedding.

The table scrap-earthworm-catfish food chain, even from its inception, was never intended to evolve into a money-making project. It was simply an effort toward a better way of life through cooperation with the forces of nature; and in this respect, our project has been a complete success in more than one way.

First of all, we have a regular supply of fresh fish at minimal cost. A seven-ounce catfish fingerling grows to 25 ounces in a summer, thus producing a pound of food in four months. In the second place, we have netted ample compost for our vegetable garden, thereby further ensuring a low-cost and nutritive food supply. In addition, and perhaps this is the greatest benefit of all, we have the satisfaction of working with growing things and the gratification of knowing that we have not wasted the earth’s resources. We have made an elementary biologic principle work in our own backyard.

IF YOU’RE THINKING OF RAISING CATFISH

The fish were channel catfish.

Our fish were not fed exclusively on earthworms in that we started them on commercial catfish food. Because it is very difficult to teach pond-grown fish to eat in confinement, we offered them exactly the same food they had been eating in the pond. We continued these rations for about four weeks before their response was sufficiently enthusiastic to risk changing food. Then the earthworms were introduced gradually — a few at a time — until the fish accepted them.

Some of the fish recognized the worms as food immediately, and within a week the water literally boiled when the worms were thrown in. We wondered, then, if they might not have started eating more readily if we had used the worms initially.

The weight of fish: We don’t have any figures at all on the weight of the fish we started with, and we didn’t weigh any before we ate them. As we stated in the article, we began with 40 fish — fingerling size. Although we arrived at this number on the basis of Auburn’s ratio of water as estimated by the fish farmer from whom we got the fingerlings. He didn’t weigh the fish and we don’t remember what that estimated weight was. We didn’t know this thing was going to work.

Earthworms: Again we have no figures on pounds of worms used. For reasons of ethics (we advertise in OGF), we didn’t mention in the article that we are in the worm business. Since we have so many worms around, it just didn’t occur to us to keep records of how many we used. We simply tossed the worms into the barrel until the fish stopped eating. We fed once a day, but we don’t think that all of the fish ate at every feeding. I would estimate an average of 75-100 worms per day. The worms were small, not weighing more than an ounce per hundred. We were careful not to feed breeders to the fish.

Table scraps: We have been feeding table scraps to earthworms for a number of years; and to date, we have not weighed a single scrap. We can, however, offer fairly precise figures on this step. Earthworms are reputed to produce their own weight in compost daily; but our experience has not indicated that they really do. A thousand worms weigh 13 or 14 ounces, but daily feeding per thousand does not approach that weight. We usually keep a container of around 2,000 composting worms in the kitchen, and I give them a couple of tablespoons of selected (that is to say, soft and mushy) scraps each day. In liquid measure this amount would be only two ounces.

It never occurred to us that a nutritional deficiency might develop in fish fed only on earthworms. I doubt that either of us would have recognized malnutrition if it had occurred. As we don’t have backgrounds in biochemistry, we are not in a position to make any statements concerning the nutritive value, qualitative or quantitative, of earthworms. We did definitely notice a considerable increase in feeding activity when we started giving worms.

In fact, we ate our first fish — seven of them — when they were only ten inches long because they jumped out of the barrel, and we didn’t want to put them back for fear they had been injured. We feed our tropical fish (Red Oscars) earthworms also, but we can’t continue the diet for more than two months at a time because the fish get so lively and eager for food that they leap out of the aquarium whenever we lift the cover for feeding. I would say we are inclined to agree that earthworms are a near-perfect fish food.

Filed Under: Homesteading

The Backyard Fish Farm

November 12, 2018 M.D. Creekmore

The text and illustrations of this article are from Organic Gardening and Farming; January 1972 The new series of reader research projects starts with an exciting plan to turn grass clippings into organic fish.

Dr. John H. Todd with Dr. William 0. McLarney, Director of Aquaculture Director of Aquaculture Studies for the New Alchemy Institute

OVER THE PAST FOUR MONTHS in the series “Shaping an Organic America” I have dealt with the urgent need to create a science and biotechnology which will permit revitalization of the countryside along organic and ecological principles.

It is my belief that if such a science is developed and its findings put into practice, an ecological crisis of saddening dimensions can be averted. I have also pointed out that there is no guarantee for the development of a truly ecological science by the scientific community alone.

Most scientists simply are not trying to set examples for the future by living and working with the earth. Because of this, the recommendation was made that the science for the organic method should marshal the participation of many, many people from all walks of life arid particularly you who are already working with the land.

If this were to happen, then a true restoration of the countryside might be possible. I know that this is a tall order and no doubt the concept will be scoffed at by many scientists. Yet, my confidence in the whole idea of the Readers’ Research Program has been bolstered by the letters I have received following my article in the November issue of OGF.

Several really ingenious and even brilliant ideas have been presented by a number of people. (In a future issue I would like to describe some of these exciting plans and discoveries which are not directly associated with the experiments outlined in this column.)

In the entire history of man, there has probably never been a period quite like now when so many people feel a sense of despair and helplessness towards the future. I think this can be changed if enough people are able to see even the slightest possibility of embarking upon a personal course of action which will truly benefit the planet as well as themselves.

Organic gardening, farming and homesteading are among the most positive steps that can be taken in this direction. Involving ourselves in creating a science for tomorrow is a commitment upon which so much will depend. This month inaugurates the Readers’ Research Program and for many of you working with us, it will be a way of beginning, in the words
of Bob Rodale, “1972 as the Year for Organic Action.”

Introducing the Readers’ Research Program

New Alchemy Institute scientists, with the support and collaboration of the editors of ORGANIC GARDENING

And Farming magazine, will be working with you to organize a widespread, continuing research program to investigate many of the important organic concepts. As gardeners and homesteaders you will have the opportunity this year to become involved in any one of at least three scientific projects.

Besides the Back Yard Fish Farm research which is described in this article, the second project will involve a country-wide search for the most pest-resistant varieties of vegetables. At the present, this essential information is not widely available to the organic gardener.

The third Readers’ Research project planed for 1972 will investigate ecological design in agriculture. Specifically, we will compare complex interplantings of vegetables in home gardens with single or monocrop plantings. Soil fertility, resistance to pests and a number of other variables will be measured and the differences between the two approaches will be analyzed.

I would like to begin by describing the way in which the Readers’ Research Program will be organized. Each of the research projects will be outlined in these pages. After you have read the articles outlining the projects, if you are seriously interested in working with us on a specific experiment, please inform us of your intent to become involved. The address is: The New Alchemy Institute, Box 432, Woods Hole, Mass. 02543. After you contact us we will send further instructions on how to set up the experiments, what equipment you will need, where to get it, and how much it will cost.

There is one point I would like to emphasize at this time. If the research program is going to succeed and be an important source of information, please do not ask us for project instruction booklets unless you honestly intend to carry out experiments with us, and have the space and facilities to do so. The booklets cost money, and replying to casual inquiries takes up valuable time. Since we are operating this program on a relatively low budget, the time and money you save us will give us a greater opportunity to work toward the success of the program. All the information you need to make a decision about your participation can be made on the basis of what you read in this column. The booklets will only add the “how-to” details and outline some of the potential pitfalls that the investigator needs to know about.

The organization of the first project, the Back Yard Fish Farm, will be slightly different. It is possible that the number of people who would like to become involved will exceed the supply of brood stock which we have available. Thus, we will have to limit the study to match the supply of fish.

The procedure for the Back Yard Fish Farm will be as follows: First, if you are seriously planning to get involved, contact us. Then, just prior to constructing the dome and installing the pool, you must contact us again to see if the fish are available. If we say yes, fish will be reserved for you. When the fish farm is built and a picture of it sent to us, we will ship the fish for the experiment.

Becoming involved in a research program may also provide a bonus that you may not have counted on; you will get to know the nearest organic gardener-scientist working on the same project. If at all possible, we will try and send you the address of the nearest participant, so that you can work together if you wish.

As the growing season proceeds you will continue to collect scientific data. At the end of the season your results will be sent to us for tabulation and be included with the findings of other investigators. Finally, we will describe the results in these pages and in research publications. Within a few years we will be able to make recommendations to you that have a large and meaningful body of knowledge to back them up. It is just possible that the Readers’ Research Program will help create the wisdom that will guide those of us who are working with the land.

The Back Yard Fish Farm, A Revolutionary New Way To Raise Foods at Home

Dr. William 0. McLarney and I are working together to organize the Back Yard Fish Farm research. The project involves a totally revolutionary concept in agriculture. If it should prove successful, fish farming, on a small scale at least, could become a common practice throughout the country.

We are proposing that you raise fish in a small pool inside a geodesic dome using intensive culture methods. You will create tiny fish farms which are organic and capable of producing foods of excellent quality. If you have ever enjoyed keeping an aquarium of tropical fishes, then I think you will receive the same pleasure as well as a food crop from the Back Yard Fish Farm.

In the November issue of OGF, I described some of the thinking and theoretical concepts which went into our Back Yard Fish Farm prototype. I also outlined the reasons for choosing herbivorous fishes from the tropics and using the dome to create a suitable climate. I think it would be wise to reread that article, as space limitations prevent my repeating it. This research project will use the same methods and fish (tilapia) as we did in our prototype.

What I didn’t point out in the November article is the necessity for developing organic methods in aquaculture. It has become clear to us that organic fish products are desperately needed in this country. The area of Cape Cod in which Bill McLamey and I live is dotted by tiny lakes, many of which provide good fishing. Bill, an ardent fisherman, can be seen often casting for pickerel, perch or bluegills.

His harvest is an important source of food for a number of us. Since fish are one of the most complete, health-giving foods, we usually jump at the chance to eat them — or at least did, until a pesticide-chemist friend examined our fish.

The little pond in the woods, far away from industry and agriculture, is contaminated. The perch we were eating had up to 40 parts per million of DDT in their fatty tissues. This is far above the allowable limit for foods. We already knew that many marine fishes are contaminated with a variety of harmful substances, but the pond was the last straw. We had to start figuring out ways to grow fish organically and cheaply and we had to do it soon.

Philosophically, we were committed to small-scale intensive systems, based upon ecological and organic principles. If the fish were to be relatively poison-free, their diet would have to consist of aquatic plants and algae; this would shorten the food chain and make the system more productive while less prone to accumulating harmful substances in the fish. The prototype we developed will act as a model for the initial OGF research project.

How To Do It

The first task of the experimenters in the Back Yard Fish Farm research will be to build an inexpensive geodesic dome which will house the pool for raising the tilapia. Tilapia are excellent and much revered tropical fish which will primarily eat the algae you grow right inside the pool.

In order for the tilapia to grow to an edible size, which is about one-half pound, a growing season that’s at least six-months long in water that is normally well above 70 degrees F. will be required. The dome provides these high temperatures by trapping the heat from the sun, which is stored in the pool and transformed into algae growth. The fish will die if the temperature drops much below 60 degrees F. Their vulnerability to cold is one of the reasons we chose this

fish. If some careless person ever takes them out of the dome and puts them in a local stream or lake they will not survive the winter to upset the natural ecosystems. This is not true for the Imperial Valley in California, parts of southern Florida and southern Texas. Although tilapia are now found wild in these areas, we do not plan to aggravate the problem of exotics by conducting experiments in these regions where they can survive outside the dome.

The dome is a very effective heat trap and the pool is quite an efficient heat retainer. At the time of this writing, which is late October, the water temperature in our prototype Tilapia-Dome is still in the 60s even though the outside temperatures have been dropping near freezing at night. With the addition of a little bit of heat, we have been able to push the temperatures up into the 70s during the cool days of fall. With design improvements in the dome, we think that even in our climate, the addition of heat will not be necessary in the future.

Building the Dome

the dome
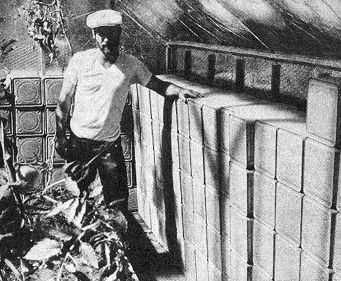
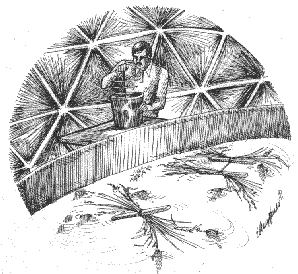
Building a geodesic dome is relatively easy and inexpensive. You should plan on two or three days to complete the task. Some of you living in the more southerly regions of the country will be able to build them for less than $50. More sophisticated structures, incorporating a double skin of clear greenhouse vinyl with an air layer in between to prevent heat loss, will last for a number of years but could run as high as $200 for materials.

Feeding time in the tilapia dome. Their main diet will be the algae which grow in the pool, but it should be enhanced with small amounts of insect larvae.

Some of you living in the more southerly regions of the country will be able to build them for less than $50. More sophisticated structures, incorporating a double skin of clear greenhouse vinyl with an air layer in between to prevent heat loss, will last for a number of years but could run as high as $200 for materials.

Our prototype was a dome 18 feet in diameter, although we wished that it had been larger. One problem was that we couldn’t move around the 15-by-10-foot pool inside. This was annoying as I had wanted to start some plants growing inside, and to do more insect-culturing research to provide new kinds of supplemental foods for the fish. The optimal size for domes to be used in the Back Yard Fish Farm would be 25 feet in diameter.

This size should provide freedom to work inside while allowing a greenhouse area. All of our future research domes will be of the larger size. Costs begin to shoot up drastically when the diameter exceeds 25 feet. Our dome was built by Multi Fassett and Marsha Zilles of Earth House in Cambridge. The plans they used and strongly recommend for the Back Yard Fish Farm research can be obtained from Popular Science magazine, 355 Lexington

Avenue, New York, N.Y. 10017. (Ask for the Sun-Dome Plans.) The plans and instructions cost $5 and include a license to build it from the inventor, Buckminster Fuller. You should also read Knight Starr’s OGF article in the September 1971 issue on the geodesic greenhouse. Although this dome is too small for the fish experiments, he does provide a lot of valuable information. If any of you have access to a cheap supply of window glass, you may be able to build an experimental dome which will last for many years.

The Pool

The pool can be any type of children’s swimming pool, which varies in price from about $40 to $100. We used a 15-by-10-by-4-foot-deep, almost rectangular pool with a 3,400-gallon capacity. We assumed that this shape would be more conducive to breeding fish, but this original supposition was not correct. A 12-to-14-foot-diameter pool, 3 feet deep would do just as well and cost much less. The
volume of this pool would be close to that of the prototype since we only filled ours to a depth of three feet.

There is an alternative way of constructing a pool which would be less expensive: digging a pond in the ground, about three or four feet deep and 12 to 15 feet in diameter. Since we haven’t tried this method, we don’t know how well it will work. If your soil is heavy and contains clay, lining the pool to prevent water seepage will not be needed. One problem that we can foresee with the pond-pool is the loss of heat from the water into the surrounding soils. This might be minimized by the use of an inexpensive liner combined with a good insulating material.

Fish for the Back Yard Fish Farm

Tilapia, a tropical fish native to Africa and the Near East, will be used in the experiment. They eat algae, the microscopic plants that color lakes green. This coloration is especially prevalent in the summer months. Because it is possible to grow algae in huge amounts and at almost no cost, algae-eating fish can be raised quite cheaply.

Each of the experimenters participating in the project will receive one pair of tilapia parents from us. The only cost to you will be shipping and handling fees, which might run as high as $25, depending on where you live. However, if they survive and breed, this will be the only investment in tilapia you will ever have to make. Once established, the parents will be capable of producing thousands of young per year. This will supply you with plenty of offspring and you will be able to pass them on to any friends who may be interested in starting their own Back Yard Fish Farm.

Place the adults you receive in the dome pond. As soon as the temperature climbs to the low 80s they will start to breed and lay eggs which they care for in their mouths. Don’t panic at this stage; they are not eating their young. Tilapia are members of a group of fishes known as mouth-breeders.

After the brood is hatched and swimming freely about the pool, the parents will breed again if conditions are right. This process should continue until an optimal population density for your experimental pool is reached. If, after sampling the population, you find that there are more than 500 fish in the pool, you should pull the parents out to prevent overpopulation and stunting of the residents.

After the first year’s growing season is over, if the conditions have been favorable, you will have an excellent crop of edible fish. These can be frozen or stored live in aerated tanks for eating fresh as needed. The Malayan peoples in the Orient often store their live fish in rain barrels just outside the back door. Fish that are not of edible size can be held over the winter in warm tanks exposed to sunlight, or they can be fed to the chickens or pigs as an excellent high-protein organic feed.

The idea of feeding livestock herbivorous fishes is not as crazy as it sounds. At present, we are experimenting with growing tiny herbivorous fish, to be cropped at a small size, as a future source of organic food for poultry — but more about that in a later issue. A small number of fish should be held over the winter. That way you will have brood stock the following spring.

Food for the Fish

The main diet of the tilapia will be the algae which will grow within the pool. After the pool is filled in the spring, one-gallon samples of water from a number of local ponds should be added. This makes it possible to seed your pool with a variety of algae species.

You will also have to provide fertilization. In our prototype we suspended a small burlap bag filled with horse manure. We estimated the algae growth by scooping the water into a tall glass and examining the color. If the water looked green enough, we shook the bag every few days. When the “bloom” began to wane, we replaced the used manure with fresh. Many of you will have cow, chicken or rabbit manure which can be used instead of horse manure. The weight and source of all fertilizer used must be recorded. It is very important not to over fertilize, as too many nutrients could deprive the water of its oxygen. Be careful!

Supplemental Feeds

Thousands of years ago the Chinese found that the growth and health of plant-eating fishes is enhanced by feeding them small amounts of animal matter in the form of insect larvae. This past season we raised our fish on a variety of insect larvae including mosquitos, midges, rat-tailed maggots and house fly larvae. Each experimenter should culture one or two types of insects or earthworms. The goal should be to produce one-half pound per day of these animals. Two productive and easy insects to culture are the ordinary house fly and the midge.

If you have ever opened a garbage can that has rotten meat in it and seen the thousands of larvae or maggots crawling around, you have discovered how easy it is to raise fly larvae! Small garbage cans and a little waste meat might produce the supplemental food your fish need. Midges are cultured on trays in water fertilized with manure. The production of one pound of midges per day on a three-foot-square rearing tray has been achieved by fisheries scientists in Israel and Florida.

Apart from the algae and the insect larvae, your system should require few other food inputs. We have tied bunches of carrot tops and grasses to rafts as additional feed in the prototype Tilapia-Dome.

Collecting of Scientific Information

fish farm

Intuition and common sense have played a large role in fish farming in the past. Science has hardly penetrated the domain of aquaculture. But scientific data is needed if we are to discover the best possible methods of fish farming.

It is essential that the participants in the Readers’ Research Program collect basic scientific information. At least half an hour per day should be spent caring for the Tilapia-Dome and collecting information. The first year’s data will not be very difficult to collect. We
need:

1) Temperature profiles taken twice daily, including air temperature, temperature within the dome and in the water; also, a log of weather conditions.

2) Estimates of the population in the pool made at least twice; once at the end of the month following the first appearance of young fish and once at the end of the season.

3) Measurements of fish growth taken each month from a selected sample of individuals.

4) Production calculations made at the end of the growing season by counting and weighing the total crop.

Building the geodesic dome is comparatively simple and inexpensive. It should take two or three days to complete the job. Costs can run from $50 to about $200.

5) A description of the food used (worms, insect larvae, etc.) must be given with the amount listed in pounds.

6) A description of the amount of fertilizer and the source must be given, including the length of time between changes.

Hopefully, we will be able to design a simple colorimetric test for you to estimate algae production on a weekly basis.

We do not know how successful the Back Yard Fish Farm idea will be. We have indications from the prototype that it will work. In fact, some of you may produce edible organic fish at less than 20 cents per pound (exclusive of your labor), some may even set still-water fish culture records for this country. All of you will have fun and learn a lot.

The experiment is risky . . . you could also end up with fish only large enough to feed to the chickens.

This may not make you happy, but your scientific data will tell us what went wrong. Your Tilapia-Dome can be used as a greenhouse the following winter, or if you are excited by aquaculture, you may decide to trap native fishes and fatten them in the dome in the winter. Thus, the experiment cannot really fail.

Bill McLarney wants to start a research project to find out if the dome can be used for two fish crops a year. During the winter he would like to try fattening bluegills, perch, crayfish, and clams to be harvested before the tilapia experiments begin again in the spring. The majority of us here want to use the prototype dome for growing kale, spinach, Chinese cabbage, and lettuce this winter. I suspect the cooks rather than the fisherman will win the first round.

I hope many of you will become involved in the OGF Reader’s Research Program. It could become a potent force for a saner agriculture in this country.

Filed Under: Homesteading

The Solar Greenhouse That’s Right for You

November 12, 2018 M.D. Creekmore

The Solar Greenhouse That’s Right for You (Text & illustrations for this web page came from the August 1978 issue of Organic Farming & Gardening) Here is a new gardening tool that produces fresh food when the snow flies.

by JACK RUTTLE

ALMOST ANY STRUCTURE that is built to look like a solar greenhouse will work. That is to say, the solar greenhouse concept is so right that you can ignore (or not know) the fine points of solar design and still build a house with much less need for supplemental heat than a traditional greenhouse. But once you understand a few basic solar-greenhouse design ideas, you can easily put together a greenhouse that truly lives up to the label solar, and provides remarkable efficiency.

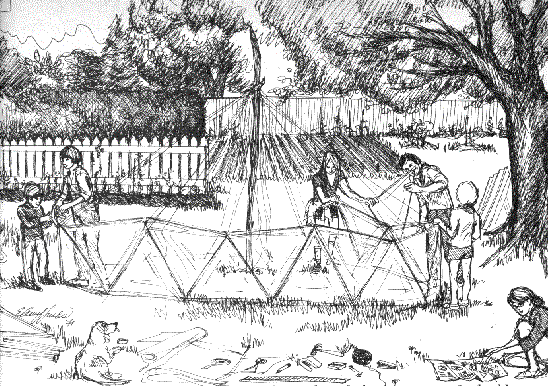
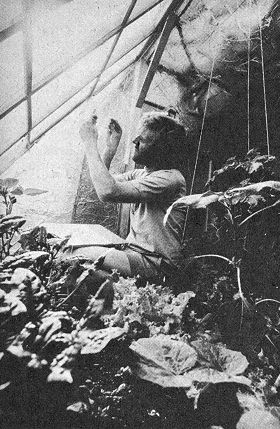
Dave MacKinnon, Ph.D., ORGANIC GARDENING greenhouse designer, has put it all together after three years of experimenting and has created a design formula that gardeners in any climate can follow. His newest solar greenhouse, which he has built and tested in Flagstaff, Arizona, epitomizes a good solar shape. It has produced food through two winters without requiring any outside heat source. Almost all the floor space is usable for growing beds because the energy storage is on the walls. And it uses a minimum of materials because the design, insulation and heat storage are in balance and arranged to complement each other.

The best measure of a solar greenhouse is the plant-growing environment it creates. When the building is skillfully made, you will get midspring soil and air temperatures in the depths of winter on sun power alone.

Our experiences suggest that solar greenhouses can maintain that kind of environment in most parts of the country. ORGANIC GARDENING researchers have built two different greenhouses that have worked well despite unusual winter weather. The Flagstaff greenhouse performed well with much less sun than is considered normal, and the one at our Maxa-tawny, Pennsylvania, research center worked through the coldest winters in recorded meteorological history.

In December and January, we harvested enough salad greens every day for three or four people. Cold-hardy plants, all very rich in vitamins A and C, produce best. Escarole, lettuce, parsley, corn salad, chervil, chives, and other salad herbs are dependable. So are kale, chard and chicory, which grow so thin and tender in the weak winter sun that they are best in salads too. In spring and fall the harvests are bigger. Succession plantings make heat-loving plants like tomatoes and cucumbers possible far beyond their normal seasons.

Dave MacKinnon’s solar greenhouse greatly expands his crops of homegrown food. He picks salads every day through winter. Frost nips his outside garden early, so greenhouse protection has meant the first heavy-producing tomato plants he’s ever grown.

SOLAR GREENHOUSE BASICS

At the least, a solar greenhouse should have three features. One of the long walls should face due south rather than east or west. The south wall should have two layers of glazing. All the surfaces that don’t face south are insulated. But there’s a little more to it than that if the greenhouse is to live up to its solar potential. The new Flagstaff greenhouse is a perfect model.

Dave MacKinnon says the greenhouse should be about twice as long (east to west) as it is wide. Accordingly, his Flagstaff greenhouse is 20 feet by 12 feet. The two-to-one relationship offsets the effect of the shade that the opaque east and west end walls create. The building thus captures more solar energy for each square foot of growing space. If the building is made much deeper than two to one — that is, closer to a square floor plan — the heat-storage material in back is shaded too much. These proportions are recommended for greenhouses everywhere.

building a greenhouse

MacKinnon has learned another rule of thumb for sizing the energy-collecting south face properly, and has built it into the Flagstaff greenhouse. The peak should be made about as high as the building is wide (north to south). Heat-storing materials in the back of the greenhouse will then get the direct exposure to the sun they must have if the storage is to work efficiently.

The slope of the north roof is an important feature of MacKinnon’s greenhouse, though the precise angle of slope is not critical. Sunlight which enters the greenhouse and strikes the aluminum-foil-covered roof (white paint works well too) is aimed back down to the growing beds. From the outside, the interior of the greenhouse looks almost black because very little light is bouncing back out to the viewer. If designed well, solar greenhouses with reflective walls can actually deliver up to a third more light to the plants in winter. In the traditional all-glass design, much of the light passes right on out the clear north roof and wall. Angles between 60 and 75 degrees for the north roof will work well in the United States and southern Canada.

The slope of the sun-collecting south face might appear to be trickier to decide upon. The angle does affect how well the translucent face collects sunlight, but for greenhouses, it’s not as critical as when setting up a compact solar-heating unit. Actually, a wide range of angles will work equally well at any given latitude. The simplest thing to do is to add 20 degrees to your latitude. A south face with that angle will give optimum performance in January. But if that particular angle proves hard to work with, go to a slightly shallower one, and you will be favoring solar collection in spring and fall. If you use 50 degrees rather than 60, which, for example, you may figure is your ideal, you still have sacrificed very little midwinter light.

Given this leeway, other factors like convenient construction can help determine the south slope. The south face of the Flagstaff greenhouse was made steep all the way to the ground to shed snow quickly. That feature lets sunlight in sooner after storms. The Maxatawny greenhouse has a vertical glazed knee wall from which a shallow, clear roof slopes up to the peak. There is much less snow to worry about there, and this shape makes working in the front of the growing beds easier.

When it comes to putting in insulation and heat storage, however, solar greenhouses can get needlessly expensive. The key is to have sensible amounts of both. Great thicknesses of insulation can’t do away with the need for heat storage, and are wasteful. And obviously, adequate heat-storage material without a certain amount of insulation in the walls is equally wasteful. Even if you build a greenhouse that is not completely solar-reliant, using a balance of these component parts guarantees an economical building that will work well. (The information on the map indicates the proper proportion of materials, as well as recommending minimum amounts for a fully solar structure.)

HOW HEAT STORAGE AND INSULATION TEAM UP

building a greenhouse

The connection between heat-storing materials and insulation works like this. Without heat storage, solar greenhouses are something like a thermos bottle — all the energy is in the sun-warmed air. Drafts will quickly drain off the heat, because even the most tightly made building will have a fair amount of tiny cracks. Energy held within storing materials is not lost along with escaping air. The energy is released slowly as the greenhouse cools, and the building stays warm much longer.

A no-less-important effect is that heat-storage materials keep the greenhouse from overheating during the day. We quickly learned that without storage the inside temperature can soar into the 80’s or 90’s on cold, bright days. That is quite hard on a winter greenhouse crop.

With storage absorbing some of the incoming energy, the result is a milder daytime environment.

The amount of heat storage for full solar heating seems enormous at first, but is manageable in practice. Both of MacKinnon’s greenhouses use about 1,000 gallons of water stacked vertically on the rear walls. That amounts to four gallons of water for each square foot of floor space. The best method we’ve found is to use rectangular five-gallon honey cans with a rust inhibitor added to the water.

“Five-gallon honey cans make efficient heat-storage containers,” says MacKinnon. They pack the maximum amount of water into a given space.

greenhouse build
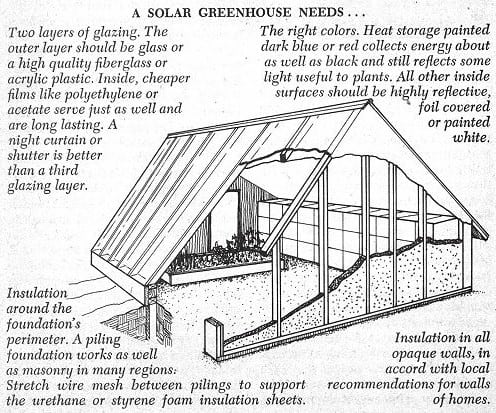
Why do we rely so heavily on water? It is admittedly hard to work with because it tends to corrode containers and to leak. But water is about the best heat-storing material known and is cheap. The best alternative is rock (in any form from sand through concrete), but water holds about five times more heat. So water reservoirs on walls make compact heat storage that gets a good share of direct incoming sunlight.

MacKinnon favors smaller containers over 55-gallon drums for two reasons. Drums leave empty about a third of the space they occupy, because they are big and round. They also permit warmed water to gather into a few large areas, which causes both greater heat losses and poorer collection in those areas. Smaller containers keep the energy more evenly distributed. On the other hand, the large barrels are certainly worth using if they can be had cheaply. We’ve also used translucent plastic cider jugs filled with water dyed black, and have heard reports of success with beverage cans sealed with tape and stacked right-side-up.

greenhouseThe amount of insulation that MacKinnon judges to be practical in various regions is roughly the same as local, energy-efficient recommendations for homes. If that seems lavish for a greenhouse, remember that homes get a lot of extra heat; the greenhouse is designed to get along with none. To me, the need for plenty of insulation is a reminder that people aren’t much different from plants in their requirement for warmth, among other things. To use less insulation, however, is to need more heat storage, which demands more space and money.

Two other simple things are crucial to the success of our greenhouses. The earth below them is insulated to a little below frostline with plastic foam. And at night an insulating curtain is drawn over the clear south wall to reduce the high heat losses there.

It pays to insulate the earth below the greenhouse because the earth is a relatively poor insulator, contrary to a lot of lore.

A few inches of most common insulators match the R-value of ten to 15 feet of earth. But earth is a good heat-storing material, lying somewhere between rock and water. So insulating around the perimeter builds heat storage into the structure while stopping steady heat losses to the ground outside. We checked the advantage of doing this at the Maxa-tawny site. Six inches below the surface, the insulated soil was in the 40’s in January and in the 50’s in February, while the ground outside was frozen solid several feet deep.

The day comes when shuttering the glass or plastic face becomes practical despite the inconvenience of twice daily attention. Past a certain point, there’s no easier way to gain a few degrees inside. The south-facing glass loses a tremendous amount of heat compared to the other three-fourths of the building’s surface that is insulated. To add enough storage material to make up for what shutters can save would take too much room away from the plants.

We’ve found that a good nighttime heat barrier for the window doesn’t have to be a great insulator, but it must be durable and easy to maneuver, since it will get heavy use. More important, the material should be reflective on the inside and fitted tightly at the edges to stop air flow. A reflective material (aluminum paint or foil) will block all escaping radiant energy. Combined with an airtight seal, that seems to do plenty for me greenhouse. Beyond that, any insulating value you can build into the curtain is so much the better.

The muscle power it takes to raise and lower the heat-trapping curtain is the only non-solar energy a well-designed greenhouse needs.

snow covered greenhouseWithout a doubt, a thin, aluminized fabric which is operated by ropes or a pulley is the cheapest system to make and work with. The best one Dave MacKinnon tried was made of aluminum foil glued to one side of parachute fabric. That curtain lasted two years before needing repairs.

The third winter at Maxatawny we used a shutter system that could hardly be bettered for stopping heat. Panels of one-inch urethane foam, aluminized on one side, were held in place with wooden battens. We kept them in an air-lock entrance room that doubled for storing tools and gardening supplies. The only drawback to the foam is that it is expensive. Any exposed foam surfaces should be painted to waterproof the material against condensation that accumulates on the glazing.

Those are the basics of a solar greenhouse: the sun-catching design, strategically placed insulation, and heat storage. Together they make a cool-weather garden possible even in Northern states. In ours, the air inside has averaged 42 degrees higher than outside and between 45 and 55 degrees F. in the soil throughout the winter. Many vegetables will thrive in that temperature range.

VEGETABLE GROWING IN THE SOLAR GREENHOUSE

There’s a lot to be learned about cool greenhouse vegetable culture. The most important trick we’ve discovered is using the right growing container. Traditional greenhouse wisdom recommends pots on waist-high benches — easy to reach and easy to isolate diseases and pests. But continuous temperature recordings in the soil pots showed that the temperature in the root zone changed right along with the air temperature because the exposed surface of a pot is so large. There were large swings every day, extremes that plant roots aren’t used to. So we switched to two large beds 18 inches deep that cover the greenhouse floor. They held the root zone to a 10-degree daily change which is natural and also made a greater heat-storing mass.

Beds have many other advantages. Roots have more room to forage for water and nutrients. The environment becomes a better one for natural predators like spiders. Because the soil in beds holds a large amount of organic matter, they also become an important source of carbon dioxide. Plants in a sunny, airtight greenhouse can use up all the available carbon dioxide in a few hours.

Nothing like these greenhouses is available for sale yet, but several years from now you will start to see them. The big greenhouse manufacturers are redesigning their products exactly along these lines. They will probably be expensive. But a home-built, sun-heated greenhouse like ours

can be constructed now for less than the finest energy-wasting glass house, and will be tailored to match your local climate.

In the far North, where solar greenhouses will be the most expensive to build, they will yield the greatest expansion of the gardening season. Even in southerly Flagstaff, Dave MacKin-non reports that his solar greenhouse has made possible his first really good tomato crops, so dry and short is the growing season there.

Properly made and maintained, a solar greenhouse should outlast its builder. The materials are all durable or renewable.

House-attached greenhouses are even cheaper to build. As you plan your solar greenhouse, you should think first of this kind for many reasons. Attached greenhouses have about a third less surface area for the same floor space as a freestanding one. Thus construction costs are lower, and less heat is lost at night. Attached solar greenhouses are the most efficient hot-air solar collectors known. High and low vents that open into the home through the common wall exchange solar-heated greenhouse air for cool air at floor level from the house. At night, the house can return some of the heat to the greenhouse. All the design principles for solar greenhouses apply to the attached greenhouse, except they may need less heat storage. The only requirement is a suitable spot facing south that is unshaded in winter.

Looking only at the money, it’s obvious that a durable solar greenhouse, attached or freestanding, will repay its cost. Compared to conventional all-glass models the fuel savings alone will pay for its construction in three to four years in the North. And they make you independent of an unhealthy agriculture and the transportation system it depends upon for fresh vegetables to tide you through winter. That’s why we recommend so strongly that you build one if you can.


Filed Under: Homesteading

What Is The Best Home Defense Weapon That Isn’t A Gun?

November 11, 2018 Jesse Mathewson


Open-ended questions like these are often answered using personal experience or second-hand chatter. What is often ignored are the actual studies and verified results coming from these studies. For instance in the United States did you know that while Bear Spray (somewhat more elevated approach to pepper spray) works very well on animal encounters while similar products are less likely to have an immediate stopping effect on humans? (Smith, et al. 2006) (Vesaluoma, et al. 2000) Facts matter when it comes to self-defense of any type.

What I hope to give you with this article is a compilation of data that shows enough for you to make appropriate decisions regarding your defense of self and family. The best defense is avoidance of potential harm through better life decisions and practices.

An indisputable reality is that those who seek war will find it, and those who seek peace will also find it. Lastly, training is inherently necessary with any form of defense and or tool used in said defense. Without training, any tool used in defense is as useful as a brick sitting on the ground. With the preaching out of the way, its time to look at what is the best non-firearm home defense weapon!

Non-firearm defensive implements take many forms. Some of the more popular are as follows, in no particular order.

  • Blades (knives, swords, and farm or working implements with blades)
  • Chemical repellents (oleoresin capsicum otherwise known as OC spray or pepper spray through hairspray and even ammonia in bottles as suggested by some misguided individuals.)
  • Taser-type devices (tasers, stun guns, cattle prods, and spring or air powered electric prong launchers)
  • Bludgeoning tools (bats both cricket and American ball bats, rocks, bricks, anything that can be held in your hand and used to bludgeon an animal or individual who may be attacking you)
  • Walking aids and support material (canes, walking sticks, umbrellas and or walkers etc.,)

When you are in the home what is your plan of defense and approach to safety? Do you have plans in place with alternative meeting locations for all individuals in your house and immediate family group? Do you know what you will do in case of a fire? Have you made plans and practiced them with regards to potential home invasion by armed assailants?

best-self-defense-weapons-that-not-a-gun

It has been established that armed home invasions while relatively small in number compared to other crimes are still a large enough risk that if you practice fire drills than you should also be practicing home invasion drills. It is essential to understand that there is no glory in battling from room to room with individuals regardless of situation when your family is also involved.

In fact, while it may seem a bit cowardly it is the more intelligent thing to avoid this and barricade yourselves into rooms resorting to using of armed defense only when directly threatened.

Obviously, if you live in a rural area and have no backup from emergency responders or neighbors within a reasonable distance and time frame, in this case, it would be important to have studied how to repel individuals intent on harming you and yours. It is still the best approach to barricade yourself and loved ones and defend from a secure position.

Hunting the intruders is pure Hollywood and will only get you or those you love harmed physically or otherwise. I for one would rather my children never have to take a human life or witness its occurrence. Use of less than lethal tools for defense allows for a solution that while not always immediately effective reduces these issues. It should be noted that firearms are not immediately effective either.

Use of bladed tools for defense is hotly contested by many countries and in many states within the United States. Regulations on length and type of bladed tool are important to know for your individual location.

Where I happen to reside blades are relatively unregulated and I am able to own virtually any type of bladed weapon and even use them in defensive situations. However, the same legal implications apply with the use of a bladed tool and a firearm as both are seen as deadly weapons in the eyes of the law regardless of where you live.

Be very careful about the laws and take the time to review recent cases where blades may have been used defensively in your residential area (country, state or social area).

Using a blade takes a substantial amount of training to be effective with, however, due to the alternative uses for blades as utility tools they can be easily carried, procured and kept around. With this one, I definitely suggest training from someone who has a proven background in use of these tools (i.e. Ghurka) or in the Filipino art of Arnis/Escrima/Kali or similar Filipino bladed martial art as these are widely considered the best for self-defense and modern combat approaches. (Wagner, 2014)(Alonso, 2010) There are several extremely solid schools where you can train over the course of a 2 or 4-day seminar and learn enough to practice and have a good footing for future use. As with all things related to personal safety continued training is an essential component.

Chemical repellents have been shown to be somewhat more effective when employed properly. Meaning directly to the eyes and face of the assailant or assailants. It should be noted that in many tests with products and individuals over the years these sprays have had less than stellar results, some uses ending in harm coming to the person using the spray due to it simply not working at the time.

There have also been deaths related to use of OC and other similar sprays. (U.S. Dept of Justice, 2003) There is a relatively high failure rate of the spray canisters themselves to function. These devices are not legal and are outright banned in many locations around the globe. I disagree with the reasoning behind these decisions made by governments, however, they exist so make sure you understand the local laws!


As for overall effectiveness, OC spray ends up being about 85% effective per several studies, when used properly. (Kaminski, Robert et al. 1999) I would suggest training with one and even being sprayed if possible so that you understand exactly how this spray works and can better use it or avoid the use of it when needed.

Lastly, make sure you get a solid version and do not settle for inexpensive knockoffs as this will simply lower the effectiveness with these tools.

These are tools that absolutely require a higher level of quality control from the factory and result in a higher price as well. One last consideration with these devices, OC spray regardless concentration can cause or significantly contribute to difficulty breathing which with already impaired individuals (asthmatics, obese individuals and similar) can and has lead to death as shown above.

SABRE Red is one of the most effective and is used by many police departments across the United States – check current price and availability at Amazon.com…

Taser devices work well in some scenarios also and do take somewhat less training to operate, though as with everything I do suggest practicing with your chosen tool. When it comes to taser type devices there are only a few types I can recommend as I have had numerous types used on myself and personally can attest that the vast majority of the low-cost noise makers hawked by unscrupulous individuals at local gun shows and even gun shops rarely function well.

The only versions I have used that functioned well every time contact was made are the Vipertek brand and Taser-brand stun guns. Vipertek is quite a bit less expensive than Taser with the trade-off being that Vipertek products require you to directly contact the assailant with the device while Taser offers this ability, as well as use as a standoff weapon through gas, propelled electrical leads. Both devices work quite well with human assailants when employed properly!

There are other brands out there, Sabre and Ruger both made forays into the stun gun market, my experiences with these are no different than my experience with off-brand versions. They are more gimmick than function in my strict opinion.

Stun guns may also result in unintentional death though the risk is relatively low compared to the overall use of said products. Again as with all other defensive tools, make sure you know the local rules and regulations attached. Good stun guns work well, again make sure you practice use of these and if possible test them on yourself so that you are able to better understand the effect. Practice, train and practice more!

Bludgeoning implements are the last segment we will look at for non-firearm based defensive tools. I will be including canes, walking sticks and umbrellas into this area simply because legally in some locations they are seen in the same light when used as a ‘weapon”.

Again with these make sure you know local laws, for instance in most areas around the world use of police batons and nun-chucks are banned for use as a defensive tool. However, some areas allow the use of expandable batons and other similar tools for defensive purposes. Again, you will want to have some training.

I highly recommend Filipino martial arts in this arena as they are unparalleled in the implementation of beneficial combative approaches utilizing batons and knives.

What is the best self-defense weapon that isn't a gun

There are several approaches to using a cane, walking stick and even your umbrella as a defensive tool as well. It is relatively easy with training to use the extra leverage a cane or stick can offer to gain the upper hand in a situation requiring self-defense.

There have been several news stories over the years of elderly women and men using canes and or purses to bludgeon their attackers forcing a retreat and defending themselves safely. As one of the individuals I worked with over the years stated, everything can be a weapon if you know where to use it best!

There are canes that are specifically made for the dual purpose of being used as a cane plus as a self-defense tool when needed like this BadAss Cane.

So to answer the original question, What is the best home defense weapon that isn’t a gun? There is no definitive best home defense weapon. Any self-defense instructor with personal integrity and ability will tell you something similar to what I will.

Use your head, avoid potentially dangerous situations and get training in solid, functional approach that allows you to best defend yourself. More importantly, remain aware of your surroundings and continually train yourself to recognize threats that may present themselves! If you have anything to add or comment on be sure to do so below in the comments!

Free the mind and the body will follow

Alonso, R. (2010). In the Stick of Things – INQUIRER.net, Philippine News for Filipinos. [online] Web.archive.org. Available at: https://web.archive.org/web/20100615170421/http://showbizandstyle.inquirer.net/sim/sim/view/20100612-275230/In-the-Stick-of-Things [Accessed 29 Jul. 2018].

Kaminski, Robert et al. (1999). Assessing the incapacitative effects of pepper spray during resistive encounters with the police. Policing: An International Journal of Police Strategies & Management. 22. 7-30. 10.1108/13639519910257801.

Smith, T. et al. (2006). Efficacy of Bear Deterrent Spray in Alaska. [online] Wdfw.wa.gov. Available at: https://wdfw.wa.gov/hunting/bear_cougar/bear/files/JWM_BearSprayAlaska.pdf [Accessed 29 Jul. 2018].

U.S. Dept of Justice (2003). The Effectiveness and Safety of Pepper Spray. [online] Ncjrs.gov. Available at: https://www.ncjrs.gov/pdffiles1/nij/195739.pdf [Accessed 29 Jul. 2018].

Vesaluoma, M. et al. (2000). Effects of Oleoresin Capsicum Pepper Spray on Human Corneal Morphology and Sensitivity. [online] Iovs.arvojournals.org. Available at: https://iovs.arvojournals.org/article.aspx?articleid=2123766 [Accessed 29 Jul. 2018].

Wagner, J. (2014). Filipino Kali is Alive and Well in Today’s Police and Military Training – USAdojo.com. [online] USAdojo.com. Available at: https://www.usadojo.com/filipino-kali-is-alive-and-well-in-todays-police-and-military-training/ [Accessed 29 Jul. 2018].

Filed Under: Security

Must Have Items for Your Car Emergency Kit (A Checklist)

November 11, 2018 M.D. Creekmore

Must Have Items for Your Car Emergency Kit (A Checklist)

Most of us spend a lot of time in our cars, and I feel that it’s necessary to have an emergency auto kit aka auto survival kit in every automobile we drive in addition to our every day carry kits (EDC) and concealed carry handguns.

A handgun won’t be of much use when you need to change a tire, get you unstuck, or change a burnt-out fuse for a new one so that you can get your lights or wipers working and get back on the road and to your intended location.

One of the worst on the road breakdowns that I can remember is having a flat tire in winter with the temperature setting right a freezing with a mixture of freezing rain and sleet pouring down as I changed the tire.

By the time I had finished loosening the lugnuts, jacking up the car, finishing taking off the lug nuts, and then removing the flat tire, and putting the inflated spare tire on and snugging the lug nuts, unjacking and then finished tightening the lug nuts. I was soaked through and miserably cold.

It was, an awful (and dangerous with all the ice and uneven footing) experience… mainly because that happened years ago and I wasn’t properly prepared and didn’t have anything but a jack and spare tire.

Granted even now I’d not want to have to change a flat tire again in those weather conditions but even so, it would be a better experience if I do because now I’m more prepared and would at least stay dry because I have a poncho in my auto emergency kit and a change of clothes.

Below are lists of items for two different kits: the deluxe and basic. Choose the one that best fits your needs and budget also feel free to modify the contents list below to match your location and personal driving habits.

Basic Auto Preparedness KIT

❏ Duct tape
❏ EDC kit (your phone, knife, handgun, lighter etc.)
❏ Fire extinguisher
❏ First aid kit
❏ Fix-a-Flat
❏ Folding shovel (I love this one that’s on Amazon.com)
❏ Hand cleaner, waterless (e.g., GoJo)
❏ Jack and lug wrench
❏ Jumper cables
❏ Spare tire
❏ Toilet paper
❏ Water (drinking), 1 gallon

Deluxe Auto Preparedness KIT

❏ Change of clothes, depending on the season
❏ Rain Poncho
❏ Duct tape
❏ EDC kit (your phone, knife, handgun, lighter etc.)
❏ Energy bars or similar food
❏ Fire extinguisher
❏ First aid kit
❏ Fix-a-Flat can
❏ Flashlight and extra batteries
❏ Folding shovel (I love this one that’s on Amazon.com)
❏ Fuses for your vehicle
❏ Hand cleaner, waterless (e.g., GoJo)
❏ Hose clamps
❏ Ice scraper
❏ Jack and lug wrench
❏ Jumper cables
❏ Light sticks, two or three are enough
❏ Matches
❏ Motor oil, windshield washer fluid, engine coolant; 1 gallon each
❏ Road flares
❏ Sleeping bag or wool blanket (weight appropriate for the season)
❏ Socket set
❏ Spare tire
❏ 12-volt portable air compressor
❏ Special needs items: prescription medications, eyeglasses, hearing aid batteries, and items for infants if applicable (e.g., formula, diapers, bottles, pacifiers)
❏ Tire chains for snowy climates
❏ Tire plug kit (this one on Amazon.com is nice)
❏ Toilet paper
❏ Tools: flat-head and Phillip’s head screwdrivers, pliers, vise grips, and adjustable wrench
❏ Tow chain or rope
❏ Water (for drinking), 1 gallon
❏ Whistle
❏ Wire

Finding a place to store all of this gear inside your vehicle yet out-of-the-way can be a bit tricky depending on the type of automobile. My truck is a double cab with several different storage compartments including storage areas under and behind the seats, so it’s just a matter of placing items where they will fit (and remembering where each item is so I can get to it quickly if needed).

If you drive a car with a trunk then it’s easy… just organize everything neatly in a plastic tote (get one with a tight-fitting lid and preferably one that locks down) and secure it in the trunk of your car.

Vehicle Safety Tips (from ready.gov)

  • Keep your gas tank full in case of evacuation or power outages. A full tank will also keep the fuel line from freezing
  • Install good winter tires and ensure they have adequate tread or any jurisdiction-required chains or studs
  • Do not drive through flooded areas. Six inches of water can cause a vehicle to lose control or possibly stall. A foot of water will float many cars.
  • Be aware of areas where floodwaters have receded. Roads may have weakened and could collapse under the weight of a car.
  • If a power line falls on your car you are at risk of electrical shock, stay inside until a trained person removes the wire.
  • If there is an explosion or other factors that make it difficult to control the vehicle, pull over, stop the car and set the parking brake.
  • If the emergency could impact the physical stability of the roadway avoid overpasses, bridges, power lines, signs, and other hazards

Also Read:

  • The Ultimate Bug Out Bag Checklist
  • Best Survival Guns for Preppers: Handguns, Shotguns, and Rifles

Well, folks, that’s it. If you have any questions, comments, and or suggestions then please post those in the comments section below…

Filed Under: Bugging Out

What is The Best Long Term Survival Foods?

November 6, 2018 M.D. Creekmore

Whether you are looking to be better prepared for a general short-term emergency like an extreme weather event or something more long-term such as an economic collapse or civil unrest it’s important to have a sufficient food stockpile so that you can fulfill your nutritional needs until the threat has passed or until you can start producing your own food by gardening and foraging for example.

But what is the best long term survival food? And the answer is foods that will store for well for two or more years and that you normally eat. For example most store bought canned foods have a shelf-life of several years (or even decades), as long as the cans aren’t rusted through or dented and leaking and the contents smell and look fresh then it’s still good to eat. However, if you want to prepare your long term survival foods from basic foods that also have a very long and stable storage life then consider foods such as wheat (or other grains, for those who have trouble digesting gluten), rice, beans, oats, corn, salt, honey, cooking oil and powdered milk.

Storing enough food to survive, unassisted and on your own for three to six months or even a full year or maybe even longer is a daunting prospect and the thought is enough to cause most people to get overwhelmed and some give up altogether.

And while I agree that storing and rotating such a large amount of food on a continuing basis can be a lot of work and takes dedication, it is by no means impossible, and if done right can even be enjoyable – just follow the food storage list below but remembers that this list isn’t set in stone, and neither is anything else in this article. This information is meant to help guide you and to give you some ideas but in the end the best long term food storage needs to be tailored to your personal needs and what you like to eat.

Prepper's Printable Food Storage Checklist
Prepper’s Printable Food Storage Checklist (Click Here For PDF)

Hard Red Winter Wheat

This is the backbone of your survival diet.

Wheat is nature’s longest storing seed, with an indefinite shelf life given proper storage conditions. The wheat (and other grains) can also be sprouted, adding fresh greens to the diet even in winter.

White and Brown Rice

Rice is my favorite storage foods and I actually prefer rice over wheat for storage, but that’s a personal decision, and well I like rice and rice dishes. White rice stores better and has a longer shelf-life than brown rice; however brown rice has more nutritional value.

Despite the trade off in storage duration, I still prefer brown rice for storage because of the added nutritional value.

Pinto Beans

Beans, corn, and rice combined make a complete food, providing just about everything you need to survive. Add some fresh green sprouts or garden produce and extra vitamin C just to be sure you’re getting enough to avoid scurvy, and you’ll be well fed and healthy.

I like to store a combination of pinto beans, black beans, and mung beans. How much you store of each will depend on your personal preferences to taste.

Oats

Don’t go overboard when storing oats, about 20 pounds per adult per year is plenty. Oats have a storage life of approximately four to six years, depending on storage conditions and whether or not they have been opened after being packaged for long-term storage.

Whole Corn

Corn equals cornmeal, cornbread, cornmeal mush, corn cakes, and a huge list of other foods that you can prepare using the seed. I store whole corn because it stores much better and with at least double the shelf-like of cracked corn.

Salt

While not a food but a mineral, salt, is none the less essential to the diet and individual health. Salt is also used in the preservation of food and animal products. Salt, like wheat, has an indefinite shelf life. Store at least 10 pounds of iodized salt per person, per year.

It’s also a good idea to stock up on salt blocks to attract game animals for future harvesting. You can find these in the sporting goods stores and other outlets that sell to hunters. You can also get these through your local farmer’s co-op, where they sell them for domestic livestock supplementation.

Honey or Sugar

As a sweetener honey makes an unequaled contribution to the diet. Honey, like wheat and salt, has an indefinite shelf-life. Store at least 10 pounds per person. If the honey hardens and crystallizes, heat it slowly in a double boiler to reconstitute.

Cooking Oil

There is some controversy as to which is best for storage in the preppers pantry, vegetable oil or olive oil, while both will work fine and you should stock up on the one that you like best. I recommend putting away, 10 quarts, per person, per year.

Powdered Milk

Most people turn their nose at the thought of powdered milk, preferring whole milk from the supermarket shelf. Granted it does have a slightly different taste, but it’s not unpleasant to drink, and after a week or two it seems to “grow” on you. Studies have shown that nonfat powdered milk, when packaged (nitrogen-packed) and stored properly has a storage life of 20 years or more.

Freeze Dried Foods

I prefer to buy those hard-to-store long-term items like powdered milk, dry margarine, butter powder, buttermilk powder, cheese powder, shortening, and powdered eggs pre-packaged for long-term storage in #10 metal cans, from Augason Farms or other reputable survival food vendors.

Supermarket Canned Foods

Canned foods from the supermarket have many advantages when it comes to food storage, they have a decent shelf-life on average of 2-5 years for most products, (note: shelf-life means that the foods retain 100% of their listed original nutritional value up until that point – store bought canned foods remain edible, far past the listed expiration dates in most cases).

As long as the cans aren’t bulging, rusted through or punctured and the foods smell fresh, upon opening then I would not hesitate to eat canned goods that are far past their listed expiration date. But that is a personal choice and one you’ll have to make yourself when the decision is needed.

Store bought canned foods have several advantages over freeze-dried or dehydrated foods, including cost and calories contained per serving. Another advantage is that canned foods already have their own water supply for preparation, so there is no need to use any potable water from your storage.

Despite the advantages of canned foods over freeze-dried and dehydrated foods, canned goods do have some disadvantages in comparison, like, weight, space needed for storage, and shelf-life.

I like to include a combination of the basic foods like wheat, rice, and beans, store-bought canned foods and certain “packaged for long-term storage” foods that are hard to store like powdered milk from one of the reputable survival food vendors…

All canned foods should be dated using a permanent marker and rotated on a FIFO (first-in-first-out) basis. I suggest that you build a rotating canned food shelf that will automatically rotate your canned foods when added and pulled off the shelf.

Always keep a notepad beside the shelf or in your kitchen, and write down every item that you take from the shelf and then take the note with you on your next trip to the supermarket, and then buy and restock the items that you’ve taken from the shelf, that way you always have a fully stocked shelf and a fresh supply.

Please read this article to see how long canned foods can last in storage before going bad…

Don’t Forget the Can Opener

Sure you could use a knife, but a manual can opener is easier and safer – so whatever else you do, don’t forget the can opener. Buy several or the strongest made ones that you can find.

Other Foods to Add to Your Food List

After you get the basic foods listed above in the needed proportions (see below), it is a simple matter to add other foods as you get the extra money.

Canned meats: We all know that SPAM is the preppers go to for a cheap “meat” source that has a longer than average shelf-life, and fat content. Canned hams, tuna, salmon, chicken, and turkey are all welcome additions in my pantry shelf – stock-up on the meats that your family normally eat and date and rotate just as you would any other canned food.

White flour: White flour from the store has a much longer shelf-life than does whole wheat flour because it has been “processed” which removes the oily germ, but unfortunately this “processing also removes the nutrition.

Processed white flour has a shelf-life of over five years if kept dry and safe from pests (like the meal moth). Mill moths get into the flour, lay eggs and those eggs turn into flour weevils, which ruin the flour. Look for tiny dark specks in the flour, as this is the first sign that the flour has been infested.

If it clumps together because of settling, just break it apart and run it through a sifter before use.

Store flour for long-term storage in airtight containers, with oxygen absorbers, added – see details below. You can also freeze flour that has been put into five-gallon buckets. Freezing will also kill any meal moths that happen to have been trapped inside before they can do any damage to your flour.

Most of my “flour” is in the form of whole wheat berries, that I have to mill (grind) before use, but I do have some processed flour in my pantry, for lazy days when I don’t feel like grinding whole wheat into usable flour.

Peanut butter: Peanut butter is a good source of fat and calories and has a decent shelf-life. Peanut butter is also an energy food and one that I always take on hunting and camping trips. Unopened peanut butter will last for years.

Spices: Be sure to include a good selection of spices in your food storage. Spices can make even the most awkward foods palatable, and help to alleviate food boredom. Cinnamon, Turmeric, Paprika, Ginger, Oregano, and Garlic are my favorites and make up the bulk of the spices in my pantry.

Baking powder, baking soda, and yeast: Baking powder, baking soda, and yeast (keep yeast frozen to extend shelf-life) are also essential since you’re storing and baking using unprocessed grains.

Dried pasta: Dried pasta will keep indefinitely if kept dry in bug and rodent proof containers.

Comfort Foods

Storing a sufficient amount of “comfort foods” is very important, to your psychological well-being as well as to alleviate “food-boredom” that is sure to set in after eating only storage foods for several months. Comfort foods are even more important if you have children or need to care for the elderly.

Consider comfort foods such as – Jell-O, instant pudding mix, cake mix, hard candies, chewing gum, Spaghettios, mac and cheese, brownie mix, canned spaghetti and meatballs, mashed potatoes, popcorn, cocoa, tea, coffee, powdered juice mixes, sunflower seeds etc. And remember to date and rotate on a FIFO basis.

We crave variety and having a supply of familiar comfort foods can go a long way toward retaining our sanity and self-worth during a long-term disaster. You can only deny yourself for so long before desperation and depression start to set in. Life will be difficult enough – give yourself a treat. You deserve it.

It is a proven fact that if we are forced to eat foods we don’t want or the same foods for extended periods – just to stay alive – dissociation begins to set in. We begin to float away as an escape – we still eat to stay alive, but suffer a lack of focus and become disoriented in relation to our surroundings.

This is dangerous in a survival setting. Don’t think it can happen? Try eating nothing but beans and rice for three months and you’ll see what I mean. Having a supply of comfort foods can help by providing at least some form of normalcy to your life.

Older folks and children will have the hardest time adjusting to new or unfamiliar foods, with many refusing to eat altogether, especially if the food is unnecessarily bland or unappetizing. Comfort foods will help them cope.

Food Storage Shelf Life (printable chart)

Food Storage Shelf Life (printable chart)

Vitamins and Supplements

To ensure that you’re getting a sufficient amount of needed daily vitamins and minerals for optimum health, you need to stockpile a good multi-vitamin and mineral supplement. Also, consider extra vitamin C and D. Vitamin D is of extra importance if you’re forced to stay inside (bugging in) for a longer than normal period of time and thus are unable to receive the needed vitamin D producing sunlight that is required for optimal health.

Don’t Forget About Your Pets

prepping for pets
She likes to watch the chickens…

Don’t forget to include a sufficient amount of food in your stockpile to feed your pets. A decent dog will increase your chances of survival because they can hunt and alert you to trespassers and other trouble. I prefer smaller dual-purpose breeds, with my choice for a working dog being the Jack Russell terrier.

Three Month Food Storage List for One Adult

  • Wheat 75 Pounds
  • Grains, rice, oats etc. 25 Pounds
  • Canned meats 5 Pounds
  • Canned margarine, powdered eggs etc. 2 Pounds
  • Dried beans, peas, lentils, etc., 6 Pounds
  • Dried fruit juice and concentrates 6 Pounds
  • Dried fruits or canned 25 Pound (if dried, then equal to this fresh weight
  • Comfort foods 3 Pounds
  • Non-fat dried milk 25 pounds
  • Peanut butter or substitute protein/fat source 3 pounds
  • Dried potatoes 12 pounds (equal to this fresh weight)
  • Salt 2 pounds
  • Shortening oils 3 quarts
  • Sugar or honey 12 pounds
  • Canned or dried vegetables 9 pounds (if dried, then equal to this fresh weight)

Please bear in mind that the above list is only a sample to help you get started, the most useful food storage list is the one that you put together yourself. After all who knows better than you, what you and your family, like to eat and in what amounts.

Where to Put All this Food?

After reading the above recommendations, you’re probably asking yourself where in the heck, you’re going to store all of this food. Well, that’s a good question and one that you alone can answer for your situation better than anyone else, but I’ll make a few suggestions that I hope will point you in the right direction.

The absolute best place in an underground bunker, root cellar or basement, unfortunately, most people don’t have any of those and have to make due with other less ideal storage options… Consider a spare bedroom, attached garage, detached storage building on your property, or as a last-resort a nearby storage unit rental.

If at all possible put in an underground storage area of some sort to keep you storage foods safe (and you) safe from weather extremes, as well as the main enemy of your food-storage shelf-life; heat. An excellent option, and inexpensive when compared to other suitable alternatives are the buried shipping container.

Long-Term Storage with Oxygen Absorber and Mylar Bags

I store all my grains, beans and other dry foods (besides sugar, salt or sprouting seeds) inside food-grade five-gallon plastic buckets. There is some controversy over what is and isn’t food grade. Most buckets with #2 inside a small triangle on the bottom are food grade, but not all – the only way to be reasonably certain is to contact the manufacturer and ask.

I buy mine from the local hardware store in the paint department. They also have them at my Wal-Mart, but, I prefer to buy from local business owners if possible. Sometimes they can even be gotten free from bakeries and restaurants, just be sure they only held food products – not paint, chemicals or other things that can make you sick or dead.

Foods packed in oxygen don’t store as well as those in an oxygen-free atmosphere. Oxygen absorbers work by removing the air from the enclosed container, leaving an atmosphere of 99% pure nitrogen in a partial vacuum inside the buckets.

Don’t open the bag of oxygen absorbers until ready to use because they will absorb oxygen from the surrounding air and become useless. Have everything ready to go before you open the package. Any unused oxygen absorbers can be stored in a small canning jar until needed.

Be sure to have everything ready to go before you start. Line the inside of the bucket with an appropriately sized Mylar bag these will help to keep light and moisture out extending the storage life of the foods inside.

The Mylar bag also offers a layer of protection between the food and the plastic bucket, if for some reason the bucket that you’re using isn’t considered food-grade.

Pour the food into the buckets a little at a time, shaking each bucket as it is being filled to settle and distribute the contents. Fill each bucket to about ½ inch from the top and throw in one 2000 cc oxygen absorber in each five-gallon bucket of food.

Now to seal the Mylar bag – first roll the top of the bag closed on one end leaving an opening at the other and press out any air that has been trapped inside, next place a 2×4 across the top of the bucket and pull the Mylar bag over the 2×4 and seal with a clothing iron set at the highest setting in a typical ironing fashion across the board.

Quickly put the lids on each bucket and pound shut by laying the board on the top and striking with a hammer or rubber mallet. After a few hours, the absorbers will create a vacuum that will cause the lids on the buckets to “pop down” indicating a good seal and a proper atmosphere for long-term storage. Be sure to label each with date, content, and weight, written on the front with a permanent marker.

Section Two: Tools For Cooking and Processing Your Long Term Food Storage

Most homes will already have most of what you will need to process and cook the foods from your survival pantry, items such as pots, pans, and other common household kitchen utensils. So we will not get into that. What we will cover are tools that most typical kitchens do not have on hand but that are necessary for the prepper’s kitchen. So let us get started.

Choosing a Grain Mill

You need a grain mill now. Don’t put it off another day. Even one of the least expensive models would be better than not having one at all. I know many of you want the best, and that is great. Get the best if you can afford it. Just do not put it off any longer. Get a mill now. If you cannot afford one of the better models, get a cheaper one; buy two or three of the cheaper models – that way if one breaks and cannot be repaired, you will still have spares to fall back on.

This goes along with my philosophy of the rule of three. Always have at least three independent sources of any survival necessity. Never put all your eggs in one basket. Too many things can happen which will leave you with nothing, which is what we are trying to avoid by prepping in the first place.

While I cannot give recommendations on all the models currently available today (because I have not owned or used them all), I can tell you what I have and my thoughts on these which should, at least, get you started in the right direction.

I currently own four different grain mills, The Wonder Junior Deluxe Grain Mill, a Corona Landers, a Back to Basics, and a Grizzly H7775.

Wonder Junior Deluxe Grain Mill

Wonder Junior Deluxe Grain Mill

If you read my book “Dirt Cheap Survival Retreat”, then you already know that I use the Corona hand grain mill for all of my day-to-day milling. It is a strong and well-built grain mill, and for less than $75 it is hard to beat. The Mill to Table Clamping System is a very strong feature included with the Wonder Mill. However, I have never liked having to run the meal through the Corona several times to produce usable fine-enough flour for baking. That is one reason I made my homemade sifter – to speed up the process. However, it was still always necessary to run the bulk of the flour through the mill two or more times.

Since I mill grain several times per week, I needed a more efficient mill. I considered the Country Living Grain Mill but never could find enough extra change for the purchase. Therefore, I started looking for an alternative. I eventually decided to order the Wonder Mill Deluxe from www.thewondermill.com.

I have used the Wonder Mill for the past three weeks, and so far I have been extremely pleased with my new mill. In fact, I think I’ll retire the Corona and use the Wonder Mill Deluxe exclusively. Yeah, it is that good.

The Wonder Mill comes with both stone and steel grinding heads as shown in the photo above.

I love the one-piece construction of the mill and hopper. There is no separate hopper that can fall off during operation or any pins or clamps that could be lost. This is one thing I never liked about the Corona, as there were several times that the hopper fell off during aggressive cranking of the handle.

Another big improvement over most hand-operated grain mills is the double clamping system used on the Wonder Mill, which is the strongest I have ever seen on any mill. When properly clamped to the table, I had no problems with the mill moving out-of-place or coming off during grinding.

However, since all of my grinding is done in the same place, I will likely remove the clamp altogether and bolt the Wonder Mill directly to the table. This will provide the strongest possible mill to table mounting system.

Another thing I loved about the Wonder Mill is the quick change head system that allows you to easily switch from grinding dry grains, beans, and legumes to oily grains, nuts, and even coffee in just a couple of minutes. The Wonder Mill Deluxe comes with both steel and stone grinding heads, which can be changed out in less than one minute.

Here are the product specifications:

  • Weight: 10 pounds
  • Height: 12 ¾ inches (without the clamp)
  • Hopper capacity: one quart
  • Crank handle: 10 inches

Best of all, the Wonder Mill produces excellent, fine flour (with no sifting or re-grinding required). This saves a lot of time and effort. Moreover, the consistency is easily adjusted using a simple knob to adjust from pastry flour to cracked grains.

In fact, 90% of flour files through the sifter screen after the first pass through the mill. Again, this is a huge improvement over the Corona. In addition, because of the excellent bearing system (that never needs lubricating) cranking the handle is much smoother, but still requires effort.

The flour guide directs the falling flour into the catch pan or onto the screen without any mess around the milling heads or thrown flour on the table and floor. This is always been a problem with the Corona when grinding pieces of grain and flour would be thrown all over the place. One solution was to secure a plastic bag over the grinding head of the Corona to catch the flour and grain particles.

I wish that I had a Country Living Mill to compare against the Wonder Mill. I am sure there would have been some interesting findings with the comparison. The folks at WonderMill.com did perform a speed comparison between the two and according to their website: In a test performed at the Wonder Mill test kitchen, the Wonder Junior was able to grind 1 ¼ cups of flour in a single minute *80 turns* (see our video speed test). This is 65% (about 1/2 cup) more than we were able to produce with the Country Living grain mill with the same flour setting and the same amount of turns *80 turns*, and for half the price.

I know what you are thinking, it sounds great but “can it be motorized?” Yes, it can. There is a motoring pulley available that will allow you to do just that; however doing so will void the warranty. They also make a special adapter which can be used with a power drill to make grinding any grains or beans a quick and easy process.

I only grind a small amount of flour at a time (why grind more than I need?). I will not be adding a motor, but it is an option to keep in mind.

Your next question is probably going to be “what will it grind?” I have used it to grind wheat, corn, and beans. It can also grind spices, herbs, oily grains, nuts, and seeds. See WillItGrind.com for more info on what the Wonder Mill will grind.

Based on my tests, comparisons, price, and use, I give the Wonder Junior Hand Grain Mill my highest recommendation for a grain mill. If you are looking for a hand grain mill this is the one you should get.

Corona Landers Mill

It is strong, robust, well made and my second favorite grain mill. The Corona is a hand-cranked unit that uses rotating steel burrs to crack and grind corn, beans, grains, nuts, and seeds.

It is manufactured using cast-iron parts with an electro-tinned finish to guarantee a rustproof and easy to clean tool. I give it my second highest recommendation following the wonder junior hand grain mill.

Back To Basics Mill

This mill works well and is actually very easy to use. My main complaint is the small hopper that needs to be refilled after a few cranks of the handle. It is lightweight when compared to the Corona and I do not think it would stand up as well to continued usage.

Grizzly H7775 Mill

The Grizzly H7775 mill it is not my first choice but it sure beats having nothing at all. It sits low on the table, low enough that getting a large enough bowl under the head to catch the flour is difficult. I have the same problem when using the Corona. This is the main reason I use a homemade sifter to catch the grindings.

My other complaint is the small hopper, refilling it every few cranks can be an annoyance, at least for me. On the plus side, the grinder is efficient and the grinding plates are easily adjusted to the desired consistency.

While this is a good mill, it is not of the quality of the Corona; but note that it is half the price, so buying two or more is an option.

Country Living Mill

While I do not own this mill, it is given the highest recommendations by those that do. A recent advertisement proclaims: The Country Living Grain Mill is one of the highest quality grain mills ever made.  Living Grain Mill is one of those high-quality items that could be passed on to the next generation.

How to Grind Grains and Beans

When grinding, it is often necessary to regrind the grain several times before reaching the desired consistency. Some of the meal will come out perfectly fine the first time through, while other parts remain coarse and need to be reground several times.

One way to make grinding easier is to use a screen to sift out the finer flour while leaving the larger pieces of grain behind. The sifter is simply a four-sided box with sides but no top, and a bottom made of nylon window screen from the hardware store. Mine is 15″ X 12″ with sides made of a ¾ inch by 3-1/2 wood.

Cut the wood to length, and nail or screw the pieces together. Lay the screen out on a hard surface, sit the box down flat on top of the screen, and cut to fit with a utility knife. Turn the box over and tack the screen to the box with several thumbtacks or small nails to hold the screen in place.

Take all-purpose cement from the plumbing department of the hardware store, and spread generously around the rim of the over the edge of the screen, forming a permanent seal between the wood and the screen.

When grinding, place a section of newspaper under the grinder head and set the box on top. Grind as normal but after each pass through the grinder, shake the finer meal onto the newspaper and transfer into a bowl.

Pour the coarser meal back into the grinder and regrind, repeating until reaching the desired constancy. This saves running the finer meal back through the mill, making grinding easier and quicker.

How to Clean Field Run Wheat

First off, never buy “seed” grain for human consumption. Seed grain is often treated with insecticides and fungicides. Seed grain is to be planted and grown not eaten. Buy untreated whole grain sold as “feed” that is meant to be eaten.

Look for “field run grain.” It is cheaper and because of fewer processing steps, it is less likely to be infected with mold or contaminated. Field run wheat will have dirt and detritus that will need to be removed before use, but cleaning wheat is not a big deal.

First, sort the grain by laying it out on a clean surface and pick out any chunks of dirt, rocks or darker grain. After sorting, you need to wash the grain. Place the grain on a sifter or screen and pour clean water over it until the water coming out the bottom is as clean as that poured in from the top.

After cleaning the grain, you will need to dry it before grinding. Pour the grain into a strainer and set it aside for about ten minutes. After it stops dripping, spread it out on a cookie sheet about ¼ inch deep, heat in oven at 180° degrees occasionally stirring until dry. Drying usually takes about an hour. If it takes longer that’s fine; just make sure it does not burn.

Alternatively, if you prefer you can dry it outside under the sun. This is better and cheaper but is dependent on the weather and time of day and the season. Just spread the grain out in a thin layer on newspaper or other suitable material in direct sunlight. A solar oven could also be used; however, I have never tried this method myself.

Sprout Seeds for Fresh Greens All Year

Fresh sprouts are full of vitamins and minerals that aren’t readily available in the unsprouted seed. Sprouting allows you to have fresh greens even in winter and will expand the bulk of your food storage many times over without any extra expense to you.

To start sprouting, you’ll need at least one wide-mouth quart canning jar (a quart mayonnaise jar will also work) and a 6×6 inch square piece of nylon window screen or cheesecloth. Both the screen and cheesecloth are easy to cut with scissors or a sharp knife.

sprout grains for food

how to sprout grains for food

sprouting seeds and grains for food

Next, put approximately 3 to 4 ounces of wheat, alfalfa, chickpeas, lentils, mung beans, pumpkin seeds, rye, sunflower seeds, or other sprouting seed in each jar and cover the mouth with the nylon window screen. You can use a large rubber band, string, or a canning jar ring to hold the screen in place over the mouth of the jar.

Fill each jar with water to within 2 inches of the top and let stand overnight. When you get up the next morning, pour out the soak water and tilt the bottom of the jar over the sink and leave for an hour or two so the rest of the water can drain off the seeds.

After this initial soaking and draining, you’ll want to flood the jars about every four hours and then drain any excess water by tilting the jar bottom up into a bowl or sink. Repeat two to three times per day.

how to spout seed for food and survival
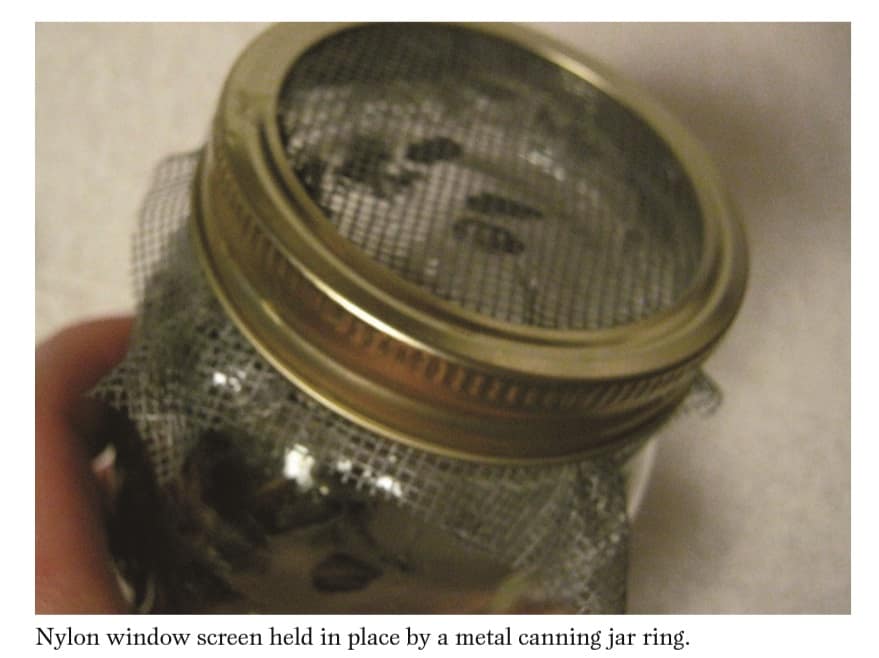
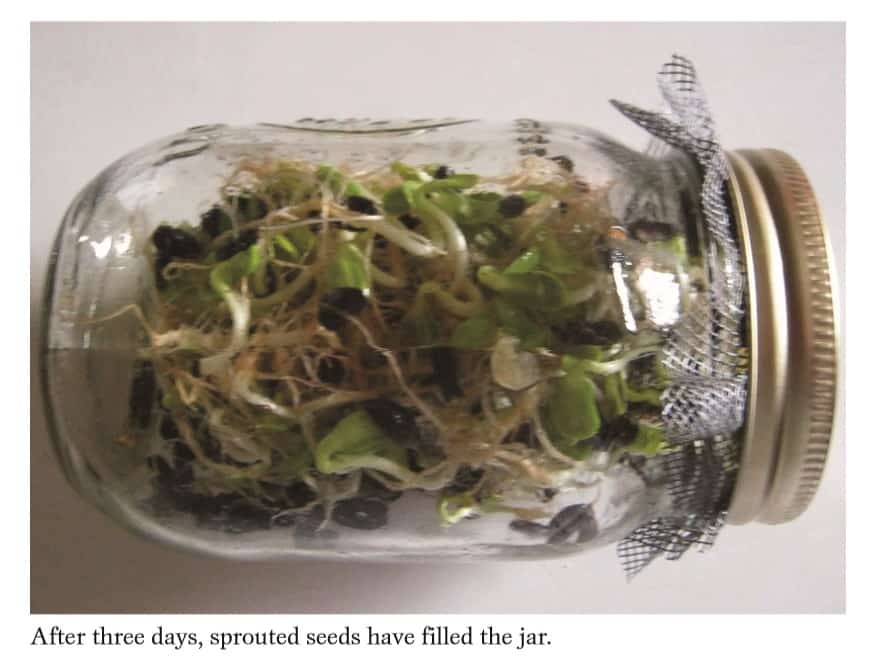
At this point, you want to keep the seeds moist but not covered with water. In a few days, the seeds will begin to sprout. When the sprouts reach 1 to 2 inches in length (for most seeds), they are ready to eat. Sprouts can be eaten raw, cooked, or dried. If dried, they can be ground into flour and used for bread or other baked items.

to keep a steady supply of fresh sprouts, simply start a new jar 24 to 48 hours after the last sprout jar has finished sprouting. Repeat cycle. This is a great routine that will keep you in fresh greens year round.

And that is all there is to it. If you want to learn more about sprouting, including in-depth but simple recipes using sprouts, order a copy of The Sprouting Book by Ann Wigmore. This excellent resource is a must-have for any serious survival seed sprouter.

Warning: Even though the risk is low because sprouts can contain bacterial contamination, people with compromised immune systems (e.g., individuals with AIDS, organ transplants, undergoing chemotherapy) are advised to avoid eating them.

Cooking Tools and Related Items

Listed below are some of the best cooking stoves and related tools for preppers. I have all of these and they are all well-made and useful; however, it should be noted that you do not need to go out and buy one of each type of cooking stove. Get what is best for you in your location. For example, if you’re located far north and don’t get all that much sunshine, then you’re probably better off skipping the solar oven and purchasing an EcoZoom rocket stove.

Zoom Versa Stove

The EcoZoom rocket stove is designed to burn wood, dried biomass (plant materials and animal waste used as fuel) or charcoal,  making it a truly versatile means of cooking, especially after the lights go out and other more conventional sources of fuel (like propane) are no longer available or are in short supply

My EcoZoom rocket stove has proven to be very heat efficient. It will bring a pan of water to a rolling boil in less than two minutes and fry an egg like nobody’s business. Having a means of cooking when the power goes out should be self-explanatory. Having a cooking source that uses easy to find, renewable fuel is an extra bonus.

Camping Stove

Having a standard camping type stove on hand for emergencies is one of those common sense things to do, and most folks in the country already have one or two of these for camping purposes.

If you do not have one, go out and buy one now. A top-of-the-line model will put you back around $100 at current prices, but the cost is well worth it. In addition, do not forget to pick up some extra fuel canisters. Put back at least 24 one-pound canisters, or better yet get a hook-up that will allow the use of the larger 20-pound tanks.

Sun Oven

If you are in an area that receives a sufficient amount of sunlight, then a solar oven is must have. With a solar oven there is no need to store or scrounge for fuel, and as long as the sun is hot in the sky you will have an unlimited “fuel” source to prepare food.

The best brand and the one that I recommend is The All American Sun Oven. It is best to get the package with the accessories included in your order to avoid having to buy these later.

Folding Camp Grill

A folding camp grill is another item like the camping stove that most folks in the country already have on hand. But it is still worth mentioning. Every prepared prepper should have one of these. So if for some strange reason you do not have one, go get one as soon as possible. I bought mine at Wal-Mart in the sporting goods department for under twenty-five dollars. They also have them at Amazon.com.

Outdoor Grill / Smoker

This is another one of those items that will make like much easier at least when it comes to preparing food after a disaster or a long-term grid-down situation. I bought mine at Wal-Mart in the lawn and garden department for less than one hundred dollars. They also have them at Amazon.com.

Extra Large Stew Pot

Even if you don’t anticipate having a large group to cook for you should still have at least one large stew pot because you never know who or how many family members or close friends will show up at your door, and most of us don’t want to shoot them, so we will have to feed them. I have a Bayou Classic 7406, 6-Qt. Cast Iron Soup Pot with Cast Iron Lid, but I am afraid that even this will not be sufficient for my needs.

Food Saver Vacuum Sealer

The Food Saver Series vacuum sealer is a great little machine that can greatly increase the shelf life of products. This is a highly recommended item for preppers – check Amazon.com for the current price!

Butchering Kit

Because most preppers are “knife collectors” of sorts, we often overlook the need for a good home butchering kit. Get the very best kit that you can afford. The Outdoor Edge Game Processor PR-1 12-Piece Portable Butcher Kit with the Hard Side Carry Case is a good product – Click here to check availability and the current price on Amazon.com.

Other On-Site Resources:

  • How Much Food Should A Prepper Have?
  • 21 Point Prepper’s Checklist For Stocking Up at Walmart

RECOMMENDED BOOKS THAT DEAL WITH FOOD STORAGE

  • Layton, Peggy. Emergency Food Storage & Survival Handbook: Everything You Need to Know to Keep Your Family Safe in a Crisis. New York: Clarkson Potter/Crown Publishing, 2002.
  • Layton, Peggy, and Vicki Tate. Cookin’ with Home Storage. Self-published, 1991.

Filed Under: Featured Articles, Prepping

Primary Sidebar

Subscribe to Blog via Email

Enter your email address to subscribe to this blog and receive notifications of new posts by email.

Join 7,202 other subscribers
  • Amazon
  • Facebook
  • Substack
  • Twitter
  • YouTube

“Do more with less.”

– Minimalist proverb

Recent Posts

  • Just so you know
  • Weather Update for My Corner of Appalachia
  • Why I’m Ordering Ivermectin + Mebendazole Every Year
  • The Website’s Shutting Down (But Here’s the Plan)
  • You Are Hated! Start Training Like It!

Footer

Recent Posts

  • Just so you know
  • Weather Update for My Corner of Appalachia
  • Why I’m Ordering Ivermectin + Mebendazole Every Year
  • The Website’s Shutting Down (But Here’s the Plan)
  • You Are Hated! Start Training Like It!

More about me

Books I’ve written

Books I’ve read

Follow Me on YouTube

Follow Me on Facebook

Gear I Use and Recommend

Newsletter

Search this site

Follow me elsewhere

  • Amazon
  • Facebook
  • Substack
  • Twitter
  • YouTube

© 2008–2025 M.D. Creekmore · As an Amazon Associate, I earn from qualifying purchases.