• Skip to main content
  • Skip to secondary navigation
  • Skip to primary sidebar
  • Skip to footer

M.D. CREEKMORE

  • Blog
  • Books
  • Newsletter
  • Gear I Use
  • About
  • Contact
  • Facebook
  • YouTube
  • Blog
  • Books
  • Newsletter
  • Gear I Use
  • About
  • Contact
  • Privacy Policy

Blog

What Survival Skills Does A Prepper Need?

October 5, 2018 M.D. Creekmore

bushcraft skills for survival

Top 15 Essential Prepper Skills to Learn Now!

Any person who sets out to acquire a set of survival skills must start with a brutally honest self-assessment. If you don’t make a truthful appraisal of where you are in terms of your survival skills and knowledge, you have no reliable means of getting to where you want to be.

Do an inventory. In what areas are you most skilled? Where are you definitely lacking? Are you well versed in firearms but lack knowledge about water purification? Have you amassed an impressive food pantry but have no way to protect that food should the need arise?

Do you have a stocked first aid kit but don’t know how to use it? Just as a business that fails to take regular inventory cannot succeed, neither can a survivor who doesn’t tabulate his resources. You need a starting point, and today’s assignment is to take an inventory of your essential survival skills. As you read through the following list, check off those skills you have mastered so you can focus on those skills on which you need to improve.

1. Food processing

Many survival planners overlook food processing in favor of more exciting elements of preparedness. This is a mistake. Learning how to prepare basic survival foods is one of the most important elements of long-term disaster preparedness.

2. Bulk food storage

Without adequate quantities of stored foods, your demise is virtually guaranteed after a major catastrophe. Storing and rotating basic grains, beans, and other foodstuffs isn’t difficult; anyone can learn how to do it properly in an hour or two.

You will find everything you need to know here and here.

3. Emergency medical care

Every survivalist should have sufficient medical training. A good start is taking a basic cardiopulmonary resuscitation (CPR) and first aid class; check with your local Red Cross for scheduling. If time and finances allow, taking EMT classes is an excellent idea.

Don’t overlook herbal medicine, which may be all you will have to work with after a disaster.

Please read my article Prepper’s First Aid and Medical Checklist to find out about getting medical training, alternative medicine, kits, and even birth control methods.

4. Gardening

Because of space and finances, most of us cannot cache enough food to last the rest of our lives. We’ll need to replace our stored foods with fresh supplies.

Gardening is an excellent way to do this and can be easily learned with instruction and practice. It is amazing the amount of food that can be grown in a small space under proper conditions.

5. Preserving food

Food preservation is an important survival skill, as most fresh foods spoil fairly quickly, resulting in a loss of quality, edibility, and nutritional value. You should learn how to can, dry, freeze, cure (salt or sugar), smoke, pickle, bury, vacuum-pack, jelly, and/or pot food.
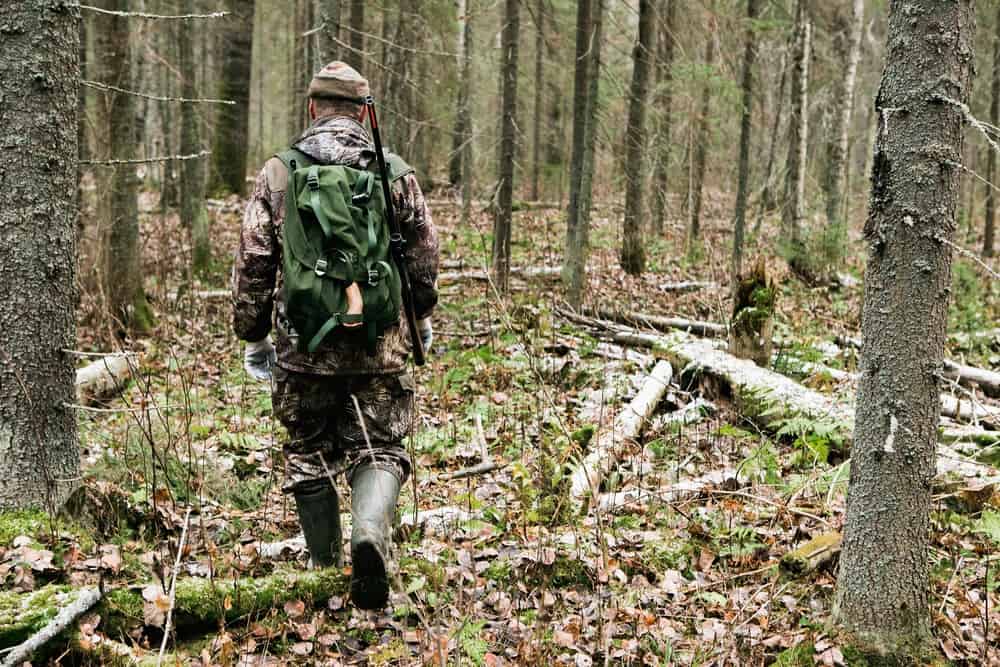
6. Hunting

Contrary to popular belief, all wild game will not disappear after a collapse, natural or manmade. Most people would rather stand in a food line waiting for a handout than scour the backwoods for wild game.

And let’s not forget that the extent of most people’s hunting skills doesn’t go beyond the latest hunting themed video game.

7. Trapping

Trapping is more practical under survival conditions than hunting. By setting a trap, you can be other places doing other things while the trap does the hunting for you. Learn to build and set snares, deadfalls, box traps, fish traps, and steel traps.

Becoming a proficient trapper is not difficult—all you need to do is get off the couch and learn by doing.

8. Firearms repair

Basic firearms repair (replacement of broken parts) isn’t difficult if you have the parts needed when something breaks. You don’t need to learn how to repair every make and model of firearm in existence. You do need to have an in-depth understanding of your firearms: how they work and how to maintain and repair them.

9. Self-defense skills

The most effective self-defense techniques are also the easiest to master. Striking vulnerable points, biting, and eye gouging are simple and effective techniques that can be learned quickly and, when applied with aggression and precision, can bring down the most determined attacker.

10. Firearms proficiency

If you’re new to firearms, a basic safety course is highly recommended before learning defensive skills. Concealed-carry permit classes are held in most areas, as are hunter education programs. I suggest you participate in both.

The National Rifle Association (NRA) offers a number of classes that are most helpful.

11. Water purification

Another simple skill often overlooked is water acquisition and purification.

12. Using tools

You should have a survival toolbox of basic tools, including hammers, saws, drills, screwdrivers, winches, vise grips, wire cutters, and files. Your toolbox should also include the skills needed to put these tools to good use.

13. Raising small livestock

Raising livestock for food goes hand-in-hand with gardening, hunting, and trapping to ensure sustenance during hard times. I highly recommend Barnyard in Your Backyard by Gail Damerow and Secret Livestock of Survival which covers everything you need to know about making livestock part of your survival food plan.
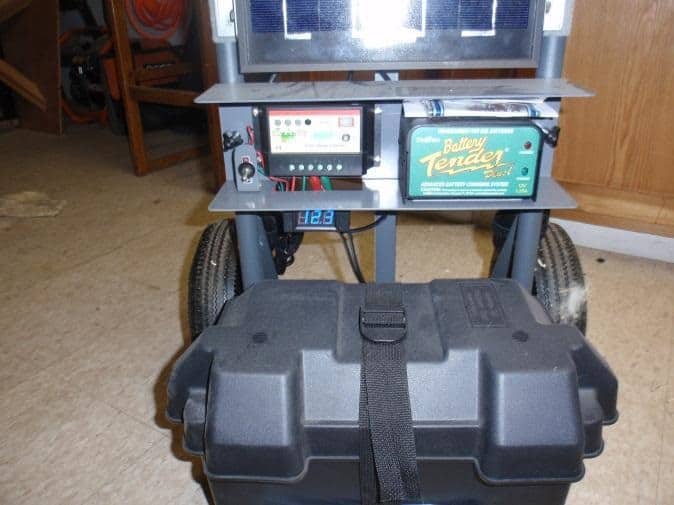
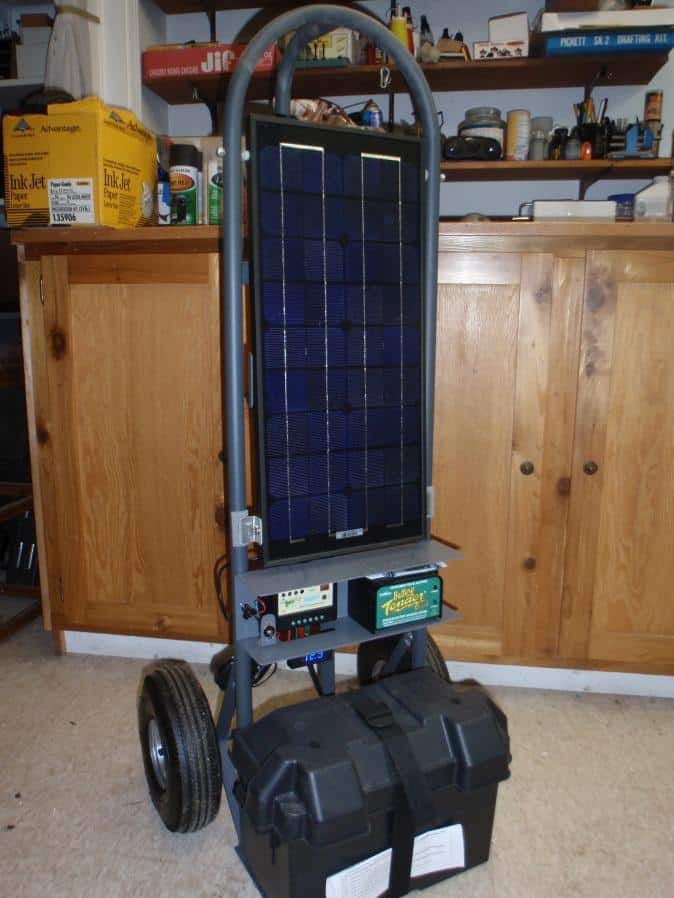
14. Home power

While it may be possible to survive with no electrical power at all, having some source of electrical current will make life much easier. My solar setup cost me under $600, including the batteries, and the price of building my homemade electrical generator amounted to just under $100.

15. Investing

After getting your survival necessities in order (e.g., food, water, medical supplies, shelter, defense), you need to start thinking about investing in barter goods, such as .22-caliber ammo, pocketknives, and “junk” silver coins. Just be sure not to make the mistake of going into debt while investing in these metals.

And don’t overlook learning how to barter – here is a list of the ten top barter items.

Check your skills (be honest!) against the list above. If there are areas in which you are lacking (and there will be if you’re being honest), then get to work filling in the gaps. What skills do you have now? What skills do you need to learn or build upon?

Filed Under: Prepping

Building A Mobile Solar Power Station

October 4, 2018 M.D. Creekmore

solar power stationby Dan W

One of the more important things we’ve wanted to include with our other prepping supplies is a communication system. Something beyond two cans and a string! Should a catastrophic event occur we don’t expect help in the form of government assistance will be readily available.

Besides, we are leery and don’t think we’d want that kind of help ……….. even if it was offered. At least not until things have shaken out a bit and we have a better feel for what is going on.

However, it will be important especially during the early phase of an event to be able to receive broadcasts (if there are any) to stay apprised of situations both near and far. Forewarned is forearmed!

We discussed just who it might be that we wanted to communicate with, why, and the type of equipment we’d need. There’s a big difference between active and passive communicating. Getting active on the airwaves right away using a radio transmitter did not seem to be a wise thing to do.

Better to stay quiet and attentive while things shake out. The time will come when communicating with those outside your immediate vicinity will not be as risky. Until you know what is going on, why broadcast your presence?

power station diagram

Maintaining communications with those in your tribe is important. If we had to leave our compound for any reason it would be beneficial to stay in close contact with those afield. Small handheld transceivers satisfy this need but eventually, we’d need to be able to actively communicate over greater distances.

A more powerful transceiver of some sort would be needed. We were torn between choosing a Shortwave or a CB Transceiver. These two devices each fill a different function in communications equipment: The Shortwave Transceiver is a long range device while a CB Transceiver is more suited to relatively short range communications.

power station diagram
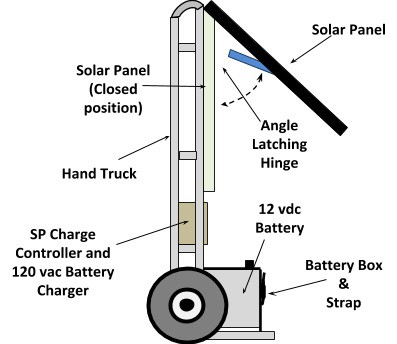
Setting up and using a shortwave system is more complex than using CB devices. There is a definite need for both types of devices in a complete communications system, but did we want to purchase and set up both types? Would only one type suit our needs?
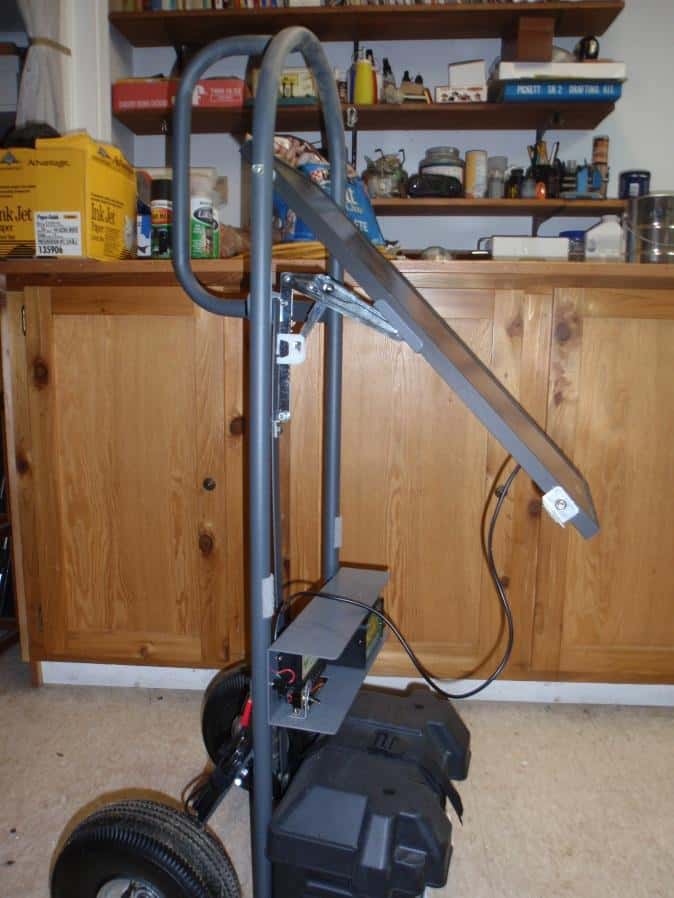
After much discussion regarding the pros and cons of each, we decided to go with a CB Transceiver as our main unit. Our choice was based on our feelings that we really don’t need to actively communicate with anyone at long ranges (other than listening). To cover all bases we may still purchase a hand-held SW Transceiver at a later date.

We analyzed our needs to determine what devices we’d want to assemble for our communication station. Our “want” list quickly evolved into a “need” list. These are the generic items we settled on:

  • A professional quality CB Base Station combined with an excellent antenna system would allow us to reach out across our valley.
  • Handheld CB Units (x4) would amplify the flexibility of our base station and give us roving communications capability. We wanted units with rechargeable batteries and an adapter for an external antenna.
  • FRS (Family Radio Service) Band Transceivers (x4) for use around our property (short range).
  • A multi-band radio (AM/FM/Aircraft/SW + SSB) would be our ears to the outside. This would have to be high quality, high gain radio.
  • An emergency frequency scanner that could monitor police, fire & EMS, plus the Aircraft bands; further adding to our ability to monitor what is going on locally.
  • A small inexpensive multi-function AM/FM, CD, Cassette player for entertainment. A life without music is unthinkable, so I consider being able to listen to recorded music a crucial aspect of surviving.

These devices would compose our communication and entertainment system. We knew what equipment we wanted to use, but needed to address the issue of how they would be powered? What would it take to ensure we had enough self-generated electricity to meet the need? What other items did we have, or plan to get, that would also need power? It’s always a good plan to plan for more capacity than what you think you will need.

Mobile power station

The only other key items in our cache needing power (either directly or by charging its batteries) were: our Voice Alert Intruder Warning Station and sensors, several Night Vision scopes, the Marine Band transceiver on our boat, and a bunch of flashlights. Only the Voice Alert was added to our “needs power” list for the purpose of calculating total electrical load requirements.

I mentioned a Marine Band Transceiver in the previous paragraph. Let me digress for a moment to discuss where it might fit into the scheme of things. Since Marine Band frequencies are different from FRS, CB, and standard SW Band and since folks in a survival mode would likely be using those more common devices to communicate; using a marine band radio to connect with your friends provides a small measure of “secure communications”.

mobile solar power station

At least it would be somewhat more secure than other methods of communicating over the airwaves. People living in landlocked areas don’t tend to think about Marine Radios and would probably not be monitoring those frequencies. Back to the main topic.

Primary Considerations

Starting with the assumption that there would be no grid electricity or phone system operative, our communication devices would need to be powered by whatever electricity we could generate. We’ve got a large gasoline generator that will provide a lot of juice, enough to run our home if needed.

But even with rationing our supply of gasoline it will only last so long. Scrounging for more fuel during the first few months of chaos might prove to be unproductive, as well as a very risky chore.

Wind or water power is not an option where we live so that’s out of the equation. Solar power is an obvious choice. A bank of solar cells, charging a bank of batteries, powering an inverter to produce AC power, is feasible; but I have some reservations regarding this type of arrangement.

First is the number of solar cells required to produce adequate charging current and second is the number of batteries that would be needed.

Those two issues, plus our northern locale and the reduced daylight hours during the 6 months of our winter cycle (at Winter Solstice we have about 8 hours of daylight) made me reluctant to bite the bullet and put our funds into a large, complex solar power supply.

The ratio of expense versus return just didn’t seem to make a large solar-powered system worthwhile. I wanted a system with as few components as possible. The more components there are within any system, the greater the likelihood one will fail; thus rendering the system inoperative.

Considering all of my negative concerns, solar power still seemed to be the answer. I decided to compromise; I’d use solar power on a smaller scale to power our communications system. With a working solar power supply, we could then hold back on using our generator. This has a positive impact since the generator is noisy and would attract attention. A solar charger is silent.

System Design Criteria: I searched through commercial products to see what was available but couldn’t find anyone device that had the features I was looking for.

Nowhere was there a solar-powered, battery based, a multi-voltage power supply that would suit my wants and needs.

So, I decided to design my own. I wanted to follow the time-proven “KISS” philosophy of design ………….. Keep It Simple Stupid! The result is a system that is based on two main components: A Portable Solar Battery Charger and a Power Panel.

  • The Solar Charger needed to be portable so I could easily move it around the property to wherever the sunlight was strongest.
  • The Solar Charger would need to be able to recharge a slightly discharged Deep Cycle 12 vdc RV battery within 8 – 10 hours.
  • The portable Solar Charger should have an onboard 120vac-12vdc charger to provide one more way to charge a battery.
  • The battery used would need to have enough capacity to power the equipment for at least 12 hours out of a 24-hour cycle.
  • Two batteries would be used initially, although more can be added if desired.
  • Each day (of the use cycle) the batteries would be swapped. The freshly charged battery would come into the house to be connected to the power panel. It would replace the battery that had been used the previous day & night. The slightly discharged battery would then be rolled outside (on the Solar Charger) for recharging.
  • The Power Panel would be designed so as to provide easy access to facilitate battery and device connections.
  • The Power Panel would supply 12, 9, 6, 3, and 1.5 vdc as well as 120vac at amperage levels required by the devices (Radio, CB Station, etc.).
  • 120VAC would be supplied to the Power Panel by three sources: Normal Grid connection, Generator, and an onboard 12vdc to 120vac Inverter.
  • All of these DC voltages, plus the 120 VAC, would be readily accessible on the face of the Panel. A connection would be by the use of common connectors, alligator clips, terminal strips and the like.

The Portable Solar Charger and the Power Panel would comprise a very flexible electrical supply system. As long as we had grid power or were using our generator the Solar Charger and the Power Panel would remain in standby mode.

Electrical Sizing: Once I had decided on the general details for the charging station and power panel, I set about figuring which specific communication devices I wanted to purchase. This was necessary so that I would know what the estimated total power requirements were for each device.

That way I could ensure my system would be adequate for the load. As I said earlier, I wanted to be able to have a way to communicate via CB, be able to listen to what was being broadcast locally on emergency channels, receive worldwide broadcasts, and play CD’s or cassettes (yes I still have boxes of them).

After shopping around, I selected a CB base station by Galaxy, a world/all band receiver from Grundig, a Uniden300 Channel Broad Band Base Station Emergency Frequency Scanner, and a nice little Sony AM/FM/Cassette/CD Radio & Player. Another electrical device that would be connected to the Power Panel is our Voice Alert System base station.

I obtained the amperage requirement specifications for all of these devices. Both idle and operational mode values were figured into the equation. The total wattage needed would be my guide in choosing an appropriately sized battery as well as other assembly components.

The Voice Alert Perimeter Defense system (which would be on almost all of the time especially at night) draws less than a ½ amp/hour. If the CB Base Station is turned on it will draw less than ½ amp/hour in the Receive-Only mode, and less than 1 amp when transmitting.

The World Band Receiver uses less than ¾ amps/hour. The scanner uses less than ¾ amps and the Cassette/Cd player uses ½ amp/hour at a normal sound level. If the CB Transmitter or the Inverter was in use the current draw would be greater: meaning that the battery would need longer to recharge.

And of course, the louder the audio setting the more current these units will draw. If all of them were turned on at the same time the total current draw is still well within the arbitrary 5 amp limit.

After a search, I selected a Deep Cycle RV battery made by Interstate (SRM-27) that was rated to provide 12vdc @ 5 amps 19 hours. It would be a rare occurrence when all of these devices were in use at the same time so in all likelihood, the battery would actually be put to use for less than 12 hours a day.

This battery was perfect and would work well to satisfy my initial target value of 5 amps. The Interstate battery would work just fine!

Portable Solar Charger Design: Having settled on the major components, and the overall design of the portable solar charger and power panel, I began the actual layout design work. I settled on using a common hand truck purchased at a local retailer as the base on which to design the portable charger.

The hand truck was large enough to accommodate all of the components. It would work well as the batteries are heavy and unwieldy to carry around. An additional plus is that the entire charging station can be rolled into the house for security and to facilitate the battery exchange.

The Solar Power Charging Station is essentially a 20-watt solar panel connected to an SP Charge Controller. The solar panel is mounted on the hand truck so it can be pivoted at the top on a vertical plane. This allows it to be angled so as to best capture the rays of the sun, yet present a slim profile when not in use.

I added a special locking hinge that allows the angle to be easily set. The Solar Panel Battery Charge Controller moderates the output of the panel and keeps the battery from sulfating over time. A very small meter was added so I could monitor the voltage of the battery as an indicator of its charge level. T

o give added flexibility to the unit I added a small 120vac charging unit. A heavy plastic battery box is mounted on the foot of the dolly. Each of the electronic devices was mounted to the hand truck so as to be able to easily remove them. This was done so the individual components could be stored in my grounded Faraday Shield cabinet ………… just in case!

Power Panel Design

The Power Panel is simply a fixed panel that has a variety of quick connect terminals and cables that can be selected and connected with ease. It has two inputs: 12vdc (using battery clips) from the batteries currently in use) and 120vac (using a standard extension cord type connector plugged into a wall outlet). The 120vac is used when our generator is running and supplies 12vdc by powering a standard charger.

The 12vdc to 120 vac inverter is also mounted to the panel. I added a switch so I can choose between Generator/Grid 120vac or Inverter 120vac). The inverter I chose is a Power Bright PW1100. It will provide 1100 watts and draw roughly 9+ amps when used at its max capacity.

It is not a true sine wave inverter but then again I don’t need one. I do not foresee having to use the inverter all that much, but it’s nice to have it wired in and available if needed.

There are no indicator lamps as they just add to the load on the supply. The output connections are all switched and labeled to reduce confusion. I did add a 12vdc switched light (low current LED) to illuminate the panel and immediate surrounding area.

The best radios in the world are worthless unless connected to a good antenna. To complete my communications system I bought a Solarcon I-MAX 2000 24’ CB/HAM Base Station vertical antenna. I constructed a 40’ long-wire receive only antenna.

Both are mounted on the roof peak of my home and feed into my office. The roof peak is approximately 40’ high so the antennas are nicely elevated. These antennas extend the operating range of the CB and significantly improve the reception of any receiver.

to be on the safe side I also added a lightning arrestor. There are other antennas available but I believe that the ones I have chosen are a good compromise.

Details

Major components of my Solar Charger, Power Panel, and the Communication Devices:

•CB Radio, Galaxy DX-2547 AM/SSB CB Base Station
•Eaton (Grundig) 750 Satellite AM/FM Stereo/Shortwave/Aircraft band Radio
•Sony CFDS05 CD/Cassette/AM/FM Radio
•Uniden 800 MHZ 300 Channel Base or Mobile Scanner (BC355N)
•Cobra HHRoadTrip Hand Held CB Radio (x4)
•Maybe: Baofeng UV5RA Ham Two Way Radio 136-174/400-480 MHz Dual-Band Transceiver
•Instapark 20W High-Efficiency Mono-crystalline Solar Panel
•HQRP Solar Panel Controller 10 AMP @ 150 Watt
•Power Bright P-1100 12vdc-120vac Inverter
•Solarcon I-MAX 2000 24’ CB/HAM Base Station Antenna
•Battery Tender 021-0156 Battery Tender Plus 12V Battery Charger True Gel Cell Model (x2)
•Mini Blue Digital Panel Voltmeter 4.5 – 30v for 9, 12, and 24 vdc (x2)
•Adjustable Drafting Table Hardware, lift up ratchet support, sold By Rockler
•Wineguard DS-3000 “J” Pipe support for antennas (x2)
•Coaxial Lightning Antenna Surge Protector LP350
•Hand Truck with air-filled tires, $60 @ Home Depot
•Misc. screws, bolts, wire, coaxial cables, etc.
•Custom mounting plate for Charge Controller, etc.

As of this writing, the Portable Solar Charger has been completed and works as designed. A “maintenance level” charger is kept on both batteries to ensure they are always fully charged. Assembly of the Power Panel is in progress and I expect it to be completed in the near future.

Below you’ll find several photos on the Portable Solar Charger and a very basic schematic for the electrical connections. They should give you an idea of how I put it together. It’s not necessary to be an electrical engineer to assemble a system like this.

All of it is basically a “plug and go” type arrangement with common components readily available off the shelf. You too can put one together and tailor it to your own needs.

Define what you want to do, what type of devices it’ll take to do it, then make a parts & components list. Be sure all of the components you’re going to put together are compatible and will give you the power you need.

Almost everything I used is available online or at your local hardware store. I did have a local metal shop fabricate an aluminum square “C” shaped plate for mounting the SP Controller and small battery charger. The purpose of the “C” shape, beyond providing a mounting plate, is to shield those two components from the weather.

Filed Under: Power Generation

Hiluckey Solar Charger Review

October 4, 2018 Jesse Mathewson

solar charger review

Legally I have to tell you if I have received the product or any compensation for writing this review. As with the large majority of products I review, I have not received this product or any compensation. There may be affiliate links in the material that utilize Amazon as a platform. However, unlike other blogs, we follow the laws here, even if the laws are intrusive.

Additionally due to recent comments and emails received, I want to remind everyone that the vast majority of products on the market today are not made in one country alone.

When it comes to GPS, communications, national weather service radio, electronic reading devices and more having extra power and or the ability to charge using the sun is an essential prep. Over the years I have tested and used several different battery backup systems.

All of them have worked, but some have worked far better than others. The Hiluckey 10000mAh Solar Charger has worked very well. Sadly, Elon Musk does not have an easily affordable version yet!

This charger/ battery pack comes with extra features that are fun but ultimately not why I purchased the unit. For your benefit, the extra features are as follows, 2 LED flashlight diodes with 3 modes (Bright/ SOS/ strobe), small compass (it works though I wouldn’t rely on it), and a solid well made silicone rubber case that protects it from shocks and dust and splash damage.

The best features are the addition of a new generation solar panel for charging and a well made 10000mAh battery with an IC chip for easy battery evaluation and limiting to prevent overcharging and promote the best charging depending on the drain.

With indirect (cloudy days/winter) sunlight in Arizona, the unit charged from 25% all the way through 100% within 6 hrs. On a nice clear day with direct sunlight in early spring, it easily charged through 100% within 4 hrs. Again this was in Arizona, the important thing to recognize is that Arizona is at a nearly perfect latitude for the use of solar energy.

We have in fact one of the best overall climates for the use of solar year round with an average of 270 days a year of sun and easily over 175 days annually with full sun. This unit would work well in most areas across the United States and while it may take an extra day to recharge on just the sun alone in less sunny areas, its ability to hold a charge for over a month makes it an easy addition to my pack.

Its storage capacity maintains 100% for over 3 weeks and for myself did not drop below 4 lights for well over 4 weeks.

For the various natural disaster seasons across the United States I would suggest having one or more of these on standby, with a quick check and top off every month or so you should have the power you need when you need it.

solar charger review

For instance, if you live along the East Coast or on Islands across the Atlantic and or Pacific rim having additional chargers for your electronic needs can mean the difference in a Hurricane, Typhoon, or severe tropical storm.

For those of us in flood, fire or tornado areas having additional power for our small electronics could make it easier for help to get here. At an average of $22 apiece, these are worth every penny invested and will quickly repay the money spent after the first camping expedition you take with your children or grandchildren.

When it comes to batteries for GPS, modern cell phones, electronic books and many other small items the standard is between 1000 and 3000mAh in size. This means that the backup battery which weighs just slightly more than an Amazon Kindle Fire or the same as a modern cell phone or GPS unit will charge most of those units several times over before needing to be recharged itself.

It is my suggestion that you setup check-in times as standards for immediate and extended family members and friends; in the times between check-in and use simply power the units down to conserve energy. You will find that most modern batteries will easily hold their charge for up too 2 weeks when this approach is used.

So in review, what are the pros of the Hiluckey 10000mAh Solar Charger?

  1. 10000mAh battery size allows for multiple charging events for most modern small electronics.
  2. It is a small size in comparison to many other units for the ability it has, this makes it easy to store and efficient.
  3. The solar panel is a newer generation and works very well allowing for multiple options from plugging it in through using the sun when available.
  4. Solid construction with shock-resistant silicone armor and dust cover help keep it dust free and resistant to splash damage. (I put it in an industrial grade zip-lock bag for full water protection)
  5. Lights are very bright and work very well, strobe is a great setting and is the last click allowing an easy one-touch on approach.
  6. Compass works, while I do not rely on small compasses like this, having them and knowing how to use them really do benefit your kit.
  7. Pricing is reasonable for the quality of the product you are getting, $20-25 will get this shipped right to you. Two of them are less or the same as most other units being currently advertised with similar attributes.

At this time I have not found any real cons to owning this unit. I understand that many of you probably have similar setups, I would suggest that the added benefit of a working solar panel and modern IC chip for better control makes it an invaluable addition. As with all my reviews, it is important to remember that my goal is not to sell it but rather just show you if it works or does not.

Free the mind and the body will follow

Filed Under: Gear Reviews, Power Generation

How to Build a Small Game Survival Snare For Rabbit

October 3, 2018 M.D. Creekmore

trap-basic-power-snare-setby SurvivorDan

Before we begin with a discussion of the construction of the most basic primitive/minimal* tension trap; a quick look at the ethics of primitive trapping.

Modern trap use is legal as long as you obey the local laws, licensing, seasons, limits, etc.

Primitive trapping is illegal in most places and definitely in my neck of the woods…er…desert. Exigent circumstances may negate that illegality.

It is to be used in an extreme emergency survival situation only. It is only for keeping you and yours alive in an all-out emergency survival situation. Even practicing setting your traps may run you afoul of the law.

Last year I took Mrs. Survivordan into a national forest and taught her to make a variety of traps. I had her cut the pieces of stick we would need in advance from private property with permission. Any saplings we used in the National Forest for tension were not stripped of ancillary branches and leaves. In other words, we left everything the way we found it.

All traps were sprung after completion, then disassembled and re-bagged. Nothing in that riparian area was disturbed. Still could have ended up having to do some fast talking with the local game warden or ranger. So be careful where you practice these techniques.

And pre-cut whatever devices you need for your traps. Even simply chopping and/or slashing greenery in a state park, National Park or National Forest may land you in a more modern trap. The local hoosegow. The lock-up. Jail. So obey the law and when walking that fine line betwixt legal and illegal while practicing primitive trap building, be law abiding………….and discreet.

Pre-Trapping Strategy

First, I rig up a shelter and build a small fire and put on some water. I dig a little slit trench. Then I sit down and prepare a cup of coffee or tea or some chow. I listen and observe while I work. Usually, while my food or java is heating I walk around the area and reconnoiter a bit. Look for critters and sign. Then I go back to the campsite and eat and drink. Gives me a chance to think about the lay of the land. Did I spy any critters?

Where were the game trails? Did I see any scat? Rub marks and wallows and such? Tracks down by the water (if any water)? If I determined there are game and what kind, for instance, rabbits, then I decide what kind of traps I am going to make and where I might put them.

For rabbits, I usually make a giant crossbow thingy that fires a great big eight-foot spear capped by a massive trident with exploding tips made from .357 magnum shells……….

I’m just kiddin’! The rabbits will get fixed snares (if I have wire) and tension snares on the ground. In this article, I am mainly dealing with traps constructed with string, vines or paracord. Assuming primitive/at-hand materials – no wire. If you do have wire….wire is good. I go where I figure the rabbits ain’t and cut the pieces of stick I’ll be needing.

When I’ve got them whittled up and partially rigged with cord, I usually try to rinse them off with water or wipe some dirt and such on them to get some of my scent off. But I’m getting ahead of myself…..

Making The Trigger Stick

Cut a small simple cylinder of wood, about 5 – 6” long and 1 1/2” – 2” thick. This is the simple trigger for many traps. This is a fundamental piece that you need to learn to make. It is very simple to fabricate. As is the second part of our first trap, the anchor which looks and functions much like a tent stake. That and some cord and we can build our first spring or tension snare.

trap-basic-snare-trigger
Basic Snare Trigger

Back to the trigger…..cut a small 5 – 6” length of wood 1 ½” to 2” thick and about a third of the way from an end, score it about 1/8” deep all the way around with your camp saw or drywall saw. (You can do all this with a knife but why? Cruder but easier with the camp saw.

Either way, watch out that you keep all your fingers so you don’t have to practice one-handed first aid.) That will be a good place to anchor your paracord or another line that goes up to your tension pole. Tie it on good ‘cuz if anything pulls loose you have no dinner and something may smack you in the face while you are setting your trap. But first, let’s cut another notch.

At approximately a third of the way from the other end of the stick, you need to make a mark across it. Cut straight down at that center line mark and alternately shave from the middle of the stick towards the mark until you have a nice ½ to ¾” deep flat surfaced notch. That is where you will catch your trigger stick on its anchor stick. Sounds more complicated than it is. It’s easy.

The Anchor stick

The Anchor stick
The Anchor stick

Find a spot where a branch forks off and cut a stick roughly shaped like this longish stick pictured above. Twelve inches to the fork would be good. If your trap will be set in soft marshy ground in a riparian area, then make it a bit longer.

You want a long strong piece as it will be pounded into the ground. Leave a couple of inches above the forked area as that will be the head of your ‘nail’ when you pound it into position. The fork that you cut off has to be shaped to match up to your trigger so bear that in mind when you cut it originally as it can save you some sawing and filing.

Anyway, this ain’t about mil specs. When you set your trap you can make last-minute adjustments to the interlocking surfaces of the trigger and anchor sticks. Line up the trigger and anchor sticks. It is simpler than it sounds.

The Power Pole

 twitch-up rabbit snare.
How the two go together for a twitch-up rabbit snare.

The power pole should be very close to the actual noose placement. It can be a sapling or a large overhanging branch. If saplings and such are not located where you want to site a trap then you can cut a strong branch and place it vertically in a hole and brace it with rocks.

You could even throw a line over a big overhanging branch and tie it securely to a good size rock or log for your power source. Hoist the rock up and set your tension on your trigger. It’s a fairly simple concept so I will assume common sense will guide you to figure out what to use for a power source.

Once on site, find a good tension pole (rooted sapling or branch) that bends down to about a foot from your trap site with enough tension (power) to hoist your dinner aloft. Bend the tip of the power pole down to where you want to site the trap. Line it up. Pound your anchor stick in with a rock or small log.

Out of respect for the environment and fear of the law, I would not strip the ancillary branches and leaves but in exigent circumstances (ie: you are hopelessly lost and hungry) you can strip the sapling, reducing the weight, and thus increase its power. (For these photos I am using a fishing pole for a power source) You will tie a paracord (Use green, tan or camo cord.- I used this multi-color easy-to-see cord for illustration purposes) to the end of the sapling and allow a foot or so of free cord until you fasten it securely to your trigger stick.

If you can’t tie a basic knot then get on Google and learn as there are all kinds of knot loving sites. Climbers and sailors I reckon. I can only tie about 6 knots and they serve me well. I couldn’t tell you the difference between a reef knot and the Flemish eight. But I got my little arsenal of idiot proof knots and they work. Get yours.

The Noose

Basic power set noose

Assuming you only have the paracord or other strong line and no pre-made wire nooses then you must form a noose from your line. Pretty straightforward. Tie a little loop in the end of a 3-5 foot piece of cord and feed the end of the line thru it (Don’t make the loop too tight so, when sprung, the noose cinches up quickly without binding).

Now you have a nice snare loop (make it 6 – 8 inches across) you can position it horizontally atop of 3-4 small forked twigs, so your future dinner guest steps in it.

Or you can prop it up vertically so your bunny or what-have-you walks into the loop. For bunnies have the bottom of the loop about 3-4 inches off the ground. In my experience, vertical orientation tends to be more productive.

Note: I don’t like set (non-powered) snares with cordage as the critter is likely to chew off the line before expiring or may suffer for a prolonged period of time. There are examples of set snares (no power pole) that are reasonably efficient even with cordage and I may address them in the future.

Modern snares have a one-way device that continually constricts as the animal pulls to get loose and are more likely to effectuate a ‘clean’ kill. Herein I am only addressing primitive powered snares using cordage or vines.

Powering The Snare

DANGER! CAUTION! First, you need to tie the free end of the noose to the trigger stick and set it under power. Now you need to set your loop vertically or horizontally but very gingerly, very carefully so you don’t lose an eye or some teeth if you inadvertently trigger the trap while setting the noose.

Sounds a bit scary but I have never been hurt though I have experienced premature triggering (No jokes please. I’m sensitive.) of my traps while setting them. Keep your head back and your hands-free of the noose while setting. I was wearing safety goggles while setting this trap. You need to have a healthy respect for all traps you set.

The Trap site

Assuming you are a natural-born trap builder and can extrapolate the basic design into a dozen different sure-fire can’t miss critter-killer primitive traps, that doesn’t mean you are going to eat! You could put up 50 traps hither and thither and get nary a bunny for your efforts.

Down-the-rabbit-hole
Rabbit hole

The cardinal rule that applies to retail locations, restaurant sites, hotels, survivalist retreats, gas stations, hunting camps and just about everything else you could want to build or locate somewhere consists of three principles, “Location. Location. Location.” You have to place your traps along the routes between where the animals eat, sleep and drink.

Where do they sleep? Well, a lot of little critters sleep in dens. Holes in the ground (don’t reach in and feel around…ya might find claws, fangs and maybe even some venom), hollowed out logs and tree trunks, nests in the trees ( squirrels ), etc. Larger game like deer, elk, and horses tend to bed down in the grass when they can get it.

You will notice large flattened out areas in the bush. These are not your trapping sites. Wild pigs tend to bed down deep into a thicket and will have scraped away the ground cover down to the dirt, in fact, if you can stand and see their bedding area you are not looking at their bedding area.

You would usually have to crawl back into it and you do not want to meet a feral hog in that position. It would get ugly.

Of course, the type of trap in this article is not designed to take out a large animal. But by understanding the signs for large animals you will not waste your tension trap there. Your target critter is most likely going to be a bunny. Typically you can find bunnies in many environments.

They will den in holes, usually inter-connected to form warrens so watch out as there will be more than one way in and out. You can locate a few holes and place a snare at each one. You should look for runs which are the flattened out paths through the bush that the rabbits use to get from their dens to their feeding and watering areas.

The rabbit runs often exhibit sign like bits of grass clipped off and rabbit ‘pellets’ (scat/poop) scattered along the run.

rabbit-run
Rabbit run

If the run is very large and you see large hoof prints then you are probably looking at a pig run and need to build a bigger trap! I suggest that if you are a new survivor trapper, you should stick to bunnies, chipmunks, squirrels and such until you get a bit more confident and a bigger repertoire of traps.

Besides, you need snare wire and cable for the big critters like feral hogs. Back to the bunnies …. some species of rabbits sleep in the dense thickets and thorns rather than underground.

You will set traps for all types of rabbits on their runs and catch them coming and going. {By the way, if you’ve got a slingshot or smoke pole you might just lurk somewhere and pop off a bunny around sunset or dawn when they’re on the move along one the rabbit runs.

I’m just saying that two layers of critter harvesting is better than one.} Be aware that rabbits don’t stray to far from where they den up as they have many enemies.

If you have had little luck finding the rabbit’s runs for some reason and you have located a water source such as a small stream or a pond you will need to backtrack from there. Many critters doubtless come to that water to drink eventually.

If there is small game in the area you will find runs and bigger game trails leading to and from the water. Pick the ones that seem to have your target critter using them (meaning if there are huge hoofprints or paw prints and you can’t discern any little tracks, find another game trail or run) and set your traps.

Remember….look for tracks and scat (poop). Site your traps in the narrowest part of the runs. You may need to place some sticks or brambles in such a way as to funnel the rabbits to your noose. While you are doing that and when you are setting your traps try to avoid leaving too much human scent on everything.

At least don’t be wearing any deodorant, cologne, hairspray/gel, soap residue, hand lotion, bug spray…..well, you get the picture.

rabbit-pellets
Rabbit pellets

Try not to stink up the bunnies world cuz they will know something is not right. If setting your snare or noose vertically then you want the bottom end only 3-4 inches from the ground. We are aiming for the bunnies head.

Speaking of his head, bring a big stick when you go to check your traps. Cordage snares don’t always dispatch your critters. Make it quick. And on that note, check your traps often (every 5-6 hours). You don’t want the little critters to suffer and you want a coyote to steal ‘em neither.

Those of you more sensitive to killing and field dressing an animal, I want you to know that I am not a natural-born hunter. Some of my friends enjoy the kill. I really don’t. It’s for meat. To survive. It’s a necessary task in order to keep yourself and comrades fed. You don’t have to enjoy it. Just do what you have to do.

Get Your Hands Dirty

You think you’ve got all this down? You can do it when you need to? Photographic (eidetic) memory? Practice now when you don’t need this skill. When you need to do it for real it will seem so natural and you will build your traps easily and correctly so they are effective.

Lives may depend on it. You don’t want on-the-job training and have your dinner get loose from a defectively constructed tension trap.

So cut some sticks. Make a couple of basic traps until you are comfortable and confident in building them. Securely prop up a fishing pole in the backyard and use it for a power source (wear safety glasses) to practice your trap building skills. (In my backyard I buried a 14″ PVC pipe with a removable cap to put my power stick in for teaching purposes) You will come to realize that you could fashion a half-dozen such traps in an hour and set them in another hour or two.

Trigger your practice traps immediately so you don’t snare/kill Fluffy. Don’t run to get Momma to show her your neat-to new trap cuz, for sure and for certain, that’s when Fluffy will find it! Anyway, that’s 6 traps out there working for you 24/7. Think about that. Much more productive than chasing fast-moving rabbits with your tire iron in hand. Smarter too. Good trapping!

Practice your trapping skills. Be a survivor.

* As we are utilizing manufactured cordage one could argue these traps are not truly ‘primitive’ traps. For instructional purposes and simplicity here we will designate such traps as primitive as opposed to ‘humane’ modern manufactured traps.

Filed Under: Bushcraft

How To Be A Prepper With A Disability

September 22, 2018 M.D. Creekmore

how to be a prepper with a disability

by W. D. Sultemeier – The Wheelchair Prepper

When MD asked for readers’ help I responded with a suggestion for an article about and for the prepper who finds himself in a handicapped situation. I really meant the suggestion for MD to take the ball and run with it but he turned the table and challenged me to prepare a guest post.

I was diagnosed with a syrinx on my thoracic spinal cord in 1996. I was a teacher/coach at the time at a local public school and due to a stroke suffered by my dad in ’93, I was also operating the family cow/calf business. I was while having earned a pair of college degrees, someone who preferred a physical, outdoor lifestyle.

The prospect of spinal surgery was frightening, to say the least but the option was limited. The cyst was removed but the damage to the spinal cord was already done due to its lack of elasticity. Thus began a slow debilitation.

Let me say I seek no sympathy and have looked at this episode as a challenge. Pain management is the biggest part of my altered life. A gradual change in my mobility required an “adjustment” to my lifestyle. I went from a limp to a cane, to crutches and walker, to finally a wheelchair.

I had time to make some preparations for the changes that were coming. Those who find themselves faced with an abrupt physical change have a daunting but do-able task before them.

Making the structural changes necessary will challenge many depending on the individual’s situation. I was able to make my surroundings more easily manageable due to the length of time involved. Construction of ramps(not ADA approved), installation of handicap bars in the shower and at the toilet, making room to access the bed and closet space, were all things I was able to deal with.

Early on I was able to build and improve pathways around my house, shop, and barns, using hard-packed granite gravel from sources from the ranch. I was fortunate to have access to equipment and even unto this day have some ability to operate that machinery. I have to remind myself daily what can be done or should not be attempted, with safety being paramount.

I never leave the house without my cell phone. I sometimes feel a slave to that concession to my wife. I am very lucky that I have access to a battery-powered scooter and a power chair. These are used at the house and around the place. I do not take off out into the pastures with the scooter ( even though I would love to ) but do use it in the yard and to the shop and barns.

When we go somewhere, i.e. church, doctor, store, etc., I use a handed down traditional wheelchair for ease of handling into and out of the vehicles.

Like any of you, my wife and I stockpile canned and dry foods, store potable water, maintain first aid supplies, add to the ammunition stores, and do many of the things we have learned from MD’s blog. The point of this missive is to make one see that preparing can be done regardless of one’s physical abilities. Contributions can be made by pretty much anyone.

I come from a very tall family. I stand 6’5”, the wife is 5’10”, son is 6’8” and my daughter and her husband are both over 6’. Our house was built with that in mind 20 years ago with cabinets and pantry shelves reflecting our stature.

Today I need a “grabber” to reach some of the items and a careful balance to get others. We raised the kitchen table (hand-made by my grandfather) to allow me access in my power chair. Since my wife still works off-farm, I do the meal preps and try to keep the house (not very good at that). Because I can get to the table to help cut up meat, process fruit and vegetables, we have been able to keep our freezers full.

Gardening has been a tough one for me. I grew up with a seasonal garden at least a half acre in size. I would still love to get out into the middle of one but riding a scooter into a plowed garden would not be too simple. This year I had my son plow strips with space for packed ground to drive between rows. I have been keeping my hands dirty by container gardening.

Because I cannot get out among the cattle easily or safely to feed them, I began feeding them using 250# tubs of molasses lick. When empty, with perforated bottoms, these tubs make great container beds and are a good, easily accessible height.

I have gone from a short hoe to tractor and tiller, back to a short hoe for my gardening tool of choice. This past spring-summer I grew okra, beans, squash, tomatoes, peppers. I still have various herbs and shallots growing in these tubs.

After reading ONE SECOND AFTER, my wife became more supportive of the idea and efforts of being prepared for different situations (she recently broke her right arm). My adult children are like-minded and contribute as they can, be it with the butchering, vegetables, or keeping a good supply of firewood up to the house. Of course, they help with the regular ranch work as much as they can since they have been exposed to this life from the time they were little and not afraid to get a bit dirty.

We put together a rig for me to haul firewood to the house by pulling it with my scooter. I have moved my target range closer to the house so I can practice shooting. My kids are both shooters and better shots than I.

These days the practice is mostly with 22’s but the occasional feral hog still meets the business end of my .357 magnum. I am still proficient with my other pistols, rifles, and shotguns.

I don’t really foresee myself clearing the house at night with my wheelchair and Glock 21 but it would not be wise to enter our house uninvited. I have not thought too much about renewing my CCW permit, but I am determined to do so.

For those who think there is little hope or usefulness left to them due to a handicap…they are wrong. I have and continue to acquire source material on many topics covered in this blog. When TSHTF providing information will be a major contribution to keep you and yours safe and prepared.

Being a keeper of knowledge (sharer of knowledge) is and always has been a revered place in society. One can still work in one’s shop, doing projects, limited only by one’s imagination. After making room to navigate around the workbench and various tools, I recently began working on a Vertical Axis Wind Turbine using the heavy lids from the same feed tubs as the wings.

Getting power to make our lives easier when TSHTF is now a bigger concern. I will need something to charge my mobility batteries when the grid goes down. Solar panels and a bank of batteries are on the “someday” list. Money is always a factor for most of us.

The concept of bugging out is a bit more difficult in a wheelchair situation. I still have bags for my wife and myself in case we have to get out in a hurry. Preparations have been made setting up a site away from the house if the need arises.

The thing that disturbs me is being able to get back home if something catastrophic occurs while away. I keep emergency bags and firearms in each vehicle that sees time away from home. My fear is making a 30 to 60 mile trip in a wheelchair. I cannot jog but do try to keep the upper body fit.

There are assuredly many things I have omitted and others’ situations will be different, but one must remember that just because one is in a wheelchair or is in some way handicapped, one must still do what he can to prepare and help himself and his loved ones survive.

If you have tips, advice or survive with a disability I would love to hear from you in the comments below…

Filed Under: Prepping

Colorado Knife Laws: A Guide for Knife Carriers!

September 22, 2018 M.D. Creekmore

colorado knife laws
Colorado Knife Laws

Colorado conjures images of the Rocky Mountains, snow-capped ski slopes and wide-open space. Colorado is not the most restrictive state in terms of knife laws, but it is certainly not the most relaxed either.

As a state that falls in the middle of being knife friendly and knife-restrictive, it is important to understand which knives are legal to own and carry, whether open or concealed.

In short, it is legal to own almost any knife, including a gravity knife and/or a switchblade, in Colorado other than a ballistic knife. Additionally, pocket knives or any other knife with a blade that is shorter than three and one-half inches is legal to carry open or concealed.

Overview of Colorado Knife Laws

Knife laws in Colorado are a combination of several other states’ restrictions with additional rules thrown in. There are important restrictions to understand relating to ownership, conceal carry and affirmative defenses available to knife owners.

Permitted Knives

First, it is legal to own the following knives:

  • Dirks
  • Daggers
  • Push knifes
  • Stilettos
  • Bowie knives
  • Disguised knives

According to Colorado law, it is not only illegal to own ballistic knives, but ownership is a felony. Colorado Law provides: “(1) As used in this section, the term “dangerous weapon” means a firearm silencer, machine gun, short shotgun, short rifle, or ballistic knife. (2) As used in this section, the term “illegal weapon” means a blackjack, gas gun, metallic knuckles, gravity knife, or switchblade knife. (3) A person who knowingly possesses a dangerous weapon commits a class 5 felony. Each subsequent violation of this subsection (3) by the same person shall be a class 4 felony. (4) A person who knowingly possesses an illegal weapon commits a class 1 misdemeanor.”

Concealed Carry in Colorado

The relevant law reads, in part: “ (1) A person commits a class 2 misdemeanor if such person knowingly and unlawfully: (a) Carries a knife concealed on or about his or her person; “Knife” means any dagger, dirk, knife, or stiletto with a blade over three and one-half inches in length, or any other dangerous instrument capable of inflicting cutting, stabbing, or tearing wounds, but does not include a hunting or fishing knife carried for sports use. The issue that a knife is a hunting or fishing knife must be raised as an affirmative defense.”[i] (emphasis added)

Blade Length Limits in Colorado

It is a crime to conceal carry certain knives over three and one-half inches long. The law reads, in part, that a knife including “… any dagger, dirk, knife, or stiletto with a blade over three and one-half inches in length or any other dangerous instrument capable of inflicting cutting, stabbing, or tearing wounds, but does not include a hunting or fishing knife carried for sports use.”

Recent Case Law and Defenses

Like many other states, Colorado looks to the intended use of a knife in addition to the legislation. In a widely cited case, The Colorado Supreme Court has interpreted the unlawful carrying statute as prohibiting the conviction of a person for carrying a knife with a blade less than three-and-one-half inches (3½”) in length, absent proof that the person intended to use the knife as a weapon. Moreover, such intent cannot be inferred solely from the appearance of the knife in question. A.P.E., a Juvenile v. The PEOPLE of the State of Colorado, 20 P.3d 1179 (Colorado Supreme Court 2001).[ii]

Moving Forward

While ownership of knives is rather lax in Colorado, it is not without limits. There is no state law preemption in Colorado, meaning that knife owners should be cognizant of their surroundings at all times.

Additionally, there is no specific law relating to the transfer of knives to minors or carrying limitations applicable to minors. As always, knife owners should be cognizant of their surroundings and be particularly mindful of carrying knives on public property, government buildings, schools, and airports.

[i] 18-12-105. Unlawfully carrying a concealed weapon – unlawful possession of weapons

[ii] https://www.akti.org/state-knife-laws/colorado/

None of the material in this article should be interpreted as legal advice.  I am not a lawyer. Never take any action with legal consequences without first consulting with a lawyer licensed in your jurisdiction. This article should not be relied upon for making legal decisions. This information is provided for scholarship and general information only.

[ Note: Out of all of the pocket knives available on Amazon.com this one is my favorite everyday carry knife – click here to see what it is on Amazon.com. I love this knife! It’s built like a tank and holds an edge better than any other knife that I’ve owned…]

Check out these related articles:

  • What’s The Best Multi-Tool to Buy For EDC
  • Best Survival Knife of for Under $100
  • Best Folding Knives For Self-Defense
  • Work Sharp Pocket Knife Sharpener Review
  • SOG Tactical Tomahawk Review

Filed Under: Knife Laws by State

  • « Go to Previous Page
  • Page 1
  • Interim pages omitted …
  • Page 64
  • Page 65
  • Page 66
  • Page 67
  • Page 68
  • Interim pages omitted …
  • Page 87
  • Go to Next Page »

Primary Sidebar

Subscribe to Blog via Email

Enter your email address to subscribe to this blog and receive notifications of new posts by email.

Join 7,202 other subscribers
  • Amazon
  • Facebook
  • Substack
  • Twitter
  • YouTube

“Do more with less.”

– Minimalist proverb

Recent Posts

  • Just so you know
  • Weather Update for My Corner of Appalachia
  • Why I’m Ordering Ivermectin + Mebendazole Every Year
  • The Website’s Shutting Down (But Here’s the Plan)
  • You Are Hated! Start Training Like It!

Footer

Recent Posts

  • Just so you know
  • Weather Update for My Corner of Appalachia
  • Why I’m Ordering Ivermectin + Mebendazole Every Year
  • The Website’s Shutting Down (But Here’s the Plan)
  • You Are Hated! Start Training Like It!

More about me

Books I’ve written

Books I’ve read

Follow Me on YouTube

Follow Me on Facebook

Gear I Use and Recommend

Newsletter

Search this site

Follow me elsewhere

  • Amazon
  • Facebook
  • Substack
  • Twitter
  • YouTube

© 2008–2025 M.D. Creekmore · As an Amazon Associate, I earn from qualifying purchases.