• Skip to primary navigation
  • Skip to main content
  • Skip to primary sidebar
  • Skip to secondary sidebar
  • Skip to footer

M.D. CREEKMORE

  • Blog
  • Books
  • Newsletter
  • Gear I Use
  • About
  • Contact
  • Facebook
  • YouTube
You are here: Home / Archives for Featured Articles

Featured Articles

The Quickest Way I Know To Get a Family of Four Prepped for The Coming Economic Collapse

December 15, 2019 M.D. Creekmore


The Quick-Start Guide to Survival & Preparedness for a family of Four

This morning as I was trying to catch up on my email (I get a massive amount of email each month), I opened a great one from John W. In a nutshell  John is new to prepping and hasn’t really done anything prep-wise yet, but he has been thinking and making plans.

John said that he has his home on two acres paid-off and that he has a job and works to support his wife and two children (one 6 and the other 9 years old). He said that he knows from all of the news and the tell-tell signs that something big is coming and that his main fear is a total economic collapse.

He said that he has $15,000 to spend on preps and that he wanted to be ready as quickly as possible, without all of the buying a can of food here and another can another day or a few extra cans each time he goes to the grocery store.

He also insists on long-term storage foods, with a shelf-life of 25 years or more, because he doesn’t want to be bothered with all of the rotating and other stuff involved when stockpiling perishable foods.

John’s question to me was, if you had nothing prep-wise, and just starting out and wanted to be ready within the next month and with a budget of $15,000 what would you do and buy to be prepared as quickly as possible?

I’ll answer that question below.

Six Month+ Food Storage for Four People

To start I would order the MEGA 1-Year Emergency Food Supply – the $3,189.95 might seem like a lot at first glance, but considering this package will provide 2,250 calories/day (for each person for three months) and will feed a family of four for three month, with a 25-year self-life it’s really a pretty good bargain, especially for those wanting to get prepared NOW.

The My Patriot Supply products make up the bulk of my long-term food storage and I can attest to the quality and taste of their products, their Traveler’s Stew is absolutely delicious!

I would then order four of the Survive2thrive 100% USDA Organic 40-day Nutrition Emergency Food Supply Buckets, then I would top it all of with eight gallons of cooking oil (store it frozen and it will last a long time), 32 pounds of salt, yes that sounds like a lot, however, salt is cheap and has so many uses you can’t have too much.

Add 15 to 20 pounds of sugar, and an extra 48 cans of Augason Farms Country Fresh 100% Real Instant Nonfat Dry Milk in the #10 can it has a 20-year shelf-life. Then I would add an assortment of herbs and spices for cooking and about 10 pounds of assorted hard candies for threats for the kids (and yourself).

I would also add 12 large jars of peanut butter, 24 cans of SPAM and 12 canned hams.

If you drink coffee be sure to add that in the amounts you normally consume over a 12 month period. And don’t forget multivitamins and extra vitamin C.

Total Cost of approximately five to six thousand dollars…

And be sure to add store bought canned fruits, vegetables, soups, and stews as mush and as often as possible and use on a first in first out rotation.

Protection and Foraging

If I had no firearms now (get training) I would buy a Mossberg  500 Combo package and 100 rounds of 00 buckshot, 50 rifled slugs and 200 bird-shot (preferably #6 shot), then I would buy a Ruger 10/22, 1,000 rounds of .22 ammo and five of the Ruger factory 25 round BX 25 magazines.

Total Cost around $750

Water Storage and Purification

I would store as much tap-water as possible (limited by space) in every suitable (but free container – avoid the plastic milk jugs, they are weak and fall apart after a few months) that I could find. Then I would order a ProOne Water Filter and a set of extra elements.

Total Cost Around $350

Food Production

John said that he had two acres of paid-off property, so I would find the best place (most level, sun exposure, and best soil) and have the largest area that I could work tilled and add as much free organic matter that I could get, check with any local large production chicken, horse or dairy farmers in your area, most of the time they will give you all of the manure that you need if you’ll haul it away.

gardening on the homestead

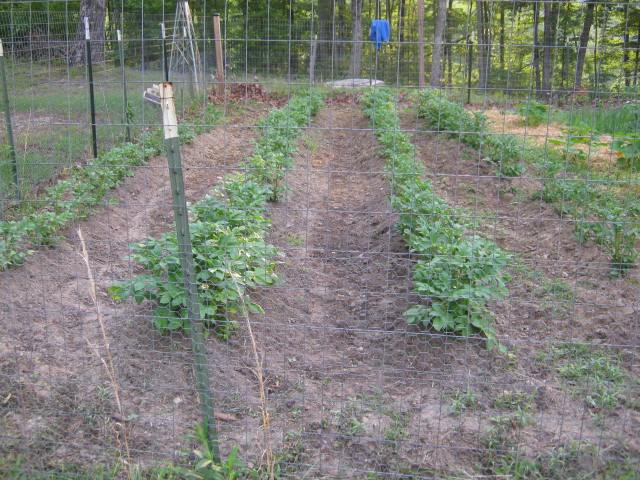
Spread this on your newly tilled garden plot and till again, now cover this all with about six inches of straw and throw some old lumber on top to keep the straw in place. Leave it to compost in the ground over the fall, winter and into spring. When it’s time to plant in late spring, till it all up (including the straw) again and plant.

If I did not already have gardening tools on hand, I would get a good quality shovel, hoe, and a bow rake, spading fork,  a big box of  Miracle-Gro all-purpose plant food and a copy of Gardening When it Counts.

Then I would build a small chicken coop from mostly scrounged building material and buy 8-10 six-month to one-year-old chickens or ducks. Then I would build rabbit hutches along one of the sidewalls of the coop and buy two does and one buck for breeding stock.

I would also plant fruit and nut trees everywhere that I have space on my property…

Total Cost Under $650

Power Production

I would order a OUPES 2400W Solar Generator with 2pc 240W Panels, and a gas-powered portable generator. Then I would get five-5 gallon fuel cans and fill with gasoline, add STA-BIL fuel stabilizer, then rotate every year.

Total Cost Around $4,400

Random Items

Two hundred and sixty-five rolls of toilet paper, (more if you have room), 24 tubes of toothpaste, 48 toothbrushes, feminine hygiene products (ladies you know how much you’ll need for a year – I stay as far away as possible during that time), 24 bars of soap for bathing, 24 56 FL OZ bottles of dish-washing liquid, (can also be used for hand-washing of clothing.

A good first-aid medical kit (get training if you need it and include any personal medications), download free copies of Where There is No Doctor and Where There is No Dentist and print them to paper or just buy copies from Amazon.com.

Then while on Amazon.com, I would order a Zoom Versa Stove, a Kaito Voyager Pro KA600 Digital Solar/Dynamo AM/FM/LW/SW & NOAA Weather Emergency Radio and two sets of Motorola MR350R 35-Mile Range 22-Channel FRS/GMRS Two-Way Radios for family communications when separated from family members.

Cold weather sleeping bags for every family member.

Total Cost Around $900

Conclusion

As you get more money put in a wood stove if possible, or at the least a propane wall heater and enough propane to last through a rough winter. Having both a wood-stove and propane is a better and more flexible solution.

Then add a good handgun or two (I suggest the Glock model 19 and a Browning Buckmark) extra magazines and ammo. Then look into buying a center-fire rifle, this can be something like an AR-15 or even a 30.30 lever action.

And get all of the training possible. Not only firearms training but, medical, auto mechanics canning, wood-shop, sewing, etc. you can never know too much.

Add some non-hybrid garden seed.

So there you have it, folks – how to get a family of four quickly prepped to survive for a period of six months or longer – in the easiest way possible… and at a total cost of $10,000 to $13,000 (approximately, depending on inflation)…

Filed Under: Featured Articles, Prepping

What Are The Best Alternative Heat Sources to Use During a Power Outage?

October 21, 2019 M.D. Creekmore

Let’s face it, heating your home during a long-term power outage is probably one of the biggest challenges that a homeowner facing the cold winter has to overcome. You have to keep your body temperature in the normal range i.e. above 95 F (35 C) or hypothermia will start to set in.

When your body temperature drops, your heart, nervous system and other organs can’t work normally. Left untreated, hypothermia can eventually lead to complete failure of your heart and respiratory system and eventually to death. From: The Mayo Clinic – Hypothermia.

In other words, you need a shelter and to be able to keep that shelter warm enough to keep your body temperature above 95 F (35 C) and you need to be prepared to do this for as long as the disaster that caused the grid to go down lasts and depending on the severity and length of the situation you’ll need to be able to do this without attracting unnecessary attention to your location.

Not an easy task to say the least – but it can be done with proper planning, preparation, and work… Let’s get started…

What are the best alternative heat sources to use during a power outage? That’s a good question and our top choices include a wood stove, coal stove, fireplace, ventless propane heater, natural gas wall-heater or fireplace. It’s also, important to have warm clothing and cold weather sleeping bags. Also, having a well insulated house goes a lone way towards keeping warm during a power outage.

Location

One of the first things to consider when planning ways to heat your home during a power outage or long-term grid-down situation is where you’re located. Where is your home/survival retreat? No, I’m not asking you to tell me or to post it in the comments section, I’m just asking you to consider where you are or plan to be and the winter climate in that area.

For example, if you’re a prepper living in Sanders Montana or in Great Falls where the coldest recorded Temperature was a bone-chilling 43 degrees below zero then you would have to put more thought and effort into keeping your home heated during the long winter months than you would if your location was in the redoubt of the east (Tennessee’s Cumberland Plateau area).

Keep your location in mind when reading the rest of this article and plan accordingly… the warmer the average winter temperatures are in your chosen area the less of an issue heating your home in winter will be. This is so important that I think that winter temperatures should be a major consideration when choosing a survival retreat location.

Your Home

Your second consideration for heating your home during a power outage or long-term grid-down situation should be the home itself. My advice is that if you’re building your home yourself or remodeling then over-insulate, meaning go above the recommended home insulation standards for your area.

If your home is already built and you’re not planning a full remodel then do what I did and add extra insulation inside the attic. My attic was already well insulated for my area, however, I decided to have a contractor add extra blown-in insulation to the attic to a rating of R-60.

Also, make sure all doors and windows seal tight when shut and are the best that you can afford. If your windows are old, worn out and not energy-efficient then have those replaced with better windows if your finances will allow it.

Also, consider adding a clear plastic sheeting, heavy insulating curtains and window shades to help keep the cold out and heat in. The heavy curtains will also help to hide any light inside the house from anyone passing by outside which could be a security risk.

Here is an excellent article on energy-efficient windows with tips to make yours more energy-efficient… Read it and then implement all the tips and advice that you can and you’ll see a big improvement now and when the grid goes down.

Dress For The Cold

To survive the cold during a short-term power outage or long-term grid-down situations you’ll need to dress properly for the environment. And keep in mind that you’ll probably be sleeping in your winter clothes so be sure to think of comfort as well as warmth when buying your cold-weather clothing.

When dressing for cold weather the key is layering. Start with thin layers first and then top it off with a protective outer layer that insulates as well as traps air and stops the wind. This outer protective layer should also protect your other clothes from rain and moisture when you’re outdoors.

For example when indoors without heat or when having to conserve heating resources in the home you could wear heavyweight thermal underwear as a base layer, and top it off with RefrigiWear Iron-Tuff Hooded Coveralls or similar outerwear.

If you’re like me then no matter how well dressed your body is your feet still get cold. I can be warm and comfortable everywhere else and still have cold feet. To help with this use the same layering principle that you did with your other winter clothing.

To keep my feet warm in cold weather indoors and outdoors I start with ultra-lightweight liner socks to keep my feet dry and then a cold-weather boot sock and then well-insulated winter boots. My top choice for a winter boot is the Sorel Men’s, Conquest Boot.

The same layering principle should also be used to keep your hands warm i.e. thin gloves or glove liner like the Terramar thermasilk glove liner covered by a thicker insulated pair of winter gloves will keep your hands warm during a power out long-term grid-down situation.

Let’s not forget about the face and head, consider a skull-cap or stocking cap for cool weather and a Russian style earflap hat for colder weather.

Last but not least invest is a good cold weather sleeping bag (or two) for each member of your family or group, or better yet have them to buy their own. I prefer the Military Modular Sleep System – you can read a full review here.

The Urban (or rural) Igloo

It’s easier to keep a smaller space warm then a larger one so if fuel to heat is limited it’s a good idea to only try to heat part of the house. For example, if the main heat source is in the living room area as is commonly the case then you can keep the interior doors that lead into the other rooms closed. You can also hang heavy blankets or similar insulating materials over those doors to keep the warm air from the heat source in the confined space and the colder air out.

Doing this will help to concentrate the heat into a smaller area which will keep you stay warmer while at the same time conserving fuel resources.

Taking this a step further is what I call the urban igloo. This concept will work in the country as well but would probably be more likely to be put to use by folks who were caught in the city or apartment or public housing where having alternative long-term heat sources are not an option.

The urban igloo is a simple concept and just about everyone should have the materials needed for its construction.

The First step is to take the mattress off the bed and place it underneath the kitchen table or similar table or frame. Next drape heavy blankets, quilts, rugs and whatever else that’s on hand over the top and down the sides to make what is essentially an indoor tent or igloo. Hang the insulating materials all the way down to the floor being sure to leave a small gap in one corner edge near the floor to keep condensation to a minimum.

Body heat and your exhaled breath will help to heat the “igloo” somewhat and if you have dressed for the cold and have a good cold weather sleeping bag as detailed above you can stay comfortable even when it’s extremely cold outside the home.

The more people you have in your indoor igloo the warmer it will be.

Best Alternative Heat Sources to Use During a Power Outage

heating home in winter
Part of my firewood supply…

This is the most difficult part of staying warm during a long-term grid-down situation because there are so many things to consider. You’ll need a way to heat, you’ll need a way to resupply your fuel resources, and you’ll need to not draw unwanted attention to your location.

Not an easy task to say the least but there is hope…

One of the best situations to be in is to have your own gas well and have your heat, cook stove, water heater, generator, etc hooked up to that resource – here is a great example of a perfect prepper property with two gas wells and everything else needed to live off the grid for a large family or prepper group. However, at a listing of nearly two-million dollars most (probably none) of us could afford such a place, I know I couldn’t even come close.

The best or at least the most practical heat source for most of us is propane. If you have your own property you can have a 500-gallon or even a 1,000-gallon propane tank installed (or do it yourself) and use that to power an efficient ventless propane heater. The tanks can be coated with roofing compound and buried out of sight.

The next most practical option for most preppers would be wood, however, the main downside to heating with wood during a long-term collapse is the smoke and smell which under the right conditions can be seen or smelt from a mile away or more. This can be a problem if you’re trying to not attract unwanted attention to your location.

However, there are manufacturers who claim to be producing smokeless wood-stoves, however, I’ve never seen one of these in operation and so I can’t vouch for their effectiveness or efficiency. If you’re handy then you can probably make your own smokeless wood-burning stove, here is a link to an MIT article that has some ideas that might be of use.

And below is a good video with instructions on how to turn an existing wood stove into a nearly smokeless wood stove…

At any rate heating with wood might require some tools and skills that you don’t currently have like a chainsaw. Yes, I know it’s loud and would attract attention and it also requires gasoline, mixing oil, bar oil, chains, and other spare parts to keep it running properly, but go on ahead and try to cut a winter’s worth of firewood with a human-powered crosscut saw…

Yes, it can and has been done before, but it’s not easy and will take a lot more time and energy compared to using a chainsaw.

But if you’re prepared to heat your home with wood then this would not be an issue for the first year or three because you’ll have a one to three supply of seasoned firewood already cut down, cut up, split and stacked.

And yes, you can just buy the firewood now and use and rotate like food storage on a first in first out rotation so that you always have a fresh supply. However, firewood that is kept dry and out of the elements will store for many years.

But, you really do need to have the tools needed and to learn how to cut your own firewood if you plan to use firewood as a heating source. The more you know the more independent you’ll be and that’s a good thing.

Don’t forget to have smoke detectors and carbon monoxide detectors installed and working anytime you’re heating with wood or any other combustible fuels. Be sure to have extra batteries for these as well. And last but not least ensure proper ventilation for the home and closed in areas.

Recommended Reading

  • Wood Heat: A Practical Guide to Heating Your Home with Wood
  • Keeping Warm in Hard Times: The Art of Saving Money on Home Heating Costs
  • Homeowner’s Complete Guide to the Chainsaw: A Chainsaw Pro Shows You How to Safely and Confidently Handle Everything from Trimming Branches and Felling Trees to Splitting and Stacking Wood
  • Firewood Heat Value Comparison Chart

Any thoughts, or suggestions… then please add those in the comments below…

Filed Under: Featured Articles

How to Make a Faraday Cage (An Easy Illustrated Guide)

July 17, 2019 M.D. Creekmore

by Dr. Arthur Bradley

how to make a Faraday cageThere is a great deal of confusion about DIY Faraday cages and Faraday Boxes. Not only about how to build them, but also what they actually protect against. In this article, Dr. Arthur Bradley, author of Disaster Preparedness for EMP Attacks and Solar Storms, answers a few basic questions and perhaps debunks a few myths.

What is a Faraday cage?

A Faraday cage (a.k.a. Faraday shield or Faraday box) is a sealed enclosure that has an electrically conductive outer layer. It can be in the shape of a box, cylinder, sphere, or any other closed shape.

The enclosure itself can be conductive, or it can be made of a non-conductive material (such as cardboard or wood) and then wrapped in a conductive material (such as aluminum foil).

There are also readymade military-grade Faraday Cages that are meant to protect large electronics and gear such as portable gas or solar home-use generators, compact solar panels, computer towers, radios, electric medical equipment, smart home appliances, power tools, lights, and other large devices – check out this one to see what I’m talking about. These are even more effective than anything you can build at home.

What does it do?

Simple and Effective Faraday Cage Construction

A Faraday cage works by three mechanisms: (1) the conductive layer reflects incoming fields, (2) the conductor absorbs incoming energy, and (3) the cage acts to create opposing fields. All of these work to safeguard the contents from excessive field levels.

A Faraday cage is particularly useful for protecting against an electromagnetic pulse that may be the result of a high-altitude nuclear detonation in the atmosphere (a.k.a. EMP attacks).

Despite rumors to the contrary, a Faraday cage is not necessary to protect against solar coronal mass ejections because the frequency content of such disturbances is at much lower frequencies—they don’t couple energy efficiently into small-scale electronics, except through conducted paths (e.g., wires coming into the system). A better precaution against solar events is to unplug electronics and use quality surge suppressors.

How does field cancellation work?

Field cancellation occurs when the free carriers in the conductive material rapidly realign to oppose the incident electric field. If the cage is made from something non-conductive, the free carriers are not mobile enough to realign and cancel the incident field.

How thick should the conducting layer be?

The conductive layer can be very thin because of something known as the skin effect. That term describes the tendency of current to flow primarily on the skin of a conductor. As long as the conducting layer is greater than the skin depth, it will provide excellent shielding because the absorption loss will be large.

The skin depth is a function of the frequency of the wave and the conductor material. As an example, consider that for a frequency of 200 MHz, the skin depth of aluminum is only about 21 microns. EMP pulses can have a frequency content that ranges up to 1,000 MHz.

Therefore, wrapping a box in a couple of layers of heavy-duty aluminum foil (typically about 24 microns thick) provides the necessary conductor thickness to protect against high-frequency radiated fields.

Does it matter what type of conductor is used?

Not much. The conductivity of nearly any metal is good enough to allow the carriers to easily realign to cancel external fields. For example, if silver (the best conductor) is used in place of aluminum, the skin depth at 200 MHz is reduced to about 4.5 microns. Of course, the high cost of silver would prevent using it for such a purpose.

Can a Faraday cage have holes?

Yes, as long as the holes are small with respect to the wavelength of the incident electromagnetic wave. For example, a 1 GHz wave has a wavelength of 0.3 meters in free space. As long as the holes are significantly smaller than that dimension (i.e., a few millimeters), they won’t let in much of the incident wave. This is why fine conductive mesh can be used when constructing a DIY Faraday cage. In practice, the cage’s lid or door usually causes the most leakage. Taping the seam with conductive tape helps to reduce this leakage.

Can you use existing conductive enclosures?

Yes, there are many conductive enclosures that can be used, including ammo cans, metal garbage cans, anti-static bags, and even old microwave ovens. Each has its own level of effectiveness as covered in my book, Disaster Preparedness for EMP Attacks and Solar Storms. The key criterion is that the gaps and seams remain very small.

Must the cage be grounded?

There is a great deal of confusion regarding grounding of a Faraday cage. Grounding of the cage (i.e., connecting it to some Earth-referenced source of charge) has little effect on the field levels seen inside the box. Grounding primarily helps to keep the cage from becoming charged and perhaps re-radiating. The bottom line is that an ungrounded cage protects the contents from harmful electromagnetic fields as well as a grounded one.

Anti-static Bags

Static-Bags-EMP
Static Bags

Anti-static bags are readily available to protect electronic components against electrostatic discharge. They can be purchased in many different sizes, including some large enough to hold radio equipment. While they do offer shielding from EMP, not all products are created equal. Testing confirmed that products certified to MIL-PRF-8170 and/or MIL-PRF-131 offer the greatest protection from an EMP.

The results from testing three different types of bags are provided in Disaster Preparedness for EMP Attacks and Solar Storms. When selecting an ESD bag, consider not only the shielding effectiveness but also the physical ruggedness of the bag. A tear or large hole can compromise the bag by allowing EMP energy to enter.

Larger Faraday Cages in a House

Large Faraday Cage in a House
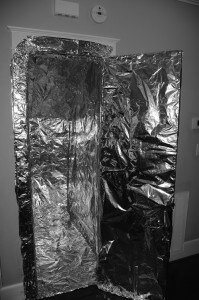
Storing a larger set of electronics might require an entire room. Engineers who work in electromagnetics often use “shield rooms” to conduct experiments because they do an excellent job of filtering out interfering signals, providing in excess of 100 dB of shielding. A poor man’s Faraday shield room can be made inside a house by lining a small closet with heavy-duty aluminum foil, covering all four walls, the floor, the ceiling, and the inside of the door.

Overlap and tape the seams using either conductive or regular cellophane tape. There can be no conductive penetrations into the room, or it will seriously degrade the shielding. Cover all electrical outlets, light switches, etc. with aluminum foil. Do not plug anything into the electrical outlets. Also, lay a piece of plywood or cardboard on the floor so that it can be walked on without damaging the aluminum foil. Rooms built in this way have been shown to offer more than 50 dB of shielding up to several hundred MHz.

How To Protect Red-Dot and Laser Sights From EMP

This video shows how to use RF cloth to protect red-dot, laser, and other electro-optical sights from an EMP. Testing was done in my laboratory to determine which RF cloth performed best for EMP protection. This particular cloth is made with stainless steel fibers. You can use this for guns that are kept outside of a metal safe, or as an additional layer of protection for those kept inside of a safe.

Protect Generators and Cars from EMP

This video describes how to protect generators and cars from EMP using a conductive cloth to protect cars and generators from a high-altitude nuclear EMP attack.

Testing the Shielding Effectiveness of a Metal Garbage Can

Many people are looking for an inexpensive Faraday cage to protect personal electronics from a nuclear-generated EMP. Unfortunately, it requires quite a bit of test equipment to determine shielding effectiveness.

On the transmit side, it requires a signal generator, a high-power amplifier, and a broadband antenna. The receive side requires a small, battery-operated spectrum analyzer. I’ve done quite a bit of testing on various makeshift Faraday cages, and this article discusses the effectiveness of a metal garbage can.


faraday-cage-trash-canA baseline open-air measurement is first taken to determine the ambient field levels at some predetermined frequency (i.e. 500 MHz in this case). The levels at the spectrum analyzer are shown to be at -36 dBm.

faraday-cage-trash-can-1
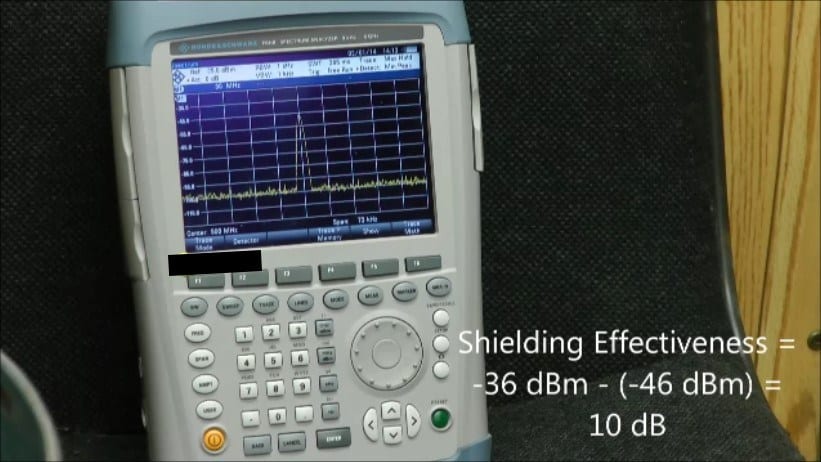
When placed inside the garbage can, the measurement is shown to be -46 dBm, meaning that the can offered 10 dB of shielding. Not too great!


faraday-cage-trash-can-readingsMuch of the energy was believed to be coming in through the seam around the lid. It was, therefore, taped with conductive tape and the measurement repeated.

Next, the spectrum analyzer is placed into a metal garbage can, and the measurement is repeated.

The new measurement was shown to be at -77 dBm, meaning that the taped can offered 41 dB of protection. Much better!

Faraday-cage-trash-can-testThis experiment showed that a metal garbage can can serve as a very good Faraday cage, but only if the seams are taped. Remember, it is not small holes that matter most, but rather long narrow slots, such as those around the lid’s seam.

faraday-cage-trash-can-shelding-effectivness
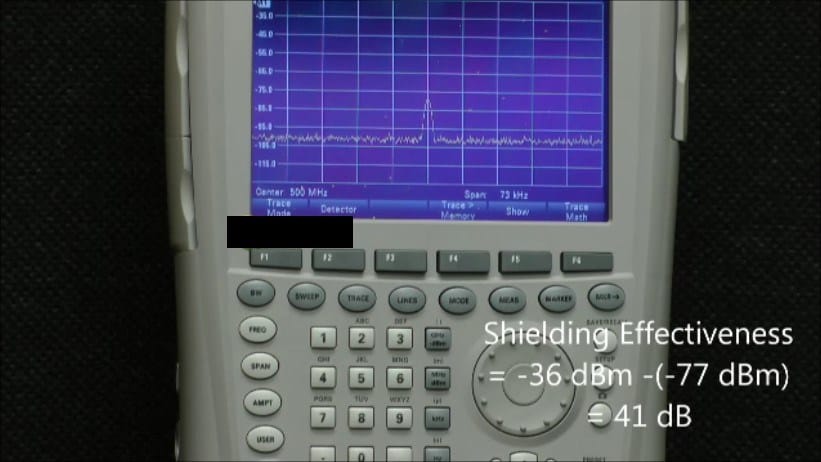
Expensive EMI copper tape and cheap aluminum duct tape both worked equally well, so a quick stop at the hardware store will get you what you need.
To learn more about EMP protection, check out Disaster Preparedness for EMP Attacks and Solar Storms. Also, to find the highest quality EMP bags, see http://disasterpreparer.com.

To order Dr. Bradley’s EMP book please go to Amazon.com. To sign up for his free Practical Prepper Newsletter, Email: newsletter@disasterpreparer.com .

Remember, true survival isn’t merely about making it through – it’s about effectively navigating and thriving in challenging circumstances. Equip yourself well, stay informed, and always be prepared.

Filed Under: Featured Articles, Prepping

What is The Best Long Term Survival Foods?

November 6, 2018 M.D. Creekmore

Whether you are looking to be better prepared for a general short-term emergency like an extreme weather event or something more long-term such as an economic collapse or civil unrest it’s important to have a sufficient food stockpile so that you can fulfill your nutritional needs until the threat has passed or until you can start producing your own food by gardening and foraging for example.

But what is the best long term survival food? And the answer is foods that will store for well for two or more years and that you normally eat. For example most store bought canned foods have a shelf-life of several years (or even decades), as long as the cans aren’t rusted through or dented and leaking and the contents smell and look fresh then it’s still good to eat. However, if you want to prepare your long term survival foods from basic foods that also have a very long and stable storage life then consider foods such as wheat (or other grains, for those who have trouble digesting gluten), rice, beans, oats, corn, salt, honey, cooking oil and powdered milk.

Storing enough food to survive, unassisted and on your own for three to six months or even a full year or maybe even longer is a daunting prospect and the thought is enough to cause most people to get overwhelmed and some give up altogether.

And while I agree that storing and rotating such a large amount of food on a continuing basis can be a lot of work and takes dedication, it is by no means impossible, and if done right can even be enjoyable – just follow the food storage list below but remembers that this list isn’t set in stone, and neither is anything else in this article. This information is meant to help guide you and to give you some ideas but in the end the best long term food storage needs to be tailored to your personal needs and what you like to eat.

Prepper's Printable Food Storage Checklist
Prepper’s Printable Food Storage Checklist (Click Here For PDF)

Hard Red Winter Wheat

This is the backbone of your survival diet.

Wheat is nature’s longest storing seed, with an indefinite shelf life given proper storage conditions. The wheat (and other grains) can also be sprouted, adding fresh greens to the diet even in winter.

White and Brown Rice

Rice is my favorite storage foods and I actually prefer rice over wheat for storage, but that’s a personal decision, and well I like rice and rice dishes. White rice stores better and has a longer shelf-life than brown rice; however brown rice has more nutritional value.

Despite the trade off in storage duration, I still prefer brown rice for storage because of the added nutritional value.

Pinto Beans

Beans, corn, and rice combined make a complete food, providing just about everything you need to survive. Add some fresh green sprouts or garden produce and extra vitamin C just to be sure you’re getting enough to avoid scurvy, and you’ll be well fed and healthy.

I like to store a combination of pinto beans, black beans, and mung beans. How much you store of each will depend on your personal preferences to taste.

Oats

Don’t go overboard when storing oats, about 20 pounds per adult per year is plenty. Oats have a storage life of approximately four to six years, depending on storage conditions and whether or not they have been opened after being packaged for long-term storage.

Whole Corn

Corn equals cornmeal, cornbread, cornmeal mush, corn cakes, and a huge list of other foods that you can prepare using the seed. I store whole corn because it stores much better and with at least double the shelf-like of cracked corn.

Salt

While not a food but a mineral, salt, is none the less essential to the diet and individual health. Salt is also used in the preservation of food and animal products. Salt, like wheat, has an indefinite shelf life. Store at least 10 pounds of iodized salt per person, per year.

It’s also a good idea to stock up on salt blocks to attract game animals for future harvesting. You can find these in the sporting goods stores and other outlets that sell to hunters. You can also get these through your local farmer’s co-op, where they sell them for domestic livestock supplementation.

Honey or Sugar

As a sweetener honey makes an unequaled contribution to the diet. Honey, like wheat and salt, has an indefinite shelf-life. Store at least 10 pounds per person. If the honey hardens and crystallizes, heat it slowly in a double boiler to reconstitute.

Cooking Oil

There is some controversy as to which is best for storage in the preppers pantry, vegetable oil or olive oil, while both will work fine and you should stock up on the one that you like best. I recommend putting away, 10 quarts, per person, per year.

Powdered Milk

Most people turn their nose at the thought of powdered milk, preferring whole milk from the supermarket shelf. Granted it does have a slightly different taste, but it’s not unpleasant to drink, and after a week or two it seems to “grow” on you. Studies have shown that nonfat powdered milk, when packaged (nitrogen-packed) and stored properly has a storage life of 20 years or more.

Freeze Dried Foods

I prefer to buy those hard-to-store long-term items like powdered milk, dry margarine, butter powder, buttermilk powder, cheese powder, shortening, and powdered eggs pre-packaged for long-term storage in #10 metal cans, from Augason Farms or other reputable survival food vendors.

Supermarket Canned Foods

Canned foods from the supermarket have many advantages when it comes to food storage, they have a decent shelf-life on average of 2-5 years for most products, (note: shelf-life means that the foods retain 100% of their listed original nutritional value up until that point – store bought canned foods remain edible, far past the listed expiration dates in most cases).

As long as the cans aren’t bulging, rusted through or punctured and the foods smell fresh, upon opening then I would not hesitate to eat canned goods that are far past their listed expiration date. But that is a personal choice and one you’ll have to make yourself when the decision is needed.

Store bought canned foods have several advantages over freeze-dried or dehydrated foods, including cost and calories contained per serving. Another advantage is that canned foods already have their own water supply for preparation, so there is no need to use any potable water from your storage.

Despite the advantages of canned foods over freeze-dried and dehydrated foods, canned goods do have some disadvantages in comparison, like, weight, space needed for storage, and shelf-life.

I like to include a combination of the basic foods like wheat, rice, and beans, store-bought canned foods and certain “packaged for long-term storage” foods that are hard to store like powdered milk from one of the reputable survival food vendors…

All canned foods should be dated using a permanent marker and rotated on a FIFO (first-in-first-out) basis. I suggest that you build a rotating canned food shelf that will automatically rotate your canned foods when added and pulled off the shelf.

Always keep a notepad beside the shelf or in your kitchen, and write down every item that you take from the shelf and then take the note with you on your next trip to the supermarket, and then buy and restock the items that you’ve taken from the shelf, that way you always have a fully stocked shelf and a fresh supply.

Please read this article to see how long canned foods can last in storage before going bad…

Don’t Forget the Can Opener

Sure you could use a knife, but a manual can opener is easier and safer – so whatever else you do, don’t forget the can opener. Buy several or the strongest made ones that you can find.

Other Foods to Add to Your Food List

After you get the basic foods listed above in the needed proportions (see below), it is a simple matter to add other foods as you get the extra money.

Canned meats: We all know that SPAM is the preppers go to for a cheap “meat” source that has a longer than average shelf-life, and fat content. Canned hams, tuna, salmon, chicken, and turkey are all welcome additions in my pantry shelf – stock-up on the meats that your family normally eat and date and rotate just as you would any other canned food.

White flour: White flour from the store has a much longer shelf-life than does whole wheat flour because it has been “processed” which removes the oily germ, but unfortunately this “processing also removes the nutrition.

Processed white flour has a shelf-life of over five years if kept dry and safe from pests (like the meal moth). Mill moths get into the flour, lay eggs and those eggs turn into flour weevils, which ruin the flour. Look for tiny dark specks in the flour, as this is the first sign that the flour has been infested.

If it clumps together because of settling, just break it apart and run it through a sifter before use.

Store flour for long-term storage in airtight containers, with oxygen absorbers, added – see details below. You can also freeze flour that has been put into five-gallon buckets. Freezing will also kill any meal moths that happen to have been trapped inside before they can do any damage to your flour.

Most of my “flour” is in the form of whole wheat berries, that I have to mill (grind) before use, but I do have some processed flour in my pantry, for lazy days when I don’t feel like grinding whole wheat into usable flour.

Peanut butter: Peanut butter is a good source of fat and calories and has a decent shelf-life. Peanut butter is also an energy food and one that I always take on hunting and camping trips. Unopened peanut butter will last for years.

Spices: Be sure to include a good selection of spices in your food storage. Spices can make even the most awkward foods palatable, and help to alleviate food boredom. Cinnamon, Turmeric, Paprika, Ginger, Oregano, and Garlic are my favorites and make up the bulk of the spices in my pantry.

Baking powder, baking soda, and yeast: Baking powder, baking soda, and yeast (keep yeast frozen to extend shelf-life) are also essential since you’re storing and baking using unprocessed grains.

Dried pasta: Dried pasta will keep indefinitely if kept dry in bug and rodent proof containers.

Comfort Foods

Storing a sufficient amount of “comfort foods” is very important, to your psychological well-being as well as to alleviate “food-boredom” that is sure to set in after eating only storage foods for several months. Comfort foods are even more important if you have children or need to care for the elderly.

Consider comfort foods such as – Jell-O, instant pudding mix, cake mix, hard candies, chewing gum, Spaghettios, mac and cheese, brownie mix, canned spaghetti and meatballs, mashed potatoes, popcorn, cocoa, tea, coffee, powdered juice mixes, sunflower seeds etc. And remember to date and rotate on a FIFO basis.

We crave variety and having a supply of familiar comfort foods can go a long way toward retaining our sanity and self-worth during a long-term disaster. You can only deny yourself for so long before desperation and depression start to set in. Life will be difficult enough – give yourself a treat. You deserve it.

It is a proven fact that if we are forced to eat foods we don’t want or the same foods for extended periods – just to stay alive – dissociation begins to set in. We begin to float away as an escape – we still eat to stay alive, but suffer a lack of focus and become disoriented in relation to our surroundings.

This is dangerous in a survival setting. Don’t think it can happen? Try eating nothing but beans and rice for three months and you’ll see what I mean. Having a supply of comfort foods can help by providing at least some form of normalcy to your life.

Older folks and children will have the hardest time adjusting to new or unfamiliar foods, with many refusing to eat altogether, especially if the food is unnecessarily bland or unappetizing. Comfort foods will help them cope.

Food Storage Shelf Life (printable chart)

Food Storage Shelf Life (printable chart)

Vitamins and Supplements

To ensure that you’re getting a sufficient amount of needed daily vitamins and minerals for optimum health, you need to stockpile a good multi-vitamin and mineral supplement. Also, consider extra vitamin C and D. Vitamin D is of extra importance if you’re forced to stay inside (bugging in) for a longer than normal period of time and thus are unable to receive the needed vitamin D producing sunlight that is required for optimal health.

Don’t Forget About Your Pets

prepping for pets
She likes to watch the chickens…

Don’t forget to include a sufficient amount of food in your stockpile to feed your pets. A decent dog will increase your chances of survival because they can hunt and alert you to trespassers and other trouble. I prefer smaller dual-purpose breeds, with my choice for a working dog being the Jack Russell terrier.

Three Month Food Storage List for One Adult

  • Wheat 75 Pounds
  • Grains, rice, oats etc. 25 Pounds
  • Canned meats 5 Pounds
  • Canned margarine, powdered eggs etc. 2 Pounds
  • Dried beans, peas, lentils, etc., 6 Pounds
  • Dried fruit juice and concentrates 6 Pounds
  • Dried fruits or canned 25 Pound (if dried, then equal to this fresh weight
  • Comfort foods 3 Pounds
  • Non-fat dried milk 25 pounds
  • Peanut butter or substitute protein/fat source 3 pounds
  • Dried potatoes 12 pounds (equal to this fresh weight)
  • Salt 2 pounds
  • Shortening oils 3 quarts
  • Sugar or honey 12 pounds
  • Canned or dried vegetables 9 pounds (if dried, then equal to this fresh weight)

Please bear in mind that the above list is only a sample to help you get started, the most useful food storage list is the one that you put together yourself. After all who knows better than you, what you and your family, like to eat and in what amounts.

Where to Put All this Food?

After reading the above recommendations, you’re probably asking yourself where in the heck, you’re going to store all of this food. Well, that’s a good question and one that you alone can answer for your situation better than anyone else, but I’ll make a few suggestions that I hope will point you in the right direction.

The absolute best place in an underground bunker, root cellar or basement, unfortunately, most people don’t have any of those and have to make due with other less ideal storage options… Consider a spare bedroom, attached garage, detached storage building on your property, or as a last-resort a nearby storage unit rental.

If at all possible put in an underground storage area of some sort to keep you storage foods safe (and you) safe from weather extremes, as well as the main enemy of your food-storage shelf-life; heat. An excellent option, and inexpensive when compared to other suitable alternatives are the buried shipping container.

Long-Term Storage with Oxygen Absorber and Mylar Bags

I store all my grains, beans and other dry foods (besides sugar, salt or sprouting seeds) inside food-grade five-gallon plastic buckets. There is some controversy over what is and isn’t food grade. Most buckets with #2 inside a small triangle on the bottom are food grade, but not all – the only way to be reasonably certain is to contact the manufacturer and ask.

I buy mine from the local hardware store in the paint department. They also have them at my Wal-Mart, but, I prefer to buy from local business owners if possible. Sometimes they can even be gotten free from bakeries and restaurants, just be sure they only held food products – not paint, chemicals or other things that can make you sick or dead.

Foods packed in oxygen don’t store as well as those in an oxygen-free atmosphere. Oxygen absorbers work by removing the air from the enclosed container, leaving an atmosphere of 99% pure nitrogen in a partial vacuum inside the buckets.

Don’t open the bag of oxygen absorbers until ready to use because they will absorb oxygen from the surrounding air and become useless. Have everything ready to go before you open the package. Any unused oxygen absorbers can be stored in a small canning jar until needed.

Be sure to have everything ready to go before you start. Line the inside of the bucket with an appropriately sized Mylar bag these will help to keep light and moisture out extending the storage life of the foods inside.

The Mylar bag also offers a layer of protection between the food and the plastic bucket, if for some reason the bucket that you’re using isn’t considered food-grade.

Pour the food into the buckets a little at a time, shaking each bucket as it is being filled to settle and distribute the contents. Fill each bucket to about ½ inch from the top and throw in one 2000 cc oxygen absorber in each five-gallon bucket of food.

Now to seal the Mylar bag – first roll the top of the bag closed on one end leaving an opening at the other and press out any air that has been trapped inside, next place a 2×4 across the top of the bucket and pull the Mylar bag over the 2×4 and seal with a clothing iron set at the highest setting in a typical ironing fashion across the board.

Quickly put the lids on each bucket and pound shut by laying the board on the top and striking with a hammer or rubber mallet. After a few hours, the absorbers will create a vacuum that will cause the lids on the buckets to “pop down” indicating a good seal and a proper atmosphere for long-term storage. Be sure to label each with date, content, and weight, written on the front with a permanent marker.

Section Two: Tools For Cooking and Processing Your Long Term Food Storage

Most homes will already have most of what you will need to process and cook the foods from your survival pantry, items such as pots, pans, and other common household kitchen utensils. So we will not get into that. What we will cover are tools that most typical kitchens do not have on hand but that are necessary for the prepper’s kitchen. So let us get started.

Choosing a Grain Mill

You need a grain mill now. Don’t put it off another day. Even one of the least expensive models would be better than not having one at all. I know many of you want the best, and that is great. Get the best if you can afford it. Just do not put it off any longer. Get a mill now. If you cannot afford one of the better models, get a cheaper one; buy two or three of the cheaper models – that way if one breaks and cannot be repaired, you will still have spares to fall back on.

This goes along with my philosophy of the rule of three. Always have at least three independent sources of any survival necessity. Never put all your eggs in one basket. Too many things can happen which will leave you with nothing, which is what we are trying to avoid by prepping in the first place.

While I cannot give recommendations on all the models currently available today (because I have not owned or used them all), I can tell you what I have and my thoughts on these which should, at least, get you started in the right direction.

I currently own four different grain mills, The Wonder Junior Deluxe Grain Mill, a Corona Landers, a Back to Basics, and a Grizzly H7775.

Wonder Junior Deluxe Grain Mill

Wonder Junior Deluxe Grain Mill

If you read my book “Dirt Cheap Survival Retreat”, then you already know that I use the Corona hand grain mill for all of my day-to-day milling. It is a strong and well-built grain mill, and for less than $75 it is hard to beat. The Mill to Table Clamping System is a very strong feature included with the Wonder Mill. However, I have never liked having to run the meal through the Corona several times to produce usable fine-enough flour for baking. That is one reason I made my homemade sifter – to speed up the process. However, it was still always necessary to run the bulk of the flour through the mill two or more times.

Since I mill grain several times per week, I needed a more efficient mill. I considered the Country Living Grain Mill but never could find enough extra change for the purchase. Therefore, I started looking for an alternative. I eventually decided to order the Wonder Mill Deluxe from www.thewondermill.com.

I have used the Wonder Mill for the past three weeks, and so far I have been extremely pleased with my new mill. In fact, I think I’ll retire the Corona and use the Wonder Mill Deluxe exclusively. Yeah, it is that good.

The Wonder Mill comes with both stone and steel grinding heads as shown in the photo above.

I love the one-piece construction of the mill and hopper. There is no separate hopper that can fall off during operation or any pins or clamps that could be lost. This is one thing I never liked about the Corona, as there were several times that the hopper fell off during aggressive cranking of the handle.

Another big improvement over most hand-operated grain mills is the double clamping system used on the Wonder Mill, which is the strongest I have ever seen on any mill. When properly clamped to the table, I had no problems with the mill moving out-of-place or coming off during grinding.

However, since all of my grinding is done in the same place, I will likely remove the clamp altogether and bolt the Wonder Mill directly to the table. This will provide the strongest possible mill to table mounting system.

Another thing I loved about the Wonder Mill is the quick change head system that allows you to easily switch from grinding dry grains, beans, and legumes to oily grains, nuts, and even coffee in just a couple of minutes. The Wonder Mill Deluxe comes with both steel and stone grinding heads, which can be changed out in less than one minute.

Here are the product specifications:

  • Weight: 10 pounds
  • Height: 12 ¾ inches (without the clamp)
  • Hopper capacity: one quart
  • Crank handle: 10 inches

Best of all, the Wonder Mill produces excellent, fine flour (with no sifting or re-grinding required). This saves a lot of time and effort. Moreover, the consistency is easily adjusted using a simple knob to adjust from pastry flour to cracked grains.

In fact, 90% of flour files through the sifter screen after the first pass through the mill. Again, this is a huge improvement over the Corona. In addition, because of the excellent bearing system (that never needs lubricating) cranking the handle is much smoother, but still requires effort.

The flour guide directs the falling flour into the catch pan or onto the screen without any mess around the milling heads or thrown flour on the table and floor. This is always been a problem with the Corona when grinding pieces of grain and flour would be thrown all over the place. One solution was to secure a plastic bag over the grinding head of the Corona to catch the flour and grain particles.

I wish that I had a Country Living Mill to compare against the Wonder Mill. I am sure there would have been some interesting findings with the comparison. The folks at WonderMill.com did perform a speed comparison between the two and according to their website: In a test performed at the Wonder Mill test kitchen, the Wonder Junior was able to grind 1 ¼ cups of flour in a single minute *80 turns* (see our video speed test). This is 65% (about 1/2 cup) more than we were able to produce with the Country Living grain mill with the same flour setting and the same amount of turns *80 turns*, and for half the price.

I know what you are thinking, it sounds great but “can it be motorized?” Yes, it can. There is a motoring pulley available that will allow you to do just that; however doing so will void the warranty. They also make a special adapter which can be used with a power drill to make grinding any grains or beans a quick and easy process.

I only grind a small amount of flour at a time (why grind more than I need?). I will not be adding a motor, but it is an option to keep in mind.

Your next question is probably going to be “what will it grind?” I have used it to grind wheat, corn, and beans. It can also grind spices, herbs, oily grains, nuts, and seeds. See WillItGrind.com for more info on what the Wonder Mill will grind.

Based on my tests, comparisons, price, and use, I give the Wonder Junior Hand Grain Mill my highest recommendation for a grain mill. If you are looking for a hand grain mill this is the one you should get.

Corona Landers Mill

It is strong, robust, well made and my second favorite grain mill. The Corona is a hand-cranked unit that uses rotating steel burrs to crack and grind corn, beans, grains, nuts, and seeds.

It is manufactured using cast-iron parts with an electro-tinned finish to guarantee a rustproof and easy to clean tool. I give it my second highest recommendation following the wonder junior hand grain mill.

Back To Basics Mill

This mill works well and is actually very easy to use. My main complaint is the small hopper that needs to be refilled after a few cranks of the handle. It is lightweight when compared to the Corona and I do not think it would stand up as well to continued usage.

Grizzly H7775 Mill

The Grizzly H7775 mill it is not my first choice but it sure beats having nothing at all. It sits low on the table, low enough that getting a large enough bowl under the head to catch the flour is difficult. I have the same problem when using the Corona. This is the main reason I use a homemade sifter to catch the grindings.

My other complaint is the small hopper, refilling it every few cranks can be an annoyance, at least for me. On the plus side, the grinder is efficient and the grinding plates are easily adjusted to the desired consistency.

While this is a good mill, it is not of the quality of the Corona; but note that it is half the price, so buying two or more is an option.

Country Living Mill

While I do not own this mill, it is given the highest recommendations by those that do. A recent advertisement proclaims: The Country Living Grain Mill is one of the highest quality grain mills ever made.  Living Grain Mill is one of those high-quality items that could be passed on to the next generation.

How to Grind Grains and Beans

When grinding, it is often necessary to regrind the grain several times before reaching the desired consistency. Some of the meal will come out perfectly fine the first time through, while other parts remain coarse and need to be reground several times.

One way to make grinding easier is to use a screen to sift out the finer flour while leaving the larger pieces of grain behind. The sifter is simply a four-sided box with sides but no top, and a bottom made of nylon window screen from the hardware store. Mine is 15″ X 12″ with sides made of a ¾ inch by 3-1/2 wood.

Cut the wood to length, and nail or screw the pieces together. Lay the screen out on a hard surface, sit the box down flat on top of the screen, and cut to fit with a utility knife. Turn the box over and tack the screen to the box with several thumbtacks or small nails to hold the screen in place.

Take all-purpose cement from the plumbing department of the hardware store, and spread generously around the rim of the over the edge of the screen, forming a permanent seal between the wood and the screen.

When grinding, place a section of newspaper under the grinder head and set the box on top. Grind as normal but after each pass through the grinder, shake the finer meal onto the newspaper and transfer into a bowl.

Pour the coarser meal back into the grinder and regrind, repeating until reaching the desired constancy. This saves running the finer meal back through the mill, making grinding easier and quicker.

How to Clean Field Run Wheat

First off, never buy “seed” grain for human consumption. Seed grain is often treated with insecticides and fungicides. Seed grain is to be planted and grown not eaten. Buy untreated whole grain sold as “feed” that is meant to be eaten.

Look for “field run grain.” It is cheaper and because of fewer processing steps, it is less likely to be infected with mold or contaminated. Field run wheat will have dirt and detritus that will need to be removed before use, but cleaning wheat is not a big deal.

First, sort the grain by laying it out on a clean surface and pick out any chunks of dirt, rocks or darker grain. After sorting, you need to wash the grain. Place the grain on a sifter or screen and pour clean water over it until the water coming out the bottom is as clean as that poured in from the top.

After cleaning the grain, you will need to dry it before grinding. Pour the grain into a strainer and set it aside for about ten minutes. After it stops dripping, spread it out on a cookie sheet about ¼ inch deep, heat in oven at 180° degrees occasionally stirring until dry. Drying usually takes about an hour. If it takes longer that’s fine; just make sure it does not burn.

Alternatively, if you prefer you can dry it outside under the sun. This is better and cheaper but is dependent on the weather and time of day and the season. Just spread the grain out in a thin layer on newspaper or other suitable material in direct sunlight. A solar oven could also be used; however, I have never tried this method myself.

Sprout Seeds for Fresh Greens All Year

Fresh sprouts are full of vitamins and minerals that aren’t readily available in the unsprouted seed. Sprouting allows you to have fresh greens even in winter and will expand the bulk of your food storage many times over without any extra expense to you.

To start sprouting, you’ll need at least one wide-mouth quart canning jar (a quart mayonnaise jar will also work) and a 6×6 inch square piece of nylon window screen or cheesecloth. Both the screen and cheesecloth are easy to cut with scissors or a sharp knife.

sprout grains for food

how to sprout grains for food

sprouting seeds and grains for food

Next, put approximately 3 to 4 ounces of wheat, alfalfa, chickpeas, lentils, mung beans, pumpkin seeds, rye, sunflower seeds, or other sprouting seed in each jar and cover the mouth with the nylon window screen. You can use a large rubber band, string, or a canning jar ring to hold the screen in place over the mouth of the jar.

Fill each jar with water to within 2 inches of the top and let stand overnight. When you get up the next morning, pour out the soak water and tilt the bottom of the jar over the sink and leave for an hour or two so the rest of the water can drain off the seeds.

After this initial soaking and draining, you’ll want to flood the jars about every four hours and then drain any excess water by tilting the jar bottom up into a bowl or sink. Repeat two to three times per day.

how to spout seed for food and survival
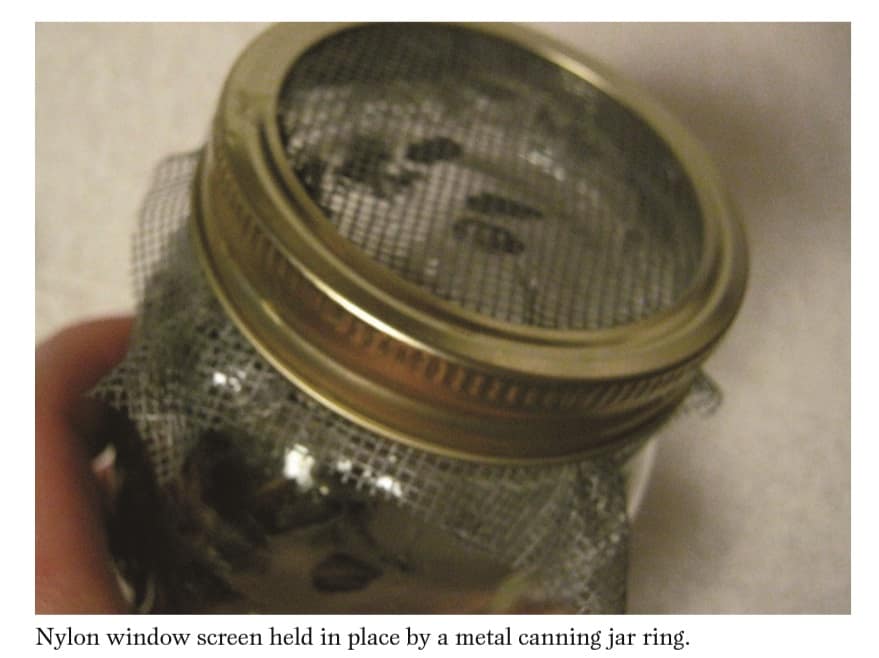
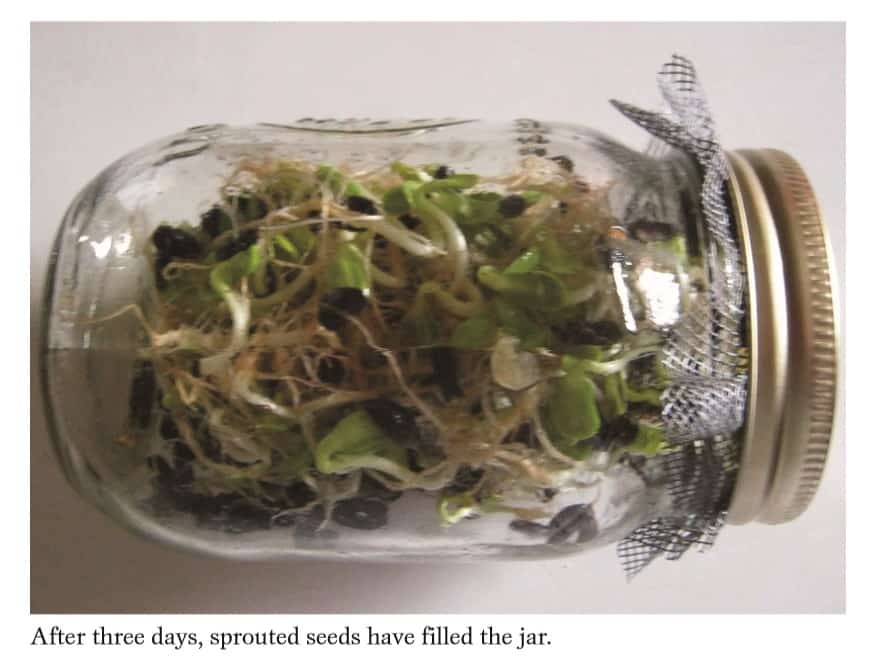
At this point, you want to keep the seeds moist but not covered with water. In a few days, the seeds will begin to sprout. When the sprouts reach 1 to 2 inches in length (for most seeds), they are ready to eat. Sprouts can be eaten raw, cooked, or dried. If dried, they can be ground into flour and used for bread or other baked items.

to keep a steady supply of fresh sprouts, simply start a new jar 24 to 48 hours after the last sprout jar has finished sprouting. Repeat cycle. This is a great routine that will keep you in fresh greens year round.

And that is all there is to it. If you want to learn more about sprouting, including in-depth but simple recipes using sprouts, order a copy of The Sprouting Book by Ann Wigmore. This excellent resource is a must-have for any serious survival seed sprouter.

Warning: Even though the risk is low because sprouts can contain bacterial contamination, people with compromised immune systems (e.g., individuals with AIDS, organ transplants, undergoing chemotherapy) are advised to avoid eating them.

Cooking Tools and Related Items

Listed below are some of the best cooking stoves and related tools for preppers. I have all of these and they are all well-made and useful; however, it should be noted that you do not need to go out and buy one of each type of cooking stove. Get what is best for you in your location. For example, if you’re located far north and don’t get all that much sunshine, then you’re probably better off skipping the solar oven and purchasing an EcoZoom rocket stove.

Zoom Versa Stove

The EcoZoom rocket stove is designed to burn wood, dried biomass (plant materials and animal waste used as fuel) or charcoal,  making it a truly versatile means of cooking, especially after the lights go out and other more conventional sources of fuel (like propane) are no longer available or are in short supply

My EcoZoom rocket stove has proven to be very heat efficient. It will bring a pan of water to a rolling boil in less than two minutes and fry an egg like nobody’s business. Having a means of cooking when the power goes out should be self-explanatory. Having a cooking source that uses easy to find, renewable fuel is an extra bonus.

Camping Stove

Having a standard camping type stove on hand for emergencies is one of those common sense things to do, and most folks in the country already have one or two of these for camping purposes.

If you do not have one, go out and buy one now. A top-of-the-line model will put you back around $100 at current prices, but the cost is well worth it. In addition, do not forget to pick up some extra fuel canisters. Put back at least 24 one-pound canisters, or better yet get a hook-up that will allow the use of the larger 20-pound tanks.

Sun Oven

If you are in an area that receives a sufficient amount of sunlight, then a solar oven is must have. With a solar oven there is no need to store or scrounge for fuel, and as long as the sun is hot in the sky you will have an unlimited “fuel” source to prepare food.

The best brand and the one that I recommend is The All American Sun Oven. It is best to get the package with the accessories included in your order to avoid having to buy these later.

Folding Camp Grill

A folding camp grill is another item like the camping stove that most folks in the country already have on hand. But it is still worth mentioning. Every prepared prepper should have one of these. So if for some strange reason you do not have one, go get one as soon as possible. I bought mine at Wal-Mart in the sporting goods department for under twenty-five dollars. They also have them at Amazon.com.

Outdoor Grill / Smoker

This is another one of those items that will make like much easier at least when it comes to preparing food after a disaster or a long-term grid-down situation. I bought mine at Wal-Mart in the lawn and garden department for less than one hundred dollars. They also have them at Amazon.com.

Extra Large Stew Pot

Even if you don’t anticipate having a large group to cook for you should still have at least one large stew pot because you never know who or how many family members or close friends will show up at your door, and most of us don’t want to shoot them, so we will have to feed them. I have a Bayou Classic 7406, 6-Qt. Cast Iron Soup Pot with Cast Iron Lid, but I am afraid that even this will not be sufficient for my needs.

Food Saver Vacuum Sealer

The Food Saver Series vacuum sealer is a great little machine that can greatly increase the shelf life of products. This is a highly recommended item for preppers – check Amazon.com for the current price!

Butchering Kit

Because most preppers are “knife collectors” of sorts, we often overlook the need for a good home butchering kit. Get the very best kit that you can afford. The Outdoor Edge Game Processor PR-1 12-Piece Portable Butcher Kit with the Hard Side Carry Case is a good product – Click here to check availability and the current price on Amazon.com.

Other On-Site Resources:

  • How Much Food Should A Prepper Have?
  • 21 Point Prepper’s Checklist For Stocking Up at Walmart

RECOMMENDED BOOKS THAT DEAL WITH FOOD STORAGE

  • Layton, Peggy. Emergency Food Storage & Survival Handbook: Everything You Need to Know to Keep Your Family Safe in a Crisis. New York: Clarkson Potter/Crown Publishing, 2002.
  • Layton, Peggy, and Vicki Tate. Cookin’ with Home Storage. Self-published, 1991.

Filed Under: Featured Articles, Prepping

What Are The Best Medications to Stockpile

September 4, 2018 M.D. Creekmore

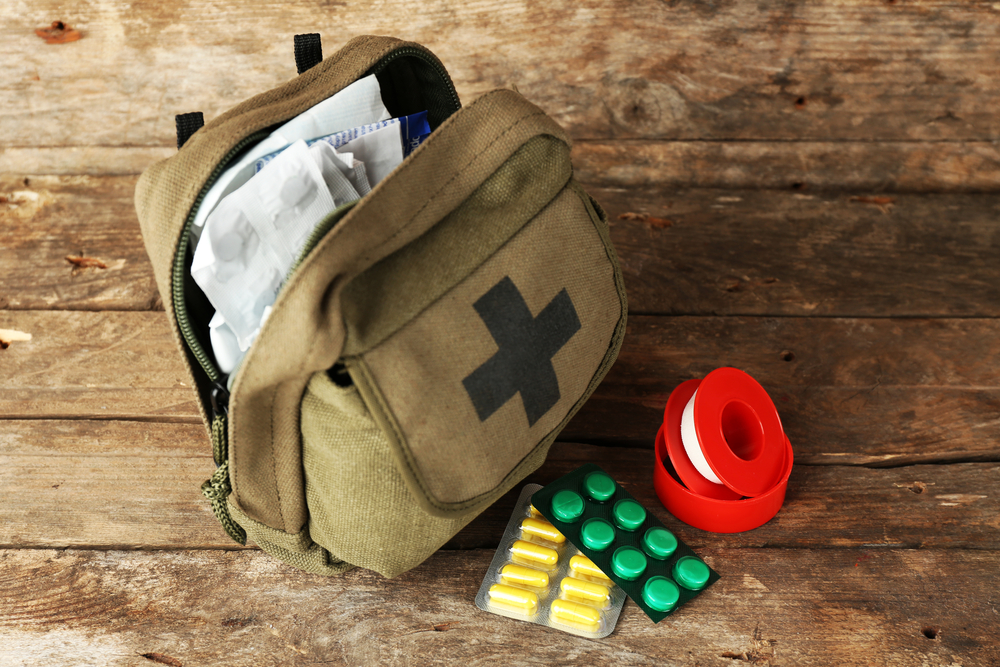
Disclaimer: I am not a doctor and cannot give medical advice, diagnosis or suggest treatment for any sickness or disease. All information in this article is for informational purposes only. Please seek out a competent medical care professional for any injury, sickness, or disease that you might have.

Now that the legal disclaimer is out-of-the-way, let us get started with some general info and advice on the types of injuries you can expect, and with a discussion of medical kits and contents, references and training recommendations.

Most preppers when stockpiling medical kits and medications often make the mistake of targeting the bulk of their preparations toward trauma care – i.e., treating gunshot wounds and other trauma caused by violence or accident. While having the medical skills and tools to treat such injuries, there must be a balance between those types supplies, and supplies needed for more likely medical conditions such as the common cold, flu, dehydration, diarrhea, food poisoning, arthritis, heat stroke, hypothermia, diabetes, childbirth and so forth.

Most of these types of illnesses are easy to deal with while the medical system is running smoothly. However, after just a short-term disaster the medical system is often overburdened and is hard-pressed to meet the increased demand causing treatment to become degraded or nonexistent.

If the medical system cannot efficiently deal with the demand for treatment after a short-term disaster, one can only imagine the lack of care that we will experience following a major event such as an EMP, a nuclear attack, or a cyber attack that shuts down the power grid for months or even a viral pandemic that affects millions nationwide.

After an economic collapse, the main hurdle to getting medical care might be the inability to pay the upfront admittance costs rather than a lack of available care. I also expect the quality of care to decline in the months after an economic collapse. In other words, you might be able to find an office or hospital that will accept you (if you have the admittance fee), but the care you get maybe far below current standards.

After Argentina’s economic collapse, it was common for hospitals to ask patients to bring their own medical supplies when they needed care. As a side note, medical supplies make great barter items. It is also a good idea to have a supply of silver coins to pay for admittance into a doctor’s office or emergency room. 

Prevention

Prevention involves regular exercise and proper diet. This is one of those things that some preppers seem to ignore, or perhaps they’re just too lazy and undisciplined to get into better shape. You know the ones – they buy all of the best gear and cool gadgets, and they pack their bug out bags thinking they are ready for the “big one”. Sadly, most of these folks cannot carry their gear 100 yards without stopping for a snack and thirty-minute nap.

Getting into decent shape (no you do not have to be a top contender in the next Iron-man triathlon) is one of the best things that you can do for yourself now, and it will benefit you greatly in any disaster.

At a minimum, strive to meet the fitness and agility level presented in the chart below, after consulting with your doctor first of course. We do not want anyone with any preexisting medical conditions to fall over with a heart attack, so please go get a check-up and ask your doctor if you are healthy enough for this type of physical activity.

Fitness Requirement
  • Walk / Run one Mile in 15 minutes – 20 minutes if 50+ years of age
  • Push-Ups 35 reps – 25 if you’re 50+ years of age
  • Sit-Ups 40 reps – 30 if you’re 50+ years of age
  • Bench Press 1+ reps 75% of body weight – 50% for those 50+

The key to success here is to start slowly, gradually working up to, and even beyond, the fitness level presented in the chart above. At the very least, these fitness event requirements will give you a starting point and some goals to strive toward achieving.

For those of you who are already in good physical condition and have no problem performing the exercises listed above, you should continue to stay on a maintenance program to maintain or even surpass what is listed in the chart above.

Okay, now let us look at the steps that necessary (for most people) to get in and stay in reasonable physical condition. Again, nothing here is to be taken or intended as medical advice. Go talk to your doctor and ask them about each step in this article and whether it is right for you considering your current physical condition.

Useful Article

What are The Benefits of Doing 50 Pushups Every Day?

Start with a Healthy Diet

A healthy diet should be at the very top of everyone’s to-do list, especially if you want to get into better physical condition and be better prepared to survive a disaster. However, where do you start? There is so much information on healthy eating continually filling the pages of books, magazine, and digital media that it is easy to become overwhelmed to the point of just giving up.

When it comes to a healthy diet, the most important consideration is to keep it as simple as possible, which is what I intend to do here. Forget about counting calories or portion size. You want to eat better, not waste away in hunger. There are three key rules for eating healthy:

(1) avoid refined sugar

(2) avoid prepackaged foods and

(3) avoid fast food.

The healthiest foods that you can eat are those that have been grown and harvested from your own garden. Commercially produced fruits and vegetables cannot compete with the goodness and health-boosting benefits that are provided from freshly harvested (preferably organically grown) vegetables and fruits that you have grown yourself in your home garden or orchard. A close second is to purchase produce at your local farmer’s market.

The bulk of your diet should consist of fresh fruits and vegetables, chicken, eggs, fish, grass-fed beef, venison or other wild game, grains, beans, and olive oil. Also, remember to chew your food slowly and completely. By chewing your food slowly, you will get full on less food, and it aids with your digestion. Eat until you feel full and then stop.

Vitamin and Mineral Supplements

Listed below are two books that I recommend you add to your bookshelf for further study:

  • Prescription for Nutritional Healing, Fifth Edition: A Practical A-to-Z Reference to Drug-Free Remedies Using Vitamins, Minerals, Herbs & Food Supplements by Phyllis A. Balch CNC
  • Over the Counter Natural Cures: Take Charge of Your Health in 30 Days with 10 Lifesaving Supplements for under $10 by Shane Ellison.

These books cover everything that you need to know about vitamins, natural healing, and health.

So what vitamins and supplements do I take? Every day I take a Centrum Silver® Adults 50+ multivitamin and mineral, 500 mg of vitamin C, Curcumin C3 Complex 500 mg, and 1200 mg of fish oil capsules. This is the combination that I have found that works best for me as a guy. However, each person has individual needs. I do recommend that women talk to their doctors about calcium and vitamin D. What is good for me might not be for you. As with diet, it is best to keep it simple. If you are taking more than five different supplements per day, then you are probably taking too many (unless, of course, you are talking them on the recommendation of your physician).

Get Enough Sleep

According to the National Sleep Foundation, an average adult needs 7-9 hours of sleep per calendar day for optimum health and alertness. Granted, this much sleep will probably be non-existent after a disaster. However, note that this chapter is about getting into better shape now before a disaster strikes. Getting in shape now will help you be more prepared and able to handle whatever might come your way.

The key to getting good night’s sleep is to set a regular schedule to go to bed and get up and stick to it. A regular schedule will help your body knows when it is time to go to sleep and when it is time to get up. Set a sleep schedule and stick to it.

Another key ingredient that I have found that works wonders when trying to get a good night’s sleep is Valerian root, specifically Spring Valley Natural Valerian Root sold by Walmart. Valerian root has several sedative compounds to help you relax and fall asleep faster, and it has been proven non-toxic with zero addictive properties.

It is also important to relax and take it easy. Relaxation will improve your sleep patterns as well as your overall health. It has been documented by countless studies and in a number of medical journals that stress has a detrimental effect on our overall health. Stressed for long periods can affect blood pressure, blood sugar levels, the immune system, and can cause premature aging, heart disease, and even cancer.

I know it can be difficult to relax after you have opened your eyes to the true state of the world and understand what is at stake. The pressure to do something and to do more to prepare can be overwhelming at times, but it is important to take a step back every now and then to relax.

I take two days per week that I do not (or try not to) think about the sad shape of the world, politics, or prepping. I take those two days to just relax and spend time with family, go fishing, sit in the swing, watch a movie, or go for a long drive and pray. I just take the time to relax no matter what is going on in the world around me.

Get Physical

First, before you start any type of physical activity, you should schedule an appointment with your doctor for a complete health check-up, and get permission to proceed from there before you start working out or even getting out of bed.

So what types of exercises should you be doing that will help you to better defend your retreat? Well, to be honest, that depends on your current level of physical conditioning and how physically fit that you want to be. No one can be too physically fit and most of us will have to continually work at it to see improvement and to even retain the gains that we make.

Any fitness program should start with flexibility. Stretch before and after every workout. Stretch your legs, back, arms, shoulders, and neck. The most important thing to remember is to take it slow. Do not over-stretch. Always stretch with solid, non-bouncy movements. This will help you avoid injury and setbacks.

Strength Training

While you could join a gym and train three or more times per week, most preppers will find that working out at home can have just as much benefit as joining a gym plus working out at home will save money on membership fees and the expense of travel to and from the work-out facility. This money can be used to buy other survival preps or even to take the family out for a night on the town.

In fact, you do not even need free weights or any other exercise equipment to build strength and muscle endurance. Calisthenics (body-weight exercises) if performed correctly and regularly will help you get stronger by building muscle mass. So what types of calisthenic exercises and routines should you do? The answer to this question will depend on your current physical condition and what you want to achieve. Again, as with building flexibility, start slowly to avoid injury and build upon your continued progress each day.

Listed below is a short list of calisthenic exercises to consider when building your routine:

  • Push-ups
  • Sit-ups
  • Jumping Jacks
  • Squats
  • Pull-ups
  • Lunges
  • Heel Raises
  • Reverse Push-Ups

I have found it best not to set a number or limit to an individual exercise or movement, but instead do each to exhaustion. For example, I’ll do one set of push-ups until my muscles are exhausted and can no longer perform the exercise properly, rest for two minutes, and repeat two more times. Below is my current calisthenics workout. I call it “the prepper’s muscle blast” because, well, it is a blast.

  • Push-ups – three sets to exhaustion
  • Pull-ups – three sets to exhaustion
  • Set-ups – three sets to exhaustion
  • Squats – three sets to exhaustion
  • Jumping Jacks – 50 reputations

Cardiovascular Endurance Training

Obviously, cardiovascular endurance training is the act of exercising to increase endurance. Greater cardiovascular endurance will allow you to work longer and harder. It will allow you to walk and run farther and faster. Building your cardiovascular endurance one of the most important things that you can do to be better prepared to survive a disaster and defend your retreat.

Some folks prefer to run, while others prefer to walk at a brisk pace when working to build their cardiovascular endurance. Both will work; however, I prefer to combine both into my cardiovascular endurance training. I also enjoy bicycling. Three days per week, I will walk approximately 200 yards followed by a 100-yard sprint, then walk again for approximately 200 yards followed by a 100-yard sprint, and repeat until I have a distance of 1-3 miles, depending on how I feel and how much time I have that day.

In addition, to mix it up a little to prevent boredom, one day per week I ride my mountain bike for 4-5 miles non-stop. Usually, I’ll ride out to the nearest little country store (a little over 4 miles away) and pick up a couple of things on my shopping list and then ride back home. By riding out to that marketplace, I get exercise for that day, save gas and get some minor shopping done.

The key to building cardiovascular endurance is to make a plan then get off the couch and put that plan into motion. In addition, you have to stick with it… well, what are you waiting for… hop to it!

Get Medical Training

I have said it before, but I will say it again, get as much medical training as possible. Everyone in your family or prepper group should at a minimum, complete a basic CPR and first aid class, and completing paramedic training and or wilderness first aid course would be a great leap forward in your medical preparedness.

If possible, recruit a medical doctor or registered nurse into your group. I know it probably will not be possible for many groups but it will be well worth the effort if you are successful. I know a single guy, who is also a prepper and his number one criteria in choosing a wife is that she be a registered nurse or have other medical training like previous or current work as a paramedic.

Sex Happens

During hard times like those following an economic collapse or any grid-down situation, men and women are going to seek comfort together, and we all know where that leads. That is right, folks. I am talking about intercourse and lots of it.

Keeping that part of human nature in mind, you will see the need for lots and lots of birth control. If you are a man who has no plans for children, then getting a vasectomy is a great idea – problem solved. Condoms work okay but are not full proof. Consider also that condoms lose their effectiveness as they age. I recommend keeping a year’s supply. The number of condoms that you keep in your “years supply” would, of course, depend on how much sex you plan on having.

Both of the birth control methods mentioned above rely on the male taking the initiative, and in my opinion, the vasectomy is by far the best option available for the male. It is permanent and you do not have to keep worrying about having condoms or other types of birth control.

However, a vasectomy does nothing to prevent STDs. If you are married or in a long-term committed relationship and both of you are STD free, then you are good to go.

Women have a much wider selection of birth control methods available to them and I’m not going to get into those here because that would take a full chapter and I’m sure that the ladies reading this already know plenty about the different types of birth control that are available and what works best for them.

The main questions women should ask when looking at post-SHTF birth control methods is what is sustainable? In other words, can you keep it working for months or even a year or more if you could not go back to the doctor to get your prescription refilled. One long-term birth control method that woman should consider is the IUD, which can be effective for up to 12 years for the non-hormonal type.

But as is always the case with any medical issues, the best option is to discuss it with your doctor. Ask your doctor what long-term birth control methods are available to you before making a decision.

Basic Prepper First-Aid Kit Recommendations

Having a well-stocked medical kit could mean the difference between life and death. As you assemble the list of medical items listed below, keep in mind that it is a basic list of suggestions only. Your kit should be tailored to your individual needs. However, the items listed should give you some ideas and get you started in the right direction when putting together your prepper first aid kit.

  • Hand soap
  • Anti-diarrhea medications
  • Bandages and wound dressings (large)
  • Basic surgical kit
  • Bed liners or plastic sheeting
  • Blood pressure monitor
  • CPR shields
  • Crutches, adjustable
  • Epson salts
  • Examination gloves
  • Antihistamine oral and injectable
  • Injectable epinephrine
  • IV electrolytes
  • Laxatives
  • Needles and silk thread for stitching wounds
  • Ophthalmic salve
  • Oral and injectable antibiotics/sulfas
  • Pain medications
  • Quikclot clotting agent (or if you prefer Israeli battle dressings)
  • Scalpel set if not in the surgical kit
  • Rubbing alcohol, peroxide, iodine, betadine, (copious amounts)
  • SAM splint
  • Scissors
  • Sterile IV kit
  • Sterile needles and syringes
  • Stethoscope
  • Thermometer (several)
  • Tweezers

Personal Items

When putting together your medical kit, do not forget to include personal items such as extra eyeglasses, hearing aids and batteries, dentures, and prescription medications.

Over The Counter Medications

Having a stockpile of over the counter medications could literally mean the difference between life and death for the prepper in a long-term grid-down situation where re-supply might not be available or as simple as taking a trip to the pharmacy.

Keep in mind that because many over the counter medications have a limited shelf life you will need to date and rotate just as you do with your food stores to ensure a fresh and viable supply. Remember first in, first out to ensure an always-fresh stockpile of perishable items.

When you decide to start stockpiling over the counter medications, the first question that arises is, “What do I need?” This is a good question because some of this stuff can get rather confusing, but it is not at all complicated.

When shopping for over the counter medications, keep in mind that the most common illnesses that we currently face will also be the most common after TSHTF, conditions like diarrhea, vomiting, fever, allergy, and pain. These are the main issues that we should prep for and stockpile medications to treat.

Herbs and Supplements

For some medical issues, herbal supplements can work better than prescription pharmaceuticals. But for disclaimer purposes, I must tell you to please go check with your doctor or other medical professionals before going off of any prescription medications or starting any herbal or other supplement program.

Stopping some types of prescription medications “cold turkey” can be deadly. Be smart; talk to your doctor and do your own research before making major decisions pertaining to your health.

What types of herbal medications should you stockpile? Well that depends on your health issues, but a few common ones include:

  • Hawthorn to lower high blood pressure.
  • Garlic, red yeast rice, folic acid, and soluble fiber to lower cholesterol.
  • Cinnamon to control blood sugar levels.
  • Peppermint oil and ginger for stomach issues like IBS.
  • Milk thistle for acute hepatitis, liver disease, jaundice, and gallstones.
  • Valerian root extract and melanin for a restful sleep.
  • St. John’s wort for depression.

The list could easily expand into another book, but it should be enough to get you started. Do your own research and talk to your healthcare provider. An excellent book that is loaded with pertinent information is The Herbal Drugstore by Linda B. White.

Dental Health

Dental health is just as important to your general overall health as is exercise and eating right. It should not be overlooked or downplayed. Take care of your teeth and get regular dental checkups.

I will admit that I am afraid of the dentist. The thought of him grinding, filling and pulling teeth is scary. And let us not forget those horrible shots, bleeding gums and that sucking thing. However, dental emergencies seldom solve themselves. Without medical attention, dental issues usually to get worse over time, possibly resulting in dire consequences to your health. Therefore, it is best to get any issues taken care of now.

One thing that is certain is that dental services will always be in demand. However, like other medical services, they may not be available. Even if dental services are available, you need to ask yourself whether will be able to afford competent care.

This is another instance where I think having a small gold or silver reserve is a good idea. After an economic collapse, the dollar may be worthless or significantly devalued. But gold and silver will retain value and that value that can be traded for dental and medical services in an emergency.

Unfortunately, no matter how prepared we are some dental and medical emergencies cannot be dealt with without proper and professional care. Nevertheless, there are steps that can be taken to better deal with minor problems or to provide care until a real solution can be found.

As previously mentioned, preventive maintenance cannot be stressed enough. Take care of your teeth. If possible, visit a dentist at least once a year to find and take care of any problems. Brush, floss, and rinse. Stock up on oral hygiene supplies. This can be done cheaply compared to the alternative of paying for treatment of major problems brought on by poor oral hygiene. Toothpaste, toothbrushes, and floss will also make excellent barter items, especially in the months following a long-term disaster.

Note: It is easy to make your own toothpaste. Simply mix equal parts baking soda and sea salt. The result tastes awful (you can add peppermint extract to improve taste) until you get used to it but it does a decent job of cleaning your teeth and gums. Simply moisten a toothbrush and dip it in the mixture and brush as usual.

It is a good idea to have a dental first aid kit to complement your other first aid supplies. A basic kit should consist of:

  • Temporary filling material Temparin or Cavit
  • Tweezers
  • Gauze
  • Toothbrush
  • Soft dental floss
  • Toothpaste
  • Orajel or another dental pain reliever
  • Advil, or Motrin
  • Clove Oil (pain relief)
  • Rubber gloves (some people are allergic to latex)
  • Dental wax
  • Toothpicks
  • Cotton
  • Dental Mirror
  • Hand Sanitizer
  • A copy of Where There Is No Dentist by Murray Dickson. This is a “must have” book. If you do not have a hard copy of this book, then your survival library is not complete. Get it now.

Alternatively, if you prefer you can purchase a ready-made kit survival emergency dental care kit and then expand it into a more comprehensive dental care package. How bad was your last toothache? Now imagine that you have the same pain but no dental care is available.

Shelf Life of Medications

What is the shelf life of medications? This is a tricky subject because there are so many variables to consider such as the type of medication, how old it is when you get it and previous storage conditions. When everything is considered, it becomes impossible to give a specific date as to when a medication will “go bad”. However, most will remain viable well past the listed expiration date. According to Joseph Alton MD in an article published at TheSurvivalistBlog.net, FEMA has seen massive stores of medication expire, and so a study was commissioned to find out how effective these expired medications still were. This study is known as the Shelf Life Extension Program (SLEP). This program has evaluated at least 100 medications that were expired for at least 2 to 10 years at the time they were evaluated. This includes many commonly-used antibiotics and other medications that could mean the difference between life and death in a collapse situation.

My recommendation is to do your own research and to talk to your doctor about your prescriptions and the shelf life and extended long-term potency of those medications to determine the estimated real-world shelf life of each.

The Use of “Fish Antibiotics” in Humans Post Collapse

The use of fish antibiotics in humans post collapse is another issue that comes up anytime two preppers talk to each other, and for good reason. Without antibiotics, a minor cut or infection can turn deadly. However, it is often difficult to get a medical doctor to write out a prescription for larger than normal amounts of antibiotics.

Fortunately putting back a large stockpile of fish antibiotics is not difficult or costly. According to Joseph Alton MD, fish antibiotics are essentially the exact same medications as those prescribed by a doctor at a clinic; you just have to know what to look for when you buy.

Setting Up the SHTF Medical Clinic

If you have the medical expertise and feel that it’s your duty to help your community or you simply have a large family and or prepper group, then you will need to have supplies on hand that will allow you to set up an SHTF medical clinic.

This need not be elaborate or expensive, but you do need to go beyond the items recommend above which are only suitable for a small group or family. You will need the same supplies when setting up an SHTF medical clinic as those for a smaller group; you will just need more of everything to meet the demand.

You will also need a few other items that will be specific to setting up and running a SHTF medical clinic, items such as a large tent, a building or a room inside a building, a number of beds or military cots, stretchers, large amounts of PPE (personal protection equipment), like gloves, face shields, etc. You could even have a pull trailer or panel truck set up as a mobile SHTF medical clinic that you could drive or pull to wherever you’re needed and provide medical care to those in need.

You Medical Library

Below are ten must have medical books for preppers; there are many more that could be included, but these are the top ten to start your library with:

  1. Where There Is No Doctor: A Village Health Care Handbook, Revised Edition by David Werner and Carol Thuman
  2. Where There Is No Dentist by Murray Dickson
  3. The Survival Medicine Handbook: A Guide for When Help is not on the Way by Joseph Alton
  4. Emergency War Surgery: The Survivalist’s Medical Desk Reference by U.S. Army
  5. Wilderness Medicine: Beyond First Aid by William W. Forgey M.D.
  6. The Survival Nurse: Running an Emergency Nursing Station Under Adverse Conditions by Ragnar Benson
  7. Prescription for Herbal Healing, 2nd Edition: An Easy-to-Use A-to-Z Reference to Hundreds of Common Disorders and Their Herbal Remedies by Phyllis A. Balch CNC
  8. Prescription for Drug Alternatives: All-Natural Options for Better Health without the Side Effects by James F. Balch
  9. Medical Diagnosis and Treatment by Maxine Papadakis
  10. Where There Is No Psychiatrist: A Mental Health Care Manual by Vikram Patel

The End.

Filed Under: Featured Articles

How to Store Water for Emergency Preparedness (and It’s Purification)

July 25, 2018 M.D. Creekmore

Prepper water storage tips

Without the threat of severe weather or the need for immediate emergency medical care, potable water will be your first concern following any type of disaster. I always advise my consulting clients to strive for at least three independent sources of water for cooking and drinking. For example, stored water, a water well, and a rainwater collection system.

I cannot stress enough the need for reliable water sources. Without water, most people will die in only 3-4 days – a lot sooner if the weather is hot and you have no shelter, or you have to do a lot of physical labor or activity. So how much water do you need for emergency preparedness and how to you store it?

The answer to the question is that a person needs about two quarts of water per day to stay healthy barring extreme weather or a lot of physical exertion. Adding a minimum of one gallon of water for cooking, cleaning, and sanitation, a medium-sized family of four requires almost 30 gallons of water per week at a minimum just to stay alive. That is around 1,440 gallons per year. This water can be stored in a number of way including five-gallon water jugs for smaller amounts and cisterns for larger amounts of water storage for emergency preparedness… 

Unfortunately, most preppers do not have enough room to store 1,440 gallons of water. Therefore, I suggest that you strive for, at a minimum, 55 gallons per person. If you live in an arid region of the country, I suggest you double or triple this amount.

You will also need to have several different methods of water purification available to you. We will go into detail about water purification methods in the following paragraphs, as well as how to store water long-term.

A Death by Contaminated Water: A few years ago, my grandfather told me a story that illustrates how deadly contaminated water can be. It happened in the summer of 1934 when he was only 9 years old. He was out in the fields gathering corn with his dad, brothers, and sister.

He said it had to be at least 100 degrees because the sun was bright in the sky and the sweat burned his eyes as it dripped from his forehead. His eleven-year-old sister got thirsty, and instead of going to the house to get water, she drank from a nearby stream. She died a few days later.

Upon further investigation, it was discovered that a cow from a nearby farm had died upstream from where she drank, contaminating the water. They used the water from that same spot for years with no ill effects, so they thought it was safe, but it was not.

From U.S. Army Field Manual 21-76

By drinking non-potable water, you may contract diseases or swallow organisms that can harm you. Examples of such diseases or organisms are:

  • Dysentery – Severe, prolonged diarrhea with bloody stools, fever, and weakness.
  • Cholera and typhoid – You may be susceptible to these diseases regardless of inoculations.
  • Flukes – Stagnant, polluted water – especially in tropical areas – often contains blood flukes. If you swallow flukes, they will bore into the bloodstream, live as parasites, and cause disease.
  • Leeches – If you swallow a leech, it can hook onto the throat passage or inside the nose. It will suck blood, create a wound, and move to another area. Each bleeding wound may become infected.

Moreover, pollutants from human activities often find their way into the water – e.g., trash, animal feces, fertilizers, herbicides, oils, heavy metals, salts, and pollutants from vehicles etc. It’s impossible to tell with 100% certainty what water is safe to drink without laboratory testing.

There are, however, some general guidelines that can help. Running water is generally safer than still water. Below are tips to keep in mind as you look for water:

  • Look for clear water.
  • Avoid water that has algae growing in it.
  • Avoid discolored water.
  • Avoid water from marshes/swamps.
  • Avoid cloudy water.
  • Avoid water that has an odor.
  • Avoid floodwater.
  • Water always flows downhill.
  • Listen for the sound of frogs.
  • Never eat snow without first melting it to avoid speeding up hypothermia.
  • Freshly fallen snow on a clean surface is fine but old snow might be contaminated with bacteria.
  • Never drink water from a lake or stream that is near or downstream from agricultural land, factories or mines.
  • Rainwater is perfectly drinkable as it falls from the sky.
  • The safest way to treat questionable water is to first boil it and then filter it.

Water Filters

berkey filterThe spring water where I live runs in a constant flow from the side of the mountain and it is as clear as bottled water; however, I will not drink it or use it for cooking without first running it through my Berkey water filter. A good water filter is necessary, and one of the very first survival preps that you should invest in. I suggest that your first choice is a Berkey water filter system.

My father and grandfather used to drive out to my place most weekends and fill their jugs from the spring – they drank and cooked using the water without any filtration or other purification. They have never had any trouble. Still, I prefer to filter all of my water before drinking.

The Berkey filters are extremely effective at removing pathogenic bacteria, cysts, parasites, chemical contaminants, and impurities. The elements have an indefinite shelf life and will filter at least 3,000 gallons of water before needing replacement. My filters are stored in zip-lock bags inside a small plastic tote.

Boiling Water

boiling water for purification

Boiling water is one of the surest methods of water purification. This method of water purification will effectively kill viruses and bacteria. However, boiling will not remove chemicals and other pollutants such as lead, oil, and fuel.

To purify water by boiling, all you need is a heat source, a suitable container, and water. Bring the water to a rolling boil to kill any viruses or bacteria that may be present. Contrary to what a lot of survival “experts” say, you do not have to boil the water for five to ten minutes in order to kill any viruses and bacteria that it might be harboring. All that is required is that the water reaches a rolling boil.

Warning: boiled water tastes stale; however, the taste is improved greatly by pouring the water back and forth between two containers to re-oxygenate it.

Sodis Method of Water Purification

The Sodis method of water purification is one of the simplest and most cost-effective water purification methods available to the prepper or anyone needing potable water; however, like boiling, the Sodis water purification method does not remove chemicals, metals or other solids. All you need are plastic (PET) or glass bottles, water, and sunlight. The image below from https://goo.gl/m03zMY explains it better than I can in words (image used with permission).

Water Purification Tabs

Water purification tabs have been used by hikers and the military for years. They are a lightweight and portable way to effectively purify water for safe consumption. However, like boiling and the Sodis method, these tabs will not remove chemicals or metals.

The military suggests adding two tablets to a quart of water and letting it sit for thirty minutes or more before drinking. However, there are a number of different brands of water purification tablets on the market and you should follow the exact instructions for the brand you are using.

Purification with Bleach

water purification with bleach
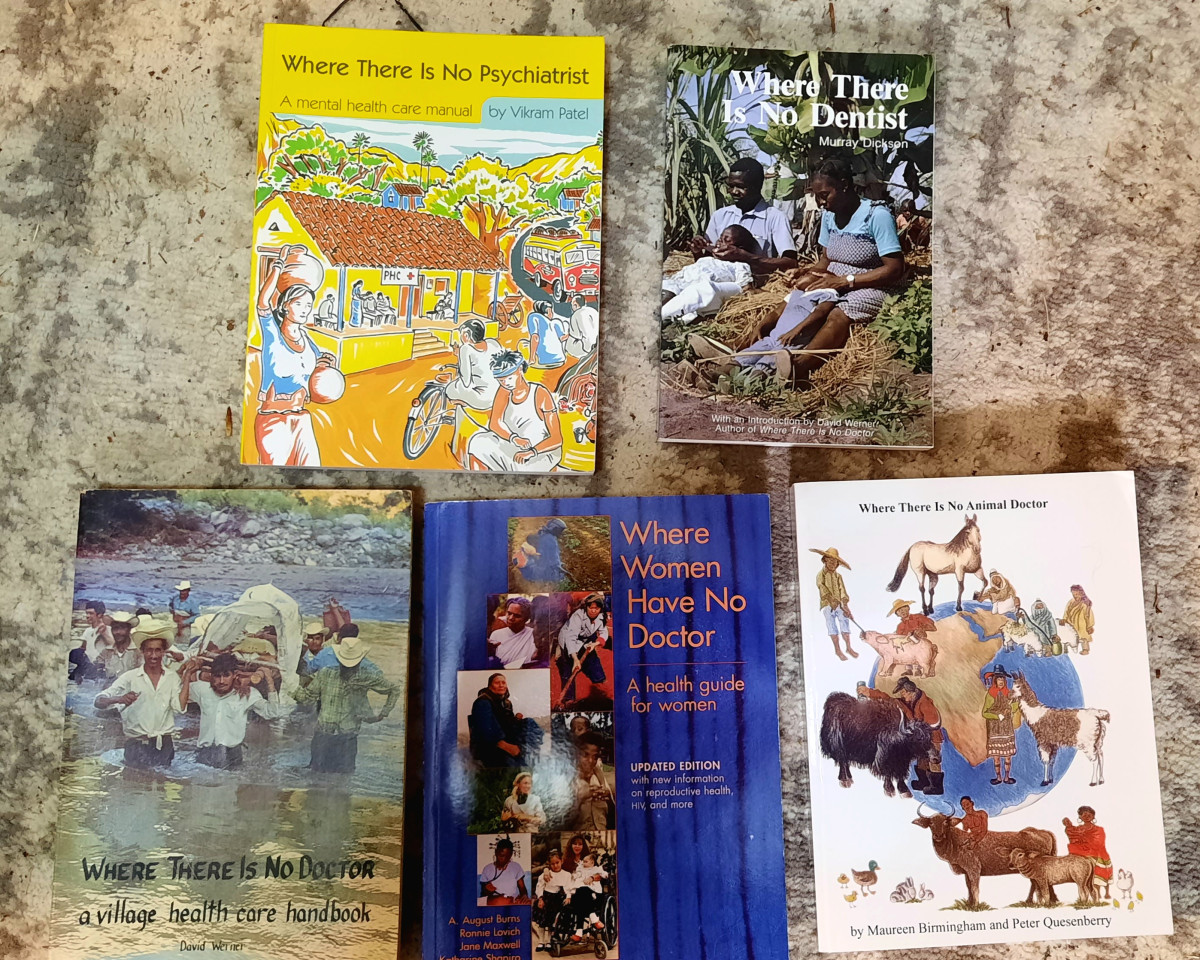
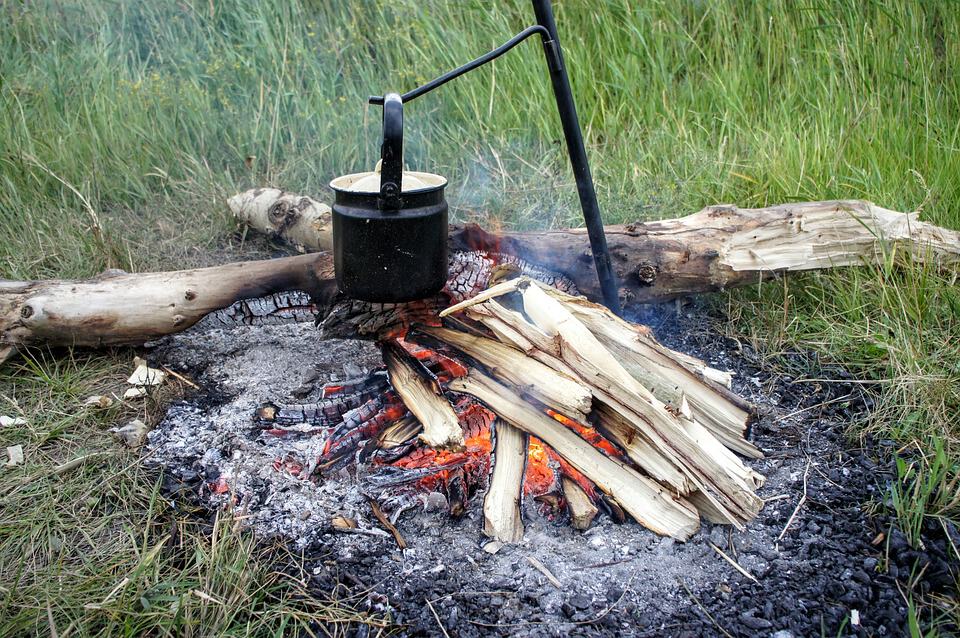
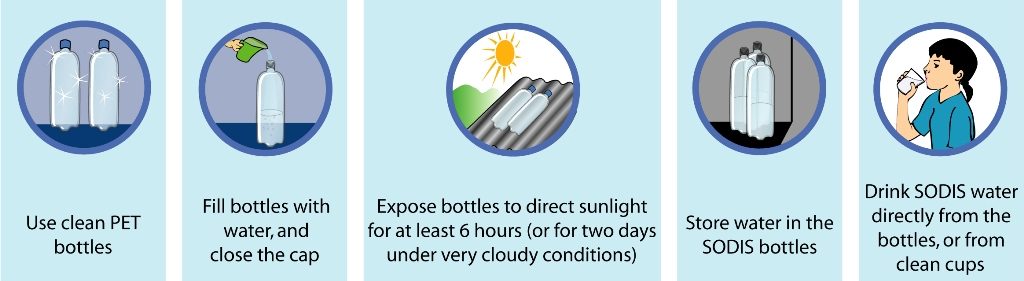
Water purification with bleach is one of those methods detailed in every survival book and any article that even hints at ways to purify water. However, it is not my first choice. If possible, I would use another method such as boiling or Sodis.

Water treated with bleach (only use unscented bleach) tastes like, well like bleach. Long-term use may lead to an increased cancer risk. I do not like it and will not use it unless no other alternative is available. Add four drops of unscented bleach (or two teaspoons per ten gallons) to each two-liter of water and let stand for 30 minutes before using.

Making Urine Drinkable through Distillation

Urine can be made drinkable (and clean) via simple distillation, which will also work for seawater. However, the downside to distillation is that it takes a significant amount of energy to boil the water for the duration required.

Pre-filtering

No matter what water purification method you use, it is a good idea to “pre-filter” any dirty or murky water. You can use a coffee filter, a clean shirt, or a bandana. This will help remove any larger particles from the water, making it more potable and increasing the life of water filters used.

Tips for Storing Water in a 55-Gallon Plastic Barrel

55 gallon water drum for catching rain water
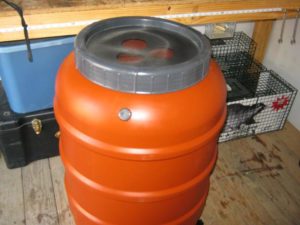
As for water storage, I have six five-gallon containers that I bought at Wal-Mart in the sporting goods department. I have also set up a 200-gallon rainwater catchment system and another 55-gallon food-grade barrel that I installed to catch water runoff from the roof of my chicken coop. I use this water for my chickens, but of course, if needed, I could filter and drink it too.

If you live in one of the drier desert regions, water would be a major concern and that may necessitate the storage of thousands of gallons of water for an emergency. A rainwater catchment can be as sophisticated as the one pictured below or as simple as purchasing a livestock watering tank or kiddie pool and catching the rainwater from your downspouts.

You can also rig tarps or plastic sheeting to funnel the rainwater into the containers. Do not store water in used five-gallon milk jugs. They are not strong enough for long-term storage and will break down and leak.

The five-gallon containers sold in the sporting goods section of most department stores work great as do the 55-gallon food-grade plastic drums. Just be sure that the drums are clean and contain no harmful chemicals before filling. If you must use small containers, emptied 2-liter soda bottles work well. They are stronger than the aforementioned milk jugs, have better lids, and are more convenient to use.

rainwater-catchement-system

A Note about Tap Water for Long-Term Storage

tap water long-term storage
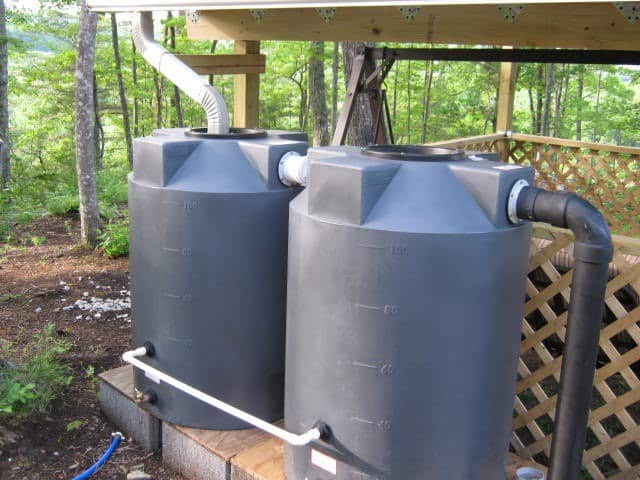
If you are storing tap water from a municipal water system, there is usually no need to add bleach as suggested by some writers. Water from the municipal tap already contains enough chlorine to prevent any bacterial growth and can be stored without any other additives.

When putting water away for long-term storage, I use a Water Preserver Concentrate from Amazon.com instead of bleach. Water preserver concentrate will extend the storage life to up to five years.

Choosing the Right Retreat Property to Ensure Water Independence

When buying a retreat property, your first consideration should be to secure a reliable, non-grid dependent water source. The best source would be a deep well (have it tested before using, especially if it’s an old well). The next best option would be a full-time spring. And finally, the next best option would be a river or creek, or even a pond or lake.

All water from ponds, rivers, and streams should be treated as if it is contaminated with the worst pathogens, just to be on the safe side. Better safe than sorry, I always say.

You might also like:

  • The Doomsday Preppers Quick and Easy Food Storage Checklist
  • What You Should Know About Non-Hybrid Vegetable Seed
  • Mountain House Long-Term Storage Foods: weekly product review

Filed Under: Featured Articles, Prepping

Primary Sidebar

About the author

I’m M.D. Creekmore, and I’m all about simple living, financial freedom, and life here in Appalachia. I grew up poor in these mountains and built a life around doing more with less. Read more→

  • Amazon
  • Facebook
  • Substack
  • Twitter
  • YouTube

Subscribe to my newsletter

Join the thousands of readers who get it delivered free to their inboxes every week

“Do more with less.”

– Minimalist proverb

Secondary Sidebar

Read My Books

Paperback and Kindle

Footer

Recent Posts

  • Weather Update for My Corner of Appalachia
  • Why I’m Ordering Ivermectin + Mebendazole Every Year
  • The Website’s Shutting Down (But Here’s the Plan)
  • You Are Hated! Start Training Like It!
  • I don’t really give a damn anymore.

More about me

Books I’ve written

Books I’ve read

Follow Me on YouTube

Follow Me on Facebook

Gear I Use and Recommend

Newsletter

Search this site

Follow me elsewhere

  • Amazon
  • Facebook
  • Substack
  • Twitter
  • YouTube

© 2008–2025 M.D. Creekmore · As an Amazon Associate, I earn from qualifying purchases.

  • Blog
  • Books
  • Newsletter
  • Gear I Use
  • About
  • Contact
  • Privacy Policy