• Skip to main content
  • Skip to secondary navigation
  • Skip to primary sidebar
  • Skip to footer

M.D. CREEKMORE

  • Blog
  • Books
  • Newsletter
  • Gear I Use
  • About
  • Contact
  • Facebook
  • YouTube
  • Blog
  • Books
  • Newsletter
  • Gear I Use
  • About
  • Contact
  • Privacy Policy
You are here: Home / 2019 / Archives for July 2019

Archives for July 2019

10 Must Use/Read Prepper Food Storage Resources

July 31, 2019 M.D. Creekmore

1. Food storage calculator: Use this calculator to determine the minimum food storage requirements for your family for one year. While not an exact science it is a good starting point – you’ll still need to make the final list based on each family members needs.

2. Start your food storage on $10 a week: Good article written by Alan T. Hagan for Backwoods Home Magazine. He states “Depending on what you decide is important to you, everything you will need for a complete food storage program can be had from your local grocer and, perhaps, some other local businesses.”

3. Family Home Storage: Some good information by LDS, even if you’re not religious or a member you’ll find the information useful.

4. Food Storage Videos: Results from a search on YouTube for the term “Mormon Food Storage” – while I didn’t watch them all the ones I did watch looked and good offered sound advice.

5. Prudent Food Storage: More survival food storage information presented by Alan T. Hagan via his free online book Food Storage FAQ. Worth printing and putting in a binder.

6. Food Storage Guide: Good information and chart listing the estimated shelf life of various foods…

7. My Free Food Storage List Printable (click to download the PDF).

8.  And a follow-up more complete printable checklist for stocking up at Walmart (click to download the PDF)

9. And my article “The Prepper’s Food Storage Checklist (click here to read it now.)

10. And my best selling book which is in itself a complete prepping course (click here to read the reviews of my book at Amazon).

Please share your best food storage resources in the comments below.1 8 Must Read Food Storage Resources


Filed Under: Prepping

Top 5 Tips for Avoiding Becoming a Crime Victim

July 31, 2019 M.D. Creekmore

Tips for Avoiding Becoming a Crime Victimby WL

We live in a suburb of a large metropolitan area. Our suburb is typically considered safe. Safe enough, in fact, that I know people who leave their first-floor windows wide open at night or when they’re gone for the day. Safe enough that people go for a walk around the neighborhood and leave their home unlocked. Safe enough that people warm up their vehicles unsupervised in the winter.

I have a background as a news reporter. I covered the police beats for several nearby suburban local papers; one suburb was surrounded by the “bad side” of the metropolitan proper. I’ve taken a concealed carry course, a “practical” conceal carry (click here to go to MD Creekmore’s concealed carry site) follow-up course, and a women’s self-defense course, as well as attended an ALICE training course at my place of work.

I intend to take more of such classes. I’ve read several books about personal safety and survival (click here to see a list of MD Creekmore’s favorite survival books). I work in a school – and am conscious of the safety of our students and staff at all times, am aware of what’s going on around us.

Much of what I write here seems like common sense, yet I’m continually amazed (and saddened) at how many news reports demonstrate that too many people obviously don’t think like me. Please ensure you talk with your children and parents about safety!

1.) Never be totally alone if you can avoid it.

I spent much of my young adult life, prior to being married, alone. As an only child, I’m used to being alone! Once an adult, I lived alone. I shopped alone. I went for walks around my apartment complex and at parks alone. As a college student, I often walked alone across campus or around town. I drove alone. I traveled far distances alone – to visit my parents or my boyfriend in another city 2 1/2 hours away.

Looking back on it, I can’t believe I took such great risks. I had a can of mace; I don’t even know if it worked and I rarely carried it (it was usually on my bedside table in my apartment). I didn’t own a firearm, had never shot a gun, and I’d never taken a self-defense course. My apartment did not have close-by parking and the path from the parking lot to the apartment was not well-lighted.

I was quite used to being by myself and apparently, that’s still normal: As I drive to work, I pass several parks. I am amazed at the number of individuals, many of whom are women, jogging and walking alone in the early hours of the morning. In the dark. With earbuds crammed into their heads.

Don’t assume that you’re safety is guaranteed anywhere!

Recently, an individual was walking alone after dark on a local bike path and was robbed at gunpoint in what most people consider a “safe” part of a nearby town.

Such incidents are avoidable — don’t be alone!

Many elementary schools have a rule that students must be in pairs (buddy system) at all times. It makes sense when you think about it — if a child falls ill or is injured, a friend or classmate is there to get help. Students should never leave a classmate alone in the locker room, or alone in any room; that way, there are two to witness anything that might happen.

The buddy system isn’t just for children: Be with someone you know as much as possible. Travel with a friend. Walk with a friend or coworker as much as you can. If you and a neighbor arrive home at the same time, make it a habit to get know that person well and walk toward your homes at the same time. Make sure someone knows where you are at all times when to expect you home.

If you can’t avoid being alone, ensure you know how to protect yourself. Carry mace or pepper spray (click here for pepper spray laws by state) and know how to use it. Consider getting your conceal carry and take many, many classes and get as much instruction in the use of your firearm as you can. Take a basic self-defense course — then consider enrolling in a martial arts class. You can never be too safe.

2.) Be aware of what’s going on around you, always.

Experts call this “situational awareness”, but I call it being aware of LIFE. Know what the normal condition is for where you are. Are you in a work parking lot? Do you recognize cars that are always there every day, or do you walk while texting on your phone or staring at your feet on the pavement?

Look around you! Notice which cars are typical for your work or apartment complex parking lot — people are habitual, they’ll usually park in or near the same spot every day. Only when you’re familiar with the “normal” will you notice if something is “out of place”.

Get to know people you see regularly. Know your coworkers (and their spouses or children if they frequently visit). Don’t just recognize their faces — really get to know them! Be nosy — have lunch with them, talk with them at break time or in the hall or in the restroom, while walking across the parking lot at the start or end of the day.

Ask questions — do they have kids/grandkids/pets? What are their hobbies? Do they read? What kinds of books do they like? What’s their favorite show? Get them talking, get to know them. They are your allies in this world!

3.) Listen to your instincts.

This is one right out of “The Gift of Fear” by Gavin de Becker – the concept was repeatedly discussed at my self-defense class.

Background: I worked at a public library years ago, shelving books in all the departments. There were some of the nicest people who visited the library frequently. And there were also some of the creepiest people that hung out there, daily. Men who, when I’d walk past them, gave me “the willies”: the hair on my arms would stand up, I’d get a shiver up my spine, and I wanted immediately to run away. Interestingly, I had co-workers who said they felt the same way about the same people.

Got the “willies” or the feeling that someone is “creepy” or that something “just isn’t right”? This is your body’s natural warning system. Humans are animals: we have instincts and senses, too: we’ve just been socially trained to ignore such feelings.

Don’t ignore your feelings, don’t ignore your intuition. If someone gives you the creeps or doesn’t seem “right”, get away from them instantly. Find a safe place where there are many people, or police, or security officers, and be aware if the creepy person follows you.

4.) Don’t ever leave belongings in plain sight in your car.

This is something I learned the hard way: my car was broken into when I was in college. They wanted my stereo system (it said “Pioneer” on it). They took my cassette tape carry-case (hey, this was in the 1980s!), my spare change, and a duffel bag (which contained a pair of dirty socks and a pair of jeans that had a rip in the crotch).

After that, I learned never to leave anything insight — it’s just temptation for those not-so-nice people looking into car windows. (I put black electrical tape over the brand name of my stereo and speakers, too, since the stereo and speakers were black plastic.)

As a police beat newspaper reporter after college, I was always flabbergasted at the number of people who would leave purses, wallets, or other valuables in their cars, in plain sight, even if only for a minute or two while they ran into a shop or store — and then were surprised to return to their vehicle to find their belongings gone.

Your purse, wallet, briefcase, backpack, keys (and your cell phone, tablet, or laptop) should NEVER be left anywhere — they should always be with you.

5.) Lock up!

Locks have a purpose and they don’t fulfill their purpose if you don’t use them.

When you walk into or out of your house: lock the door behind you. Always close the garage overhead door.

When you get into your car, lock the doors immediately. When you leave your car, always close your car windows and lock the doors.

If you are sitting out on the back patio, ensure your front door is locked. Make sure your front windows aren’t wide open for someone to easily pop the screen out and enter that way. (I read a police report recently about residents in a nearby suburb who were robbed, at gunpoint: they’d been on their back patio during the late evening hours, the dog was in the house and started barking.

The owners walked into the house and right into a man with a gun standing in their front room. The front door had been left open and unlocked.)

If you’re to be away at work (or home asleep), and you wish to leave second-floor windows open, ensure they’re not easily reached from a nearby tree, a roofline, or fire escape. Use the “part-way-open” locks many newer windows have that allow you to have the window open, but not open far enough that someone could climb into the open window, or open it further. Close your blinds.

Don’t leave items near windows, in plain sight, in your home (such as computers or large screen televisions to be easily seen by passersby); don’t leave televisions on screened porches.

Do leave lights on the outside and inside your home.

Simple, common-sense habits can keep you and your family from becoming a crime victim. It takes minimal thought and effort to ingrain these routines into your lifestyle, but that effort is worth it.

Click here for my most recommended home security/retreat defense plan for when the SHTF…

Filed Under: Security

The Top Water Filters For Your Bug Out Bag

July 31, 2019 M.D. Creekmore

by David

There is no shortage of products or systems to choose from, but which one’s are the best investments? I’ve been doing a lot of research into the packable water filtration systems currently on the market and I’d like to share my findings and opinions.

In this post, I’d like to try to cover which products successfully filter/purify water of toxic industrial chemicals, viruses, bacteria’s, protozoa, cysts, algae, spores, and sediments, and which do not. Also, some of the pros and cons of each variety.

So, here we go…

Product Group 1A: Katadyn Hiker / Hiker Pro / Vario

These pump style filters have found their way into many bug out bags, and for good reason. They’re simple and effective. There are very few differences between the models listed above, but I’ll highlight the differences here.

Hiker and Hiker Pro $50 – $75 – Fact Sheet / Pro Fact Sheet

The Hiker and Hiker Pro are both decent backpacking filters and they are both fairly reasonably priced if you shop around. In fact, I own the Katadyn Hiker and I’ve successfully used it to pump my canteens and hydration pack full of pond water with no ill effects.

The products are compact, lightweight, easy to use, and relatively effective, but you assume some risk because the filter media is only capable of capturing particles of 0.3 microns average size or larger. They do leave a slight tinge to the water and if the water is particularly nasty there can be some mild odors or taste left in the water.

It probably won’t kill you, but there are better options out there so that in the event you do have to drink water that is potentially contaminated with a virus you won’t contract it, especially post SHTF when treatment will be harder to come by.

  • •Filtration Quality: 0.3 Microns (bacteria, protozoa, cysts, algae, spores, sediments)
    •Filtration Volume: 200gal / 750L (Pro 300gal / 1150L) 1-3 people
    •Filtration Media: replaceable glass fiber media with an activated carbon core
    •Filtration Flow: +/- 1 quart / liter per minute
    •Filtered Turbidity: Mildly Tinged / Mostly Clear
    •Filtered Aroma: Very Mild
    •Filtered Taste: Mostly Pure

Vario $75-100 – Fact Sheet

  • •Filtration Quality: 0.3 Microns (bacteria, protozoa, cysts, algae, spores, sediments)
    •Filtration Volume: 528gal / 2000L 1-4 people
    •Filtration Media: replaceable glass fiber media with an activated carbon core
    •Filtration Flow: +/- 2 quart / liter per minute (1q/lpm in long-life mode)
    •Filtered Turbidity: Slightly Tinged / Almost Clear
    •Filtered Aroma: Slight or None
    •Filtered Taste: Mostly Pure

With the exception of volume, these filters are almost all identical. If you are going to purchase one of these, purchase the most inexpensive version because no improvement in particle size is gained by purchasing the upgrades.

The replacement filters (Hiker / Vario) are reasonably priced to stock up on and easily replaceable simply by unscrewing the top discharge lid, disposing of it, and installing a new one (don’t throw it away though because you can drill a hole in the bottom, clean out the charcoal, and reinstall to use the filter system as an unfiltered pump unit as I’ll discuss later).

In the end, these are decent products, but make sure you stock up on the filter cartridges if you intend to use it for an extended period of time or buy a Sawyer (if you’re sold on Katadyn’s brand name then upgrade to one of their endurance series products for greater filtration volume).

Product Group 1B: Katadyn Pocket / Combi / Expedition

These pump style filters are designed to support multiple people (anywhere from 1 – 20 depending on variety) or for a longer period of time. They range from on the expensive side to outrageous, but if you have the money they’re awesome. There are some variations to discuss though.

Pocket +/- $270 – Fact Sheet

  • •Filtration Quality: 0.2 Microns (bacteria, protozoa, cysts, algae, spores, sediments, and some viruses)
    •Filtration Volume: 13,200gal / 50,000L
    •Filtration Media: Replaceable Ceramic
    •Filtration Flow: +/- 1 quart / liter per minute
    •Filtered Turbidity: None
    •Filtered Aroma: None
    •Filtered Taste: Pure

Combi +/- $225 – Fact Sheet

  • •Filtration Quality: 0.2 Microns (bacteria, protozoa, cysts, algae, spores, sediments, and some viruses)
    •Filtration Volume: Ceramic 13,200gal / 50,000L, Charcoal 105gal / 400L
    •Filtration Media: Replaceable Ceramic / Replaceable Activated Charcoal
    •Filtration Flow: +/- 1 quart / liter per minute
    •Filtered Turbidity: None
    •Filtered Aroma: None
    •Filtered Taste: Pure

Expedition +/- $1200 – Fact Sheet

  • •Filtration Quality: 0.2 Microns (bacteria, protozoa, cysts, algae, spores, sediments, and some viruses)
    •Filtration Volume: 26,400gal / 100,000L
    •Filtration Media: Replaceable Ceramic
    •Filtration Flow: +/- 4 quarts / 4 liters per minute
    •Filtered Turbidity: None
    •Filtered Aroma: None
    •Filtered Taste: Pure

There are some variations here, but with the exception of volume and flow, the pocket and Combi filters are almost identical, the expedition is more of a camp filter, but I suppose you could pack it.

The replacement filters (Pocket / Combi Cer – Car / Expedition) are fairly expensive, but the volume they’re capable of makes up for the cost if you plan to use the filter this much. These are really great products, but the initial cost will be prohibitive to people on tighter budgets.

Product Group 2A: Sawyer Point One Biological Filter Variations – Print Brochure

These filters are sold as a squeeze, gravity, and pump style with different adapters and configurations. The filters are Non-replaceable sealed element hollow fiber membrane (kidney dialysis machine technology).

But they’re guaranteed for 1 million gallons (I’m not sure that the guarantee will work for you post-collapse though) and are touted as an indefinite use filter by the use of periodic backflushing and maintenance. If the filter ever does happen to break on you though, they’re very affordable and stocking up on them won’t be too difficult. Let’s delve in.

Point Zero Series $20 – $220 (average $50) – flow rate report – microbiological test report

  • •Filtration Quality: 0.1 Microns (absolute) (bacteria, protozoa, cysts, algae, spores, sediments, and some viruses)
    •Filtration Volume: Indefinite (yes indefinite with maintenance back flush and care)
    •Filtration Media: Non-Replaceable Hollow Fiber Membrane
    •Filtration Flow: 4 quarts / 4 liters per minute Squeezed or up to 5 gallons per minute at max inlet 40psi
    •Filtered Turbidity: None
    •Filtered Aroma: None
    •Filtered Taste: Pure

These filters are excellent. They’re lightweight, easy to use, filter down to extremely small micron size, and are extremely inexpensive and reliable. They do not have replaceable media, but they are considered indefinite use as long as you regularly backflush the filter with the included backflush syringe and prevent it from freezing with water inside.

If you do happen to break it, they’re so affordable you can buy backups. These filters really only have 1 drawback in my opinion, and that is due to their hollow membrane pore construction they do not filter out and dissolved solids or solutions. That is to say that they cannot filter out anything that is completely dissolved into the water.

Product Group 2B: Sawyer Point Zero Two Biological Purifier Variations

These purifiers are sold as a squeeze, gravity, and pump style with different adapters and configurations. The purifiers are Non-replaceable sealed element hollow fiber membrane (kidney dialysis machine tech).

But they guaranteed for 1 million gallons and are touted as an indefinite use filter by the use of periodic backflushing and maintenance. If the filter ever does happen to break on you though, they are fairly affordable and stocking up on a small supply is doable.

Point Zero Two Series $140 – flow rate report – microbiological test report

  • •Purification Quality: 0.02 Microns (bacteria, protozoa, cysts, algae, spores, sediments, and all of the most common viruses CDC: Scroll all the way down)
    •Purification Volume: Indefinite (yes indefinite with maintenance back flush and care)
    •Purification Media: Non-Replaceable Hollow Fiber Membrane
    •Purification Flow: 4 quarts / 4 liters per minute Squeezed or up to 5 gallons per minute at max inlet 40psi
    •Purification Turbidity: None
    •Purification Aroma: None
    •Purification Taste: Pure

If you haven’t noticed the above facts, these are actually not considered filters anymore, but purifiers. These purifiers are capable of removing every harmful thing (that is not in dissolution) from the water.

Again, the only drawback is that due to the hollow fiber technology, these purifiers do NOT remove anything that is completely dissolved into the water. They pass everything that is smaller than .02 Microns in size without absorption.

Product Group 2A & 2B both function in exactly the same manner, but the Point Zero Two variation has smaller pore sizes. Both of them utilize an ABSOLUTE micron measurement which is much more stringent than the AVERAGE micron measurement. This basically means that absolutely NO particles, biology, or vectors of the specified micron size or larger will be found in the processed water.

The different variations of these products are the same core filter or purifier with different peripherals included in the package. For example, the SP129 package contains one Point One filter, one 1L collection pouch, and a mouthpiece valve for $45 while the SP131 contains one Point One filter, 3 collection pouches, a backflush syringe, and a mouthpiece valve for $45, and the SP181 All In One package contains 1 Point One filter, 2 mouthpiece valves, 1 faucet adapter hose, 1 backflush syringe, 1 1L collection pouch, and a bucket adapter kit for $60. Here’s a view of their water products.

At the end of the day, in my opinion, the best investment would be to purchase both a Sawyer Zero Point Two purifier and the Katadyn Hiker Pro along with some extra filters for the Katy.

The reasoning is that while some chemicals can slip by all but the most advanced filtration and purification techniques, a glass fiber / activated charcoal filter pump unit used as a post-filter would help to capture some chemicals by absorption while the Sawyer purifier will function to eliminate all of the smaller non dissolute “badies” such as HEV/HAV/SARS.

The sawyer will benefit and accommodate the pressurization that the pump filter will add to the line and this will speed your collection up as the drop tube can be easily dropped into the water source, the pump outlet can be connected to the Sawyer very easily, and the Sawyer can be adapted to a hydration pack drink tube so you never really have to drop your kit to refill your bladder if you’re traveling with a buddy.

If you are trying to collect water in an environment that is potentially hostile you can just use the sawyer collection pouches to grab the water and take it with you to purify it in a safer environment. Just bear in mind that the Katy media would need replacement after about 200 gallons (you could probably get more since it’s used as a post filter).

Most filters cannot remove toxic chemicals due to the dwell time required to absorb them onto the charcoal media. In fact, even distillation does not remove all chemicals because some exhibit the same properties of evaporation and boiling/condensation points.

Choose your water source more wisely, and/or use the old fashioned method of digging a hole a few feet from your source water and collect from the water that has flowed into the hole. The Katy is mainly used as a pump, but the filter can help to improve taste that the Sawyer may not. You can refer to the CDC for further information on filtration properties and effectiveness here.

My personal configuration currently is a combination Katadyn Hiker Basic / Sawyer Point One filter connected in series so that the Sinker/Screen and Bobber are connected to the inlet of the Sawyer Point One filter, the Sawyer outlet is connected to the Hiker inlet, the Hiker outlet is connected to a quick disconnect Camelbak adapter and the QD connects to my Camelbak drinking tube after removing the bite valve.

Connected in this manner I am using the Katadyn prescreen and bobber to screen the water out going into the Sawyer. Since the Sawyer is back-flushable I use it to capture all sediment, bacteria, and protozoa prior to the Katadyn Glass Fiber / Charcoal unit to extend the life of the filter. I am using the Glass Fiber / Charcoal filter to absorb any dissolved contaminants that the Sawyer passes through which can help to improve any taste issues that the Sawyer may miss, and I’m using the pump unit to speed the process by pressurizing the line.

An added benefit to using this system is that by slightly pressurizing my Camelbak’s bladder I can allow the filtered water to backflush the Sawyer filter automatically and lose only 1 liter of water from my 3-liter reservoir providing me with a freshly backflushed Sawyer filter and 2.5 liters of very clean water.

Bear in mind that while this system is excellent for most water sources in the US, it does not filter our viral contaminations. I plan to upgrade the Sawyer Point One to a Point Zero Two purifier in the not too distant future.

If viral contamination is a concern you can add 4 drops of unscented bleach per liter/quart or 12 drops to a full bladder directly into the drinking tube prior to connecting the filtration system and allow the bleach 10-15 minutes of contact time in the bladder before drinking.

Now, if you remember, I recommended saving your used Katadyn filter cartridges because they can be reused in away. Allow your filter to thoroughly dry out by leaving it in the sun for a day or two. Take your used filter cartridge and turn it upside down to see a plastic circle in the center of the bottom plate. Using a 1/4″ or similar sized drill bit you can drill a hole through it.

Now, just dump out any charcoal media that you may find inside. Now find a drill bit that just fits into the outlet hole in the top of the filter cartridge and drill down through the top to clear the silt barrier that holds the charcoal in. Now, run some tap water through the inlet hole of the filter to wash out any residual charcoal or drill shavings that may still be inside.

Now reinstall the filter into your pump and cycle about a quart of fresh tap water through the filter to remove any more filtration media or shavings that may have survived your first two attempts. You now have a cartridge that can turn your Katadyn filter into a basic hand pump to use on your Sawyer indefinitely.

Warning: This is only recommended for filtration cartridges that have only ever been used as a post filter behind a Sawyer or other similar smaller micron filtration system.

If you’ve ever used a filter cartridge to directly filter contaminated water this is not recommended because bacteria and or cysts could be present on the dirty filtration media and could potentially make their way through the filter in the future.

If you want to convert a used filter of this type be sure to allow the filter to soak in a water/bleach solution of at least 1% for 24 hours, then allow the filter to thoroughly dry out in direct sunlight.

Filed Under: Bugging Out

How to Make a Faraday Cage (An Easy Illustrated Guide)

July 17, 2019 M.D. Creekmore

by Dr. Arthur Bradley

how to make a Faraday cageThere is a great deal of confusion about DIY Faraday cages and Faraday Boxes. Not only about how to build them, but also what they actually protect against. In this article, Dr. Arthur Bradley, author of Disaster Preparedness for EMP Attacks and Solar Storms, answers a few basic questions and perhaps debunks a few myths.

What is a Faraday cage?

A Faraday cage (a.k.a. Faraday shield or Faraday box) is a sealed enclosure that has an electrically conductive outer layer. It can be in the shape of a box, cylinder, sphere, or any other closed shape.

The enclosure itself can be conductive, or it can be made of a non-conductive material (such as cardboard or wood) and then wrapped in a conductive material (such as aluminum foil).

There are also readymade military-grade Faraday Cages that are meant to protect large electronics and gear such as portable gas or solar home-use generators, compact solar panels, computer towers, radios, electric medical equipment, smart home appliances, power tools, lights, and other large devices – check out this one to see what I’m talking about. These are even more effective than anything you can build at home.

What does it do?

Simple and Effective Faraday Cage Construction

A Faraday cage works by three mechanisms: (1) the conductive layer reflects incoming fields, (2) the conductor absorbs incoming energy, and (3) the cage acts to create opposing fields. All of these work to safeguard the contents from excessive field levels.

A Faraday cage is particularly useful for protecting against an electromagnetic pulse that may be the result of a high-altitude nuclear detonation in the atmosphere (a.k.a. EMP attacks).

Despite rumors to the contrary, a Faraday cage is not necessary to protect against solar coronal mass ejections because the frequency content of such disturbances is at much lower frequencies—they don’t couple energy efficiently into small-scale electronics, except through conducted paths (e.g., wires coming into the system). A better precaution against solar events is to unplug electronics and use quality surge suppressors.

How does field cancellation work?

Field cancellation occurs when the free carriers in the conductive material rapidly realign to oppose the incident electric field. If the cage is made from something non-conductive, the free carriers are not mobile enough to realign and cancel the incident field.

How thick should the conducting layer be?

The conductive layer can be very thin because of something known as the skin effect. That term describes the tendency of current to flow primarily on the skin of a conductor. As long as the conducting layer is greater than the skin depth, it will provide excellent shielding because the absorption loss will be large.

The skin depth is a function of the frequency of the wave and the conductor material. As an example, consider that for a frequency of 200 MHz, the skin depth of aluminum is only about 21 microns. EMP pulses can have a frequency content that ranges up to 1,000 MHz.

Therefore, wrapping a box in a couple of layers of heavy-duty aluminum foil (typically about 24 microns thick) provides the necessary conductor thickness to protect against high-frequency radiated fields.

Does it matter what type of conductor is used?

Not much. The conductivity of nearly any metal is good enough to allow the carriers to easily realign to cancel external fields. For example, if silver (the best conductor) is used in place of aluminum, the skin depth at 200 MHz is reduced to about 4.5 microns. Of course, the high cost of silver would prevent using it for such a purpose.

Can a Faraday cage have holes?

Yes, as long as the holes are small with respect to the wavelength of the incident electromagnetic wave. For example, a 1 GHz wave has a wavelength of 0.3 meters in free space. As long as the holes are significantly smaller than that dimension (i.e., a few millimeters), they won’t let in much of the incident wave. This is why fine conductive mesh can be used when constructing a DIY Faraday cage. In practice, the cage’s lid or door usually causes the most leakage. Taping the seam with conductive tape helps to reduce this leakage.

Can you use existing conductive enclosures?

Yes, there are many conductive enclosures that can be used, including ammo cans, metal garbage cans, anti-static bags, and even old microwave ovens. Each has its own level of effectiveness as covered in my book, Disaster Preparedness for EMP Attacks and Solar Storms. The key criterion is that the gaps and seams remain very small.

Must the cage be grounded?

There is a great deal of confusion regarding grounding of a Faraday cage. Grounding of the cage (i.e., connecting it to some Earth-referenced source of charge) has little effect on the field levels seen inside the box. Grounding primarily helps to keep the cage from becoming charged and perhaps re-radiating. The bottom line is that an ungrounded cage protects the contents from harmful electromagnetic fields as well as a grounded one.

Anti-static Bags

Static-Bags-EMP
Static Bags

Anti-static bags are readily available to protect electronic components against electrostatic discharge. They can be purchased in many different sizes, including some large enough to hold radio equipment. While they do offer shielding from EMP, not all products are created equal. Testing confirmed that products certified to MIL-PRF-8170 and/or MIL-PRF-131 offer the greatest protection from an EMP.

The results from testing three different types of bags are provided in Disaster Preparedness for EMP Attacks and Solar Storms. When selecting an ESD bag, consider not only the shielding effectiveness but also the physical ruggedness of the bag. A tear or large hole can compromise the bag by allowing EMP energy to enter.

Larger Faraday Cages in a House

Large Faraday Cage in a House
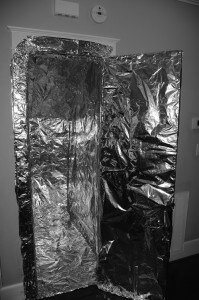
Storing a larger set of electronics might require an entire room. Engineers who work in electromagnetics often use “shield rooms” to conduct experiments because they do an excellent job of filtering out interfering signals, providing in excess of 100 dB of shielding. A poor man’s Faraday shield room can be made inside a house by lining a small closet with heavy-duty aluminum foil, covering all four walls, the floor, the ceiling, and the inside of the door.

Overlap and tape the seams using either conductive or regular cellophane tape. There can be no conductive penetrations into the room, or it will seriously degrade the shielding. Cover all electrical outlets, light switches, etc. with aluminum foil. Do not plug anything into the electrical outlets. Also, lay a piece of plywood or cardboard on the floor so that it can be walked on without damaging the aluminum foil. Rooms built in this way have been shown to offer more than 50 dB of shielding up to several hundred MHz.

How To Protect Red-Dot and Laser Sights From EMP

This video shows how to use RF cloth to protect red-dot, laser, and other electro-optical sights from an EMP. Testing was done in my laboratory to determine which RF cloth performed best for EMP protection. This particular cloth is made with stainless steel fibers. You can use this for guns that are kept outside of a metal safe, or as an additional layer of protection for those kept inside of a safe.

Protect Generators and Cars from EMP

This video describes how to protect generators and cars from EMP using a conductive cloth to protect cars and generators from a high-altitude nuclear EMP attack.

Testing the Shielding Effectiveness of a Metal Garbage Can

Many people are looking for an inexpensive Faraday cage to protect personal electronics from a nuclear-generated EMP. Unfortunately, it requires quite a bit of test equipment to determine shielding effectiveness.

On the transmit side, it requires a signal generator, a high-power amplifier, and a broadband antenna. The receive side requires a small, battery-operated spectrum analyzer. I’ve done quite a bit of testing on various makeshift Faraday cages, and this article discusses the effectiveness of a metal garbage can.


faraday-cage-trash-canA baseline open-air measurement is first taken to determine the ambient field levels at some predetermined frequency (i.e. 500 MHz in this case). The levels at the spectrum analyzer are shown to be at -36 dBm.

faraday-cage-trash-can-1
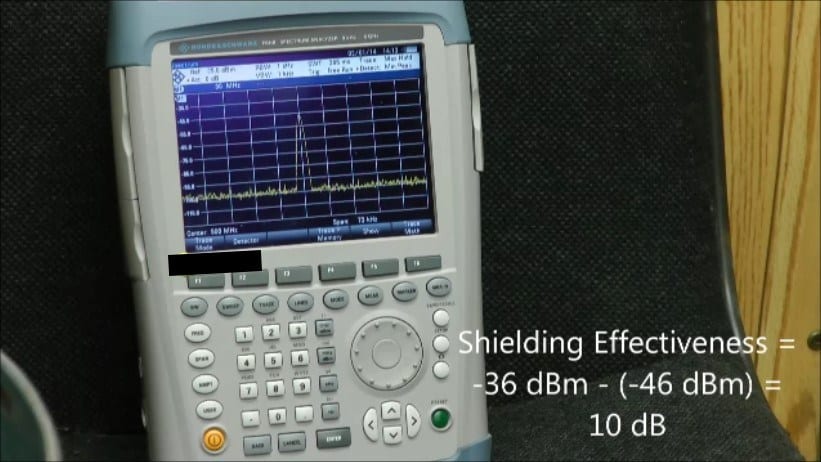
When placed inside the garbage can, the measurement is shown to be -46 dBm, meaning that the can offered 10 dB of shielding. Not too great!


faraday-cage-trash-can-readings
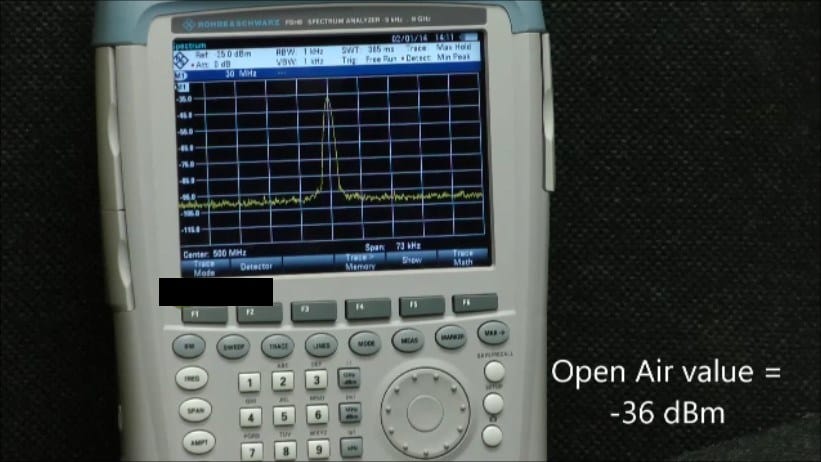
Much of the energy was believed to be coming in through the seam around the lid. It was, therefore, taped with conductive tape and the measurement repeated.

Next, the spectrum analyzer is placed into a metal garbage can, and the measurement is repeated.

The new measurement was shown to be at -77 dBm, meaning that the taped can offered 41 dB of protection. Much better!

Faraday-cage-trash-can-testThis experiment showed that a metal garbage can can serve as a very good Faraday cage, but only if the seams are taped. Remember, it is not small holes that matter most, but rather long narrow slots, such as those around the lid’s seam.

faraday-cage-trash-can-shelding-effectivness
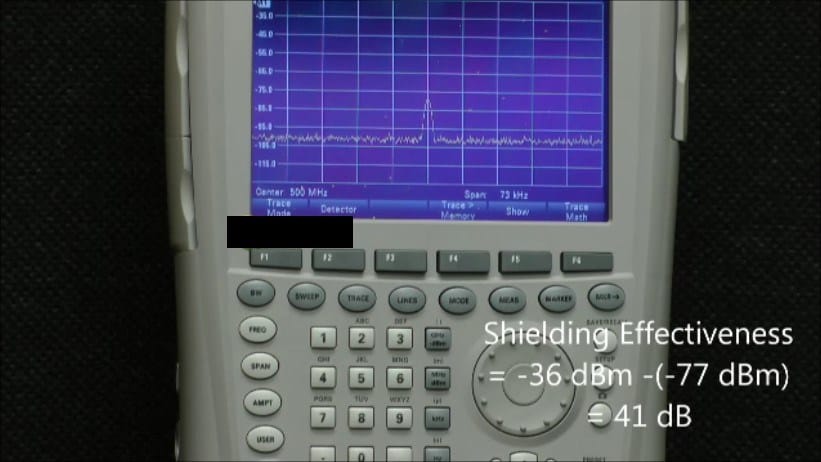
Expensive EMI copper tape and cheap aluminum duct tape both worked equally well, so a quick stop at the hardware store will get you what you need.
To learn more about EMP protection, check out Disaster Preparedness for EMP Attacks and Solar Storms. Also, to find the highest quality EMP bags, see http://disasterpreparer.com.

To order Dr. Bradley’s EMP book please go to Amazon.com. To sign up for his free Practical Prepper Newsletter, Email: newsletter@disasterpreparer.com .

Remember, true survival isn’t merely about making it through – it’s about effectively navigating and thriving in challenging circumstances. Equip yourself well, stay informed, and always be prepared.

Filed Under: Featured Articles, Prepping

How To Get Rid Of Cockroaches Without An Exterminator

July 17, 2019 M.D. Creekmore

HOW TO KILL Cockroachesby Tia G.

Growing up, I had the pleasure of never seeing a roach, except on T.V. I grew up with the assumption that only dirty people had roaches. When I moved to Texas, I found out how wrong that assumption was. Even the cleanest of homes can get infested with roaches and it doesn’t take much.

My first apartment in Texas appeared to be clean. Nice neighborhood, clean grounds, the apartment itself looked and “smelled” clean, all the stuff you look for when moving into an apartment. I didn’t know the signs to look for, or even that I needed to look, for a roach infestation.

Within a week I saw my first roach. It was huge and it flew right into my hair. I found out later it was a wood roach or a palmetto bug. Did I mention it flies? After an hour-long shower, and scrubbing my hair a dozen times, I was fine. After all, the bug was outside and I was inside, so I was safe-right? Wrong!

My first-midnight foray into the kitchen proved just how wrong I was. There were roaches everywhere on the floors and counters. Of course, I didn’t have any kind of bug spray, I didn’t even have a flyswatter. I went around with a flip-flop smacking all them I could catch while doing the “ewwwe dance.”

The next morning I stormed the manager’s office complaining. I was practically laughed out of the office with the advice to go and buy some roach spray. I keep a clean house, and this is probably some kind of a fluke, some roach spray should get rid of them, so I believed. That started my two year battle with them.

You can name any brand of roach spray, gel, trap, bait, and fogger, and I will guarantee that I have tried it. I moved into a different apartment that sprayed on a weekly basis. I cleaned, and cleaned, and cleaned some more. All food was kept in an airtight container or in the fridge. Nothing seemed to help. When I sprayed, it was like they spread.

When when I used the baits, they seemed to multiply. When I fogged, they would disappear for a day or two, and then would be back in full force. It got so bad I was seeing them not only at night but during the day.

My breaking point happened over two events. I went to make a pot of coffee and there were roaches crawling all over and in my coffee pot (to this day I still drink instant coffee) and my daughter got up from the table during breakfast, came back and there were roaches all over her food. I freaked out.

I had tried everything I could think of to get rid of them and nothing was working. How do people live like this? How do people get away from them? I tried moving and they just packed themselves into my stuff and moved with me. I keep my house clean as can be, I even tried pouring straight bleach on the counters and they seemed to enjoy playing in it.

After having my little breakdown, I had a thought pop into my head. “Know thy enemy.” No one said that it only applies to people. So what do I know about roaches? They are creepy and nasty. They carry disease, and would probably survive a nuclear holocaust. Time to do some research.

I learned so much about them, things I never wanted to know. It confirmed that I NEEDED to get rid of them, but that the approach I was taking would NOT work. Here are three things that told me I needed to find a different way:

1) Roaches can eat and survive off of pretty much anything. From that microscopic crumb that got left behind, to the glue on book bindings, stamps, and envelopes. They will also eat body parts that they shed and other dead roaches. So in essence, they can feed each other, and don’t need the food you have in your home.

2) Just like we build immunities to antibiotics and other medications, roaches can become immune to the chemicals we spray on/feed them.

3) They can hold their breath for an obnoxious length of time, 40 minutes. That means when you start spraying, unless you are hitting them directly they hold their breath and scurry off to a safe location, usually in another room. It works the same for the foggers, they hold their breath until they can find a pocket of fresh air the chemicals cant reach. So in spraying all the roach sprays, I effectively spread them throughout the apartment.

With those being some of my biggest problems, how do I work around it? An internet search on getting rid of roaches brought up so many sites selling pesticides, and all the exterminators, that I would never find what I needed that way.

I did a search on “alternative ways to kill roaches” and it came up with mixed results.

Where I struck pay dirt was when I looked up “natural ways to kill roaches.” On site after site, three things kept popping up. Diatomaceous Earth (DE), boric acid, and baking soda.

Here Are My Results For Each:

Diatomaceous Earth: I found that it does kill roaches if you can actually get it on them. The problems were that you do not want to breathe this stuff in so it really limited where all you could place it, and the roaches avoided it. Where it really helped was that I was able to put it in the dog and rabbit food. It was safe for my pets to eat and yet kept the roaches out.

*****NOTE: if you buy DE make sure you buy the FOOD GRADE as the stuff they sell for pool filters is very toxic to people and pets.

Boric acid: I first tried Borax as I had some in the house. The problem with the borax is it caked really easy and would not work. I then bought the both the powder and tablet form of boric acid. I believe this to be the reason I am now roach free.

The powder form I found at the dollar store for $3 a bottle and the tablets I found at a grocery store for around the same price. I put the tablets under all appliances, in the back and corners of my cabinets, and anywhere I didn’t want loose powder.

I put the powder in a very thin line around all baseboards, on my bookcases, and anywhere else I needed a large area covered. I would sprinkle it all over my floors and counters at night before going to bed, cleaning it up in the morning. It was not a quick success by any means. It took a couple of weeks for me to notice a difference and a couple of months before I completely stopped seeing them. The trick with boric acid is to put it in very thin lines otherwise the roaches will go around or jump over it.

Note: be very careful using boric acid on and around areas that you prepare food. It is toxic.

Baking soda: here is where I started and had my least amount of success. The roaches were not interested in the baking soda by itself. When mixed with sugar (which is the most recommended) it became a hard sticky mess, at least in my high humidity area. It did work if you changed it out every day so the mixture would be fresh, but you couldn’t spread it out like with the boric acid.

It took about six months of trying all the different techniques and finding the one that worked in my home. In the end, although I believe it to mainly be because of the boric acid, I used a mixture of the three things.

I used the DE in the pet food, the boric acid pretty much everywhere else, and I would fill bottle caps with the baking soda/sugar mix and put them up as bait stations throughout the house in problem areas, making sure they walked through the boric acid to get to them.

I have now been roach free for 4 years. Even now, and after moving into a house, I keep lines of boric acid down behind the baseboards, and the tablets in my cabinets and under appliances. I still buy DE to mix with the animal food. The boric acid, as long as it is kept dry, will last for years. Some easy measures to take so that if/when SHTF and sanitation becomes an issue, it is one less thing for us to worry about.

Filed Under: Uncategorized

Escape and Evasion Survival Kit [aka Wilderness Survival Cache]

July 15, 2019 M.D. Creekmore

Escape & Evasion Cache

Please note: I wrote this post way back in 2010 and wanted to share it here with you by re-posting. I hope that my writing ability has improved at least some since then. 

I’m sure everyone reading this is familiar with the bug out bag – essentially the escape and evasion kit is based on the same concept, but with several advantages.

Don’t get me wrong, having abug out bagis a good idea, however a back-up plan, for your backup plan is even better – let me explain.

Depending on the situation, getting to your bug out bag may not be an option and let’s not forget the possibility of loss to fire, theft or another unforeseen event.

If the bug out bag is plan B, the escape and evasion kit should be considered plan C.

I know what you’re thinking – what is an “escape and evasion kit” and how do I get one? For the purposes of our discussion, an escape and evasion kit is basically a cache of supplies, hidden in a secure place. 

Unfortunately, I don’t know of any ready-made kits or at least none on par with what we need, so you’ll have to assemble yours yourself. 

Obviously, the first thing you’ll need is a container for securing your kit. I make mine from four-foot sections of 6-inch Schedule-40 PVC pipe with a permanent end cap on one end and Cleanout adapter and Threaded Plug on the other, both held in place with PVC cement.

Contents will depend on location and need – every situation will be different with kits being modified toward specific individual needs. Here are several areas to consider…

  • Shelter – Space Blanket, Plastic Trash Bags, Thermals.
  • Fire – Matches, Flint and steel, Magnifying Glass. Cotton wool.
  • Water – Sterilizing tablets, Filter, Collapsible Canteen and Cover.
  • Food – Fish-hooks and Line, Snare Wire, Slingshot Rubber, Food.
  • Cooking – Sheet of Aluminum Foil, Small Cooking Pot, and Utensils.
  • Medical – First-aid kit and Related Gear.
  • Tools – Mora Knife, Swiss Army Knife, Multi-Tool, Ka-Bar Kukri Machete.
  • Navigation – Compass, Topo Map of Area.
  • 0514173144/Light – LED Flashlight, Headlamp, and Batteries.
  • Rope and Cordage – Fishing Line, Spool of Dental Floss, Para-Cord.
  • Repairs – Sewing kit, Duct Tape, Crazy Glue.

It’s a good idea to pack items with a potential for leakage at the bottom of the tube,  and items of an immediate need (first-aid, etc) near the top.

Remember this is an escape and evasion kit, a last-ditch effort at survival, you could be wounded, pursued or both. Keep those items near the top and within reach.

Since you won’t be checking or replacing contents often, food items should be of low moister and suitable for long-term storage. You may find it a good idea to have a separate cache of food items aside from your main escape and evasion kit. I have one stuffed full of Mountain House Pouch foods and another with beans and grains.

After you get your tubes assembled and filled, it’s time to start thinking about security, or more specifically where and how to hide your kit. You don’t want to go through all this trouble and expense, just to have some two-bit thief or jackboot thug come along and steal what you’ve worked to put away.

Bug Out Bag Checklist (Ultralight Survival Pack)

The escape and evasion kit should be hidden away from your home or retreat and not buried in your backyard. Remember this is an effort of last resort. The escape and evasion kit acts as an insurance policy should you lose or be denied access to your home storage.  Having it buried in your backyard would be self-defeating.

These tubes (if constructed properly) are waterproof and could be submerged underwater without risk of damage to the contents. But erring on the side of caution, I look for a well-drained area not easily accessible to heavy machinery such as logging equipment.

When moving to the cache site, it’s a good idea to have someone scout the area ahead, hopefully averting the possibility of you being seen. The last thing you want is to run face-to-face with a group of hunters, hikers or police.

The scout can move ahead alerting you, by two-way radio if anything is out of the ordinary or if someone is heading your way, allowing you time to react and avoid detection.

When digging, it’s best to go slowly – stop often and scan the area for potential threats. Again, the scout can offer security by watching the most likely avenues of approach and giving advanced warning. 

Use a manual post hole digger to excavate a hole straight down and as deep as possible. Insert the tube in a vertical position into the hole and bacK-fill with dirt.

Carry an old tarp to pile the dirt on as you dig. Dispose of this in a discreet way out of sight and away from the cache area – when you finish, the area should look the same as it did when you started.

Foiling Metal Detectors:

  • Bury in a junkyard or a dump.
  • Seed the area with ferric chloride
  • Litter the area with metal shavings and debris
  • Old abandoned farms usually have pre-existing metal debris
  • Abandoned surface-mines are naturally seeded with discarded metal
  • Deserted log landing and yards can be good areas

It’s best to hide in an area with “naturally” occurring and pre-existing metal debris in fact seeding an area with metal can have the negative effect of drawing attention to it. 

Look for locations where such metal deposits would be considered normal and if needed add to this. Remember the best security is keeping your mouth shut.

A bug out bag is great for getting out of dodge in a hurry – a bug out bag combined with an escape and evasion kit and you just might make it. What do you think…?

Filed Under: Bushcraft

  • Page 1
  • Page 2
  • Page 3
  • Go to Next Page »

Primary Sidebar

Subscribe to Blog via Email

Enter your email address to subscribe to this blog and receive notifications of new posts by email.

Join 7,202 other subscribers
  • Amazon
  • Facebook
  • Substack
  • Twitter
  • YouTube

“Do more with less.”

– Minimalist proverb

Recent Posts

  • Just so you know
  • Weather Update for My Corner of Appalachia
  • Why I’m Ordering Ivermectin + Mebendazole Every Year
  • The Website’s Shutting Down (But Here’s the Plan)
  • You Are Hated! Start Training Like It!

Footer

Recent Posts

  • Just so you know
  • Weather Update for My Corner of Appalachia
  • Why I’m Ordering Ivermectin + Mebendazole Every Year
  • The Website’s Shutting Down (But Here’s the Plan)
  • You Are Hated! Start Training Like It!

More about me

Books I’ve written

Books I’ve read

Follow Me on YouTube

Follow Me on Facebook

Gear I Use and Recommend

Newsletter

Search this site

Follow me elsewhere

  • Amazon
  • Facebook
  • Substack
  • Twitter
  • YouTube

© 2008–2025 M.D. Creekmore · As an Amazon Associate, I earn from qualifying purchases.