• Skip to main content
  • Skip to secondary navigation
  • Skip to primary sidebar
  • Skip to footer

M.D. CREEKMORE

  • Blog
  • Books
  • Newsletter
  • Gear I Use
  • About
  • Contact
  • Facebook
  • YouTube
  • Blog
  • Books
  • Newsletter
  • Gear I Use
  • About
  • Contact
  • Privacy Policy
You are here: Home / Archives for M.D. Creekmore

M.D. Creekmore

Hello, I’m M.D. Creekmore. I’ve been interested in self-reliance topics for over 25 years. I’m the author of four books that you can find at Amazon.com as well as Barnes and Noble. Over the years, I’ve learned a lot about prepping, homesteading, and self-reliance topics through first-hand experience and now I want to share what I’ve learned with you.

Homesteading 101 – Prospective Homestead Priorities

August 8, 2018 M.D. Creekmore

by Patient Momma

LOG HOME HOMESTEAD

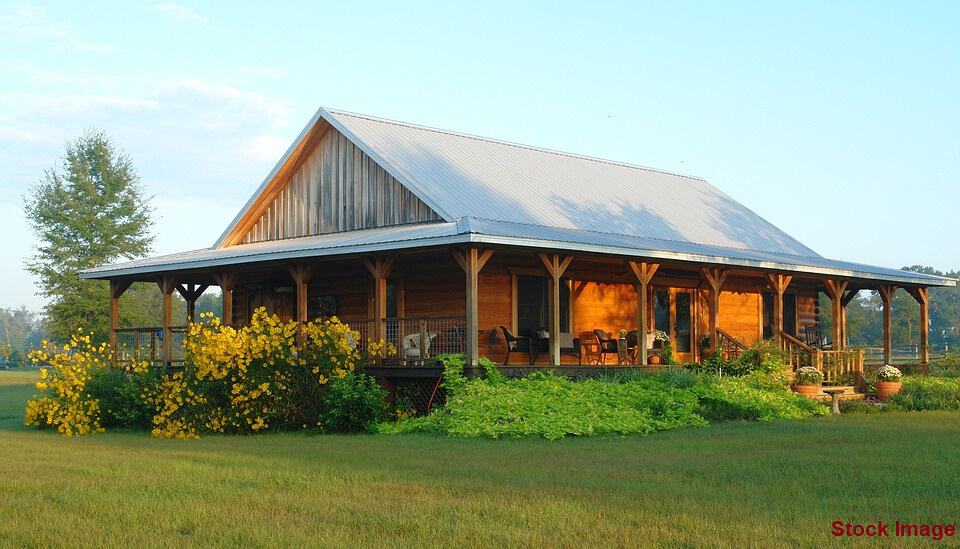
I have heard of and read some sad accounts of people purchasing property to begin their dream of homesteading, only to find thousands of dollars of expenses facing them. I’ve watched some of those ‘Homestead Rescue’ programs on TV and wondered what in the world were those people thinking?  This article is based on the premise that you’ve decided to get out of the city, to purchase some land with an existing on-grid residence and start homesteading in the country.

Life Style Change

Moving to the country and establishing a homestead is a major lifestyle change for the entire family.  I strongly suggest a family meeting and the reality of the situation be discussed before you even think about looking at property. If you have to work outside the homestead, how long will the commute take?  If children are part of the family visit the appropriate schools and find out if there is bus service to the prospective homestead or decide if you want to homeschool.  If your spouse is not in total agreement with to moving to the country you might be better off just getting yourself some acreage with a hunting cabin for a BOL.

Are you healthy and physically strong enough to do the work a homestead requires?  How far are the closest gas station, grocery store and doctor?   What are the roads like?  The further away from civilization you get, the worse the roads are.  Many country roads are gravel and oil or just gravel or dirt with blind curves and hills.  The countryside is dark…there are no street lights, no painted lines or curbs. Just realize that you leave convenience behind when you move to a country homestead. The road I have to travel is dangerous in the daytime and deadly at night.

When You Decide to Make the Move to the Country

You have been looking for your country property for a while and you made the effort to look at the property in person, not just on the internet. You have finally narrowed your choices down to two places you think would make a good homestead. This article is about taking a serious look at the homestead you are about to buy, so you can put some contingencies in your contract, if needed, to protect yourself.

No offense meant, but most city folks are somewhat oblivious to how things work and what goes on in the country on a regular basis.  Not because they are stupid; but because they are used to the city proving water, electricity, sewage, trash removal, etc.; all for a hefty fee of course.  They are also used to the landlord fixing the all the problems in their abode.  Unless folks were raised in the country, they usually don’t have any experience with well pumps, septic tanks, propane stoves/heaters, wood stoves, plus big bugs, mice, snakes and predators, etc.

Ask Questions

Is the property within city limits or is it just part of the county? It is possible to have a city mailing address but not be in city limits.  So what; why do you care?  If you are within city limits you are subject to city taxes plus all the little annoying rules; like you can’t have chickens, you can’t burn your trash, you can’t fence your property, you can’t build an outbuilding or anything without a permit, etc.  Most country properties are zoned as farm or ranch; but some are not.  You should have a list of questions the seller or the realtor needs to answer so you can make an informed decision.

If you are negotiating with a For Sale By Owner (FSBO), make sure you are familiar with the standard real estate contract for your state.  If you are purchasing a FSBO in a new state, you should consider having a real estate attorney work your contract for your protection.  Country folks are not as dumb as TV makes them out to be.

Inspect the Property

Looking at pictures on the internet is not accurate enough to base a purchasing decision on. You must have an in-person visit to see if 13 of the 15 acres advertised are up a mountain and only suitable for goats. When you see a photo of a beautiful view of a river and rolling hills, remember that the view is looking down and the advertised property has been carved out of a mountain that you have to drive up and down on a dirt or gravel road in all types of weather.

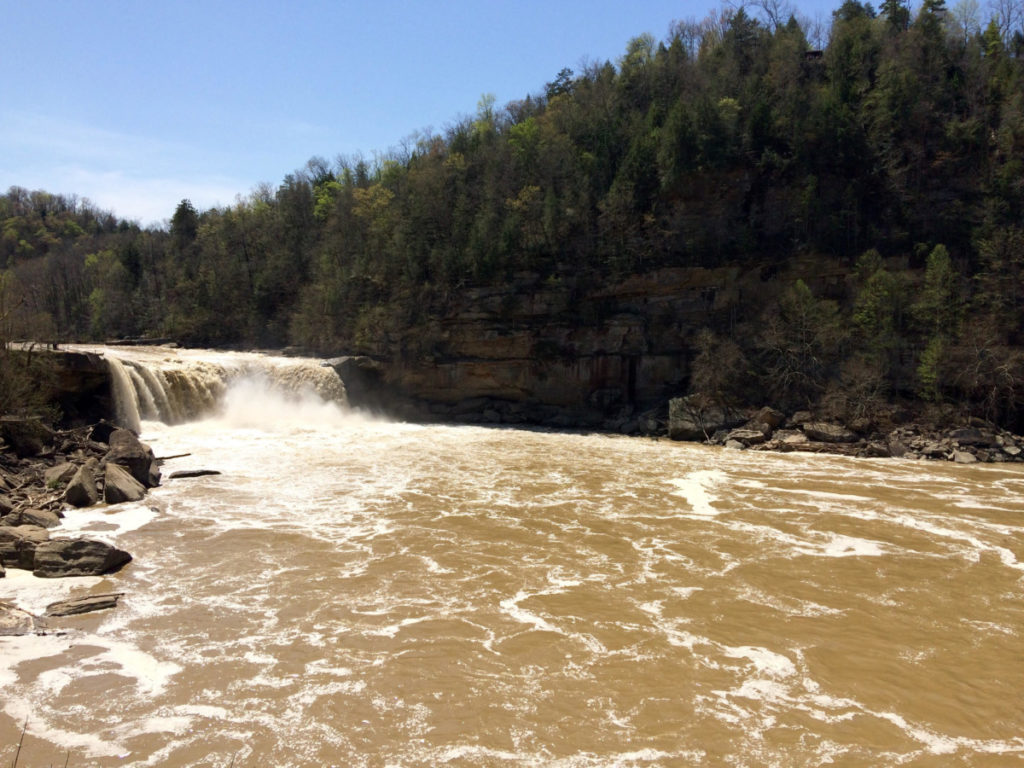
When you go to look at the homestead walk or drive the property (ATV or 4-wheel drive truck) and have the seller point out all the water sources. Is there a pond or lake? Does it flood over in the spring runoff or go dry in the summer heat? Is there a stream moving through the property; if so what is upstream and does it flood during the spring runoff?  Are there natural springs on the property or waterfalls off the hill or mountain? Is there wildlife roaming the property or is it strictly cattle pasture?

Inspect the Residence

When negotiating on the property, make sure you know the condition of the residence’s structure, roof, electrical wiring, plumbing, water well and septic system.  If you are not knowledgeable, you will need to get specific people to do these inspections as the average city home inspector, who charges $400-$700, does not do structural, wiring, pipes, wells or septic. The team of experts you need to do each inspection (structural, roof, electrical, plumbing, water well, septic) will add up to about the same cost but it would cost you more if you use a standard housing inspector plus the team of experts. These inspections can save your sanity and thousands of dollars.

Do not purchase anything without knowing the particulars of these categories. If you are purchasing a vacant property and using a realtor, insist that the realtor find out information from the seller or from public records.  The realtor is paid on commission so make s/he do some work.  If s/he cannot find the information on these critical systems, insist on the seller buying a Home Warranty Insurance Package covering all of these areas. A country package covering well and septic etc., is more expensive than the usual appliance package because they are extra riders to the basic policy.  This protects you for a year. Maybe you want the property in spite of the failures or unknowns, but at least make sure you are aware of the true condition so you know what you’re facing.

Get a Structural Inspection

If the residence is more than 15 years old, first on your priority list should be a structural inspection. Earth settles and the structure moves with it.  Sometimes older residences were built without spec and codes so determine whether the house sits on a cement slab, footers or other type of foundation. If you set a ball on the floor and it rolls across the floor that is a problem. The structural engineer will tell you what the problems are, which could be anything from foundation cracks to failed supports, sinkholes, crooked walls, warped beams, even fire damage. Sometimes the seller is not aware of the structural problems but you need to be before you sign on the dotted line.

Have the Roof Inspected

Make sure you get a reliable company to inspect your roof.  Depending on the location and age of the house it could be a lot worse than it looks. There is no substitute for an expert walking the roof for inspection. In my case the roof had to be replaced because of hail damage and the seller’s insurance paid $10,000 for the replacement.

Beware of DIY Seller Projects

A lot of country properties have homeowner DIY projects done to them; so you need to have experts look at the different things.  My brother bought a 23-year-old house only to late find it had aluminum wiring which could not handle the load of a modern home.  It cost him $15,000 to have the house rewired.

I anticipated the wiring needed updating in the 40-year old house.  I had an electrician come to inspect the wiring and give me a quote on what needed to be replaced, to install new outlets and to put in an another circuit breaker box to safely carry the additional load of newer appliances and multiple refrigerators and freezers. While he was there we found the wiring to barn was run underground from the over-loaded house circuit and without a protective PVC pipes.  The entire system for the tool shed to the barn had to be rewired to meet county code. If the work is required to meet county code, the seller usually has to pay for the update; but it is negotiable.

Inspect the Plumbing and Pipes

If your prospective home has a crawl space somebody needs to get dirty and look at the pipes and vapor barriers to see if they need fixing.  If your location gets cold snowy winters, you really need to have the plumbing pipes wrapped before you move in. It will save you from having to drip the faucets and spigots when the temps drop way down and the pipes are liable to freeze.  In my location we have very mild winters with very few nights below freezing so I decided I didn’t need every pipe in the crawl space wrapped and insulated. However, I found out I did need the exposed outdoor pipes protected and had to do that myself the day before the temperatures dropped to record lows in my area.

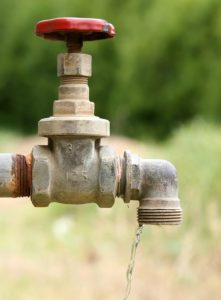
Check Out the Water Well

Most country homesteads use well water not city water.  Of course, you ask the seller how old is the well pump and how deep was the well drilled.  Some counties require paperwork when a well is drilled and installed; some don’t.  But checking the records in the county courthouse may give the date the well was drilled or motor last replaced, which is a big help to you.  Unfortunately, the well guy cannot stick a camera down the pipe and see if something is wrong. The well is either pumping or it isn’t.  Changing out the well pump is time-consuming and if the well guy is going to pull 100’ or 140’ of pipes to get to the motor, you might as well have the entire system replaced.   If the property does not have electric power to test the well, just assume it is not working and negotiate the price of a new pump and/or well drilling in the offer.

The more use the well gets the faster the pump wears out.  For example, if your well is used by two people for house water and washing cars it may last 10-12 years.  But if you have 5 or 6 people in your family and are additionally turning the spigots on and off by watering the garden, the animal barns, outbuildings or filling pasture water troughs from one well, the pump will wear out much faster. Depending on where you live, replacing just the well pump can run you around $1,000 to $4,000 depending on the depth of the well. Drilling a new well can cost between $3,000 to $15,000 or higher depending on your location and geology of the ground.  It’s important to be informed before you buy.

What is Your Backup for Water Delivery?

Another priority is your water backup system(s). Ask the seller if they have a backup if the electricity goes out (most well pumps run on electricity) or the pump fails.  We added two backup water systems after we moved in. Our DIY rainwater catchment system is a simple series of gutters, downspouts, and barrels. The rain rolls off the metal roofs of our outbuildings into gutters which have downspouts into 55-gallon food grade barrels. Each barrel sits up on concrete blocks and has a spigot to drain water or attach a hose.  Our redundant off-grid water system is a separate well with a Simple Pump, which is out of sight in an outbuilding.

Know the Age and Condition of the Septic Tank

The age and condition of the septic system is important to know.  The older the septic the stronger the chance of having trouble; which is something you don’t ever want to experience. The size of the septic depends on how many bathrooms, the number of people living in the home and how new the kitchen is; meaning is there a dishwasher, garbage disposal, automatic ice makers, etc. If you don’t know when the septic was last serviced, go by these fabled words: when in doubt, pump it out!  It is better if you can negotiate this action as a part of the selling contract, just like you would a termite inspection.

If the septic system is really old, it is possible the tank may be compromised. A friend purchased an older property and found out the hard way that tree roots had damaged the tank and over run the drain field. An instant $15,000 bill, which homeowners insurance may not pay unless you have a rider. The property I purchased did not have a septic tank; they had the old country system of a pipe running out to the woods.  I refused to buy the property unless they put in a septic system, which the seller did.  On average, a septic tank needs to be cleaned out every 4 or 5 years; but, if you have a house full of females, it only takes 2-3 years to fill up.

Inspect the HVAC System

If the residence has an HVAC system, have it checked out by a reputable person/firm. Just because you can feel hot or cold air coming out the registers doesn’t mean the system works properly.  A new heating/cooling system costs from $5,000 to $13,000 for the average 3 bed/2+bath house, depending on the quality you purchase.  Getting it repaired vs buying a new system can be negotiated with the seller.  When you call for a vendor inspection appointment be sure to ask what the service visit costs; because driving an hour each way to the country is not free.

Check Out the Wood Stove

Depending on the age of the wood stove it may or may not have a blower system.  It may or may not have fire bricks.  If it has tempered glass on the door, check the stuff that is holding the glass in. I say stuff because it varies by age, brand and if it meets current code. If the stove is free-standing, the stove pipe to the outside needs to be checked for cracks or holes so you don’t die in your sleep from carbon monoxide poisoning.  If the pipes are rusted they should be replaced. The insides should also be cleaned to avoid a stove fire which could burn your house down.

If the wood stove is in a fireplace, make sure the flue lining is cleaned and solid. If it has blowers have the wiring inspected and the motor cleaned. It is not very expensive to have the stove, pipes and motor serviced and it is worth it!  Depending on where you live and who your insurer is you may have to have a special rider to your policy if you have a wood stove.

Look at the Barn and Out Buildings

Does the property have an existing barn?  Does it have existing outbuildings? What condition are they in? If you are planning to farm or ranch you will need these structures.  A small metal barn can start at $20,000 and go upwards.  Building an 8’x10’ wood outbuilding will cost you around $500 for materials if you build it; more if you hire a helper.  If you buy a pre-built 10’x16’ metal shed it can run between $1800 to $3000, depending on quality.

Security of a Storm Shelter

High on your list of priorities should be a storm shelter or safe room.  Once you have been through a severe storm that rips your house apart while you cower in the bathtub with a mattress over your head, you won’t live anywhere without one.  Your location will determine whether it is a deep basement, a mid-house safe room or an outside storm shelter.

My location gets a lot of thunderstorms, which can spawn tornadoes.  The existing shelter was an outside concrete and steel framed storm shelter dug in the hillside. I also had a small basement dug as a backup.  I recently saw a new house being built near a town which had a concrete block safe room built in the middle of the house.

How Far is the Fire Department?

You should ask the seller or the realtor how far away is the nearest fire station and does it have a water truck.  There are very few fire hydrants out in the country so the fire department needs to bring the water.  Other items that are critical for country living are fire extinguishers and lots of them.  The further away from a town you are, the more fire extinguishers you should have.  I currently have about 8 scattered throughout the house and barn and I’m ordering a few more for the outbuildings. It is better to get the rechargeable ones; they cost a little more but don’t expire.

If you are buying in dry, wild fire country, you should identify methods of protecting your property.  I know people who lost a home and then rebuilt using concrete block and slate roof.  I have also read about folks who use sprinkler systems in the woods around their houses.  That old phase better-safe-than-sorry applies when you live in the country because your house could burn to the ground before the rescue/fire department/sheriff gets to you.

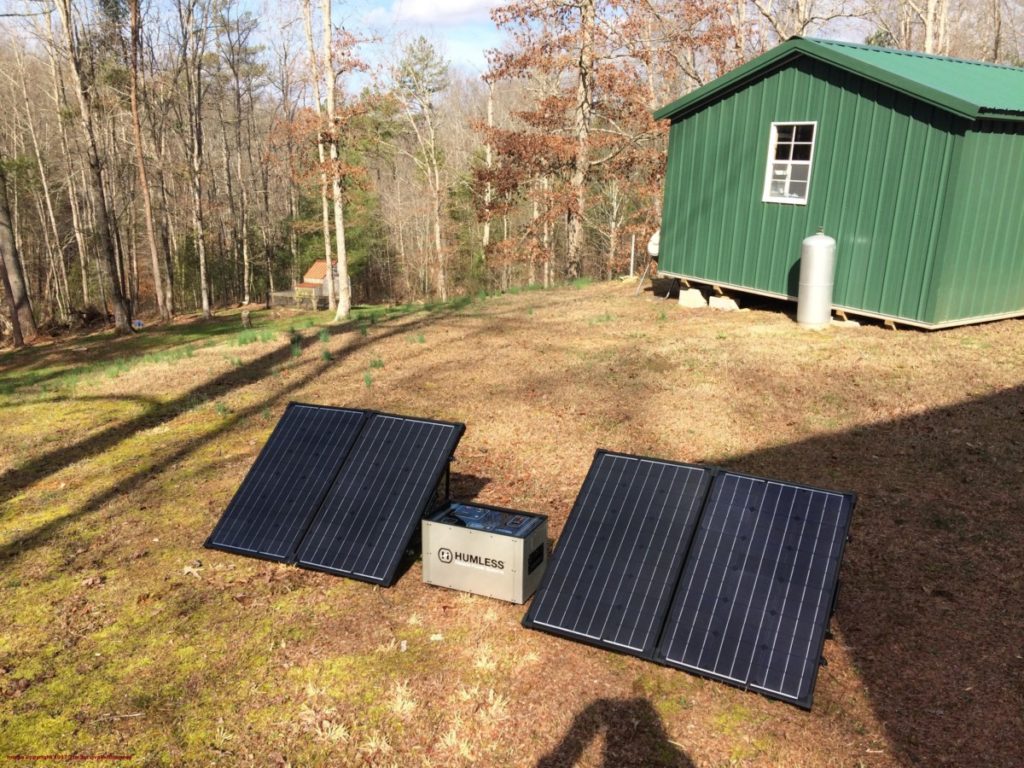
Backup Power Systems

Many country homes get their power from an electric cooperative via above-ground wires, aka telephone poles, which are prone to failure during any type of a storm. During storm season our power goes out, but usually for less than 48 hours.  Having a backup power system keeps everyone calm and systems working.  Again, it depends on your location on what you get.  Do you have enough sun for solar, wind for turbines or do you want to use a generator?  For short-term emergencies (+/- 3 months) we have a propane standby generator for the house and a portable generator for the barn.  The smaller outbuildings are solar powered.  We are still trying to figure out the best system or method for a long-term grid-down electrical outage.

Is There Protective Fencing?

Another item I consider a priority is fencing.  Living out in the country you are going to have loose critters; e.g., dogs, cats, goats, pigs, raccoons, armadillos, foxes, opossums, coyotes, deer and the occasional lost cow.  Those who choose to be in or near the mountains will have more dangerous critters such as wolves, big cats, bears, etc.

There are no leash laws in the country and some folks let their animals free range.  Many domestic animals roaming free are not vaccinated and wild animals carry a host of diseases.  A 5’ or 6’ agra fence will keep your family and animals safely inside your compound and most of the stray critters away from your house.

If you have deer in your area you will need an 8’ fence around the garden; a plastic deer fence will do.  A friend of mine used a couple of strands of hot wire which kept the deer out, but not the smaller critters.  At a previous home I had an 8’ plastic deer fence around my garden. One morning I looked out and saw a raccoon trying to climb the plastic fencing. The fencing swayed back and forth from the weight of the critter and the coon finally gave up and jumped off.

Around your chicken coops, I recommend a 5’ agra fence plus hot wire at 2 levels. The top-level hot wire discourages the owls, hawks and falcons from waiting for a chicken dinner, while the lower hot wire fends off the raccoons, skunks and opossums. For pigs we use 4’ agra fencing with a low-level hot wire. For goats you need strong fencing and multiple ways of locking the mischievous buggers in. Believe me; a stray goat can destroy any garden in one day!  If you run cattle or keep horses you will need 4 or 5 strand barbed wire fencing to contain them.  All this fencing costs money which adds up so if the property has existing fencing that is a plus.

Check Out the Closest Neighbors

Out in the country, the nearest neighbors might be across the road or 10 miles down the road.  I strongly urge you to make the drive and stop by.  Pull in the drive and blow the horn a couple of times until someone gets up off the porch or comes out of the house.  Stand by the car, wave and say hello.  If s/he waves or says hello go and talk to him/her.  If s/he seems contentious or yells for you to get off the property, seriously consider if you want that person as a neighbor.

Inquire about Communications

Depending on the population of the area, the communication systems will vary.  If you are phone, TV and Internet-dependent you need to ask where the closest cell phone tower is and if there is cable laid nearby.  You may have to get satellite TV/internet service and maybe a landline phone.  In my area, we are 12 miles too far from cell tower range and while in sunny weather we can call out and receive text messages, most of our incoming calls roll directly to voice mail.  Satellite internet out in the country is priced by data amounts so if you have game addicts in your house you need to figure out an alternative to online gaming.  If you go over your allotted data amount it slows to dial up speed or you can buy more data at sky high prices.

Be Aware

I hope this article has helped you to consider some of the variables involved when purchasing a country homestead. While setting up and running a homestead is challenging; it is also exciting. Thinking through these basic issues will help you negotiate your purchase.  Be wise and be aware before you buy!

You should also read:

  • Moving Toward Self-Reliance for the Working Poor
  • You Don’t Need To Be Wealthy to Homestead
  • Start Saving Today and Live Your Homesteading Dream Tomorrow
  • The Philosophy Of Tiny House Living – Things To Consider Before Going Tiny

Filed Under: Homesteading

How To Find and Buy Land for a Small Homestead

August 6, 2018 M.D. Creekmore

When you are buying a small homestead

Are you ready to begin homesteading? You’re joining a growing number of Americans who are returning to our roots and living off what the land provides.

So how do you get started? It’s kind of obvious but you need land. In order to find the perfect piece of land, you should consider all the benefits associated with it such as increasing land value, lower cost of maintenance and especially freedom to utilize it in any way you want.

The good news is you don’t need thousands, or even hundreds of acres, to have a fully functional homestead. Indeed, you can homestead on less than ten acres. But it’s not something you should take lightly or do quickly.

As you begin, there are several factors to consider when you are looking for your perfect homestead.

What size property do you need?

The first question you need to ask yourself is what size of property you need for your homestead. And the key word is ‘need,’ and not necessarily ‘want.’ My focus is on smaller homesteads, those less than 10 acres, but there is still a significant difference between an acre or two and 10.

On a small property, it will be tough to have room for cattle to graze, particularly if you are using the property for anything else. You would likely have room for a family milk cow, but not a lot more.

So just spend time considering what your homestead will look like. And what you want it to look like in the future. Have those plans drawn out so you don’t overbuy or underbuy.

How far out do you want to be?

You also need to consider location. Homesteading on a decent sized piece of property is generally not something you do in a subdivision. That means you will likely be moving out of town. The question is, how far out can you be, or do you want to be?

Do you want neighbors? For some, they want to be as far away as they can be. That usually works well because prices would tend to be less the more rural you get (in most places). But think of life’s basic necessities. Are you okay with having to drive 30 or 40 miles to a drug store? Maybe 15 or 20 miles is more your liking. Just make sure you are happy with the location before you sign the dotted line.

Do you want to live off the grid?

For some, the beauty of homesteading is the ability to be totally self-sufficient. You can do that.

Others don’t want to take it quite to that extreme and want electricity, water, relatively accessible roads. Keep this in mind when you spot that dream piece of land.

How much do you want to spend?

As with any real estate transaction, you need to have a budget. You don’t want to make go broke homesteading, but it’s more than just the final price tag of the property to pay attention to.

How much work needs to be done? Not just to the house, but to the property. Does it have outbuildings, or will you need to build them, or at least put money in repairing them? Does the land need to be cleared out? It stands to reason you will need to put some money into making the property right for your needs.

What kind of land do you need?

When you think about the plans for your homestead, consider what you need the land to provide. If you are relying on a wood stove to heat the house, do you have sufficient trees for your needs? If you will have cattle, does it have open land for grazing?

These are just a couple examples of questions you need to ask. In most instances, you can work the land to make it right for you, but that might not be preferable.

How much work do you want to do in preparing the land?

As a follow up to the previous question, think about the work you want to put in. One response might be that you just want to purchase a small farm or homestead that is being used in a fashion similar to what you envision.

On the other end of the spectrum, you can start completely new. You can buy property that you need to clear, build a house and any outbuildings and bring in water and electricity. This will allow you to have a homestead drawn to your exact specifications but will be time-consuming and costly.

Is the property appropriately zoned?

Make sure you can have chickens, cattle or other livestock on your property. In some instances, you need to make sure you can have outbuildings. The further out you go, the less of an issue this will be. But do make sure you check this off your list.

What about Internet access?

If you are running either a full-time or side business from your homestead, or maybe just a blog, you want to have reasonably fast Internet speeds. Unless you want to spend all of your free time on your computer.

Does it make sense for your needs?

By purchasing a homestead, you are committing to a new lifestyle. It can be a great experience and something you can pass on to your children.

But, you want it to work for you. If you want to be close to school, be close to a school. If you want to be close to town, be close to town. If you have no need for a hundred acres, don’t buy a hundred acres.

This property needs to meet your needs. The previous questions served more as a checklist or bullet points to ponder as you find a property. This is a little deeper. This is about finding a property that is right for you and your family.

You don’t want to make a purchase and regret it. By thinking about these questions, you will be off to a great start in your new life on the homestead.

If you want even more in-depth prepping and homesteading information then please check out my best selling 176-page book “How To Survive The End Of The World As We Know It – Gear, Skills, and Related Know-How. It’s available in paperback and well as Amazon Kindle.

Filed Under: Homesteading

Homesteading and Prepping Open Discussion Forum

July 28, 2018 M.D. Creekmore

Well, folks, it’s one of those mornings… one of those mornings that I wake up feeling like I’ve been hit by a Mac truck with Hillary Clinton at the wheel and driving distracted because she was looking for a Trump Russia collision.

That’s the bad thing about living in Tennessee is the constant bombardment by some sort of pollen, dust, or mold spore. I love Tennessee but honestly, I’ve thought about moving to a different part of the country to find some relief from this allergy/sinus crap.

Anyway, enough complaining about that… by now most of you know that I have another blog, TN Concealed Carry and while that blog in less than two months old it is already getting more traffic than this one…

As for preps, I this week, not a lot of food or gear wise, however, I did buy a new Glock 19X a couple of weeks ago and it’s awesome!

Glock 19 X

Well, folks, over to you…

Filed Under: Uncategorized

Long-Term Food Storage How To – Plastic Buckets, Oxygen Absorbers, Mylar Bags

July 27, 2018 M.D. Creekmore

Long term food storage plastic buckets

I store all my grains, beans, and other dry foods (besides sugar, salt, or sprouting seeds) inside food-grade five-gallon plastic buckets. There is some controversy over what is considered food grade. Most (but not all) buckets with #2 inside a small triangle on the bottom are food-grade. But the only way to be certain is to contact the manufacturer and ask.

You can also order food grade buckets directly from Amazon.com – click here to check the current price and availability.

I buy mine from the local hardware store in the paint department. They also have them at my Wal-Mart, but I prefer to buy from local business owners, if possible. Sometimes they can even be gathered free from bakeries and restaurants. Just make sure that they only contained food products, not paint, chemicals, or other things that can make you sick or dead.

Foods packed in oxygen do not store as well as those in an oxygen-free atmosphere. Oxygen absorbers (available from Amazon.com) work by removing the air from the enclosed container, leaving an atmosphere of 99% pure nitrogen in a partial vacuum inside the buckets.

Do not open the bag of oxygen absorbers until you’re ready to use it because they will absorb oxygen from the surrounding environment, rendering them useless. Have everything ready to go before you open the package. Any unused oxygen absorbers can be stored inside a small canning jar until needed.

Be sure to have everything ready to go before you start. Line the inside of the bucket with an appropriately sized Mylar bag (also available from Amazon.com). These help to keep light and moisture out, thereby extending the storage life of the foods inside. The Mylar bag also offers a layer of protection between the food and the plastic bucket, if for some reason the bucket that you are using is not food-grade.

Pour the food into the buckets a little at a time, shaking each bucket as it is being filled to settle and distribute the contents. Fill each bucket to about ½ inch from the top and throw in one 2000 cc oxygen absorber in each five-gallon bucket of food.

Sealing the Mylar bag is simple. First roll the top of the bag closed on one end, leaving an opening at the other. Then press out any air that is trapped inside. Next, place a 2×4 piece of wood across the top of the bucket, pull the Mylar bag over the 2×4, and seal it across the board with a clothing iron that is set at the highest setting.

Quickly put the lids on each bucket and pound shut by laying the board across the top and striking it with a hammer or rubber mallet (or use a Gamma Lid). After a few hours, the absorbers will create a vacuum that will cause the lids on the buckets to “pop down”, which indicates that there is a good seal and a proper atmosphere for long-term storage.

Be sure to label each bucket with a permanent marker with the date, contents, and weight written on the front.

You might also like:

  • The Doomsday Preppers Quick and Easy Food Storage Checklist
  • Free Printable: 21 Point Prepper’s Checklist For Stocking Up at Wal-Mart

Please add your thoughts, comments, and long-term food storage tips below…

Filed Under: Prepping

How to Store Water for Emergency Preparedness (and It’s Purification)

July 25, 2018 M.D. Creekmore

Prepper water storage tips

Without the threat of severe weather or the need for immediate emergency medical care, potable water will be your first concern following any type of disaster. I always advise my consulting clients to strive for at least three independent sources of water for cooking and drinking. For example, stored water, a water well, and a rainwater collection system.

I cannot stress enough the need for reliable water sources. Without water, most people will die in only 3-4 days – a lot sooner if the weather is hot and you have no shelter, or you have to do a lot of physical labor or activity. So how much water do you need for emergency preparedness and how to you store it?

The answer to the question is that a person needs about two quarts of water per day to stay healthy barring extreme weather or a lot of physical exertion. Adding a minimum of one gallon of water for cooking, cleaning, and sanitation, a medium-sized family of four requires almost 30 gallons of water per week at a minimum just to stay alive. That is around 1,440 gallons per year. This water can be stored in a number of way including five-gallon water jugs for smaller amounts and cisterns for larger amounts of water storage for emergency preparedness… 

Unfortunately, most preppers do not have enough room to store 1,440 gallons of water. Therefore, I suggest that you strive for, at a minimum, 55 gallons per person. If you live in an arid region of the country, I suggest you double or triple this amount.

You will also need to have several different methods of water purification available to you. We will go into detail about water purification methods in the following paragraphs, as well as how to store water long-term.

A Death by Contaminated Water: A few years ago, my grandfather told me a story that illustrates how deadly contaminated water can be. It happened in the summer of 1934 when he was only 9 years old. He was out in the fields gathering corn with his dad, brothers, and sister.

He said it had to be at least 100 degrees because the sun was bright in the sky and the sweat burned his eyes as it dripped from his forehead. His eleven-year-old sister got thirsty, and instead of going to the house to get water, she drank from a nearby stream. She died a few days later.

Upon further investigation, it was discovered that a cow from a nearby farm had died upstream from where she drank, contaminating the water. They used the water from that same spot for years with no ill effects, so they thought it was safe, but it was not.

From U.S. Army Field Manual 21-76

By drinking non-potable water, you may contract diseases or swallow organisms that can harm you. Examples of such diseases or organisms are:

  • Dysentery – Severe, prolonged diarrhea with bloody stools, fever, and weakness.
  • Cholera and typhoid – You may be susceptible to these diseases regardless of inoculations.
  • Flukes – Stagnant, polluted water – especially in tropical areas – often contains blood flukes. If you swallow flukes, they will bore into the bloodstream, live as parasites, and cause disease.
  • Leeches – If you swallow a leech, it can hook onto the throat passage or inside the nose. It will suck blood, create a wound, and move to another area. Each bleeding wound may become infected.

Moreover, pollutants from human activities often find their way into the water – e.g., trash, animal feces, fertilizers, herbicides, oils, heavy metals, salts, and pollutants from vehicles etc. It’s impossible to tell with 100% certainty what water is safe to drink without laboratory testing.

There are, however, some general guidelines that can help. Running water is generally safer than still water. Below are tips to keep in mind as you look for water:

  • Look for clear water.
  • Avoid water that has algae growing in it.
  • Avoid discolored water.
  • Avoid water from marshes/swamps.
  • Avoid cloudy water.
  • Avoid water that has an odor.
  • Avoid floodwater.
  • Water always flows downhill.
  • Listen for the sound of frogs.
  • Never eat snow without first melting it to avoid speeding up hypothermia.
  • Freshly fallen snow on a clean surface is fine but old snow might be contaminated with bacteria.
  • Never drink water from a lake or stream that is near or downstream from agricultural land, factories or mines.
  • Rainwater is perfectly drinkable as it falls from the sky.
  • The safest way to treat questionable water is to first boil it and then filter it.

Water Filters

berkey filterThe spring water where I live runs in a constant flow from the side of the mountain and it is as clear as bottled water; however, I will not drink it or use it for cooking without first running it through my Berkey water filter. A good water filter is necessary, and one of the very first survival preps that you should invest in. I suggest that your first choice is a Berkey water filter system.

My father and grandfather used to drive out to my place most weekends and fill their jugs from the spring – they drank and cooked using the water without any filtration or other purification. They have never had any trouble. Still, I prefer to filter all of my water before drinking.

The Berkey filters are extremely effective at removing pathogenic bacteria, cysts, parasites, chemical contaminants, and impurities. The elements have an indefinite shelf life and will filter at least 3,000 gallons of water before needing replacement. My filters are stored in zip-lock bags inside a small plastic tote.

Boiling Water

boiling water for purification

Boiling water is one of the surest methods of water purification. This method of water purification will effectively kill viruses and bacteria. However, boiling will not remove chemicals and other pollutants such as lead, oil, and fuel.

To purify water by boiling, all you need is a heat source, a suitable container, and water. Bring the water to a rolling boil to kill any viruses or bacteria that may be present. Contrary to what a lot of survival “experts” say, you do not have to boil the water for five to ten minutes in order to kill any viruses and bacteria that it might be harboring. All that is required is that the water reaches a rolling boil.

Warning: boiled water tastes stale; however, the taste is improved greatly by pouring the water back and forth between two containers to re-oxygenate it.

Sodis Method of Water Purification

The Sodis method of water purification is one of the simplest and most cost-effective water purification methods available to the prepper or anyone needing potable water; however, like boiling, the Sodis water purification method does not remove chemicals, metals or other solids. All you need are plastic (PET) or glass bottles, water, and sunlight. The image below from https://goo.gl/m03zMY explains it better than I can in words (image used with permission).

Water Purification Tabs

Water purification tabs have been used by hikers and the military for years. They are a lightweight and portable way to effectively purify water for safe consumption. However, like boiling and the Sodis method, these tabs will not remove chemicals or metals.

The military suggests adding two tablets to a quart of water and letting it sit for thirty minutes or more before drinking. However, there are a number of different brands of water purification tablets on the market and you should follow the exact instructions for the brand you are using.

Purification with Bleach

water purification with bleach
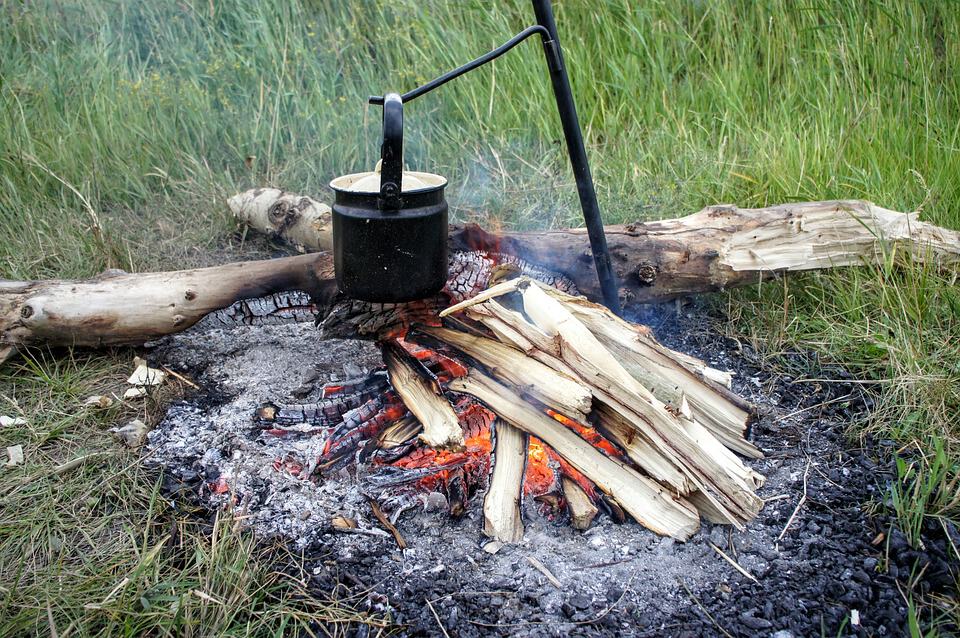
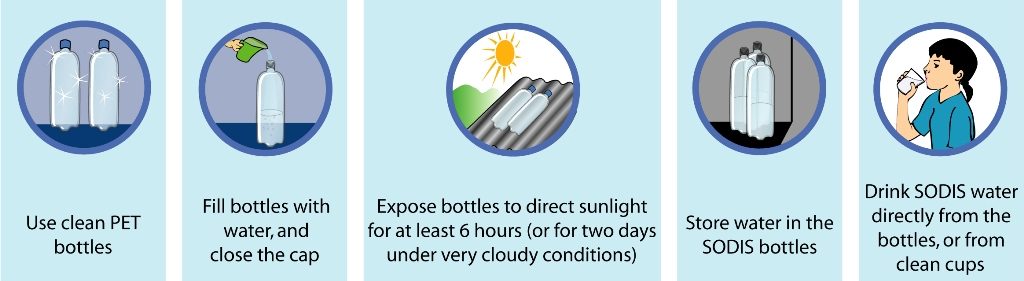
Water purification with bleach is one of those methods detailed in every survival book and any article that even hints at ways to purify water. However, it is not my first choice. If possible, I would use another method such as boiling or Sodis.

Water treated with bleach (only use unscented bleach) tastes like, well like bleach. Long-term use may lead to an increased cancer risk. I do not like it and will not use it unless no other alternative is available. Add four drops of unscented bleach (or two teaspoons per ten gallons) to each two-liter of water and let stand for 30 minutes before using.

Making Urine Drinkable through Distillation

Urine can be made drinkable (and clean) via simple distillation, which will also work for seawater. However, the downside to distillation is that it takes a significant amount of energy to boil the water for the duration required.

Pre-filtering

No matter what water purification method you use, it is a good idea to “pre-filter” any dirty or murky water. You can use a coffee filter, a clean shirt, or a bandana. This will help remove any larger particles from the water, making it more potable and increasing the life of water filters used.

Tips for Storing Water in a 55-Gallon Plastic Barrel

55 gallon water drum for catching rain water
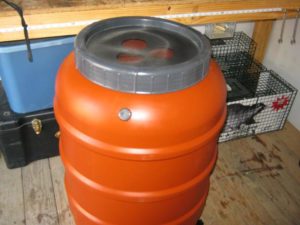
As for water storage, I have six five-gallon containers that I bought at Wal-Mart in the sporting goods department. I have also set up a 200-gallon rainwater catchment system and another 55-gallon food-grade barrel that I installed to catch water runoff from the roof of my chicken coop. I use this water for my chickens, but of course, if needed, I could filter and drink it too.

If you live in one of the drier desert regions, water would be a major concern and that may necessitate the storage of thousands of gallons of water for an emergency. A rainwater catchment can be as sophisticated as the one pictured below or as simple as purchasing a livestock watering tank or kiddie pool and catching the rainwater from your downspouts.

You can also rig tarps or plastic sheeting to funnel the rainwater into the containers. Do not store water in used five-gallon milk jugs. They are not strong enough for long-term storage and will break down and leak.

The five-gallon containers sold in the sporting goods section of most department stores work great as do the 55-gallon food-grade plastic drums. Just be sure that the drums are clean and contain no harmful chemicals before filling. If you must use small containers, emptied 2-liter soda bottles work well. They are stronger than the aforementioned milk jugs, have better lids, and are more convenient to use.

rainwater-catchement-system

A Note about Tap Water for Long-Term Storage

tap water long-term storage
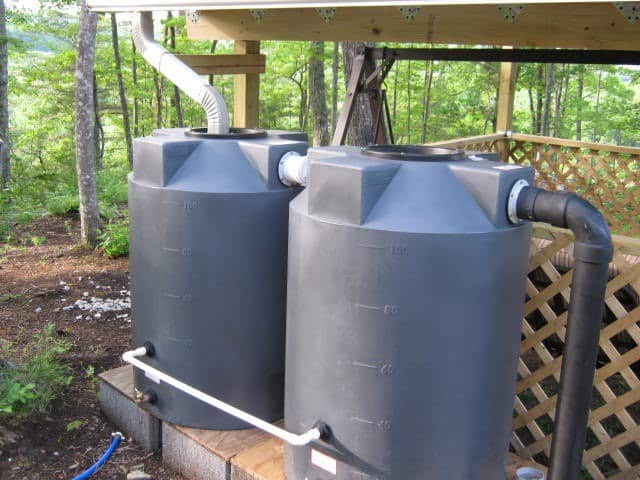
If you are storing tap water from a municipal water system, there is usually no need to add bleach as suggested by some writers. Water from the municipal tap already contains enough chlorine to prevent any bacterial growth and can be stored without any other additives.

When putting water away for long-term storage, I use a Water Preserver Concentrate from Amazon.com instead of bleach. Water preserver concentrate will extend the storage life to up to five years.

Choosing the Right Retreat Property to Ensure Water Independence

When buying a retreat property, your first consideration should be to secure a reliable, non-grid dependent water source. The best source would be a deep well (have it tested before using, especially if it’s an old well). The next best option would be a full-time spring. And finally, the next best option would be a river or creek, or even a pond or lake.

All water from ponds, rivers, and streams should be treated as if it is contaminated with the worst pathogens, just to be on the safe side. Better safe than sorry, I always say.

You might also like:

  • The Doomsday Preppers Quick and Easy Food Storage Checklist
  • What You Should Know About Non-Hybrid Vegetable Seed
  • Mountain House Long-Term Storage Foods: weekly product review

Filed Under: Featured Articles, Prepping

How Do You Handle Emergency Food Storage?

July 20, 2018 M.D. Creekmore

by Moira M

As I write this, we are in the middle of Winter Storm Jonas. There is 13″ of snow in the yard and the closest paved road is five miles away. I haven’t been off the property in five days and did not make a trip to the store to stock up for this storm. Doom and gloom time? Not really. The power was out for about 12 hours this morning. We had coffee, bacon, eggs and toast for breakfast courtesy of the propane camp stove. If necessary, we could wait here happily for the next week or two eating a variety of foods with or without electricity. I always wonder how it would be if we ever had to put our preps to actual use. So far I’m pretty pleased with how we have handled the little mini-crises we have had.

What is the best way to handle emergency food storage? The answer is different based on your situation. Your budget, your family size, your storage area, your special dietary needs, and your location all affect how you handle emergency food storage. But there are some common ideas that everyone can use.

The first rule is that anything is better than nothing. If you don’t have any food in the house, you are completely unprepared for emergencies. While some people may not believe there are people with no food in the house, consider college students (especially in dorms with meal plans for the cafeteria) and singles living in large cities. Everyone needs to have at least a three-day supply of food for something as simple as a hurricane or blizzard. Even a case of the flu could keep you stranded at your house for a few days.

Four Factors of Food Storage

It is important to consider four factors with food storage: shelf-life, calories, nutrition and morale. All four play a vital role in emergency food storage.

Commercially prepared food is usually marked with an expiration or best by date. Many people consider it safe to eat foods after the actual expiration date as long as the packaging is secure, and the food looks and smells good. If you were starving after a disaster, I’m sure you would agree. However, that would be one of the worst times to get food poisoning. Obviously, the food doesn’t instantly go bad at midnight on the date stamped on the package, but how long after is questionable and likely varies from can to can. Home processed foods may be even more in question due to the many factors that can influence the process of canning, dehydrating, sealing, etc. Choosing foods with the longest shelf life and using the oldest food, while replacing it with newer food is a good plan.

The current suggested diet in America is 2,000 calories per day for an adult. Many diets, designed to help lose weight, recommend that you not dip below 1,200 calories per day. You could possibly aim for 1,500 calories per day as long as the adults were not performing a lot of physical activity, such as waiting for a storm to subside. Those performing physical activity such as clearing debris from roads, cutting and splitting firewood, and hiking may require in excess of 2,000 calories per day. If the disaster was very short-termed then the calorie deficit would likely not matter much, but over the long-term physical problems would appear.

Everyone should be familiar with the effects malnutrition has on the body. Like calorie intake, nutrition probably doesn’t matter very much over a short-term disaster. In long-term disasters, it may matter very much. Proper nutrition is important to good health. Likely if you were unable to resupply with good food due to a long-term emergency, you would also not have access to good medical care either.

Morale is often overlooked in food storage discussions. Remember that mental health is important as well, so be sure to include items that your family likes as well as some treats as part of the supply.

How Do You Decide What to Store?

The simplest method to start storing food is to simply pick up a few extra items each time you shop. Choose items you use regularly that have a shelf life of at least one year. When you buy another of that item, you put the newest one in storage and move the older one into the cabinet for use. This has the advantage of being easy to do and allows you to take advantage of items you find on sale. However, it may result in a bunch of assorted ingredients that may not make a normal meal. Gummy bears, green beans and a tin of sardines is better than nothing, though.

Another fairly simple method is to choose one meal your family likes and on each shopping trip, purchase the ingredients to make it three times (or six, or twelve, etc.). This allows you to build a stock of complete meals that your family enjoys. It is flexible in that you can purchase as many sets of the meal as you can afford at the time. Over the course of a year, you would have several days’ worth of a variety of meals that your family likes. You may not be able to take advantage of sales as easily, but it is a pretty solid plan.

An easy, but more expensive way to amass food storage is to purchase commercially prepared freeze-dried/dehydrated meals. You’ve seen these meals in your sidebar advertising if you do an internet search for anything related to prepping. They can be found in catalogs and in the camping section of Wal-mart and sporting goods stores. You can purchase one meal or a sealed container with a multi-day, multi-person supply depending on your needs and budget. Most of these allow you to open the bag, add hot water and wait a few minutes. Those who like these meals note that they are easy, relatively light-weight, very long-term storage, and delicious. Doubters point out that they are expensive and may contain questionable ingredients for preservation.

The final food storage method I’ll address here is what I’ll call the basic ingredient method. You purchase items like flour, cornmeal, sugar, salt, powdered milk, and so on. Even more basic would be hard wheat berries, dried corn or popcorn, and other grains which must be ground with a mill before use. The original items generally have a much longer storage life than a commercially prepared mix. They are versatile because you can make many things with these ingredients. The downside is that if you must store recipes unless you and everyone with you can cook from scratch without them. These items generally require more preparation, longer cooking time and perhaps more equipment compared to the simplicity of opening a can of prepared soup or adding hot water to the camper meal noted above. If you choose this method (and I recommend it as part of your plan), remember to have a trial run of the recipes from time to time. You need to make sure you have what you need. In a disaster, you can’t run to the store for milk and butter, or anything else.

My recommendation is to do all of these together and monitor your supplies to make sure you can make a variety of meals in various circumstances. A friend of ours approached food storage simply. He bought several month’s worth of rice and bouillon cubes. I will admit that this will keep bellies full. However, after a few days, I’m guessing they’ll want something other than rice and bouillon. It is great that he did something – which is again better than nothing! Now that he has taken that step, he can add more items bit by bit. Canned or dehydrated meats and vegetables, plus some sort of bread would be great additions and allow for a bit of variety in his meals.

At first, I looked down on the fancy freeze-dried meals for prepping. Who really needs easy beef stroganoff in a disaster? I can make bread from scratch, thank you very much. Then I realized that these meals are the take-out/frozen pizza night solution for an emergency. If you’ve had a busy day clearing a giant tree that fell in your yard, do you really want to make a meal from scratch? Instead, you can do something simpler and quicker, whether it is boiling pasta to serve with canned sauce or adding the boiling water to the easy beef stroganoff. I’ve tried several of these meals now, and they really are quite delicious. Say what you want about powdered eggs. These people add meat and other flavoring, and they are wonderful. It doesn’t line up with my plan to eat fewer processed foods, but there is a place for that convenience in my food storage. Using all of the methods together gives you the greatest flexibility. You get complete meals, variety and flexibility, and convenience all in your food storage.

How Is Your Food Packaged?

This is also a good time to consider how your survival food is packaged. We’ve all seen the massive containers of food in bunkers on movies. A number ten can is contains about 110 ounces of food. If you don’t have access to refrigeration, you have to eat it all before it spoils. That may be possible if there are a lot of you, but not as easy if you are a couple or small family. The small amount of money you save by buying one larger can instead of eight smaller cans really isn’t worth it at that point. Also, you can more easily transport, share or trade your supplies if they are in smaller containers. (Some of you may be thinking that you’d never share in a post-apocalyptic scenario. Remember that it may be a blizzard and your elderly neighbors ask to borrow a can or two of soup to tide them over a few days. It is probably a better idea to build neighborhood goodwill by helping and a small can says you had a little extra where a bigger can may identify you as a prepper, and thus a target, in a real disaster).

The food must be securely packaged against air, humidity and pests. If the original packaging isn’t secure, repackage the food. This allows you to break up bulk purchases into smaller portions. I love to use my FoodSaver to seal food in mason jars or in plastic bags. The sealed bags can be placed in food safe buckets to deter pests. I’ve seen a tip recently to pour salt into the bottom of the bucket before adding the sealed bags. The salt absorbs moisture and is food safe in case of ingestion. Depending on the storage condition, the salt could be used for food preservation in the future. Many people use mylar bags with vacuum sealers and/or oxygen absorbers to store food in various quantities. These mylar bags are often stored in food safe buckets as well. We’ve stored rice and other such food in clean, dry two liter bottles. There are many options. Consider what you are storing, where you are storing it, and how you’ll be using it. Do your research and actually test your methods now while you can go back to the grocery store if your plan fails.

How Do You Track Food Storage?

I prefer to use a spreadsheet. I have columns for quantity, category, description, expiration date, size, calories and total calories (quantity times calories). I have tabs for home canning, professional canning and other goods. This allows me to see how much I have of each item and calculate how many day’s worth of calories I have. I’m able to sort by expiration date and know what I need to work into the menu over the next week or so. I can review the list and see what I need to restock on the next store trip. You can use the spreadsheet to re-inventory the food storage.

You can place a printout of the inventory in your food storage area so that you can update it as you add or use items. You can also put a white board or chalk board up to note added or used items and update your spreadsheets when you have the time. If other people in the household will be getting items from your food storage, then you should make it as simple as possible for them to record updates.

Whatever you decide to do, make sure that you do track your food storage in some way. Be sure to use items or donate them to charity before they expire. Be able to calculate how long your food storage will stretch. You may be unhappily surprised at how fast it will go!

What Do You Need Other Than Food In Food Storage?

There are many things other than food that you may need for food storage that isn’t food:

  • Vitamins – Vitamins may be a good option in an emergency when you may not be getting the proper nutrition on a regular basis. This might be even more important for children and expecting mothers.
  • Meds – Everyone should have a good first aid kit plus medicines to treat the usual illnesses, and the best place to keep it may be with food storage. It may be helpful to at least store medicines to treat acid reflux, indigestion, and other food related problems with your food storage. Plus, burns and cuts are known to happen in normal kitchen tasks, and may be more frequent when cooking with alternative fuels and light sources.
  • Grain Mill – If you store wheat berries or corn kernels, you would use this to grind them into flour or corn meal. The wheat berries and corn kernels have a longer shelf life than flour and corn meal but naturally require more work on your part. Electric models are easier when you have power, manual are useful in power failures.
  • Meat Grinder – If you want to process meat into ground meat or sausage, this is the tool. Again, electric models are easier when you have power, manual are useful in power failures.
  • Canning Jars and Equipment – If the power fails, you may be able to salvage perishables in your refrigerator and freezer by canning them. You can use a pressure canner or water bath canner with alternative fuel sources like propane and wood fires. For really long-term disasters you would need canning jars to preserve food to last all year.
  • Dehydrator – If you have a dehydrator that you can run on alternative power, you may be able to use it to salvage refrigerator and freezer items as well. In the right weather conditions, you can dehydrate food on screens in the sunshine. Note – laying the thinly sliced food on one screen will work, but if you get a little fancier, you can hinge two framed screens together. This way bugs don’t start a conga line on your dried tomatoes.
  • Seeds – If something interrupts the supply chain you may need to grow your own food. Make sure that they are heirloom seeds so that you can use the seeds from this year’s crop to grow next year.
  • Livestock – This isn’t a possibility for some, due to where they live. I suggest starting with a few hens, which make great gateway livestock. Hens can provide fresh eggs, which is a great ongoing, fresh and nutritious food. Goats, sheep and cows can provide milk and meat. Remember that a dairy animal is a big commitment, because they must be milked once or twice a day without fail.
    Note – you do not need a rooster to get eggs. Hens lay eggs with or without a rooster. If a rooster is present, you may get fertilized eggs. This is great if you want to make more chickens, but traumatizing if your child is making brownies (maybe scarred-for-life traumatizing – I know someone who won’t eat eggs after this sort of thing and it has been thirty years). I’ve heard it said that if you refrigerate fertilized eggs on day one, nothing develops and you’ll never know the difference. It is a matter of personal preference whether to get a rooster (can make more chickens to resupply meat and eggs), or not (no additional chickens, but also no “half baby chick/half egg” and no crowing). A compromise would be two coops or a divided coop.
  • Pet food – my dogs would be ecstatic if I ran out of dog food and had to feed them people food. Other people’s dogs have allergies that would cause trouble. Lay in a supply for any household pets and livestock you have.
  • Lanterns, Oil Lamps, or Candles – If you want to cook early or late in the day, you’ll need to be able to see to cook, eat, and clean up after!
  • Paper goods – I generally avoid the waste of disposable plates, napkins, cutlery and cups. However, in an extended power outage there are times you need a break from the dishes. This is especially true if you are on a well, and have to use a generator or hand pump to get water (perhaps more so if you have to carry it from a river and filter/boil it first).

Random Tips

Practice cooking, especially with foods you store for emergencies, but really any practice is better than none. An emergency is really not the best time to learn. You may waste food you need to last through the emergency. Also, you will identify things you need to add to your food storage, such as spices, water supply, alternative cooking methods and so on.

Plan meals to reduce waste. If you don’t have access to refrigeration, only cook enough for one meal. If you can refrigerate foods (like outdoors in winter, in a sealed container in a spring or river) then plan to have vegetables, with or without meat that can be combined into a soup or stew the next day. This is good advice generally. Check your perishable food once or twice a week and plan a meal to use up produce, dairy, and leftovers before they spoil.

Include foods that don’t require cooking. If you go camping and rely on a campfire for cooking, you understand the need to have food that won’t require you to keep a fire going all day long. You may want to have peanut butter and jelly sandwiches, peanut butter crackers, along with fruit (fresh or dried) and other such foods. This is also great for if you’ve had a long day working and just need to eat as quickly and simply as you can.

When camping, I like to keep cleanup simple. After dishing up the food, I fill an empty pot with water. This can be the cast iron Dutch oven you just made dinner in or a spare pot. When you’re finished eating, you have hot water ready to wash dishes!

What Do I Make With Food Storage?

I suggest everyone make a folder of recipes to keep with the food storage. That way you will have a custom set of recipes that you have everything to prepare (because you have been storing it, right?) and that your family likes.

Old cookbooks are great as well. They assume that you will cook with original ingredients instead of mixes. They are also less likely to include modern electrical appliances like microwaves and food processors.

How to bake over a camp fire: I use a cast iron Dutch oven. The edges of the lid are curved upwards so that coals can be added to the top for baking. Using a lid-lifter (a cast iron stick with a hook on the end) the lid can be carefully removed and replaced so that food can be checked without coals falling onto the food. Mine came with a small rack that fits inside the Dutch oven. A metal pie plate can be placed on top of the rack to create a baking atmosphere in the Dutch oven and prevent the bottom from scorching before the food has baked through. If you don’t have a rack, you can improvise  With a little practice it works very well.

Here are some recipes from my collection. Dehydrated or canned versions of various ingredients may be substituted.

Survival Bread

2 cups oats
2 1/2 cups powdered milk
1 cup sugar
3 Tbl honey
3 Tbl water
1 pkg. lemon or orange Jell-O (3oz)

Combine oats, powdered milk and sugar. In a medium pan, mix water, Jell-O and honey. Bring to a boil. Add dry ingredients. Mix well. (If the dough is too dry, add a small amount of water a teaspoon at a time.) Shape dough into a loaf. (About the size of a brick.) Place on cookie sheet and bake at 350 degrees for 15-20 minutes. Cool. Wrap in aluminum foil to store. This bread will keep indefinitely and each loaf is the daily nutrients for one adult. To prepare this over a fire, place the loaf in a pie pan on a rack inside a Dutch oven. Place over coals and move coals to the lid of the oven to bake.

Recipe Note – I had to add quite a bit of water to make this into a dough – I’d say about a half cup. Also, this could be made in a Dutch Oven over the fire if desired.

Cornbread

1/2 cup butter (1 stick – divided)
2 eggs
1 cup buttermilk (or 1 cup milk plus 1 Tbs. White Vinegar, let stand a few minutes; or just use the milk as-is)
1/2 tsp. baking soda
1 cup cornmeal
1 cup all-purpose flour
1 tsp. salt
Optional – 1/3 cup sugar (I don’t put sugar in my cornbread, but some people do)

Begin by preheating the cast iron skillet over the fire while you get the cornbread mixed. Melt 6 Tbs. butter in the skillet. Keep an eye on the butter so it doesn’t scorch.

In a bowl, combine eggs, buttermilk, baking soda, cornmeal, flour and salt. Pour in the melted 6 Tbs. butter from the skillet. Stir to combine thoroughly, but don’t beat.

Put the remaining 2 Tbs. butter in the skillet. Slide it around with a spoon or rotate the skillet to coat the entire bottom and about an inch up the sides. Don’t burn yourself. Once the butter is melted and the skillet coated, pour in the cornbread mixture. Put the skillet over the low coals and put the lid on. Add coals to the top. Check it after about 15 minutes. It may take up to twenty, but you don’t want to let it burn.

You may have to turn the skillet during cooking or move it to warmer/cooler spots of the coals as it cooks to maintain an even temperature. Using a lid lifter, carefully check for doneness and remove from heat when ready. See my earlier posts for a more thorough explanation of baking with cast iron.

To bake this cornbread in the oven, you follow the same recipe. Place the cast iron skillet with 2 Tbs. butter in the cold oven and preheat to 375. Mix the remaining ingredients and carefully pour into preheated skillet. Bake for 15-20 minutes until crust is lightly browned (and usually cracks will appear in the crust). You don’t use a lid on the skillet when baking in the oven.

Basic Bread

5-6 cups all purpose flour
2 packages of active dry yeast (or 4 1/2 tsp. yeast from a jar)
1 1/2 tsp. Salt
2 cups warm water (120-130 degrees)
Cornmeal
1 slightly beaten egg white
1 Tbs. water

In a large bowl, combine 2 cups of flour, the yeast, the salt and the warm water (the water is a little warmer because you are compensating for room temperature flour).Stir thoroughly to combine ingredients, scraping the edge of the bowl as you go. Continue to stir until thoroughly mixed and the gooey dough begins to pull apart in strands when you pull the spoon away. Mix in another 1-2 cups flour. You want to use as little flour as necessary to get the dough ready for kneading. You’ll add more flour as you knead and too much flour causes all kinds of problems in baking bread – tough crust, too dense bread, etc.

Turn the dough out onto a floured surface and knead for 8-10 minutes. Add remaining flour a little at a time when the dough gets sticky as you knead.  Shape dough into a ball. Place dough ball in a lightly greased bowl, cover with a cloth and put in a warm place to rise.

After the dough has roughly doubled in size, punch it down (push it down with your hands) and turn it out onto a lightly floured surface. Divide it in half and cover with a cloth. Allow it to rest for about 10 minutes.

If you are able to bake this bread in a Dutch oven with the pie pan on a rack arrangement, that may work best. If not, put it directly in the Dutch oven and bake it – you’ll just need to flip it half way through cooking. Bake over the fire for about 30 minutes and add more time as needed.

Chicken Corn Chowder

3-4 medium potatoes or can of potatoes
1 onion or dehydrated onion flakes
1 can cream of chicken soup
1 can corn
1 can chicken (can be omitted if desired)

For fresh potatoes, boil potatoes and onion in just enough water to cover potatoes. When potatoes are tender, reduce heat to simmer and add remaining ingredients. Drain corn and chicken first, if desired to have a thicker soup. A bit of cornstarch may be added to thicken soup if desired.

If you use canned potatoes, simply add all ingredients along with all liquid from cans and simmer until warm and flavors mingle. Add a bit of cornstarch to thicken if desired.

For either recipe, add salt, pepper and garlic salt to taste.

Note that other ingredients may be substituted, depending on what is available. Also, this recipe may be placed in a pie crust for a delicious pot pie. Use what you have and try to mix flavors that sound compatible to you.

Chili

1.5 pounds ground beef (venison, pork sausage, or a combination would work too)
1 medium onion, chopped
3 cloves garlic, chopped
1 bell pepper, chopped (or sweet peppers, or add hot peppers too if you like them)
2 qt. diced tomatoes
1 pt. tomato sauce
1 can kidney beans, drained (completely optional for those who don’t put beans in chili!)
3 T chili powder (you can use a chili seasoning packet if you prefer)
1 T garlic salt
a few fresh chopped tomatoes from the garden

Get a good bed of coals. Place a sturdy grill over the coals or set up a tripod or other cooking ensemble. Suspend a cast iron Dutch Oven over the coals and start cooking.

Sauté the onions, garlic and peppers. Brown the ground beef or other meats. Then add the tomatoes, tomato sauce, beans and spices. Stir together. Let the chili simmer, stirring occasionally

Let the chili simmer slowly, stirring occasionally. Make sure it is over a good, warm spot on the fire, but not boiling violently or sticking. Let it cook down until it thickens and the flavors merge. You can eat it after a half hour, or let it simmer for hours. This makes great leftovers if properly refrigerated.

Filed Under: Prepping

  • « Go to Previous Page
  • Page 1
  • Interim pages omitted …
  • Page 69
  • Page 70
  • Page 71
  • Page 72
  • Page 73
  • Interim pages omitted …
  • Page 79
  • Go to Next Page »

Primary Sidebar

Subscribe to Blog via Email

Enter your email address to subscribe to this blog and receive notifications of new posts by email.

Join 7,202 other subscribers
  • Amazon
  • Facebook
  • Substack
  • Twitter
  • YouTube

“Do more with less.”

– Minimalist proverb

Recent Posts

  • Just so you know
  • Weather Update for My Corner of Appalachia
  • Why I’m Ordering Ivermectin + Mebendazole Every Year
  • The Website’s Shutting Down (But Here’s the Plan)
  • You Are Hated! Start Training Like It!

Footer

Recent Posts

  • Just so you know
  • Weather Update for My Corner of Appalachia
  • Why I’m Ordering Ivermectin + Mebendazole Every Year
  • The Website’s Shutting Down (But Here’s the Plan)
  • You Are Hated! Start Training Like It!

More about me

Books I’ve written

Books I’ve read

Follow Me on YouTube

Follow Me on Facebook

Gear I Use and Recommend

Newsletter

Search this site

Follow me elsewhere

  • Amazon
  • Facebook
  • Substack
  • Twitter
  • YouTube

© 2008–2025 M.D. Creekmore · As an Amazon Associate, I earn from qualifying purchases.