• Skip to main content
  • Skip to secondary navigation
  • Skip to primary sidebar
  • Skip to footer

M.D. CREEKMORE

  • Blog
  • Books
  • Newsletter
  • Gear I Use
  • About
  • Contact
  • Facebook
  • YouTube
  • Blog
  • Books
  • Newsletter
  • Gear I Use
  • About
  • Contact
  • Privacy Policy

Blog

Alternative Energy Sources For The Homestead Part One – Solar Power

May 16, 2018 M.D. Creekmore

Moving off the grid doesn’t mean that you have to give up every modern convenience you enjoy today. If you don’t want to. And you don’t need to rely on having gas for your generator.

Solar power has become a popular option for many people in cities and suburbs hoping to save money. But it can also be a great option for those who don’t want to be connected to a traditional source of power.

Those who truly want a life of self-sufficiency away from the power grid can enjoy it with solar power in many locations.

This is off-grid living

And while solar power can be a great option and prices have generally been going down, it is still pretty expensive for most families. Depending on the size of the system, it will cost between $15,000 and $20,000 before any state or federal tax credits or rebates.

If you want to live off-grid and save money, you can get started with do it yourself solar power. Is that really possible? You might be thinking solar power sounds pretty complicated. But with the right planning in place, you can create a DIY off-grid solar system that will give you the self-sufficient off-the-grid lifestyle you want.

However, if you want a smaller system for backup and emergency power or if your power needs are relatively small then you can set up a system for under $5,000, which is what I did.

You can even buy a portable system like the Genex Nature’s Generator or a Humless for portable power which is what I have. These portable solar systems are great for extended fishing, hunting, and camping trips and are also an option if you have a remote bug out location but can’t set up a larger system at the site because of the possibility of theft or vandalism.

Ready to begin? Here are seven steps to getting started with do it yourself solar power for your home, homestead, or survival retreat…

Your needs are unique

The first step is more of a warning. When it comes to the solar power that your house will need, there is no one size fits all solution that will work for every house. You can’t just go to Amazon and buy a solar power kit and expect that it will work for you before doing any other research.

The system that you will need will vary depending on your location, the size of your house and how much energy you will be using. So as you begin this process, make sure you know that you will need to customize your projeMDCreekmore.comct to your individual needs.

Power

The first part of that process is the calculation of how much power you will use. What does that mean? Think of every item that will be powered by solar power in your house. And know that any little change or anything you forgot can make a big difference.

You can utilize a load evaluation calculator to help you get started. There you will enter your appliance, quantity, watts and hours on per day. To make sure you have the right data an electricity usage monitor will be a valuable tool. You can find more general data on individual appliances here.

If you’ve had electricity in the past, you can refer to past bills to find the kilowatt-hours (kWh) used. I suggest going with the highest usage seasons depending on the climate in your area. That will be easier, but it’s not going to be an option for everyone.

Either way, just remember it is very important that your numbers are right.

Batteries

Once you know how much power you need, you can then figure out how many batteries are needed to store it. You don’t want to run out of battery capacity and be forced to use a backup generator. But you don’t need to waste your money on batteries you aren’t using that will just require maintenance.

To make this determination, there are a couple questions to ask. How many days worth of energy do you want to store in your battery bank?  Is it a day or two or more like four or five? Are you storing the batteries in a cold location? Generally, the colder the room the bigger battery bank you will need. Do you have a power source for days you go without sunshine? This will certainly be impacted by where you live. What voltage battery bank do you need? Your battery will be 12V, 24V or 48V and a large system usually requires a higher voltage.

You can use this battery bank calculator to get started.

One other consideration is cost and maintenance. The two batteries most commonly used for off-grid solar power are Lead Acid and Lithium. Lithium will be the most efficient, have the longest lifespan and will not require maintenance or venting. However, it will come at a cost. Lead Acid batteries, on the other hand, will cost less. But they may also require maintenance and have a shorter lifespan.

Sunshine

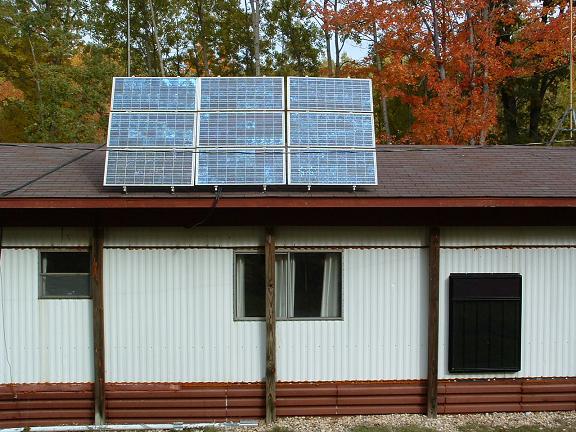
By knowing how many hours of sunshine you receive each day, you will be able to determine the number of solar panels you need.

Your sun hours will tell you how much sunshine you will be able to harvest. Now, all sun is not created equal. Sun will hit your panels at different angles and will be brighter at certain times of the day. Since you don’t want to be overly optimistic on this calculation, use the season that will give you the least amount of sunshine so you don’t run out of solar energy.

This calculator will help you find the average hours of sun in the city closest to you.

Once you’ve determined the number of sun hours your panels will receive, you will be able to calculate how many panels you need to purchase using this calculator.

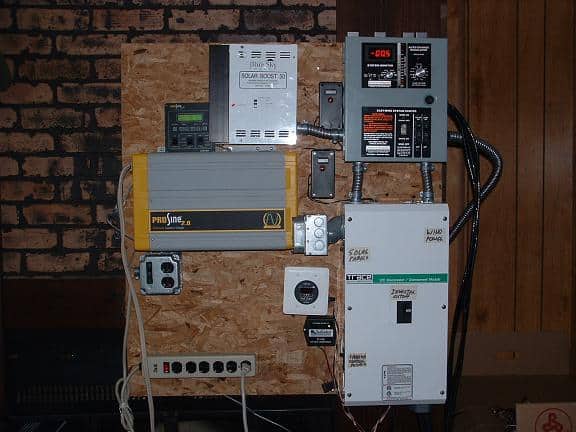
Solar charge controller

Your solar charge controller will properly charge your batteries so they will enjoy a long life. Therefore, you will need to make sure you have chosen the right controller. You can do this by taking the wattage of your solar panels and dividing it by the battery bank’s voltage. This will give you a calculation of your needs.

One other important point to note is that controllers come in two types of technologies: PVM and MPPT. If the voltage of the solar panel matches the voltage of the battery bank, you can use PVM. If they are different, you need to go with MPPT.

Inverter

An inverter is basically the “brains” of your solar panel system. It will direct current from the batteries into alternating current for your appliances.

To select the right inverter, you need to start by knowing what type of AC power you have. Once you do that, you need to know how many watts you will be powering (which you’ve already done). And then pay attention to your voltage battery bank as the inverter is designed for a specific voltage.

Tax Credits

Now that you’ve invested in your solar power system, there is some good news. A federal tax credit is available for solar power.

You can talk with your tax pro or find more details here, but this is a quick rundown. You can qualify for a credit equal to 30 percent of your total cost. This credit is currently available through the end of 2019. Then, the percentage will decrease each year and stop after 2021.

Because this is a credit, and not a deduction, you take the amount directly off your tax payment.

And yes, this credit is available for a DIY system.

By following these steps, you will be able to build the off-grid solar power system that is right for your specific needs. And you will finally be able to enjoy life where you would like without a reliance on the power grid.

It’s a great feeling.

Filed Under: Power Generation

Heritage Rough Rider .22 Revolver Review – Is It Any Good?

May 14, 2018 Jesse Mathewson

Heritage Rough Rider .22 LR Revolver Review

Everyone needs a .22lr firearm. Specifically, one that is accurate and reliable, the Heritage Rough Rider is an accurate, reliable handgun! Now before we get any further, the Heritage Rough Rider is a single action handgun that comes in several varieties and barrel lengths.

It will chamber the .22lr, .22 short and with a cylinder change .22wmr.

As with all single action handguns, accuracy is a matter of perspective and ability as well as understanding your individual firearm and ammunition combination. I originally purchased this handgun to have something that my son would enjoy.

[Note: If you’re looking for a nice Thumb Break type holster for the Heritage Rough Rider .22 LR Revolver then take a look at this one on Amazon.com! It’s a nice holster for the price.]

It is inexpensive running $136 after taxes from my local firearms dealer and easily $120-$145 depending on your location. This allowed for someone with limited funds to purchase a firearm without a large investment in the event it was not seen as a valuable addition to the family.

Heritage Manufacturing is held by parent company Taurus as of 2012. However the Heritage company has been building firearms since 1992, I first heard about them in 2004 when I was searching for a decent single action .22lr revolver.

They continued to pop up on the radar as an extremely affordable, reliable, accurate single action revolver for the hobbyist, trapper or individual who needs a solid 22lr handgun.

Now, this is not a Ruger Single Six or even an H&R trapper or similar, it is, however, quite a bit of gun for the money spent.

It comes in several variations, my personal favorite is the 6 shot 4.75” barrel. The other variations are the 6 shot 3.5” and 6.5” birds head grip, the 6 shot 4.75” and 6.5” standard colt peacemaker grip type in several colors and the 9 shot peacemaker styled setup.

All of these options have the added benefit of cylinder swaps too .22 magnum for those who need it. As an avid shooter and tester of firearms and ammunition I would say it is an unnecessary addition in a handgun, however, not everyone will agree regardless the data supporting my assertions regarding barrel length and .22 LR versus 22 magnum.

The handguns are built on aluminum alloy frames with solid steel barrels and springs. The ejector paddle is made of polymer. I would suggest after the first 100 or so rounds do a quick once over with some Winchester Gunsmith Tools or my favorite regularly used Wheeler Gunsmith Tools and some BLUE not red LocTite!

My handgun had no issues, however, the largest issue or complaint seen among other testers has been the loosening of the screws. (follow the directions sent with it and DO NOT remove the trigger/ hammer or main grip screws as it can get sticky putting things back!)

For those who care to know, the data shows that 22 LR and 22 magnum up too around 4 inches tend to run close in FPS for similar bullet weights. This being said, the benefit of having the added ability to swap cylinders is available and makes for a solid platform depending on personal taste and need.

For myself, the diminutive 22lr has proven itself numerous times with snakes, coyotes, javelina, feral Russian hogs and other small and medium critters that needed put down. This, of course, leads into accuracy as experienced by myself.

Heritage Rough Rider .22lr pistol review

Unfortunately, I only had a sample of one for this test. Regardless, taking my results and comparing them with a few dozen other reviews available I can say that you should be quite happy with the results overall.

If you know handguns and especially know single action revolvers with blade sights and no drift adjustable features you will understand that accuracy is a general thing. For instance, my kids and self-had no problem nailing spent shotgun shells at 10-25 feet while the wife had some adjustment issues and was able to quickly master the use of this fine handgun.

It does NOT aim like a modern handgun, there is some fair amount of Kentucky “windage” involved, however, that does not detract from the overall success of the test. There was a small need to adjust vertical hold, the windage, however, was spot on!

It grouped offhand into a 2” circle at 10 yards for test groups and it really does prefer 40 grn lead versus jacketed/ coated or larger or smaller rounds. The best groups were with Aguila Super Extra (blue box from LuckyGunner Ammo) and CCI 40 grn standard loads also found at LuckyGunner Ammo. Make sure to use the links if you need bulk ammunition!

We ran 500 rounds of CCI, Aguila, Federal Premium and Eley 22lr through the revolver had us all smiling by the time we called it a day. The net benefit of a single action revolver with a trap door feeding approach versus the swing arm seen in many modern revolvers tends to slow you down in shooting and 500 rounds take a substantially longer time than it would with a modern autoloader or even modern swing arm revolver.

I should mention again, it is a SINGLE ACTION ONLY revolver, it would not be my first selection for self-defense regardless of the caliber. It is plenty accurate enough for plinking, trap line running, small game disposal and hunting and range work or butcher work as needed. Now for the negatives!

Heritage Rough Rider .22lr pistol reviewed

It is NOT a trick shooting revolver, the cylinder will not spin freely it clicks solidly into each position and if you try to spin it you will end up breaking the gun. (honestly most firearms are not designed to replicate Hollywood stupid so please be careful!) Additionally, it is NOT designed to FAN the hammer for trick shooting. (see a trend here?)

It comes from the factory timed and tested by a master gunsmith who has been testing and adjusting single action revolvers for over a decade with Heritage Arms and has been in the business for many many years above that.

That is something I really liked about this handgun, it has truly impeccable timing and did not flutter even once, additionally, the mouth/throat of the barrel facing the cylinder has been designed to allow for small variances when they will inevitably occur. (I’ve never had a revolver that didn’t eventually have small timing issues and need the mainspring, trigger spring etc, replaced and tuned – of course in all cases except my Ruger GP101 this occurred post 15,000 rounds of hard use)

Overall I can recommend this revolver for the survival enthusiast, trapper, hunter, farmer, rancher, woodsman, bushcrafter, homesteader or avid backcountry living person. 500 rounds of your favorite 22lr and this handgun (and some minor cleaning supplies) and you will be set for a couple years maybe more if you stretch it.

The overall investment for my family day (test day) out with this revolver was $176 including the revolver BRAND NEW. I am investing in at least one more, and will likely get the Birdshead grip this time (it just looks cool!) This handgun is easy to maintain, easy to own and the best part is, it costs $450 less than the Ruger Single Six.

Heritage Rough Rider 22LR / 22 Magnum Review

Related:

  • LifeCard® by TrailBlazer Firearms: Weekly Product Review
  • The Prepper’s Bedside Home Defense Kit

If you have any questions or comments please let me know. Free the mind and the body will follow.

Filed Under: Gear Reviews

Homesteading and Preps For The Week: May 12, 2018

May 12, 2018 M.D. Creekmore

Well, folks, here we are again. I hope that you are as excited to be here as I am… I’m loving this new site and it’s growing much quicker than my old Survivalist Blog site which took years to gain any traction. I learned from my mistakes with the other site, and also what works and what doesn’t and I’m using that knowledge to build this one much quicker.

If you want to learn what I’ve learned about blogging because you want to start a blog of your own then I have a 100% free 7-day blogging course that you can take to do that.  I’ve also published several articles that you should read if you’re interested in doing this yourself including – How to Start a Profitable Blog in 2018, Step-by-Step Guide, and How To Start A WordPress Blog On Bluehost.

I’ve been actively publishing this site for around two months and the daily page view numbers are already near what they were on my old survivalist blog and the subscribers to MDCreekmore.com are getting ready to pass the 5,000 mark with my goal being 25,000 subscribers by the end of the year.

And I can do that, however, right now I’ve not even been focusing a lot on getting new subscribers or readers, no, what I’ve been focusing nearly all of my time and attention on is my new project that I call “The Bulletproof Survivor” check it out!

One more thing, I know that most of you have already bought my book “The Preppers Guide to Surviving The End of The World As We Know” however, new folks coming to the site haven’t so I put together a new page for the book that I will send those new readers to.

Please take a look at the page and let me know what you think and post any comments and ideas on improving it the comments below. Thank you!

Okay, now what… Oh yeah, I have a huge 5,000+ word article on alternative power systems including solar, wind, and water power that I’ll be publishing here next week. You’ll love it!

Now, let’s get to homesteading and preps for the week…

This week I planted tomatoes, peppers, squash, and potatoes in the garden… and then just like that the rain stopped! After raining what seemed like every day for months as soon as I plant boom, sunshine and dry as a powder house with no rain in sight.

Preps for the week include adding a Fire B.O.S.S.- Bug Out Bag Survival Fire Starting Kit and a Fishing and Hunting B.O.S.S.- Bug Out Bag Survival Kit to my emergency cache “Mono Vault” that’s hidden in the forest (buried but easily accessible and that’s all I’m saying).

Here is a photo of my Mono Vault…

boss kits
B.O.S.S. Kits

Well, folks, that’s it for me this week… what about you?

Filed Under: Uncategorized

Concealment Strategies Against Social Unrest, Theft, or Confiscation

May 11, 2018 M.D. Creekmore

secret rooms and security

By Joel Skousen

It does little good to spend a lot of time and money in preparing for difficult times if you don’t also plan on securing those supplies against the very threats you are preparing for.   Severe social dislocations caused by war, economic problems, or widespread natural disasters are almost always accompanied by looting, theft, and increased criminal behavior—sometimes in large mobs that even police cannot control.  We need to plan ahead on how to deal with those threats without resorting to violent confrontations, which should be a last resort.

We also have to consider government’s propensity to confiscate stored supplies when in short supply.  There is still a 1950’s law on the books that gives the government the power to declare anything in short supply as “hoarding.”   In the March 3, 2012 edition of my World Affairs Brief,  I covered the relevant sections with the Defense Production Act of 1950 that affect personal storage:

“Sec. 102. HOARDING OF DESIGNATED SCARCE MATERIALS [50 U.S.C. App. § 2072]

In order to prevent hoarding , no person shall accumulate (1) in excess of the reasonable demands of business, personal, or home consumption, or (2) for the purpose of resale at prices in excess of prevailing market prices, materials which have been designated by the President as scarce materials or materials the supply of which would be threatened by such accumulation.”

The wording implies that the government is taking action against those that start to hoard for profit once something gets scarce in a crisis, but notice that there is no provision for acknowledging or exempting stockpiles that were accumulated before something was declared scare.  That’s what is dangerous about this wording. And there are severe penalties for getting caught “hoarding,” regardless of when your supplies were purchased:

“Sec. 103. PENALTIES [50 U.S.C. App. § 2073] Any person who willfully performs any act prohibited, or willfully fails to perform any act required, by the provisions of this title or any rule, regulation, or order thereunder, shall, upon conviction, be fined not more than $10,000 or imprisoned for not more than one year, or both.”  

As you can see, it is wise to prepare to conceal your supplies from the government as well as from desperate people who may turn to looting and theft in order to survive.

In this article, I’m going to talk about strategies for concealment rather than specific designs—which have to be customized to each specific situation, and shouldn’t be published anyway, lest they become compromised.

Remember too that you must be prepared to secure people as well as your supplies.  Social unrest and even government may be a threat to your person as well, and your supplies won’t do you any good if you are dead.   A well designed safe room can provide for both protection of people and your essential supplies if they have temporary living facilities included for an emergency where you may need to get out of harm’s way.

Principle 1: Select the space for a secret room where that space isn’t obvious without detailed measurements.   I’m not talking about concealing the entrance here but rather picking a space within a cluster of rooms where one can’t tell easily that there is unaccounted space somewhere in the middle.  Large homes are more amenable to hiding a room in a complex of other rooms, wherein the presence of several twists and turns of hallways, it’s impossible to keep track of where you are, let alone the size of rooms around you.

For smaller homes, let’s suppose you have two rooms of equal size along a common wall, and the doorway to each room opens from a common hallway.  You want to create a secret narrow room within one or both rooms.  If you shorten the back wall of one room and not the other, someone opening the door of each room and looking in at the back wall can easily tell that the wall of one room is closer than the other.  But if you put the secret narrow room between the two rooms (shortening both rooms equally), no one can tell that there is extra space between the adjoining walls of both rooms without measuring.

It’s even easier to conceal a secret room in a basement if you carve out space under the garage or an outside deck since no one expects there to be basement space under these two structures.   This is easier and less labor intensive if done during initial construction of the home, but the downside is that the space shows up on the building plans on file with the county or city.  If you do it as a remodeling, shoring up and excavating by hand, the better your chances are of doing this in total privacy.

Principle 2: Make sure you can get to your secret room quickly and privately.   It does little good to have a secret room (for either storage or personal safety), if you can’t get to it easily and in private, both for loading in supplies and to access in a crisis when others may be watching.  This is one of my main objections to backyard buried shelters, with a hatch type door in the ground in the backyard that is your only entrance. People can observe not only the burial of the shelter during construction but your many trips back and forth loading it with supplies.  When you need to get inside during a crisis, don’t be surprised if the entrance is surrounded by people wanting inside too.

Even if designed inside of a house (which I prefer), I like to design the home in such a way as to get to the safe room or concealed storage room without transiting open rooms, front hallways or main staircases. In an intrusion, your access to those public areas may be compromised, so you need to provide alternate access.  If you have a home without a basement, try to carve out space near your master bedroom so you can gain access easily without venturing outside the safety of your room.

In two-story homes, I also like to design ladder wells where kids can get down to the parent’s master bedroom without using the stairs, and from there to the shelter.  Building codes don’t like penetrations through floors, so sometimes you have to do this after the home is finished, as a minor remodel.

If your secure room is in the basement, try to devise a trap door entrance from your bedroom closet that gets you directly down to the basement without using the stairs.  That requires some sort of ladder, but my preferred way is to design a trap door from a master bedroom closet that comes down over a set of basement shelves where I can use the beefed-up shelf edges as a ladder.  I simply design the front reinforced edge of the shelf as a 1” x 2” board that protrudes above the shelf rather than below, giving me a handhold as I climb up or down.

Principle 3:  Use double concealed entrances where possible:  Whenever possible in my design of high-security homes, I like to have a concealed storage room or closet in front of any safe room.  Both rooms have concealed entrances.  The would-be intruder has to find not just one secret entrance, but two, and the latter is unlikely because once the first room is found the person thinks, “I’ve found it.”

This is especially effective if you do keep some “throwaway” valuables in the first room to give some sense of satisfaction.  Naturally, you shouldn’t use the same type of concealed entrance scheme for the first room as with the second one.

Principle 4:  Think outside the normal:  The previous idea is an example of designing concealed entrances that fool people.  So is placing a basement below a garage where people don’t usually expect to find one.  But you can get even more sneaky by providing the entrance to a concealed room on the floor above or below.  Now, that’s hard for people to conceive of, let alone discover.

Principle 5:  Keep the number of persons involved small:   Constructing secure rooms is difficult to accomplish with any privacy if you have to hire it done.  The more you can do yourself, the better in terms of keeping them from being known to others.  It’s even worth learning new skills than taking the easy way out and hiring it done.  Now, I realize that is not possible with many people, so if you need to hire something down, use an older handyman rather than a big contractor who is going to bring in hired labor—which are mostly young guys who talk about any new they are doing.

If you are doing something with new construction that involves building permits and a contractor, design the basic structure of the rooms, but label them as storage.  Finish out the rooms and build the concealed entrances after the occupancy permit is issued when you can remodel or finish in privacy.  During the building process, you may observe one or more workers that are a cut above the others, who you may be able to hire on the side to do addition work later.

You also have to be careful about talking to your own children about secret rooms.  Kids love the idea of secrecy and will run around telling all their friends about the secret room in their home.  It’s better to not tell them or show them these things until they get older and you can trust them to not tell others.

Building Concealed entrances:   While I don’t have the space to get into specific designs, here are a few hints:

  1. Hinges are the most difficult things to conceal in swinging cabinets.  I prefer pivoting pin-type hinges embedded into the top and bottom of a cabinet, which are completely invisible. I show these types of designs in my books (see Bio)
  2. Avoid putting castors or rollers on the swinging side of concealed cabinets to support the weight. They will make marks on the floor that can reveal that the cabinet or shelf swings out.
  3. Pins or latches to open the secret door or cabinet can often be concealed behind the edge of an adjustable shelf. Just lift up one side of the shelf to withdraw a locking pin for opening.
  4. Make sure you provide a second locking mechanism on the inside of the concealed entrance so that once inside, you lock yourself in and disallow anyone else from opening the concealed door even if they find it.
  5. Use a steel door in a steel jamb (14 gauge steel ) for the actual door into the safe room. This way, if someone finds the concealed entrance, they still can’t easily breach the room itself.   Usually, the concealed cabinet must swing out, and the second steel door swings inward to avoid conflict.

Be wary of using published designs on concealment such as books like “How to Hide Anything.”  Once published, others will know about them.  It’s ok to read about what others have done but try and design your own variation. If you study the idea behind the concealment technique, it is easy to think of ways to modify or change them to suit your needs.

You might also like:

  • The Prepper’s Bedside Home Defense Kit
  • Urban Survival Basics: How to Survive in the City When Disaster Strikes

Bio: Joel Skousen is the publisher of the World Affairs Brief, and weekly news analysis service, and a designer of high-security homes and retreats.  He has published three books on the subject:  The Secure Home, and The High-Security Shelter.  He is also the author of Strategic Relocation—North American Guide to Safe Places.

Filed Under: Prepping, Security

DIY Solar Projects Made Simple – Even Forrest Gump Could Do This

May 9, 2018 M.D. Creekmore

by Michael C

DIY Solar ProjectsMost folks have the “idea” that solar costs lots of big bucks. But the truth of the matter is – solar energy is an investment. Like big power company’s that buy a nuclear power plant. There is a big (one time) upfront investment for the company that will usually pay off later.

You would do the same thing – invest in a pile of components that will become your personal utility. The cost of taking care of your utility is minimal – after the initial purchase. You don’t have any monthly bills – it is YOUR utility. Why is solar worth having? Because it gives you power. The power comes from the sun and goes into your pocket – if you got it. Solar power is nice and quiet – use a night-light to go to the bathroom.

A few people can tell you how to build a solar energy system. But, going into wire sizes, battery sizes, panel sizes and everything else is sure to confuse you to the point of “puttin’ it off”. So, I am going to just describe systems that I made. I am going to describe 3 different sized systems – that you can copy – for your own use. You should copy – but, keep in mind that you can adapt your system to the materials you have. If you have a 100 Watt panel lying around – use it – instead of the 80W panel I used in my medium system.

Small system

A small system for me is just some thin-film panels, taped to a piece of stretch proof plastic sheet (from the post office plastic mailer) with wires soldered on. Most productive for recharging batteries or powering a small device. A common connector is style “M” which can be found at Radio Shack.

solar projects diy

I added diodes (…N1001) to each solar panel (since they are all in parallel) to block all reverse current – I did not want any panel to “leak” power backward. At this size of alternate energy system – most of your connections would be soldered. The cost for each thin-film sheet was about $17 (USD) and the wire was cheap speaker wire (24 gage).

The solar panels can be soldered together in parallel, series or both for the voltage/amperage needed. (The thin-film panels can be bought in various sizes too.) At about 12 volts you might consider a 12V solar panel to avoid all the soldering. Thin film panels work great in this case because they are very lightweight and portable. You could have these in your BOB, GHB or with your GPS.

Medium System

This alternate energy system is larger, uses regular components like a framed solar panel. This system is still portable – if you have an electric chainsaw, you can roll into the woods and use it. I use a $30 (USD) hand truck from Harbor Freight to “mount” the parts.

The parts consist of an 80W solar panel, Xantrex C30 charge controller, 2 – 6 Volt 225 Amp hour batteries, 2 – inverters (400 & 1200 Watt), desulphator and a 12V car outlet. The batteries are inside the wood box, the inverters, desulphator, and outlet are on top.

solar projects diy

The components of this system can be separated – the battery box is strapped to the hand truck and the solar panel is mounted on the handle with 2 U-clamps. Mounting the panel this way allows me to “swing” the panel up into the sun, I use a stick to keep it there. I used a short extension cord (cut in two) to connect the panel to the battery so I can “unplug” the panel.

Connections from the battery to charge controller (and from the solar panel to charge controller) are fused using common automotive blade style fuses. The inverters and power outlet have their own (blade style) fusing. The battery and solar panel are the biggest cost in this system. The cost for the panel was $400 (at the time) and the batteries were $150 each.

This system does have 120V AC output but, if you’ll notice – you’re not going to touch it, at all. All components that you handle are only 12 volts, the inverter will be connected to the battery with the cables that they give you.

This system has an 80 Watt solar panel so the output is 80 Watts per hour or 80 Whrs. In a 10 hour sunny day, you would get 800 Whrs – enough for 5 – 24W CFL’s for over 6 hours. (This system is bigger then MD’ Creekmore’s system that’s in his book Dirt Cheap Survival Retreat.)

Large System

The large solar power setup is just like you see in magazines with solar panels on the roof, a wall full of components and kids playing in the yard. I have 3 – 90W and 6 – 80W (total 750W) solar panels on top and a Solar Boost 50 (charge control), Prosine 2 (2 kW inverter), Xantrex breaker box, Link 10 battery meter (fuel gauge), 8 – Trojan L16 batteries (20 kW storage). All components except batteries and panels are mounted on 3/4″ plywood. This means that I have 3 major connections: solar panels, batteries and AC output from the board.

solar projects diy

This type of system is best bought as a kit – I bought the first 3 panels with an inverter and added the other solar panels and charge controller later. You get almost all the pieces – including roof mounting hardware for the solar panels and the right size wires.

The trick with building this system is to put most of the stuff on a plywood board. I set the parts on plywood and arranged it to my liking. The breaker box should be located close to all the other stuff to minimize wire length. I had my panels mounted on the ground for good snow removal but, after thinking about theft (nice shiny blue panels) I mounted them on the roof. I use a snow rake and angle the panels steep (70 degrees).

The best feature of this kit was the inverter. The inverter has an automatic transfer switch (the thing that goes click in a UPS when the power goes out) and 3 stage battery charger built-in. It is true sine wave (yes, had it hooked up to my scope meter). I added the breaker box because you just can’t get 300 amp DC rated fuses from the electric store.

solar projects diy

I normally use cheap grid power for running everything but, when the power goes out – its solar time. If you have heard neighbors say something like “I have 100 amp service” then this inverter gives you 15 amp service. You can run up to 15 amps at 100% duty, it will surge to 30 amps (4 kW). This inverter is not grid tie but, UPS (Uninterruptable Power Supply) tied. I have my fridge on this inverter in case of power outage.

Here is my little lead in on efficiency. My fridge (19 cf. Kenmore side by side) uses 1.12 kW a day, in 2 hours of sun – my panels will generate 1.5 kW – enough to cover my fridge power (and inverter overhead) use for a day. This fridge is 20% more efficient than every other fridge in its class (19-21 cubic foot). It cost $700 (USD) when I bought it. In the years that I have had it (about 8) it paid for itself in lower electric costs. It will always “pay you” to buy a new fridge.

Final Notes

Try to place the panels where they get sunlight, I should say “where they get the most sunlight”. If you have a tree that shades your panels at 2 pm – move the panels so that the tree shades them at 6 pm. I know that my roof space is limited but, I plan on getting the “best” light (10 am-3 pm) that I can. Losing energy in the winter because the tree shades at 2 pm is very costly (especially after all the money you paid for solar!)

SAFETY for the small system consists of not burning yourself with the soldering iron. The medium system has batteries that could weld your tools to the posts, wrap electrical tape around “good” tools used near the battery, have a tap for the post threads.

The batteries in my medium and large systems are flooded lead acid which means that I have to fill them with pure (distilled) water, I wear rubber gloves for this task and goggles. I also keep the family sized baking soda bucket nearby in case a mouse chews the corner (for water) – a lot of solution (more than a gallon) in a 120-pound battery. Lead acid batteries generate hydrogen gas which is explosive, a vented battery box is recommended.

The medium system uses a (cheaper, easier to find) flooded lead-acid battery, not the best type (AGM Absorbed Glass Mat or Gel Cell) for this application. Since it could tilt past 40 degrees (max fluid to cap angle) the solution can leak. I installed plastic inside the box to contain any fluid and am aware of this limitation in my system. The box is strapped to the hand truck for quick release to move into a truck bed.

The lead acid batteries that I used were bought before I found out about Edison batteries. Admittedly, the lead-acid battery has more power per pound than the Edison (Alkaline based Nickel-Iron) battery but, have become the “throw away” part of every solar power system. Edison batteries will (have) last for a hundred years, don’t sulfate, don’t break down (lead plate flaking) and if they run dry – simply refill. In fact, replacing the alkaline solution would only take Berky water and wood ash (lye is alkaline) solution. Last but not least – no chance for an explosion, does not generate hydrogen.

If you have read “31 Days to Survival” then you know that there is a chapter on alternate energy. I think that any of these systems will count for that day. Please share your comments and thoughts in the comments below.

You might also like:

K-Tor hand crank generator (pocket socket 1 amp usb) : Weekly Product Review

Filed Under: Power Generation

A-zoom Snap Caps and Wall Anchors: weekly product review

May 7, 2018 Jesse Mathewson

SNAP CAP

Legally I have to write a disclosure here, I PURCHASED THE Snap Caps and Wall Anchors BEING REVIEWED HERE WITH MY MONEY and did not receive anything in exchange for a review of any type…

A-Zoom snap caps are an important part of anyone’s shooting supply. They run between $8-$15 for 6 or 10 on average depending on caliber. For your .22lr needs, there is another option. Hillman wall anchors 4-6-8 x 7/8” are what I use for all of my .22lr needs. Hillman wall anchors run $6 for a box of 100 on Amazon or around that from local hardware stores. Now before you laugh, remember the entire purpose of a snap cap is for testing triggers, repairs and dry firing your firearms. The wall anchors work for this purpose and work well for less than 0.05 cents apiece. The best part is, you can reuse them a few times for dry firing purposes and if you need it recycle them afterward for their intended purpose!

When you are training for self-defense and even hunting there are a few things that are essential to remember. Obviously, as with all firearms follow the rules of safety.

  1. Loaded or not, keep the finger OFF the trigger!
  2. Loaded or not, ALWAYS ensure the muzzle is pointed in a safe direction!

This includes but is not limited to firearms that are loaded with snap caps, I have witnessed negligent discharges by extremely well-versed individuals when they believed they had unloaded their firearms or had reloaded with snap caps. So, in the line of being safe ALWAYS, remove all ammunition from the location around the firearm you are planning to use snap caps in. I use the three check system to ensure no live ammunition is in the firearm as well.

  1. Remove the magazine or cylinder
  2. Check the chamber visually
  3. Check the chamber manually with a finger while ALWAYS keeping the muzzle pointed away from any places you do not want to be destroyed.

Now, once you do this, insert the snap caps into the cylinder or magazine. Re-check again to ensure only snap caps are inserted. Some people do not understand why I check so many times, of course, these same people likely have never been shot by “accident” or on purpose either! Taking a few minutes to ensure a completely safe experience is better than days or even weeks in a hospital and tens of thousands of dollars in bills!

Now ensuring your muzzle is pointed in a safe direction you can engage in dry fire practice or testing as needed! Doing a few minutes of this every day can easily transform your personal ability with a firearm into a much better approach. Especially when you practice maintaining your PROPER grip, correct trigger press and or gentle squeeze and sight alignment. I use these times to check my ability to maintain a level firearm and keep it stable while squeezing the trigger. Place a nickel or dime on the frame or front sight post if you can and squeeze the trigger until the firing pin is released, do this until you never lose the dime from the front sight or frame and you will notice a much-improved group at the range.

SNAP CAP 2

Some other things I like using snap caps for are failure drills, they replicate a round not going off when placed randomly in the magazine or even cylinder and you have to safely “Tap, Rack and Go” to continue shooting. I often ask shooting buddies to place snap caps at random in my range magazines, (ALWAYS KEEP YOUR RANGE MAGAZINES SEPARATE FROM ALL OTHER MAGAZINES).

Overall there is simply no reason not to have snap caps or wall anchors for your firearms training and use. I am well aware that 50 years ago snap caps were not used regularly, however, there have been many major improvements in training, firearms and more over that same time. Additionally, older firearms are more likely to not be dry fire capable and need snap caps! It is my recommendation as a very active longtime shooter that using snap caps in all firearms for dry fire practice and other purposes can only prolong the lifespan of the firing pin and more.

Stay safe and train how you carry!

Free the mind and the body will follow

Filed Under: Gear Reviews

  • « Go to Previous Page
  • Page 1
  • Interim pages omitted …
  • Page 81
  • Page 82
  • Page 83
  • Page 84
  • Page 85
  • Interim pages omitted …
  • Page 87
  • Go to Next Page »

Primary Sidebar

Subscribe to Blog via Email

Enter your email address to subscribe to this blog and receive notifications of new posts by email.

Join 7,202 other subscribers
  • Amazon
  • Facebook
  • Substack
  • Twitter
  • YouTube

“Do more with less.”

– Minimalist proverb

Recent Posts

  • Just so you know
  • Weather Update for My Corner of Appalachia
  • Why I’m Ordering Ivermectin + Mebendazole Every Year
  • The Website’s Shutting Down (But Here’s the Plan)
  • You Are Hated! Start Training Like It!

Footer

Recent Posts

  • Just so you know
  • Weather Update for My Corner of Appalachia
  • Why I’m Ordering Ivermectin + Mebendazole Every Year
  • The Website’s Shutting Down (But Here’s the Plan)
  • You Are Hated! Start Training Like It!

More about me

Books I’ve written

Books I’ve read

Follow Me on YouTube

Follow Me on Facebook

Gear I Use and Recommend

Newsletter

Search this site

Follow me elsewhere

  • Amazon
  • Facebook
  • Substack
  • Twitter
  • YouTube

© 2008–2025 M.D. Creekmore · As an Amazon Associate, I earn from qualifying purchases.