
When you are buying a small homestead Are you ready to begin homesteading? You’re joining a growing number of Americans who are returning to our roots and living off what the land provides. So how do you get started? It’s kind of obvious but you need land. In order to find the perfect piece of […]
Blog
P-38 or P-51 Can Opener Review
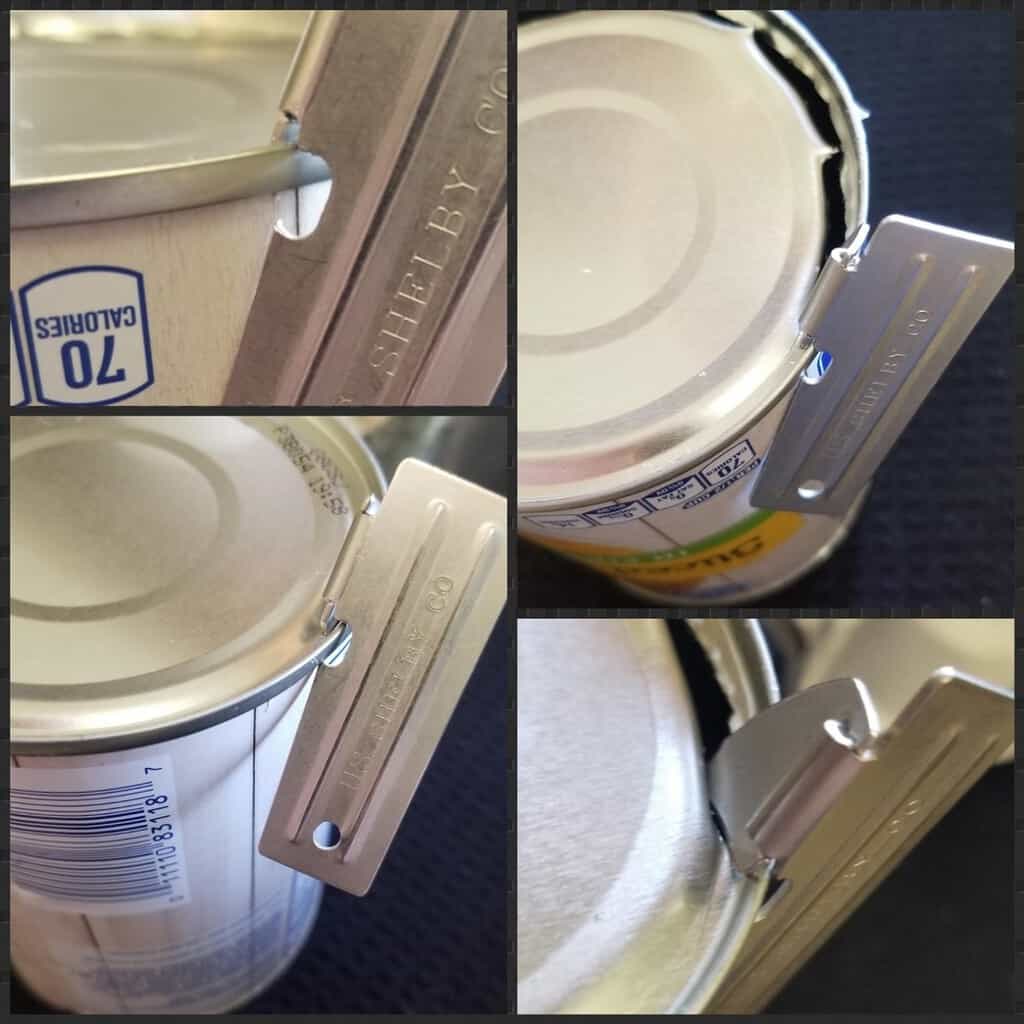
Not everything made for the military is truly well made. In many cases what is made for the military, regardless of nation of origin, often is low-end and fits into a rather loose set of restrictions guiding its building. This is the case with the amazing folding can opener known as the P-38 and P-51. The […]
How To Take A Shower In The Woods – Handy Shower Review

Showering while hunting, fishing, camping and just being outside after a good hike is something that is essential and refreshing. Personally, my family has used, abused and gone through 3 or 4 solar/camping showers in the past decade. When the creator of Handy Shower contacted me I decided to accept his offer to review the product in exchange for […]
Homesteading and Prepping Open Discussion Forum

Well, folks, it’s one of those mornings… one of those mornings that I wake up feeling like I’ve been hit by a Mac truck with Hillary Clinton at the wheel and driving distracted because she was looking for a Trump Russia collision. That’s the bad thing about living in Tennessee is the constant bombardment by […]
Long-Term Food Storage How To – Plastic Buckets, Oxygen Absorbers, Mylar Bags

I store all my grains, beans, and other dry foods (besides sugar, salt, or sprouting seeds) inside food-grade five-gallon plastic buckets. There is some controversy over what is considered food grade. Most (but not all) buckets with #2 inside a small triangle on the bottom are food-grade. But the only way to be certain is […]
How to Store Water for Emergency Preparedness (and It’s Purification)
Without the threat of severe weather or the need for immediate emergency medical care, potable water will be your first concern following any type of disaster. I always advise my consulting clients to strive for at least three independent sources of water for cooking and drinking. For example, stored water, a water well, and a […]
How Do You Handle Emergency Food Storage?
by Moira M As I write this, we are in the middle of Winter Storm Jonas. There is 13″ of snow in the yard and the closest paved road is five miles away. I haven’t been off the property in five days and did not make a trip to the store to stock up for […]
Moving Toward Self-Reliance for the Working Poor

by Sandra There are many of us who are or have been classified as the working poor, meaning we are employed and we earn a few bucks above the national poverty level ($12,140 for a single person and $25,100 for family of 4—2018 figures), but we don’t earn enough to pay for everything, e.g., food, shelter, […]
Review: Alive After the Fall™ by Alexander Cain

Electromagnetic Pulse’s have been apart of the subculture of doomsday prepping since the 1970’s. The specter of ultimate doom causing humans to revert to their pre-industrialized days scares many of us. There have been dozens of books written by professionals regarding a man-made EMP or natural similar event occurring. Alive After the Fall™ was written approximately […]
Homesteading and Prepping Open Discussion Weekend Forum

This open discussion forum is just that an open discussion where you can post your preps and homestead progress for the week, or ask questions about any topic that you need help with. All that I ask is that you keep the discussion somewhat related to the topic of prepping and or homesteading. Worth Checking Out: […]
How To Make Pepper Spray At Home

by Jarhead 03 In the event of an economic collapse or other unknown situation where you can no longer purchase pepper spray, you may come upon a situation where the firearm is not needed, conserve ammo, keep animals and pests away from plants or you just don’t like guns. You may have to make it yourself […]
Review: Slime Self-Sealing Tube for Bicycles

Here in Arizona, we enjoy bicycling, we also enjoy one of the densest populations of spiny flora on the planet. This combination is absolutely terrible for bicycle tubes. This is a review of one product I have found for my bicycle that works quite well and allows us to maintain pressure even when we encounter […]